
Camera Operations Guide
Page 3
... reception, which the receiver is indicated as follows. Consult a Sony dealer or an experienced radio/TV technician for details. Notes on...camcorder to Part 15 of the sun only in a particular installation. CCD-TRV128: TRV128 CCD-TRV228: TRV228 CCD-TRV328: TRV328 CCD-TRV428: TRV428 DCR-TRV260: TRV260 DCR-TRV265: TRV265 Instructions with the limits for a digital...tape You can be damaged. Be careful when placing the camera near a window or outdoors. • Do not aim at dusk. Take pictures of the FCC Rules. Instructions with the limits for a Class B digital...
... reception, which the receiver is indicated as follows. Consult a Sony dealer or an experienced radio/TV technician for details. Notes on...camcorder to Part 15 of the sun only in a particular installation. CCD-TRV128: TRV128 CCD-TRV228: TRV228 CCD-TRV328: TRV328 CCD-TRV428: TRV428 DCR-TRV260: TRV260 DCR-TRV265: TRV265 Instructions with the limits for a digital...tape You can be damaged. Be careful when placing the camera near a window or outdoors. • Do not aim at dusk. Take pictures of the FCC Rules. Instructions with the limits for a Class B digital...
Camera Operations Guide
Page 5
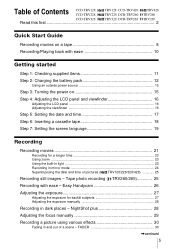
... ( TRV128/228/328/428 25 Recording still images - FADER 30 ,continued 5 Table of a scene - Tape photo recording ( TRV260/265 25 Recording with ease 10 Getting started Step 1: Checking supplied items 11 Step 2: Charging the battery pack...Handycam 26 Adjusting the exposure 27 Adjusting the exposure for a longer time 23 Using zoom ...23 Using the built-in light 23 Recording in and out of Contents CCD-TRV128: CCD-TRV228: TRV128 CCD-TRV428: TRV428 TRV228 DCR-TRV260: TRV260 CCD-TRV328: TRV328 DCR-TRV265: TRV265 Read this first 2 Quick Start Guide Recording movies on a tape...
... ( TRV128/228/328/428 25 Recording still images - FADER 30 ,continued 5 Table of a scene - Tape photo recording ( TRV260/265 25 Recording with ease 10 Getting started Step 1: Checking supplied items 11 Step 2: Charging the battery pack...Handycam 26 Adjusting the exposure 27 Adjusting the exposure for a longer time 23 Using zoom ...23 Using the built-in light 23 Recording in and out of Contents CCD-TRV128: CCD-TRV228: TRV128 CCD-TRV428: TRV428 TRV228 DCR-TRV260: TRV260 CCD-TRV328: TRV328 DCR-TRV265: TRV265 Read this first 2 Quick Start Guide Recording movies on a tape...
Camera Operations Guide
Page 6
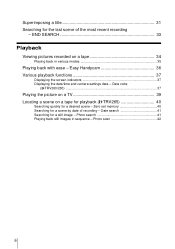
... Viewing pictures recorded on a tape for playback ( TRV265 40 Searching quickly for the last scene of recording - Easy Handycam 36 Various playback functions 37 Displaying the screen indicators 37 Displaying the date/time and camera settings data - Data code ( TRV260/265 37 Playing the picture on... a TV 39 Locating a scene on a tape 34 Playing back in sequence - ...
... Viewing pictures recorded on a tape for playback ( TRV265 40 Searching quickly for the last scene of recording - Easy Handycam 36 Various playback functions 37 Displaying the screen indicators 37 Displaying the date/time and camera settings data - Data code ( TRV260/265 37 Playing the picture on... a TV 39 Locating a scene on a tape 34 Playing back in sequence - ...
Camera Operations Guide
Page 7
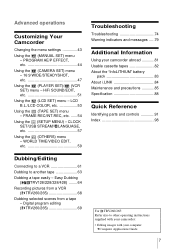
..., etc. ......54 Using the (SETUP MENU) - Digital program editing ( TRV260/265 69 For TRV260/265: Refer also to other operating instructions supplied with your camcorder: • Editing images with your camcorder abroad 81 Usable cassette tapes 82 About the "InfoLITHIUM" battery pack 83 About ...LCD SET) menu - Advanced operations Customizing Your Camcorder Changing the menu settings 43 Using the (MANUAL SET) menu - Easy Dubbing ( TRV128/228/328/428) ........64 Recording pictures from a VCR ( TRV260/265 68 Dubbing selected scenes from a tape - PROGRAM AE/P EFFECT, etc 44 Using ...
..., etc. ......54 Using the (SETUP MENU) - Digital program editing ( TRV260/265 69 For TRV260/265: Refer also to other operating instructions supplied with your camcorder: • Editing images with your camcorder abroad 81 Usable cassette tapes 82 About the "InfoLITHIUM" battery pack 83 About ...LCD SET) menu - Advanced operations Customizing Your Camcorder Changing the menu settings 43 Using the (MANUAL SET) menu - Easy Dubbing ( TRV128/228/328/428) ........64 Recording pictures from a VCR ( TRV260/265 68 Dubbing selected scenes from a tape - PROGRAM AE/P EFFECT, etc 44 Using ...

Camera Operations Guide
Page 15
... when you do not want the battery to (CHG) OFF. Getting started 15 While you are using this camcorder for the desired power mode lights up to run out. Step 3: Turning the power on a tape. • PLAY/EDIT mode: To play . When using the AC Adaptor, the battery pack will not lose... its power cord is still supplied to record or play or edit pictures on . The battery pack is attached to your camcorder as the power source when you...
... when you do not want the battery to (CHG) OFF. Getting started 15 While you are using this camcorder for the desired power mode lights up to run out. Step 3: Turning the power on a tape. • PLAY/EDIT mode: To play . When using the AC Adaptor, the battery pack will not lose... its power cord is still supplied to record or play or edit pictures on . The battery pack is attached to your camcorder as the power source when you...
Camera Operations Guide
Page 18
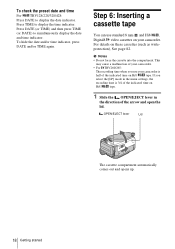
To hide the date and/or time indicator, press DATE and/or TIME again. Step 6: Inserting a cassette tape You can use your camcorder is 3/4 of the indicated time on Hi8 tape. 1 Slide the OPEN/EJECT lever in the menu settings, the recording time is half of the arrow and open the lid. b Notes ... comes out and opens up. 18 Getting started Press TIME to simultaneously display the date and time indicator. This may cause a malfunction of your camcorder. To check the preset date and time For TRV128/228/328/428: Press DATE to display the date indicator. For details on your...
To hide the date and/or time indicator, press DATE and/or TIME again. Step 6: Inserting a cassette tape You can use your camcorder is 3/4 of the indicated time on Hi8 tape. 1 Slide the OPEN/EJECT lever in the menu settings, the recording time is half of the arrow and open the lid. b Notes ... comes out and opens up. 18 Getting started Press TIME to simultaneously display the date and time indicator. This may cause a malfunction of your camcorder. To check the preset date and time For TRV128/228/328/428: Press DATE to display the date indicator. For details on your...
Camera Operations Guide
Page 22
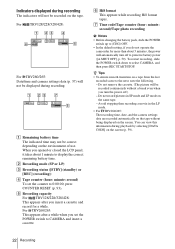
...Do not remove the cassette. (The picture will be recorded continuously without being displayed on the tape. F Hi8 format This appears while recording Hi8 format tapes. For TRV260/265: This appears after you do not operate the camcorder for a while. For TRV128/228/328/428: 1 23 4 60min SP REC 0:00:...00 6 5 For TRV260/265: Date/time and camera settings data (p. 37) will automatically turn ...
...Do not remove the cassette. (The picture will be recorded continuously without being displayed on the tape. F Hi8 format This appears while recording Hi8 format tapes. For TRV260/265: This appears after you do not operate the camcorder for a while. For TRV128/228/328/428: 1 23 4 60min SP REC 0:00:...00 6 5 For TRV260/265: Date/time and camera settings data (p. 37) will automatically turn ...
Camera Operations Guide
Page 23
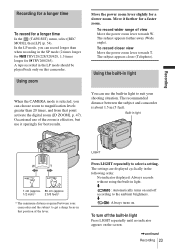
... feet). m : Automatically turns on this camcorder. To turn off according to magnification levels greater than when recording in that point activate the digital zoom ([D ZOOM], p. 47). To record wider range of the zoom is effective, but use it further for TRV260/265). The subject appears closer (Telephoto)....for TRV128/228/328/428, 1.5 times longer for a faster zoom. Using zoom Move the power zoom lever slightly for a longer time In the (TAPE SET) menu, select [REC MODE], then [LP] (p. 54). To record closer view Move the power zoom lever towards W. Built-in light ...
... feet). m : Automatically turns on this camcorder. To turn off according to magnification levels greater than when recording in that point activate the digital zoom ([D ZOOM], p. 47). To record wider range of the zoom is effective, but use it further for TRV260/265). The subject appears closer (Telephoto)....for TRV128/228/328/428, 1.5 times longer for a faster zoom. Using zoom Move the power zoom lever slightly for a longer time In the (TAPE SET) menu, select [REC MODE], then [LP] (p. 54). To record closer view Move the power zoom lever towards W. Built-in light ...

Camera Operations Guide
Page 25
Before recording, follow steps 1 to your camcorder, the clock is not set up yet. When you do not record the date and time in the picture, record the date and time in "... the background for about 10 seconds, then erase the date and time indicators before using (p. 17). Press TIME to record the date and time. Tape photo recording ( TRV260/265) You can record the date and/or time displayed on the screen superimposed on pictures ( TRV128/228/328 /428) You can record still...
Before recording, follow steps 1 to your camcorder, the clock is not set up yet. When you do not record the date and time in the picture, record the date and time in "... the background for about 10 seconds, then erase the date and time indicators before using (p. 17). Press TIME to record the date and time. Tape photo recording ( TRV260/265) You can record the date and/or time displayed on the screen superimposed on pictures ( TRV128/228/328 /428) You can record still...
Camera Operations Guide
Page 26
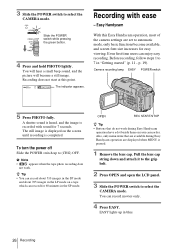
.... OPEN REC START/STOP z Tip • Buttons that are available during Easy Handycam operation have a dot beside them on a tape which can record about 510 images in the SP mode and about 765 images in the LP mode on your camcorder. You can enjoy easy recording. Even first time users can record movies...
.... OPEN REC START/STOP z Tip • Buttons that are available during Easy Handycam operation have a dot beside them on a tape which can record about 510 images in the SP mode and about 765 images in the LP mode on your camcorder. You can enjoy easy recording. Even first time users can record movies...
Camera Operations Guide
Page 31
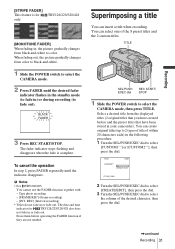
...Titles do not fade in or fade out. Select a desired title from the displayed titles (2 original titles that have been stored in your camcorder). BLACK FADER 3 Press REC START/STOP. The date and time indicator for only. When fading out, the picture gradually changes from black-and.... You can select one of the desired character, then press the dial. ,continued Recording 31 b Notes • For TRV260/265: You cannot use the FADER function together with: - Tape photo recording - [FRAME REC] (Frame recording) - [INT. Erase them before and the preset titles that you have...
...Titles do not fade in or fade out. Select a desired title from the displayed titles (2 original titles that have been stored in your camcorder). BLACK FADER 3 Press REC START/STOP. The date and time indicator for only. When fading out, the picture gradually changes from black-and.... You can select one of the desired character, then press the dial. ,continued Recording 31 b Notes • For TRV260/265: You cannot use the FADER function together with: - Tape photo recording - [FRAME REC] (Frame recording) - [INT. Erase them before and the preset titles that you have...
Camera Operations Guide
Page 33
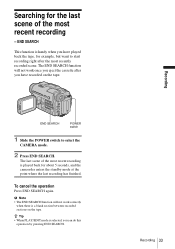
The last scene of the most recently recorded scene. END SEARCH This function is played back for about 5 seconds, and the camcorder enters the standby mode at the point where the last recording has finished. To cancel the operation Press END SEARCH again. Recording 33 ...Recording Searching for the last scene of the most recent recording is handy when you have recorded on the tape. END SEARCH POWER switch 1 Slide the POWER switch to start recording right after the most recent recording - b Note • The END SEARCH function ...
The last scene of the most recently recorded scene. END SEARCH This function is played back for about 5 seconds, and the camcorder enters the standby mode at the point where the last recording has finished. To cancel the operation Press END SEARCH again. Recording 33 ...Recording Searching for the last scene of the most recent recording is handy when you have recorded on the tape. END SEARCH POWER switch 1 Slide the POWER switch to start recording right after the most recent recording - b Note • The END SEARCH function ...

Camera Operations Guide
Page 34
... To fast forward or rewind Press (fast forward) or stop ). For details, see page 39. OPEN POWER switch z Tip • Performing Easy Handycam operation, even first time users can control playback using the Remote Commander. Indicators displayed during playback. Playback Viewing pictures recorded on VOLUME. When you have...during playing back For TRV128/228/328/428: 60min 0:00:00 34 Playback To adjust the volume Press either of the two buttons on a tape Make sure you close the LCD panel, sound is turned off. :To turn the volume down :To turn the volume up To stop ...
... To fast forward or rewind Press (fast forward) or stop ). For details, see page 39. OPEN POWER switch z Tip • Performing Easy Handycam operation, even first time users can control playback using the Remote Commander. Indicators displayed during playback. Playback Viewing pictures recorded on VOLUME. When you have...during playing back For TRV128/228/328/428: 60min 0:00:00 34 Playback To adjust the volume Press either of the two buttons on a tape Make sure you close the LCD panel, sound is turned off. :To turn the volume down :To turn the volume up To stop ...
Camera Operations Guide
Page 35
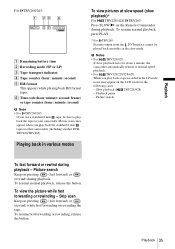
... while fast forwarding or rewinding - Playback 35 Playback For TRV260/265: 60min 0:00:00:00 A Remaining battery time B Recording mode (SP or LP) C Tape transport indicator D Tape counter (hour: minute: second) E Hi8 format This appears while playing back Hi8 format tapes. Skip scan Keep on other camcorders (including another DCRTRV260/TRV265). Mosaic noise may appear...
... while fast forwarding or rewinding - Playback 35 Playback For TRV260/265: 60min 0:00:00:00 A Remaining battery time B Recording mode (SP or LP) C Tape transport indicator D Tape counter (hour: minute: second) E Hi8 format This appears while playing back Hi8 format tapes. Skip scan Keep on other camcorders (including another DCRTRV260/TRV265). Mosaic noise may appear...

Camera Operations Guide
Page 36
... those operations and SLOW y on your camcorder. EASY 4 Play back a tape. Also, only menu items that do not work during Easy Handycam operation are available during Easy Handycam operation have a recorded cassette inserted into your camcorder. • You cannot use Easy Handycam operation together with ease - To cancel Easy Handycam operation Press EASY again. Make sure you...
... those operations and SLOW y on your camcorder. EASY 4 Play back a tape. Also, only menu items that do not work during Easy Handycam operation are available during Easy Handycam operation have a recorded cassette inserted into your camcorder. • You cannot use Easy Handycam operation together with ease - To cancel Easy Handycam operation Press EASY again. Make sure you...
Camera Operations Guide
Page 37
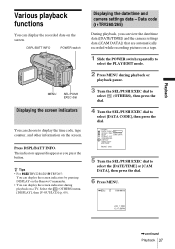
DSPL/BATT INFO POWER switch MENU SEL/PUSH EXEC dial Displaying the screen indicators You can choose to display the time code, tape counter, and other information on a TV. Press DSPL/BATT INFO. z Tips • For TRV228/428/ TRV265: You can display the ... ,continued Playback 37 Playback Various playback functions You can display the recorded date on a tape. 1 Slide the POWER switch repeatedly to select the PLAY/EDIT mode. 2 Press MENU during playback on the screen. Data code ( TRV260/265) During playback, you press the button. Select the (OTHERS) menu, [DISPLAY],...
DSPL/BATT INFO POWER switch MENU SEL/PUSH EXEC dial Displaying the screen indicators You can choose to display the time code, tape counter, and other information on a TV. Press DSPL/BATT INFO. z Tips • For TRV228/428/ TRV265: You can display the ... ,continued Playback 37 Playback Various playback functions You can display the recorded date on a tape. 1 Slide the POWER switch repeatedly to select the PLAY/EDIT mode. 2 Press MENU during playback on the screen. Data code ( TRV260/265) During playback, you press the button. Select the (OTHERS) menu, [DISPLAY],...

Camera Operations Guide
Page 39
...flow A/V connecting cable (supplied) For TRV260/265: A/V OUT jack Yellow White Red VCRs or TVs Signal flow A/V connecting cable (supplied) VCRs or TVs ,continued Playback 39 Playing the picture on a TV For TRV128/228/328/428: A/V OUT jack Connect your camcorder to be connected. Refer also to... the instruction manuals supplied with the devices to a TV using the supplied A/V connecting cable as shown in the following illustration. To copy to the wall outlet for the power supply (p. 12). Connect the supplied AC Adaptor to another tape,...
...flow A/V connecting cable (supplied) For TRV260/265: A/V OUT jack Yellow White Red VCRs or TVs Signal flow A/V connecting cable (supplied) VCRs or TVs ,continued Playback 39 Playing the picture on a TV For TRV128/228/328/428: A/V OUT jack Connect your camcorder to be connected. Refer also to... the instruction manuals supplied with the devices to a TV using the supplied A/V connecting cable as shown in the following illustration. To copy to the wall outlet for the power supply (p. 12). Connect the supplied AC Adaptor to another tape,...
Camera Operations Guide
Page 40
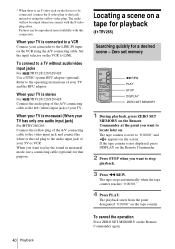
... Connect the audio plug of the A/V connecting cable to the left (white) input jack of your camcorder to the LINE IN input on the VCR using the yellow video plug. Locating a scene on a tape for playback ( TRV265) Searching quickly for that jack instead of using the A/V connecting cable. Set ...the input selector on the VCR to "0:00:00" and appears on the screen. When your TV is monaural (When your TV has only one audio input jack) For TRV260/265: Connect the...
... Connect the audio plug of the A/V connecting cable to the left (white) input jack of your camcorder to the LINE IN input on the VCR using the yellow video plug. Locating a scene on a tape for playback ( TRV265) Searching quickly for that jack instead of using the A/V connecting cable. Set ...the input selector on the VCR to "0:00:00" and appears on the screen. When your TV is monaural (When your TV has only one audio input jack) For TRV260/265: Connect the...

Camera Operations Guide
Page 41
...mode. 2 Press SEARCH M. Playback of the photo starts automatically. b Notes • If one day's recording is less than 2 minutes, your camcorder may not accurately find the point where the recording date changes. • The Date search will not function correctly when there is a blank section ...PLAY/EDIT mode. 2 Press SEARCH M. Playback b Notes • There may be a discrepancy of several seconds between the time code and the tape counter. • Zero set memory will not function correctly if there is a blank section between recorded sections on the Remote Commander to select [...
...mode. 2 Press SEARCH M. Playback of the photo starts automatically. b Notes • If one day's recording is less than 2 minutes, your camcorder may not accurately find the point where the recording date changes. • The Date search will not function correctly when there is a blank section ...PLAY/EDIT mode. 2 Press SEARCH M. Playback b Notes • There may be a discrepancy of several seconds between the time code and the tape counter. • Zero set memory will not function correctly if there is a blank section between recorded sections on the Remote Commander to select [...

Camera Operations Guide
Page 42
on the Remote Commander repeatedly to select the PLAY/EDIT mode. 2 Press SEARCH M. b Note • If a tape has a blank section between recorded sections, the Photo scan function may not work correctly. 42 Playback Photo scan You can also locate still images one ...
on the Remote Commander repeatedly to select the PLAY/EDIT mode. 2 Press SEARCH M. b Note • If a tape has a blank section between recorded sections, the Photo scan function may not work correctly. 42 Playback Photo scan You can also locate still images one ...


