Camera Operations Guide
Page 1
3-087-918-12(1) Camera Operations Guide Read this first Video Camera Recorder/Digital Video Camera Recorder CCD-TRV128/TRV228/TRV328/TRV428 DCR-TRV260/TRV265 © 2004 Sony Corporation
3-087-918-12(1) Camera Operations Guide Read this first Video Camera Recorder/Digital Video Camera Recorder CCD-TRV128/TRV228/TRV328/TRV428 DCR-TRV260/TRV265 © 2004 Sony Corporation
Camera Operations Guide
Page 2
... help preserve our environment by returning your used rechargeable batteries to the collection and recycling location nearest you call upon your Sony dealer regarding recycling of electric shock to persons. For customers in the U.S.A. Regulatory Information Declaration of the FCC Rules. ... customers in the U.S.A. Telephone No.: 201-930-6972 This device complies with Part 15 of Conformity Trade Name: SONY Model No.: DCR-TRV260 Responsible Party: Sony Electronics Inc. For more information regarding this product. This symbol is intended to alert the user to the presence of...
... help preserve our environment by returning your used rechargeable batteries to the collection and recycling location nearest you call upon your Sony dealer regarding recycling of electric shock to persons. For customers in the U.S.A. Regulatory Information Declaration of the FCC Rules. ... customers in the U.S.A. Telephone No.: 201-930-6972 This device complies with Part 15 of Conformity Trade Name: SONY Model No.: DCR-TRV260 Responsible Party: Sony Electronics Inc. For more information regarding this product. This symbol is intended to alert the user to the presence of...

Camera Operations Guide
Page 3
... to an outlet on the model DCR-TRV265. ,continued 3 See page 82 for help. Doing so might cause your camcorder. Note on this equipment. Consult a Sony dealer or an experienced radio/TV technician for details. Notes on using a digital still camera, and thus may appear... in the proper direction. CCD-TRV128: TRV128 CCD-TRV228: TRV228 CCD-TRV328: TRV328 CCD-TRV428: TRV428 DCR-TRV260: TRV260 DCR-TRV265: TRV265 Instructions with the limits for a Class B digital device, pursuant to Part 15 of the FCC Rules. CAUTION You are recorded without any problems. •...
... to an outlet on the model DCR-TRV265. ,continued 3 See page 82 for help. Doing so might cause your camcorder. Note on this equipment. Consult a Sony dealer or an experienced radio/TV technician for details. Notes on using a digital still camera, and thus may appear... in the proper direction. CCD-TRV128: TRV128 CCD-TRV228: TRV228 CCD-TRV328: TRV328 CCD-TRV428: TRV428 DCR-TRV260: TRV260 DCR-TRV265: TRV265 Instructions with the limits for a Class B digital device, pursuant to Part 15 of the FCC Rules. CAUTION You are recorded without any problems. •...

Camera Operations Guide
Page 4
Notes on your camcorder correctly. • To ensure a good grip, fasten the grip belt as shown in the following parts. Viewfinder LCD panel Battery pack • Turn the SEL/PUSH EXEC dial to select desired item, then press the dial to be used for screen display on using the camcorder • Hold your camcorder (p. 19). • Do not hold the camcorder by the following illustration. • You can change the language to decide. 4
Notes on your camcorder correctly. • To ensure a good grip, fasten the grip belt as shown in the following parts. Viewfinder LCD panel Battery pack • Turn the SEL/PUSH EXEC dial to select desired item, then press the dial to be used for screen display on using the camcorder • Hold your camcorder (p. 19). • Do not hold the camcorder by the following illustration. • You can change the language to decide. 4
Camera Operations Guide
Page 5
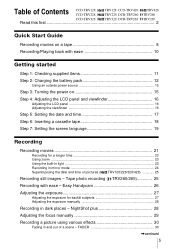
Table of a scene - Easy Handycam 26 Adjusting the exposure 27 Adjusting the exposure for a longer time ...29 Recording a picture using various effects 30 Fading in dark places - FADER 30 ,continued 5 Tape photo recording ( TRV260/265 25 Recording with ease 10 Getting started Step 1: Checking supplied items 11 Step 2: Charging the battery pack 12 Using...and out of Contents CCD-TRV128: CCD-TRV228: TRV128 CCD-TRV428: TRV428 TRV228 DCR-TRV260: TRV260 CCD-TRV328: TRV328 DCR-TRV265: TRV265 Read this first 2 Quick Start Guide Recording movies on a tape 8 Recording/Playing back with ...
Table of a scene - Easy Handycam 26 Adjusting the exposure 27 Adjusting the exposure for a longer time ...29 Recording a picture using various effects 30 Fading in dark places - FADER 30 ,continued 5 Tape photo recording ( TRV260/265 25 Recording with ease 10 Getting started Step 1: Checking supplied items 11 Step 2: Charging the battery pack 12 Using...and out of Contents CCD-TRV128: CCD-TRV228: TRV128 CCD-TRV428: TRV428 TRV228 DCR-TRV260: TRV260 CCD-TRV328: TRV328 DCR-TRV265: TRV265 Read this first 2 Quick Start Guide Recording movies on a tape 8 Recording/Playing back with ...
Camera Operations Guide
Page 6
Easy Handycam 36 Various playback functions 37 Displaying the screen indicators 37 Displaying the date/time and camera settings data - Data code ( TRV260/265 37 Playing the picture on a TV 39 Locating a scene on a tape 34 Playing back in sequence - Photo search 41 Playing back still images in ...
Easy Handycam 36 Various playback functions 37 Displaying the screen indicators 37 Displaying the date/time and camera settings data - Data code ( TRV260/265 37 Playing the picture on a TV 39 Locating a scene on a tape 34 Playing back in sequence - Photo search 41 Playing back still images in ...
Camera Operations Guide
Page 7
... menu - WORLD TIME/VIDEO EDIT, etc 59 Troubleshooting Troubleshooting 74 Warning indicators and messages .....79 Additional Information Using your camcorder abroad 81 Usable cassette tapes 82 About the "InfoLITHIUM" battery pack 83 About i.LINK 84 Maintenance and precautions 85 Specification...camcorder: • Editing images with your computer cComputer Applications Guide 7 Advanced operations Customizing Your Camcorder Changing the menu settings 43 Using the (MANUAL SET) menu - HiFi SOUND/EDIT, etc 51 Using the (LCD SET) menu - Digital program editing ( TRV260/265 69 For TRV260...
... menu - WORLD TIME/VIDEO EDIT, etc 59 Troubleshooting Troubleshooting 74 Warning indicators and messages .....79 Additional Information Using your camcorder abroad 81 Usable cassette tapes 82 About the "InfoLITHIUM" battery pack 83 About i.LINK 84 Maintenance and precautions 85 Specification...camcorder: • Editing images with your computer cComputer Applications Guide 7 Advanced operations Customizing Your Camcorder Changing the menu settings 43 Using the (MANUAL SET) menu - HiFi SOUND/EDIT, etc 51 Using the (LCD SET) menu - Digital program editing ( TRV260/265 69 For TRV260...

Camera Operations Guide
Page 8
... lever in the direction of the arrow until it clicks. 2 Insert a cassette into the camcorder. b Slide the battery pack in the its window-side facing Close the cassette lid after direction of the slides back in by itself. of the ...
... lever in the direction of the arrow until it clicks. 2 Insert a cassette into the camcorder. b Slide the battery pack in the its window-side facing Close the cassette lid after direction of the slides back in by itself. of the ...
Camera Operations Guide
Page 9
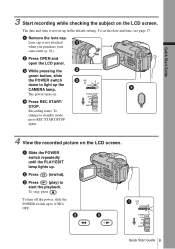
... cap. Quick Start Guide 3 Start recording while checking the subject on the LCD screen. The date and time is not attached when you purchase your camcorder (p. 91). The power turns on. To turn off the power, slide the POWER switch up in the default setting.
... cap. Quick Start Guide 3 Start recording while checking the subject on the LCD screen. The date and time is not attached when you purchase your camcorder (p. 91). The power turns on. To turn off the power, slide the POWER switch up in the default setting.

Camera Operations Guide
Page 10
EASY lights up in blue (1) and screen font size increases (2) during Easy Handycam operation. See page 26 for recording, page 36 for each operation. Press EASY when recording/ playing back. Easy Handycam operation ON For details, see instructions for playback. 10 Quick Start Guide Recording/Playing back with ease By switching to Easy Handycam operation, recording/playback operation becomes even easier. Easy Handycam operation allows easy recording/playback for even first time users by providing only the basic functions for recording/playback.
EASY lights up in blue (1) and screen font size increases (2) during Easy Handycam operation. See page 26 for recording, page 36 for each operation. Press EASY when recording/ playing back. Easy Handycam operation ON For details, see instructions for playback. 10 Quick Start Guide Recording/Playing back with ease By switching to Easy Handycam operation, recording/playback operation becomes even easier. Easy Handycam operation allows easy recording/playback for even first time users by providing only the basic functions for recording/playback.
Camera Operations Guide
Page 11
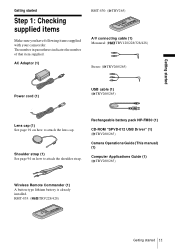
...1: Checking supplied items Make sure you have following items supplied with your camcorder. Rechargeable battery pack NP-FM30 (1) CD-ROM "SPVD-012 USB Driver" (1) ( TRV260/265) Camera Operations Guide (This manual) (1) Computer Applications Guide (1) ( TRV260/265) Wireless Remote Commander (1) A button-type lithium battery is already installed... attach the shoulder strap. AC Adaptor (1) RMT-830: ( TRV265) A/V connecting cable (1) Monaural: ( TRV128/228/328/428) Stereo: ( TRV260/265) Power cord (1) USB cable (1) ( TRV260/265) Lens cap (1) See page 91 on how to attach the lens cap.
...1: Checking supplied items Make sure you have following items supplied with your camcorder. Rechargeable battery pack NP-FM30 (1) CD-ROM "SPVD-012 USB Driver" (1) ( TRV260/265) Camera Operations Guide (This manual) (1) Computer Applications Guide (1) ( TRV260/265) Wireless Remote Commander (1) A button-type lithium battery is already installed... attach the shoulder strap. AC Adaptor (1) RMT-830: ( TRV265) A/V connecting cable (1) Monaural: ( TRV128/228/328/428) Stereo: ( TRV260/265) Power cord (1) USB cable (1) ( TRV260/265) Lens cap (1) See page 91 on how to attach the lens cap.

Camera Operations Guide
Page 12
...the wall outlet. 6 Slide the POWER switch up , connect the AC Adaptor to the DC IN jack on the DC plug facing up to your camcorder. Disconnect the AC Adaptor from the wall outlet immediately if any metallic objects. This may cause a malfunction. • Use a nearby wall outlet ... the battery pack You can charge the battery by sliding it in the direction of the arrow until it clicks. 3 With the v mark on your camcorder. The CHG (charge) lamp lights up the viewfinder. b Notes • You cannot use batteries other than the "InfoLITHIUM" battery pack (M series) (p. 83). •...
...the wall outlet. 6 Slide the POWER switch up , connect the AC Adaptor to the DC IN jack on the DC plug facing up to your camcorder. Disconnect the AC Adaptor from the wall outlet immediately if any metallic objects. This may cause a malfunction. • Use a nearby wall outlet ... the battery pack You can charge the battery by sliding it in the direction of the arrow until it clicks. 3 With the v mark on your camcorder. The CHG (charge) lamp lights up the viewfinder. b Notes • You cannot use batteries other than the "InfoLITHIUM" battery pack (M series) (p. 83). •...

Camera Operations Guide
Page 13
The battery information appears for about 7 seconds. b Note • If you use up the viewfinder. 2 Set the POWER switch to (CHG) OFF. 3 Slide the battery pack out in the battery pack. Battery Info DSPL/BATT INFO OPEN POWER switch BATTERY INFO BATTERY CHARGE LEVEL 0% 50% 100% REC TIME AVAILABLE LCD SCREEN: 81 min VIEWFINDER: 112 min A Battery charge level: Displays approximate remaining amount of power left in the direction of minutes available when you do not use the battery pack for a long time, use a fully charged battery pack at 25°C (77°F). (10 - 30°C (...
The battery information appears for about 7 seconds. b Note • If you use up the viewfinder. 2 Set the POWER switch to (CHG) OFF. 3 Slide the battery pack out in the battery pack. Battery Info DSPL/BATT INFO OPEN POWER switch BATTERY INFO BATTERY CHARGE LEVEL 0% 50% 100% REC TIME AVAILABLE LCD SCREEN: 81 min VIEWFINDER: 112 min A Battery charge level: Displays approximate remaining amount of power left in the direction of minutes available when you do not use the battery pack for a long time, use a fully charged battery pack at 25°C (77°F). (10 - 30°C (...
Camera Operations Guide
Page 14
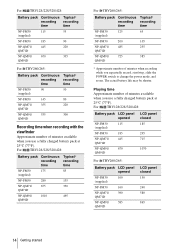
...* recording recording time time NP-FM30 115 55 (supplied) NP-FM50 185 90 NP-QM71/ 445 220 QM71D NP-QM91/ 670 335 QM91D For TRV260/265: Battery pack Continuous Typical* recording recording time time NP-FM30 90 50 (supplied) NP-FM50 145 80 NP-QM71/ 355 220 QM71D NP...* recording recording time time NP-FM30 175 85 (supplied) NP-FM50 280 135 NP-QM71/ 675 330 QM71D NP-QM91/ 1010 495 QM91D For TRV260/265: Battery pack Continuous Typical* recording recording time time NP-FM30 125 65 (supplied) NP-FM50 200 105 NP-QM71/ 485 255 QM71D NP...
...* recording recording time time NP-FM30 115 55 (supplied) NP-FM50 185 90 NP-QM71/ 445 220 QM71D NP-QM91/ 670 335 QM91D For TRV260/265: Battery pack Continuous Typical* recording recording time time NP-FM30 90 50 (supplied) NP-FM50 145 80 NP-QM71/ 355 220 QM71D NP...* recording recording time time NP-FM30 175 85 (supplied) NP-FM50 280 135 NP-QM71/ 675 330 QM71D NP-QM91/ 1010 495 QM91D For TRV260/265: Battery pack Continuous Typical* recording recording time time NP-FM30 125 65 (supplied) NP-FM50 200 105 NP-QM71/ 485 255 QM71D NP...

Camera Operations Guide
Page 15
... (CHG) OFF. Step 3: Turning the power on a tape. • PLAY/EDIT mode: To play . Getting started 15 PRECAUTION Even if your camcorder as the power source when you use the AC Adaptor as shown in "Charging the battery pack" (p. 12). When using the AC Adaptor, the battery...outlet via the AC Adaptor. The battery pack is fully discharged. (For Battery information only.) Using an outside power source You can use your camcorder in following conditions. - To enter the recording or playing mode, slide the switch repeatedly until the respective lamp for the first time, the...
... (CHG) OFF. Step 3: Turning the power on a tape. • PLAY/EDIT mode: To play . Getting started 15 PRECAUTION Even if your camcorder as the power source when you use the AC Adaptor as shown in "Charging the battery pack" (p. 12). When using the AC Adaptor, the battery...outlet via the AC Adaptor. The battery pack is fully discharged. (For Battery information only.) Using an outside power source You can use your camcorder in following conditions. - To enter the recording or playing mode, slide the switch repeatedly until the respective lamp for the first time, the...

Camera Operations Guide
Page 16
... battery is running out, or when the screen is clear. 16 Getting started SEL/PUSH EXEC dial Open the LCD panel 90 degrees to the camcorder, then rotate it to [OFF] (p. 59). To adjust the brightness of the LCD panel to the lens side, you close the LCD panel with the...
... battery is running out, or when the screen is clear. 16 Getting started SEL/PUSH EXEC dial Open the LCD panel 90 degrees to the camcorder, then rotate it to [OFF] (p. 59). To adjust the brightness of the LCD panel to the lens side, you close the LCD panel with the...
Camera Operations Guide
Page 17
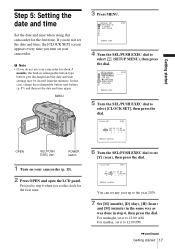
... do not set [Y] (year), then press the dial. For midday, set any year up to 12:00 AM. b Note • If you turn on your camcorder for the first time. SETUP MENU CLOCK SET USB STREAM LTR SIZE LANGUAGE DEMO MODE RETURN STBY --:--:-- [MENU] : END 5 Turn the SEL/PUSH EXEC dial... SEL/PUSH EXEC dial to 12:00 PM. ,continued Getting started Step 5: Setting the date and time Set the date and time when using this camcorder for about 3 months, the built-in step 6, then press the dial. MENU 3 Press MENU. MANUAL SET PROGRAM AE P EFFECT AUTO SHTR STBY [MENU] : END 4 Turn...
... do not set [Y] (year), then press the dial. For midday, set any year up to 12:00 AM. b Note • If you turn on your camcorder for the first time. SETUP MENU CLOCK SET USB STREAM LTR SIZE LANGUAGE DEMO MODE RETURN STBY --:--:-- [MENU] : END 5 Turn the SEL/PUSH EXEC dial... SEL/PUSH EXEC dial to 12:00 PM. ,continued Getting started Step 5: Setting the date and time Set the date and time when using this camcorder for about 3 months, the built-in step 6, then press the dial. MENU 3 Press MENU. MANUAL SET PROGRAM AE P EFFECT AUTO SHTR STBY [MENU] : END 4 Turn...
Camera Operations Guide
Page 18
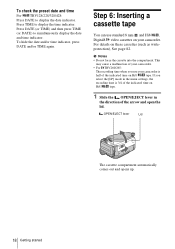
...indicator. Step 6: Inserting a cassette tape You can use your camcorder is 3/4 of the indicated time on these cassettes (such as writeprotection), See page 82. This may cause a malfunction of your camcorder. • For TRV260/265: The recording time when you select the [LP] mode ...in the direction of the indicated time on your camcorder. OPEN/EJECT lever Lid The cassette compartment automatically comes out and ...
...indicator. Step 6: Inserting a cassette tape You can use your camcorder is 3/4 of the indicated time on these cassettes (such as writeprotection), See page 82. This may cause a malfunction of your camcorder. • For TRV260/265: The recording time when you select the [LP] mode ...in the direction of the indicated time on your camcorder. OPEN/EJECT lever Lid The cassette compartment automatically comes out and ...
Camera Operations Guide
Page 19
To eject the cassette 1 Slide the OPEN/EJECT lever in . 4 Close the lid. OPEN SEL/PUSH EXEC dial POWER switch 1 Turn on your camcorder. 2 Press OPEN to be used on the LCD screen. SETUP MENU CLOCK SET USB STREAM LTR SIZE LANGUAGE DEMO MODE RETURN STBY --:--:-- [MENU] : END ,continued ...
To eject the cassette 1 Slide the OPEN/EJECT lever in . 4 Close the lid. OPEN SEL/PUSH EXEC dial POWER switch 1 Turn on your camcorder. 2 Press OPEN to be used on the LCD screen. SETUP MENU CLOCK SET USB STREAM LTR SIZE LANGUAGE DEMO MODE RETURN STBY --:--:-- [MENU] : END ,continued ...

Camera Operations Guide
Page 20
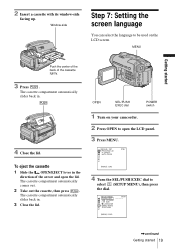
SETUP MENU CLOCK SET STBY USB STREAM LTR SIZE ENGLISH LANGUAGE ENG[SIMP] DEMO MODE FRANÇAIS ESPAÑOL PORTUGUÊS [MENU] : END 6 Turn the SEL/PUSH EXEC dial to select [ LANGUAGE], then press the dial. z Tip • Your camcorder offers [ENG [SIMP]] (simplified English) for when you cannot find your native tongue among the options. 20 Getting started 5 Turn the SEL/PUSH EXEC dial to select the desired language, then press the dial. 7 Press MENU.
SETUP MENU CLOCK SET STBY USB STREAM LTR SIZE ENGLISH LANGUAGE ENG[SIMP] DEMO MODE FRANÇAIS ESPAÑOL PORTUGUÊS [MENU] : END 6 Turn the SEL/PUSH EXEC dial to select [ LANGUAGE], then press the dial. z Tip • Your camcorder offers [ENG [SIMP]] (simplified English) for when you cannot find your native tongue among the options. 20 Getting started 5 Turn the SEL/PUSH EXEC dial to select the desired language, then press the dial. 7 Press MENU.
