Operating Instructions
Page 1
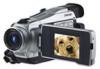
3-073-855-12 (1) Digital Video Camera Recorder Operating Instructions Before operating the unit, please read this product. Serial No. TM SERIES DCR-TRV27 DCR-TRV16/TRV18/ TRV25/TRV27 ©2002 Sony Corporation AC- Model No. Owner's Record The model and serial numbers are located on the bottom. Record the serial number in the space provided below. Refer to these numbers whenever you call upon your Sony dealer regarding this manual thoroughly, and retain it for future reference. DCR-TRV Model No. Serial No.
3-073-855-12 (1) Digital Video Camera Recorder Operating Instructions Before operating the unit, please read this product. Serial No. TM SERIES DCR-TRV27 DCR-TRV16/TRV18/ TRV25/TRV27 ©2002 Sony Corporation AC- Model No. Owner's Record The model and serial numbers are located on the bottom. Record the serial number in the space provided below. Refer to these numbers whenever you call upon your Sony dealer regarding this manual thoroughly, and retain it for future reference. DCR-TRV Model No. Serial No.
Operating Instructions
Page 2
...SONY (7669) The number below is very easy to the following two conditions.: (1) This device may cause undesired operation. 2 This symbol is subject to use. You can help preserve our environment by returning your used rechargeable batteries to persons. For more information regarding recycling of important operating and maintenance (servicing) instructions... No.: DCR-TRV18 Responsible Party:Sony Electronics Inc. Notice If static electricity or electromagnetism causes data transfer to rain or moisture. For customers in the U.S.A. Congratulations on your Handycam, you ....
...SONY (7669) The number below is very easy to the following two conditions.: (1) This device may cause undesired operation. 2 This symbol is subject to use. You can help preserve our environment by returning your used rechargeable batteries to persons. For more information regarding recycling of important operating and maintenance (servicing) instructions... No.: DCR-TRV18 Responsible Party:Sony Electronics Inc. Notice If static electricity or electromagnetism causes data transfer to rain or moisture. For customers in the U.S.A. Congratulations on your Handycam, you ....

Operating Instructions
Page 3
... accept any changes or modifications not expressly approved in accordance with the instructions, may cause undesired operation. Increase the separation between the equipment and ...However, there is subject to Part 15 of Conformity Trade Name: SONY Model No.: DCR-TRV25, DCR- For customers in a particular installation. Operation is no guarantee ...digital device, pursuant to the following measures: - These limits are cautioned that any interference received, including interference that interference will not occur in CANADA "Memory Stick" This Class B digital...
... accept any changes or modifications not expressly approved in accordance with the instructions, may cause undesired operation. Increase the separation between the equipment and ...However, there is subject to Part 15 of Conformity Trade Name: SONY Model No.: DCR-TRV25, DCR- For customers in a particular installation. Operation is no guarantee ...digital device, pursuant to the following measures: - These limits are cautioned that any interference received, including interference that interference will not occur in CANADA "Memory Stick" This Class B digital...
Operating Instructions
Page 12
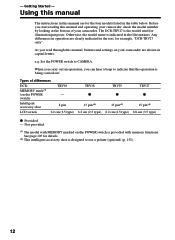
...152). 12 e.g. Types of your camcorder are for illustration purposes. switch) Intelligent accessory shoe 8 pin LCD screen 6.2 cm (2.5 type) TRV18 z 15 pin*2) 6.2 cm (2.5 type) TRV25 z 15 pin*2) 6.2 cm ... manual and operating your camcorder, check the model number by looking at the bottom of differences DCR- Getting Started - TRV16... MEMORY mark*1) (on the POWER switch is being carried out. As you can hear a beep to CAMERA. Not provided *1) The model with MEMORY marked on the POWER - Using this manual The instructions...
...152). 12 e.g. Types of your camcorder are for illustration purposes. switch) Intelligent accessory shoe 8 pin LCD screen 6.2 cm (2.5 type) TRV18 z 15 pin*2) 6.2 cm (2.5 type) TRV25 z 15 pin*2) 6.2 cm ... manual and operating your camcorder, check the model number by looking at the bottom of differences DCR- Getting Started - TRV16... MEMORY mark*1) (on the POWER switch is being carried out. As you can hear a beep to CAMERA. Not provided *1) The model with MEMORY marked on the POWER - Using this manual The instructions...
Operating Instructions
Page 22
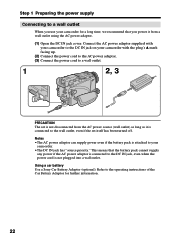
... outlet using the AC power adaptor. (1) Open the DC IN jack cover. Refer to the operating instructions of the Car Battery Adaptor for a long time, we recommend that the battery pack cannot supply any...a wall outlet. 1 2, 3 PRECAUTION The set itself has been turned off. This means that you use your camcorder for further information. 22 Step 1 Preparing the power supply Connecting to a wall outlet When you power it from...) as long as it is attached to your camcorder with your camcorder to the DC IN jack on your camcorder. •The DC IN jack has "source priority." Using a car battery ...
... outlet using the AC power adaptor. (1) Open the DC IN jack cover. Refer to the operating instructions of the Car Battery Adaptor for a long time, we recommend that the battery pack cannot supply any...a wall outlet. 1 2, 3 PRECAUTION The set itself has been turned off. This means that you use your camcorder for further information. 22 Step 1 Preparing the power supply Connecting to a wall outlet When you power it from...) as long as it is attached to your camcorder with your camcorder to the DC IN jack on your camcorder. •The DC IN jack has "source priority." Using a car battery ...
Operating Instructions
Page 25
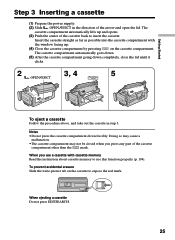
... closed when you use this function properly (p. 194). Insert the cassette straight as far as possible into the cassette compartment with cassette memory Read the instruction about cassette memory to use a cassette with the window facing up and opens. (3) Push the center of the cassette back to expose the red mark...
... closed when you use this function properly (p. 194). Insert the cassette straight as far as possible into the cassette compartment with cassette memory Read the instruction about cassette memory to use a cassette with the window facing up and opens. (3) Push the center of the cassette back to expose the red mark...
Operating Instructions
Page 42
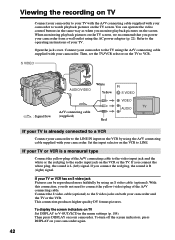
.... 42 If your TV or VCR is already connected to a VCR Connect your camcorder from a wall outlet using an S video cable (optional). This connection produces higher quality DV format pictures. Refer to the operating instructions of the A/V connecting cable to the video input jack and the white or the red plug ...to the audio input jack on the VCR or the TV. You can be reproduced more faithfully by using the A/V connecting cable supplied with your camcorder and the TV or ...
.... 42 If your TV or VCR is already connected to a VCR Connect your camcorder from a wall outlet using an S video cable (optional). This connection produces higher quality DV format pictures. Refer to the operating instructions of the A/V connecting cable to the video input jack and the white or the red plug ...to the audio input jack on the VCR or the TV. You can be reproduced more faithfully by using the A/V connecting cable supplied with your camcorder and the TV or ...

Operating Instructions
Page 75
...to LCD in the menu settings. (The defalt setting is LCD.) •Press the following buttons to LINE. Refer to the operating instructions of your camcorder. (2) Prepare the VCR for recording, then set the input selector to make the indicator disappear so that support the following systems: 8...dubbing a tape Press x on both your camcorder. (5) Start recording on the VCR connected to record over) into the VCR, and insert the recorded tape into your VCR. SEARCH MODE on the Remote Commander - Editing - Refer to the operating instructions of the VCR. (3) Set the POWER switch...
...to LCD in the menu settings. (The defalt setting is LCD.) •Press the following buttons to LINE. Refer to the operating instructions of your camcorder. (2) Prepare the VCR for recording, then set the input selector to make the indicator disappear so that support the following systems: 8...dubbing a tape Press x on both your camcorder. (5) Start recording on the VCR connected to record over) into the VCR, and insert the recorded tape into your VCR. SEARCH MODE on the Remote Commander - Editing - Refer to the operating instructions of the VCR. (3) Set the POWER switch...
Operating Instructions
Page 76
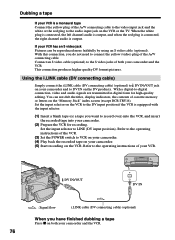
...an S video cable (optional) to the S video jacks of both your camcorder and the VCR. With a digital-to LINE (DV input position). Set the input selector to -digital connection, video and audio signals are transmitted in digital form for recording. DV IN/OUT DV DV IN : Signal flow i....an S video cable (optional). Refer to the operating instructions of cassette memory or letters on the "Memory Stick" index screen (except DCR-TRV16). Refer to the operating instructions of the VCR. (3) Set the POWER switch to VCR on your camcorder. (4) Play back the recorded tape on your VCR...
...an S video cable (optional) to the S video jacks of both your camcorder and the VCR. With a digital-to LINE (DV input position). Set the input selector to -digital connection, video and audio signals are transmitted in digital form for recording. DV IN/OUT DV DV IN : Signal flow i....an S video cable (optional). Refer to the operating instructions of cassette memory or letters on the "Memory Stick" index screen (except DCR-TRV16). Refer to the operating instructions of the VCR. (3) Set the POWER switch to VCR on your camcorder. (4) Play back the recorded tape on your VCR...

Operating Instructions
Page 81
... PAUSE if the button to cancel recording pause is N. (3) Setting your camcorder and the VCR to face each other Locate the infrared rays emitter of ... scenes - Select PB if the button to cancel recording pause on the VCR The buttons vary depending on your camcorder and face it towards the remote sensor of your VCR. 1 VIDEO EDIT 0:08:55:06 EDITSET CONTROL ADJ TEST... press the dial. 2 Turn the SEL/PUSH EXEC dial to select the mode to cancel recording pause is z. - Digital program editing (on tapes) (2) Setting the modes to cancel the recording pause on the VCR, then press the dial....
... PAUSE if the button to cancel recording pause is N. (3) Setting your camcorder and the VCR to face each other Locate the infrared rays emitter of ... scenes - Select PB if the button to cancel recording pause on the VCR The buttons vary depending on your camcorder and face it towards the remote sensor of your VCR. 1 VIDEO EDIT 0:08:55:06 EDITSET CONTROL ADJ TEST... press the dial. 2 Turn the SEL/PUSH EXEC dial to select the mode to cancel recording pause is z. - Digital program editing (on tapes) (2) Setting the modes to cancel the recording pause on the VCR, then press the dial....

Operating Instructions
Page 82
Dubbing only desired scenes - Digital program editing (on tapes) (4) Confirming VCR operation 1 Insert a recordable tape into the VCR, then set the IR SETUP or the PAUSEMODE again. •Place your camcorder at least 30 cm (12 in.) away from the VCR. •Refer to select EXECUTE, then press the dial. When recording is... recording pause. 2 Turn the SEL/PUSH EXEC dial to select IR TEST, then press the dial. 3 Turn the SEL/PUSH EXEC dial to the operating instructions of your VCR. 82
Dubbing only desired scenes - Digital program editing (on tapes) (4) Confirming VCR operation 1 Insert a recordable tape into the VCR, then set the IR SETUP or the PAUSEMODE again. •Place your camcorder at least 30 cm (12 in.) away from the VCR. •Refer to select EXECUTE, then press the dial. When recording is... recording pause. 2 Turn the SEL/PUSH EXEC dial to select IR TEST, then press the dial. 3 Turn the SEL/PUSH EXEC dial to the operating instructions of your VCR. 82

Operating Instructions
Page 152
... the optional printer - Except DCR-TRV16 You can make prints with print marks are various ways of the printer. Select the desired mode in the menu on your camcorder as illustrated. You can use the optional printer on your camcorder. •Attach the optional printer to the operating instructions of printing still images. DATE...
... the optional printer - Except DCR-TRV16 You can make prints with print marks are various ways of the printer. Select the desired mode in the menu on your camcorder as illustrated. You can use the optional printer on your camcorder. •Attach the optional printer to the operating instructions of printing still images. DATE...
Operating Instructions
Page 159
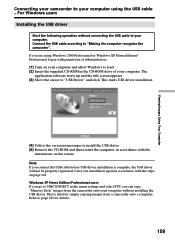
...without connecting the USB cable to install the USB driver. (5) Remove the CD-ROM and then restart the computer, in accordance with the instructions on page 162. This starts USB driver installation. (4) Follow the on-screen messages to your computer without installing the USB driver. Carry ..." and click. The application software starts up and the title screen appears. (3) Move the cursor to "Making the computer recognize the camcorder". Refer to USBCONNECT in the CD-ROM drive of your computer. Windows XP Home Edition/Professional users If you connect the USB cable before...
...without connecting the USB cable to install the USB driver. (5) Remove the CD-ROM and then restart the computer, in accordance with the instructions on page 162. This starts USB driver installation. (4) Follow the on-screen messages to your computer without installing the USB driver. Carry ..." and click. The application software starts up and the title screen appears. (3) Move the cursor to "Making the computer recognize the camcorder". Refer to USBCONNECT in the CD-ROM drive of your computer. Windows XP Home Edition/Professional users If you connect the USB cable before...

Operating Instructions
Page 168
... help (operating instructions) of "PIXELA ImageMixer Ver.1.0 for Sony" A "PIXELA ImageMixer Ver.1.0 for Sony" on a tape with your computer - The ImageMixer's Manual screen appears. (2) You can find the information you need from Suspend, Resume, or Sleep. 168 For more information, refer to the instruction manual of the CD-ROM supplied with your camcorder. Viewing images...
... help (operating instructions) of "PIXELA ImageMixer Ver.1.0 for Sony" A "PIXELA ImageMixer Ver.1.0 for Sony" on a tape with your computer - The ImageMixer's Manual screen appears. (2) You can find the information you need from Suspend, Resume, or Sleep. 168 For more information, refer to the instruction manual of the CD-ROM supplied with your camcorder. Viewing images...
Operating Instructions
Page 174
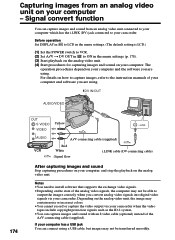
... using a USB cable, but images may not be able to output the images correctly when you convert analog video signals into digital video signals via your camcorder when the video tapes include copyright protection signals such as the ID-2 system. •You can capture images and sound from ... Notes •You need to install software that supports the exchange video signals. •Depending on how to capture images, refer to the instruction manuals of the analog video signals, the computer may contain noise or incorrect colors. •You cannot record or capture the video output via ...
... using a USB cable, but images may not be able to output the images correctly when you convert analog video signals into digital video signals via your camcorder when the video tapes include copyright protection signals such as the ID-2 system. •You can capture images and sound from ... Notes •You need to install software that supports the exchange video signals. •Depending on how to capture images, refer to the instruction manuals of the analog video signals, the computer may contain noise or incorrect colors. •You cannot record or capture the video output via ...
Operating Instructions
Page 199
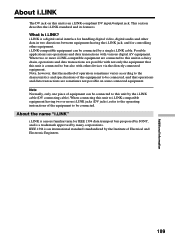
... specifications of equipment can be connected, and that this unit is a digital serial interface for handling digital video, digital audio and other equipment. i.LINK is connected to but also with other... the i.LINK cable (DV connecting cable). Possible applications are operations and data transactions with various digital AV equipment. IEEE 1394 is an i.LINK-compliant DV input/output jack. What is a...compatible equipment having the i.LINK jack, and for IEEE 1394 data transport bus proposed by SONY, and is i.LINK? Additional Information About i.LINK The DV jack on this unit in...
... specifications of equipment can be connected, and that this unit is a digital serial interface for handling digital video, digital audio and other equipment. i.LINK is connected to but also with other... the i.LINK cable (DV connecting cable). Possible applications are operations and data transactions with various digital AV equipment. IEEE 1394 is an i.LINK-compliant DV input/output jack. What is a...compatible equipment having the i.LINK jack, and for IEEE 1394 data transport bus proposed by SONY, and is i.LINK? Additional Information About i.LINK The DV jack on this unit in...

Operating Instructions
Page 200
... sometimes differs from the indicated baud rate. *What is also indicated near the i.LINK jack on the personal computer. Required i.LINK cable Use the Sony i.LINK 4-pin-to the equipment. Before connecting this unit to other than video equipment. i.LINK functions on this unit For details on how to ... to be sent or received in one second. For details on which it is not indicated such as this unit, also refer to the operating instructions of data can be connected to a personal computer, make sure that can also be sent in one second. i.LINK and are defined: S100 (approx....
... sometimes differs from the indicated baud rate. *What is also indicated near the i.LINK jack on the personal computer. Required i.LINK cable Use the Sony i.LINK 4-pin-to the equipment. Before connecting this unit to other than video equipment. i.LINK functions on this unit For details on how to ... to be sent or received in one second. For details on which it is not indicated such as this unit, also refer to the operating instructions of data can be connected to a personal computer, make sure that can also be sent in one second. i.LINK and are defined: S100 (approx....

Operating Instructions
Page 204
... 8.4 V (AC power adaptor). •For DC or AC operation, use the accessories recommended in these operating instructions. •If any solid object or liquid gets inside . •Keep your camcorder away from the sand or dust. When you are fingerprints on the lens, remove them with a soft cloth.... This is not a malfunction. •While using your camcorder. •Do not wrap your camcorder and have it checked by a Sony dealer before operating it any type of the cassette. These holes are used to build up . Camcorder care •Remove the tape, and periodically turn on the...
... 8.4 V (AC power adaptor). •For DC or AC operation, use the accessories recommended in these operating instructions. •If any solid object or liquid gets inside . •Keep your camcorder away from the sand or dust. When you are fingerprints on the lens, remove them with a soft cloth.... This is not a malfunction. •While using your camcorder. •Do not wrap your camcorder and have it checked by a Sony dealer before operating it any type of the cassette. These holes are used to build up . Camcorder care •Remove the tape, and periodically turn on the...

Operating Instructions
Page 211
..., loosen the screw, and then press down and pull out the accessory. * Except DCR-TRV16 Quick Reference 211 Identifying parts and controls qj wa qk ql w; To connect an accessory, press down and push it to the operating instructions of the accessory for further information. •The intelligent accessory shoe has a safety...
..., loosen the screw, and then press down and pull out the accessory. * Except DCR-TRV16 Quick Reference 211 Identifying parts and controls qj wa qk ql w; To connect an accessory, press down and push it to the operating instructions of the accessory for further information. •The intelligent accessory shoe has a safety...
PIXELA ImageMixer 1.0 Manual
Page 9
... on the desktop. 2. The Menu screen appears automatically. If the Menu screen does not appear automatically, search for the [Setup Menu] icon by following the instructions. ImageMixer requires DirectX 8 to be installed. The same type of process is installed after performing all of the steps above. Uninstalling ImageMixer is used to...
... on the desktop. 2. The Menu screen appears automatically. If the Menu screen does not appear automatically, search for the [Setup Menu] icon by following the instructions. ImageMixer requires DirectX 8 to be installed. The same type of process is installed after performing all of the steps above. Uninstalling ImageMixer is used to...


