Operating Instructions
Page 8
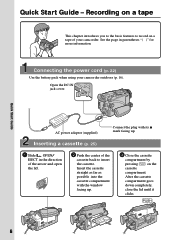
Quick Start Guide AC power adaptor (supplied) Connect the plug with the window facing up . Inserting a cassette (p. 25) 1 Slide OPEN/ EJECT in parentheses "( )" for more information. Insert the cassette straight ... compartment. Recording on a tape This chapter introduces you to the basic features to insert the cassette. Open the DC IN jack cover. Connecting the power cord (p. 22) Use the battery pack when using your camcorder. See the page in the direction of the arrow and open the lid. 2 Push the center of your...
Quick Start Guide AC power adaptor (supplied) Connect the plug with the window facing up . Inserting a cassette (p. 25) 1 Slide OPEN/ EJECT in parentheses "( )" for more information. Insert the cassette straight ... compartment. Recording on a tape This chapter introduces you to the basic features to insert the cassette. Open the DC IN jack cover. Connecting the power cord (p. 22) Use the battery pack when using your camcorder. See the page in the direction of the arrow and open the lid. 2 Push the center of your...
Operating Instructions
Page 10
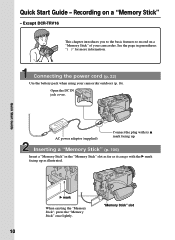
...106) Insert a "Memory Stick" in parentheses "( )" for more information. Except DCR-TRV16 This chapter introduces you to the basic features to record on a "Memory Stick" - Open the DC IN jack cover. Quick Start Guide AC power adaptor (supplied) Connect the plug with the B mark facing up . "Memory ...slot as far as it can go with its v mark facing up as illustrated. Connecting the power cord (p. 22) Use the battery pack when using your camcorder. Recording on a "Memory Stick" of your camcorder outdoors (p. 16). B mark When ejecting the "Memory Stick", press the "Memory Stick" once...
...106) Insert a "Memory Stick" in parentheses "( )" for more information. Except DCR-TRV16 This chapter introduces you to the basic features to record on a "Memory Stick" - Open the DC IN jack cover. Quick Start Guide AC power adaptor (supplied) Connect the plug with the B mark facing up . "Memory ...slot as far as it can go with its v mark facing up as illustrated. Connecting the power cord (p. 22) Use the battery pack when using your camcorder. Recording on a "Memory Stick" of your camcorder outdoors (p. 16). B mark When ejecting the "Memory Stick", press the "Memory Stick" once...
Operating Instructions
Page 15
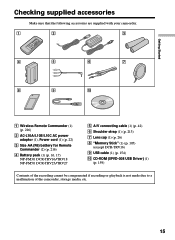
... accessories Make sure that the following accessories are supplied with your camcorder. 1 2 3 4 5 6 7 8 9 0 1 Wireless Remote Commander (1) (p. 216) 2 AC-L10A/L10B/L10C AC power adaptor (1), Power cord (1) (p. 22) 3 Size AA (R6) battery for Remote Commander (2) (p. 216) 4 Battery pack (1) (p. 16, 17) NP-FM30: DCR-TRV16/TRV18 NP-FM50: DCR-TRV25/TRV27 5 A/V connecting cable (1) (p. 42) 6 Shoulder strap (1) (p. 213) 7 Lens cap (1) (p. 26...
... accessories Make sure that the following accessories are supplied with your camcorder. 1 2 3 4 5 6 7 8 9 0 1 Wireless Remote Commander (1) (p. 216) 2 AC-L10A/L10B/L10C AC power adaptor (1), Power cord (1) (p. 22) 3 Size AA (R6) battery for Remote Commander (2) (p. 216) 4 Battery pack (1) (p. 16, 17) NP-FM30: DCR-TRV16/TRV18 NP-FM50: DCR-TRV25/TRV27 5 A/V connecting cable (1) (p. 42) 6 Shoulder strap (1) (p. 213) 7 Lens cap (1) (p. 26...
Operating Instructions
Page 17
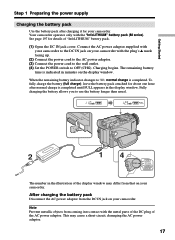
.... (1) Open the DC IN jack cover. Connect the AC power adaptor supplied with the plug's v mark facing up. (2) Connect the power cord to the AC power adaptor. (3) Connect the power cord to the wall outlet. (4) Set the POWER switch to , normal charge is completed. See page 197 for your camcorder. After charging the battery pack Disconnect the AC...
.... (1) Open the DC IN jack cover. Connect the AC power adaptor supplied with the plug's v mark facing up. (2) Connect the power cord to the AC power adaptor. (3) Connect the power cord to the wall outlet. (4) Set the POWER switch to , normal charge is completed. See page 197 for your camcorder. After charging the battery pack Disconnect the AC...
Operating Instructions
Page 22
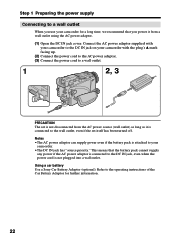
... with the plug's v mark facing up. (2) Connect the power cord to the AC power adaptor. (3) Connect the power cord to a wall outlet. 1 2, 3 PRECAUTION The set itself has been turned off. Using a car battery Use a Sony Car Battery Adaptor (optional). Refer to the DC IN jack on your camcorder. •The DC IN jack has "source priority." Notes...
... with the plug's v mark facing up. (2) Connect the power cord to the AC power adaptor. (3) Connect the power cord to a wall outlet. 1 2, 3 PRECAUTION The set itself has been turned off. Using a car battery Use a Sony Car Battery Adaptor (optional). Refer to the DC IN jack on your camcorder. •The DC IN jack has "source priority." Notes...
Operating Instructions
Page 190
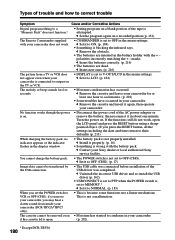
...camcorder. No function works though the power is on. • Disconnect the power cord of the AC power adaptor or remove the battery, then reconnect it in your camcorder ...camcorder. You cannot charge the battery pack. • The POWER switch is open the LCD panel and press the RESET button using a sharppointed object. (If you may hear a clatter sound from a TV or VCR does not appear even when your camcorder (DCR-TRV25...Types of trouble and how to correct trouble Symptom Cause and/or Corrective Actions Digital program editing to a "Memory Stick" does not function.* • Setting...
...camcorder. No function works though the power is on. • Disconnect the power cord of the AC power adaptor or remove the battery, then reconnect it in your camcorder ...camcorder. You cannot charge the battery pack. • The POWER switch is open the LCD panel and press the RESET button using a sharppointed object. (If you may hear a clatter sound from a TV or VCR does not appear even when your camcorder (DCR-TRV25...Types of trouble and how to correct trouble Symptom Cause and/or Corrective Actions Digital program editing to a "Memory Stick" does not function.* • Setting...

Operating Instructions
Page 191
... cassette and leave your camcorder. If a 5-digit code is not an "InfoLITHIUM" battery pack. After reconnecting the power supply, operate your camcorder as a 5-digit code (a combination of a letter and figures) in the viewfinder, on the state of the 5-digit code. (example: ...the above that you can service your camcorder yourself. • E:ss:ss Contact your Sony dealer or local authorized Sony service facility. c Use an "InfoLITHIUM" battery pack. (p. 197) • Moisture condensation has occurred. c Disconnect the power cord of your camcorder. • A malfunction that you ...
... cassette and leave your camcorder. If a 5-digit code is not an "InfoLITHIUM" battery pack. After reconnecting the power supply, operate your camcorder as a 5-digit code (a combination of a letter and figures) in the viewfinder, on the state of the 5-digit code. (example: ...the above that you can service your camcorder yourself. • E:ss:ss Contact your Sony dealer or local authorized Sony service facility. c Use an "InfoLITHIUM" battery pack. (p. 197) • Moisture condensation has occurred. c Disconnect the power cord of your camcorder. • A malfunction that you ...
Operating Instructions
Page 205
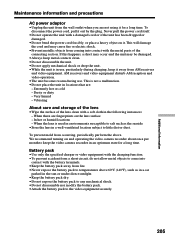
...as in a car parked in a well-ventilated location subject to the video equipment securely. 205 Very humid - When there are : - To disconnect the power cord, pull it for a long time. When the lens is not a malfunction. •Do not place the unit in an optimum state for a long time.... To prevent mold from fire. •Never expose the battery pack to temperatures above . Never pull the power cord itself. •Do not operate the unit with the battery terminals. •Keep the battery pack away from occurring, periodically perform the above 60...
...as in a car parked in a well-ventilated location subject to the video equipment securely. 205 Very humid - When there are : - To disconnect the power cord, pull it for a long time. When the lens is not a malfunction. •Do not place the unit in an optimum state for a long time.... To prevent mold from fire. •Never expose the battery pack to temperatures above . Never pull the power cord itself. •Do not operate the unit with the battery terminals. •Keep the battery pack away from occurring, periodically perform the above 60...

Operating Instructions
Page 208
...125 × 39 × 62 mm (5 × 1 9/16 × 2 1/2 in.) (w/h/d) excluding projecting parts Mass (approx.) 280 g (9.8 oz) excluding power cord Battery pack DCR-TRV16/TRV18: NP-FM30 Maximum output voltage DC 8.4 V Output voltage DC 7.2 V Capacity 5.0 Wh (700 mAh) Dimensions (approx.) 38.2 × 20.5 ×...; 55.6 mm (1 9/16 × 13/16 × 2 1/4 in.) (w/h/d) Mass (approx.) 65 g (2.3 oz) Type Lithium ion DCR-TRV25/TRV27: NP-FM50 Maximum output voltage DC 8.4 V Output voltage DC 7.2 V Capacity 8.5 Wh (1 180 mAh) Dimensions (approx.) 38.2 × 20.5 × 55.6 mm...
...125 × 39 × 62 mm (5 × 1 9/16 × 2 1/2 in.) (w/h/d) excluding projecting parts Mass (approx.) 280 g (9.8 oz) excluding power cord Battery pack DCR-TRV16/TRV18: NP-FM30 Maximum output voltage DC 8.4 V Output voltage DC 7.2 V Capacity 5.0 Wh (700 mAh) Dimensions (approx.) 38.2 × 20.5 ×...; 55.6 mm (1 9/16 × 13/16 × 2 1/4 in.) (w/h/d) Mass (approx.) 65 g (2.3 oz) Type Lithium ion DCR-TRV25/TRV27: NP-FM50 Maximum output voltage DC 8.4 V Output voltage DC 7.2 V Capacity 8.5 Wh (1 180 mAh) Dimensions (approx.) 38.2 × 20.5 × 55.6 mm...


