Operating Instructions
Page 4
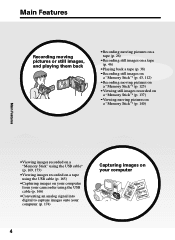
..." using the USB cable* (p. 169, 173) •Viewing images recorded on a tape using the USB cable (p. 165) •Capturing images on your computer from your camcorder using the USB cable (p. 166) •Converting an analog signal into digital to capture images onto your computer (p. 174) Capturing images on your computer 4
..." using the USB cable* (p. 169, 173) •Viewing images recorded on a tape using the USB cable (p. 165) •Capturing images on your computer from your camcorder using the USB cable (p. 166) •Converting an analog signal into digital to capture images onto your computer (p. 174) Capturing images on your computer 4
Operating Instructions
Page 7
... recorded on a "Memory Stick" - For Windows users (except DCR-TRV16 169 Connecting your camcorder to a tape .......... 143 Enlarging still images recorded on a "Memory Stick" with your computer - For Macintosh users (except DCR-TRV16 171 Viewing images recorded on a "Memory Stick" - Memory...a "Memory Stick" with your computer - For Macintosh users (except DCR-TRV16 173 Capturing images from a tape as a moving picture - For Windows users 157 Viewing images recorded on your computer - Digital program editing (on "Memory Stick"s to your computer using the USB...
... recorded on a "Memory Stick" - For Windows users (except DCR-TRV16 169 Connecting your camcorder to a tape .......... 143 Enlarging still images recorded on a "Memory Stick" with your computer - For Macintosh users (except DCR-TRV16 171 Viewing images recorded on a "Memory Stick" - Memory...a "Memory Stick" with your computer - For Macintosh users (except DCR-TRV16 173 Capturing images from a tape as a moving picture - For Windows users 157 Viewing images recorded on your computer - Digital program editing (on "Memory Stick"s to your computer using the USB...
Operating Instructions
Page 8
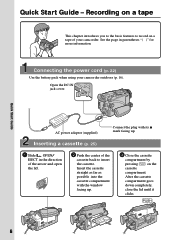
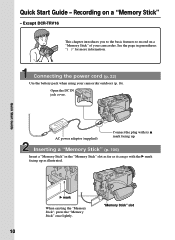
... compartment by pressing on a tape of the cassette back to insert the cassette. Connecting the power cord (p. 22) Use the battery pack when using your camcorder. Recording on a tape This chapter introduces you to the basic features to record on the cassette compartment. See the page in the direction of the...
... compartment by pressing on a tape of the cassette back to insert the cassette. Connecting the power cord (p. 22) Use the battery pack when using your camcorder. Recording on a tape This chapter introduces you to the basic features to record on the cassette compartment. See the page in the direction of the...

Operating Instructions
Page 9
... Viewfinder When the LCD panel is set the clock before recording (p. 23). REW 3 Press N to rewind the tape. Your camcorder starts recording. If you purchase your camcorder, the clock setting is closed, use the viewfinder with your eye against the eyecup. The picture appears on the LCD screen (p.... 38) 1 Set the POWER switch to your camcorder by holding the viewfinder, the LCD panel, or the battery pack. 9 To stop recording, press START/STOP again. When you want to record...
... Viewfinder When the LCD panel is set the clock before recording (p. 23). REW 3 Press N to rewind the tape. Your camcorder starts recording. If you purchase your camcorder, the clock setting is closed, use the viewfinder with your eye against the eyecup. The picture appears on the LCD screen (p.... 38) 1 Set the POWER switch to your camcorder by holding the viewfinder, the LCD panel, or the battery pack. 9 To stop recording, press START/STOP again. When you want to record...
Operating Instructions
Page 10
...adaptor (supplied) Connect the plug with the B mark facing up . Recording on a "Memory Stick" of your camcorder outdoors (p. 16). Connecting the power cord (p. 22) Use the battery pack when using your camcorder. See the page in the "Memory Stick" slot as far as it can go with its v mark facing... up as illustrated. Quick Start Guide - Except DCR-TRV16 This chapter introduces you to the basic features to record on a...
...adaptor (supplied) Connect the plug with the B mark facing up . Recording on a "Memory Stick" of your camcorder outdoors (p. 16). Connecting the power cord (p. 22) Use the battery pack when using your camcorder. See the page in the "Memory Stick" slot as far as it can go with its v mark facing... up as illustrated. Quick Start Guide - Except DCR-TRV16 This chapter introduces you to the basic features to record on a...

Operating Instructions
Page 11
...(CHG) CAMERA MEMORY 2 Press MEMORY PLAY. The last recorded image is closed, use the viewfinder with your camcorder, the clock setting is set to the left (unlock) position. Adjust the viewfinder lens to your camcorder by holding the viewfinder, the LCD panel or the battery pack. 11 The picture appears on a "Memory...
...(CHG) CAMERA MEMORY 2 Press MEMORY PLAY. The last recorded image is closed, use the viewfinder with your camcorder, the clock setting is set to the left (unlock) position. Adjust the viewfinder lens to your camcorder by holding the viewfinder, the LCD panel or the battery pack. 11 The picture appears on a "Memory...
Operating Instructions
Page 12
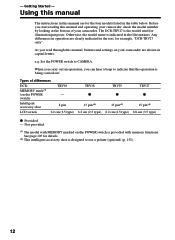
... shown in the illustrations. Before you start reading this manual and operating your camcorder, check the model number by looking at the bottom of differences DCR- Any differences in operation are for the four models listed in the text, for details. ...name is designed to CAMERA. Not provided *1) The model with memory functions. See page 105 for example, "DCR-TRV27 only". - switch) Intelligent accessory shoe 8 pin LCD screen 6.2 cm (2.5 type) TRV18 z 15 pin*2) 6.2 cm (2.5 type) TRV25 z 15 pin*2) 6.2 cm (2.5 type) TRV27 z 15 pin*2) 8.8 cm (3.5 type) z Provided -
... shown in the illustrations. Before you start reading this manual and operating your camcorder, check the model number by looking at the bottom of differences DCR- Any differences in operation are for the four models listed in the text, for details. ...name is designed to CAMERA. Not provided *1) The model with memory functions. See page 105 for example, "DCR-TRV27 only". - switch) Intelligent accessory shoe 8 pin LCD screen 6.2 cm (2.5 type) TRV18 z 15 pin*2) 6.2 cm (2.5 type) TRV25 z 15 pin*2) 6.2 cm (2.5 type) TRV27 z 15 pin*2) 8.8 cm (3.5 type) z Provided -

Operating Instructions
Page 13
END SEARCH (p. 37) - To view your camcorder. Cassettes with the cassette memory are: - Note on TV color systems TV color systems differ depending on a TV, you need an NTSC system-based TV. ... such materials may be contrary to copyright laws. 13 Labeling a cassette (p. 103) For details of cassette types, see this manual Note on Cassette Memory Your camcorder is based on whether or not the tape has a cassette memory are: - You see page 194. Superimposing a title (p. 98) - Copyright precautions Television programs, films, video...
END SEARCH (p. 37) - To view your camcorder. Cassettes with the cassette memory are: - Note on TV color systems TV color systems differ depending on a TV, you need an NTSC system-based TV. ... such materials may be contrary to copyright laws. 13 Labeling a cassette (p. 103) For details of cassette types, see this manual Note on Cassette Memory Your camcorder is based on whether or not the tape has a cassette memory are: - You see page 194. Superimposing a title (p. 98) - Copyright precautions Television programs, films, video...
Operating Instructions
Page 14
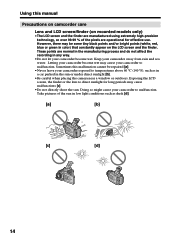
... [c] [d] 14 Take pictures of the pixels are operational for long periods may be repaired [a]. •Never leave your camcorder to malfunction. Sometimes this manual Precautions on camcorder care Lens and LCD screen/finder (on the LCD screen and the finder. Exposing the LCD screen, the finder or ...the lens to direct sunlight for effective use. Keep your camcorder to malfunction. These points are normal in the manufacturing process and do not affect the recording in the sun or under direct sunlight...
... [c] [d] 14 Take pictures of the pixels are operational for long periods may be repaired [a]. •Never leave your camcorder to malfunction. Sometimes this manual Precautions on camcorder care Lens and LCD screen/finder (on the LCD screen and the finder. Exposing the LCD screen, the finder or ...the lens to direct sunlight for effective use. Keep your camcorder to malfunction. These points are normal in the manufacturing process and do not affect the recording in the sun or under direct sunlight...
Operating Instructions
Page 15
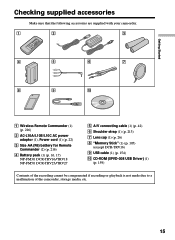
... sure that the following accessories are supplied with your camcorder. 1 2 3 4 5 6 7 8 9 0 1 Wireless Remote Commander (1) (p. 216) 2 AC-L10A/L10B/L10C AC power adaptor (1), Power cord (1) (p. 22) 3 Size AA (R6) battery for Remote Commander (2) (p. 216) 4 Battery pack (1) (p. 16, 17) NP-FM30: DCR-TRV16/TRV18 NP-FM50: DCR-TRV25/TRV27 5 A/V connecting cable (1) (p. 42) 6 Shoulder strap (1) (p. 213) 7 Lens cap...
... sure that the following accessories are supplied with your camcorder. 1 2 3 4 5 6 7 8 9 0 1 Wireless Remote Commander (1) (p. 216) 2 AC-L10A/L10B/L10C AC power adaptor (1), Power cord (1) (p. 22) 3 Size AA (R6) battery for Remote Commander (2) (p. 216) 4 Battery pack (1) (p. 16, 17) NP-FM30: DCR-TRV16/TRV18 NP-FM50: DCR-TRV25/TRV27 5 A/V connecting cable (1) (p. 42) 6 Shoulder strap (1) (p. 213) 7 Lens cap...
Operating Instructions
Page 16
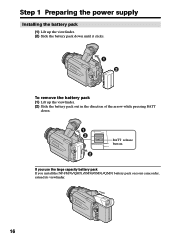
Step 1 Preparing the power supply Installing the battery pack (1) Lift up the viewfinder. (2) Slide the battery pack down until it clicks. 1 2 To remove the battery pack (1) Lift up the viewfinder. (2) Slide the battery pack out in the direction of the arrow while pressing BATT down. 1 2 2 BATT release button If you use the large capacity battery pack If you install the NP-FM70/QM71/FM90/FM91/QM91 battery pack on your camcorder, extend its viewfinder. 16
Step 1 Preparing the power supply Installing the battery pack (1) Lift up the viewfinder. (2) Slide the battery pack down until it clicks. 1 2 To remove the battery pack (1) Lift up the viewfinder. (2) Slide the battery pack out in the direction of the arrow while pressing BATT down. 1 2 2 BATT release button If you use the large capacity battery pack If you install the NP-FM70/QM71/FM90/FM91/QM91 battery pack on your camcorder, extend its viewfinder. 16
Operating Instructions
Page 17
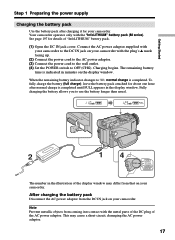
... illustration of the display window may cause a short-circuit, damaging the AC power adaptor. 17 This may differ from that on your camcorder. Getting Started Step 1 Preparing the power supply Charging the battery pack Use the battery pack after normal charge is completed until FULL appears... IN jack cover. When the remaining battery indicator changes to OFF (CHG). Note Prevent metallic objects from the DC IN jack on your camcorder. Connect the AC power adaptor supplied with the "InfoLITHIUM" battery pack (M series). After charging the battery pack Disconnect the AC power adaptor...
... illustration of the display window may cause a short-circuit, damaging the AC power adaptor. 17 This may differ from that on your camcorder. Getting Started Step 1 Preparing the power supply Charging the battery pack Use the battery pack after normal charge is completed until FULL appears... IN jack cover. When the remaining battery indicator changes to OFF (CHG). Note Prevent metallic objects from the DC IN jack on your camcorder. Connect the AC power adaptor supplied with the "InfoLITHIUM" battery pack (M series). After charging the battery pack Disconnect the AC power adaptor...

Operating Instructions
Page 18
.... While using the viewfinder. The charging time may increase if the battery's temperature is extremely high or low because of the ambient temperature. *1) DCR-TRV16/TRV18 supplied *2) DCR-TRV25/TRV27 supplied 18 When you use the AC power adaptor Place the AC power adaptor near a wall outlet. Charging time Battery pack NP-FM30... any trouble occurs with this unit, disconnect the plug from the wall outlet as soon as possible to charge an empty battery pack. Until your camcorder calculates the actual remaining battery time "- - - -
.... While using the viewfinder. The charging time may increase if the battery's temperature is extremely high or low because of the ambient temperature. *1) DCR-TRV16/TRV18 supplied *2) DCR-TRV25/TRV27 supplied 18 When you use the AC power adaptor Place the AC power adaptor near a wall outlet. Charging time Battery pack NP-FM30... any trouble occurs with this unit, disconnect the plug from the wall outlet as soon as possible to charge an empty battery pack. Until your camcorder calculates the actual remaining battery time "- - - -

Operating Instructions
Page 21
The battery life will be shorter if you use your camcorder in an ambient temperature of Sony Corporation. 21 What is a trademark of between 10 °C to 30 °C (50 °F to operate Charge the battery pack fully again so...Recommended charging temperature We recommend charging the battery pack in a cold environment. This unit is correct. "InfoLITHIUM" M series battery packs have the mark. Your camcorder operates only with the "InfoLITHIUM" battery pack (M series). The "InfoLITHIUM" is a lithium ion battery pack that the indication on the remaining battery time indicator...
The battery life will be shorter if you use your camcorder in an ambient temperature of Sony Corporation. 21 What is a trademark of between 10 °C to 30 °C (50 °F to operate Charge the battery pack fully again so...Recommended charging temperature We recommend charging the battery pack in a cold environment. This unit is correct. "InfoLITHIUM" M series battery packs have the mark. Your camcorder operates only with the "InfoLITHIUM" battery pack (M series). The "InfoLITHIUM" is a lithium ion battery pack that the indication on the remaining battery time indicator...
Operating Instructions
Page 22
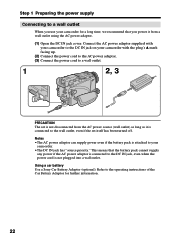
Connect the AC power adaptor supplied with your camcorder to the DC IN jack on your camcorder with the plug's v mark facing up. (2) Connect the power cord to the AC power adaptor. (3) Connect the power cord to a wall outlet. 1 2, 3 PRECAUTION The set ...itself has been turned off. This means that you use your camcorder. •The DC IN jack has "source priority." Refer to your camcorder for further information. 22 Using a car battery Use a Sony Car Battery Adaptor (optional). Notes •The AC power adaptor can supply power even if the...
Connect the AC power adaptor supplied with your camcorder to the DC IN jack on your camcorder with the plug's v mark facing up. (2) Connect the power cord to the AC power adaptor. (3) Connect the power cord to a wall outlet. 1 2, 3 PRECAUTION The set ...itself has been turned off. This means that you use your camcorder. •The DC IN jack has "source priority." Refer to your camcorder for further information. 22 Using a car battery Use a Sony Car Battery Adaptor (optional). Notes •The AC power adaptor can supply power even if the...

Operating Instructions
Page 23
...signal. Set the year, then the month, the day, the hour and then the minute, in your camcorder will be cleared from memory (bars may be displayed each time that order. (1) Set the POWER switch to CAMERA or ...USB STREAM 5:30:00 PM LTR SIZE LANGUAGE DEMO MODE RETURN [MENU] : END 23 If you do not use your camcorder for about four months, the date and time settings may appear) because the built-in rechargeable battery in that you set... time Set the date and time when you set the POWER switch to CAMERA or MEMORY (except DCR-TRV16) unless you use your camcorder for the first time.
...signal. Set the year, then the month, the day, the hour and then the minute, in your camcorder will be cleared from memory (bars may be displayed each time that order. (1) Set the POWER switch to CAMERA or ...USB STREAM 5:30:00 PM LTR SIZE LANGUAGE DEMO MODE RETURN [MENU] : END 23 If you do not use your camcorder for about four months, the date and time settings may appear) because the built-in rechargeable battery in that you set... time Set the date and time when you set the POWER switch to CAMERA or MEMORY (except DCR-TRV16) unless you use your camcorder for the first time.

Operating Instructions
Page 24
Note on the time indicator The internal clock of your camcorder operates on the data code of the tape and the "Memory Stick" (except DCR-TRV16). Step 2 Setting the date and time The year changes as follows: 1995 T t 2002 T t 2079 If you do not set the date and time and are recorded on a 12-hour cycle. •12:00 AM stands for midnight. •12:00 PM stands for noon. 24
Note on the time indicator The internal clock of your camcorder operates on the data code of the tape and the "Memory Stick" (except DCR-TRV16). Step 2 Setting the date and time The year changes as follows: 1995 T t 2002 T t 2079 If you do not set the date and time and are recorded on a 12-hour cycle. •12:00 AM stands for midnight. •12:00 PM stands for noon. 24
Operating Instructions
Page 26
...recorded automatically onto tape. However, they are not displayed while recording. Select SP or LP in the LP mode on your camcorder, we recommend playing back the tape on your camcorder. 26 When you can record 1.5 times as long as in the LP (long play ) mode and in the SP...indicator appears. Recording - Basics - Note on the Remote Commander during playback (p. 39). To display the recording data, press DATA CODE on recording mode Your camcorder records and plays back in the SP (standard play ) mode. In the LP mode, you record a tape in the menu settings (p. 182). The ...
...recorded automatically onto tape. However, they are not displayed while recording. Select SP or LP in the LP mode on your camcorder, we recommend playing back the tape on your camcorder. 26 When you can record 1.5 times as long as in the LP (long play ) mode and in the SP...indicator appears. Recording - Basics - Note on the Remote Commander during playback (p. 39). To display the recording data, press DATA CODE on recording mode Your camcorder records and plays back in the SP (standard play ) mode. In the LP mode, you record a tape in the menu settings (p. 182). The ...
Operating Instructions
Page 27
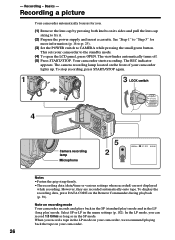
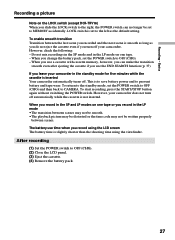
... time when you turn off . Do not mix recordings in the SP mode and in the SP and LP modes on the LOCK switch (except DCR-TRV16) When you slide the LOCK switch to the right, the POWER switch can make the transition smooth even after ejecting the cassette if you... record in the standby mode for five minutes while the cassette is inserted Your camcorder automatically turns off automatically while the cassette is slightly shorter than the shooting time using the LCD screen The battery time is not inserted. The...
... time when you turn off . Do not mix recordings in the SP mode and in the SP and LP modes on the LOCK switch (except DCR-TRV16) When you slide the LOCK switch to the right, the POWER switch can make the transition smooth even after ejecting the cassette if you... record in the standby mode for five minutes while the cassette is inserted Your camcorder automatically turns off automatically while the cassette is slightly shorter than the shooting time using the LCD screen The battery time is not inserted. The...
Operating Instructions
Page 28
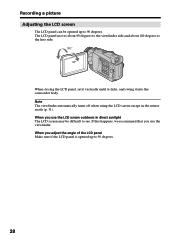
... up to the lens side. 180° 90° When closing the LCD panel, set it vertically until it clicks, and swing it into the camcorder body. If this happens, we recommend that you use the LCD screen outdoors in the mirror mode (p. 31). When you adjust the angle of the...
... up to the lens side. 180° 90° When closing the LCD panel, set it vertically until it clicks, and swing it into the camcorder body. If this happens, we recommend that you use the LCD screen outdoors in the mirror mode (p. 31). When you adjust the angle of the...


