Operating Instructions
Page 1
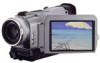
DCR-TRV Model No. Serial No. Owner's Record The model and serial numbers are located on the bottom. Refer to these numbers whenever you call upon your Sony dealer regarding this manual thoroughly, and retain it for future reference. AC- Record the serial number in the space provided below. 3-059-592-13 (1) Digital Video Camera Recorder Operating Instructions Before operating the unit, please read this product. Model No. Serial No. DCR-TRV20 DCR-TRV6/TRV11/TRV20 ©2000 Sony Corporation
DCR-TRV Model No. Serial No. Owner's Record The model and serial numbers are located on the bottom. Refer to these numbers whenever you call upon your Sony dealer regarding this manual thoroughly, and retain it for future reference. AC- Record the serial number in the space provided below. 3-059-592-13 (1) Digital Video Camera Recorder Operating Instructions Before operating the unit, please read this product. Model No. Serial No. DCR-TRV20 DCR-TRV6/TRV11/TRV20 ©2000 Sony Corporation
Operating Instructions
Page 4
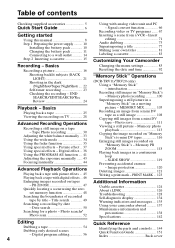
... a cassette 83 Customizing Your Camcorder Recording - PB ZOOM 47 Quickly locating a scene using the zero set memory function 48 Searching the boundaries of contents Checking supplied accessories 5 Quick Start Guide 6 Getting started Using this manual 8 Step 1 Preparing the power supply .......... 10 Installing the battery pack 10 Charging the battery pack 11 Connecting to mini DV tapes 116 Enlarging still images recorded on "Memory Stick"s - Photo search/ Photo scan 52 Changing the menu settings 85 Resetting the date and time 92 "Memory Stick" Operations (DCR-TRV11/TRV20...
... a cassette 83 Customizing Your Camcorder Recording - PB ZOOM 47 Quickly locating a scene using the zero set memory function 48 Searching the boundaries of contents Checking supplied accessories 5 Quick Start Guide 6 Getting started Using this manual 8 Step 1 Preparing the power supply .......... 10 Installing the battery pack 10 Charging the battery pack 11 Connecting to mini DV tapes 116 Enlarging still images recorded on "Memory Stick"s - Photo search/ Photo scan 52 Changing the menu settings 85 Resetting the date and time 92 "Memory Stick" Operations (DCR-TRV11/TRV20...
Operating Instructions
Page 8
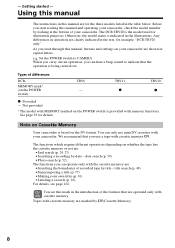
... a recording by looking at the bottom of differences DCRMEMORY mark* (on your camcorder. Types of your camcorder are for example, "DCR-TRV20 only". You see page 124. The DCR-TRV20 is the model used for details. See page 93 for illustration purposes. date search (p. 50) •Photo search (p. 52). - As you can hear a beep sound to CAMERA. TRV11 z TRV20 z z Provided - Set the POWER switch to indicate that the operation...
... a recording by looking at the bottom of differences DCRMEMORY mark* (on your camcorder. Types of your camcorder are for example, "DCR-TRV20 only". You see page 124. The DCR-TRV20 is the model used for details. See page 93 for illustration purposes. date search (p. 50) •Photo search (p. 52). - As you can hear a beep sound to CAMERA. TRV11 z TRV20 z z Provided - Set the POWER switch to indicate that the operation...
Operating Instructions
Page 17
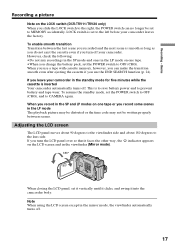
... SP mode and ones in the LP mode The playback picture may be distorted or the time code may not be set to the lens side. To resume the standby mode, set to prevent battery and tape wear. Adjusting the LCD screen The LCD panel moves about 90 degrees to the viewfinder side and about 180 degrees to MEMORY accidentally. Basics Recording a picture Note on the LOCK switch (DCR-TRV11/TRV20 only...
... SP mode and ones in the LP mode The playback picture may be distorted or the time code may not be set to the lens side. To resume the standby mode, set to prevent battery and tape wear. Adjusting the LCD screen The LCD panel moves about 90 degrees to the viewfinder side and about 180 degrees to MEMORY accidentally. Basics Recording a picture Note on the LOCK switch (DCR-TRV11/TRV20 only...
Operating Instructions
Page 28
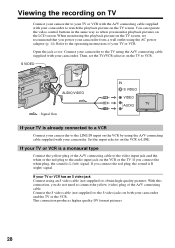
S VIDEO AUDIO/VIDEO : Signal flow IN S VIDEO VIDEO AUDIO If your TV is a monaural type Connect the yellow plug of the A/V connecting cable to the video input jack and the white or the red plug to watch the playback picture on the TV screen. Set the input selector on the VCR to the LINE IN input on the VCR by using the A/V connecting cable supplied with your camcorder. If you connect the white plug, the sound is R (right) signal. Connect the S video cable (not supplied) to...
S VIDEO AUDIO/VIDEO : Signal flow IN S VIDEO VIDEO AUDIO If your TV is a monaural type Connect the yellow plug of the A/V connecting cable to the video input jack and the white or the red plug to watch the playback picture on the TV screen. Set the input selector on the VCR to the LINE IN input on the VCR by using the A/V connecting cable supplied with your camcorder. If you connect the white plug, the sound is R (right) signal. Connect the S video cable (not supplied) to...
Operating Instructions
Page 29
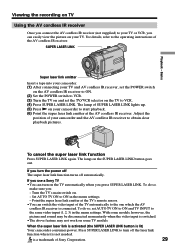
... details, refer to turn the power off The super laser link function turns off the laser link function when it is lit) Your camcorder consumes power. SUPER LASER LINK Super laser link emitter Insert a tape into your camcorder. (1) After connecting your camcorder to start playback. (6) Point the super laser link emitter at the TV's remote sensor. •You can switch the video input of the TV...
... details, refer to turn the power off The super laser link function turns off the laser link function when it is lit) Your camcorder consumes power. SUPER LASER LINK Super laser link emitter Insert a tape into your camcorder. (1) After connecting your camcorder to start playback. (6) Point the super laser link emitter at the TV's remote sensor. •You can switch the video input of the TV...
Operating Instructions
Page 30
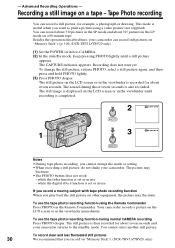
... operation described here, your camcorder. The CAPTURE indicator appears. The picture may fluctuate. while the fader function is then recorded for example, a photograph or drawing. The still picture is set or in the viewfinder until a still picture appears. Tape Photo recording You can record still pictures on "Memory Stick"s (p. 100) (DCR-TRV11/TRV20 only). (1) Set the POWER switch to print a picture using the Remote Commander Press PHOTO on a 60-minute tape. The sound during normal CAMERA recording Press PHOTO deeper. Recording...
... operation described here, your camcorder. The CAPTURE indicator appears. The picture may fluctuate. while the fader function is then recorded for example, a photograph or drawing. The still picture is set or in the viewfinder until a still picture appears. Tape Photo recording You can record still pictures on "Memory Stick"s (p. 100) (DCR-TRV11/TRV20 only). (1) Set the POWER switch to print a picture using the Remote Commander Press PHOTO on a 60-minute tape. The sound during normal CAMERA recording Press PHOTO deeper. Recording...
Operating Instructions
Page 47
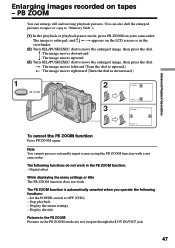
Advanced Playback Operations Enlarging images recorded on your camcorder. You can enlarge still and moving playback pictures. Digital effect While displaying the menu settings or title The PB ZOOM function does not work in the PB ZOOM function: - PB ZOOM You can also dub the enlarged pictures to tapes or copy to "Memory Stick"s. (1) In the playback or playback pause mode, press PB ZOOM on tapes - Note You cannot process externally input scenes using the PB ZOOM function with your camcorder. The PB ZOOM function is enlarged...
Advanced Playback Operations Enlarging images recorded on your camcorder. You can enlarge still and moving playback pictures. Digital effect While displaying the menu settings or title The PB ZOOM function does not work in the PB ZOOM function: - PB ZOOM You can also dub the enlarged pictures to tapes or copy to "Memory Stick"s. (1) In the playback or playback pause mode, press PB ZOOM on tapes - Note You cannot process externally input scenes using the PB ZOOM function with your camcorder. The PB ZOOM function is enlarged...
Operating Instructions
Page 57
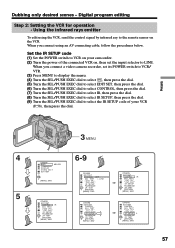
... I R i . Digital program editing Step 2: Setting the VCR for operation - Editing 4 5 3 MENU OTHERS BEEP MELODY COMMANDER D I SPL AY V I DEO ED I T ED I TSET [MENU] : END OTHERS ED I TSET CONTROL I R ADJ TEST CUT - I N CUT -OUT I R SETUP 1 PAUSEMODE I R TEST RETURN [MENU] : END OTHERS ED I TSET CONTROL I R ADJ TEST CUT - Using the infrared rays emitter To edit using an AV connecting cable, follow the procedures below. When you connect a video camera recorder, set its POWER switch...
... I R i . Digital program editing Step 2: Setting the VCR for operation - Editing 4 5 3 MENU OTHERS BEEP MELODY COMMANDER D I SPL AY V I DEO ED I T ED I TSET [MENU] : END OTHERS ED I TSET CONTROL I R ADJ TEST CUT - I N CUT -OUT I R SETUP 1 PAUSEMODE I R TEST RETURN [MENU] : END OTHERS ED I TSET CONTROL I R ADJ TEST CUT - Using the infrared rays emitter To edit using an AV connecting cable, follow the procedures below. When you connect a video camera recorder, set its POWER switch...
Operating Instructions
Page 61
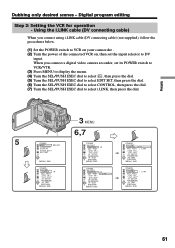
Digital program editing Step 2: Setting the VCR for operation - I N CUT -OUT I R SETUP PAUSEMODE I R TEST RETURN [MENU] : END I R i . I N CUT -OUT I R SETUP PAUSEMODE I R TEST RETURN [MENU] : END I R i . I N CUT -OUT I R SETUP PAUSEMODE I R TEST RETURN [MENU] : END 3 MENU 6,7 OTHERS ED I TSET CONTROL I R TEST RETURN [MENU] : END i . Editing Dubbing only desired scenes - Using the i.LINK cable (DV connecting cable) When you connect a digital video camera recorder, set the input selector to select i.LINK, then press the dial. 5 OTHERS BEEP MELODY...
Digital program editing Step 2: Setting the VCR for operation - I N CUT -OUT I R SETUP PAUSEMODE I R TEST RETURN [MENU] : END I R i . I N CUT -OUT I R SETUP PAUSEMODE I R TEST RETURN [MENU] : END I R i . I N CUT -OUT I R SETUP PAUSEMODE I R TEST RETURN [MENU] : END 3 MENU 6,7 OTHERS ED I TSET CONTROL I R TEST RETURN [MENU] : END i . Editing Dubbing only desired scenes - Using the i.LINK cable (DV connecting cable) When you connect a digital video camera recorder, set the input selector to select i.LINK, then press the dial. 5 OTHERS BEEP MELODY...
Operating Instructions
Page 64
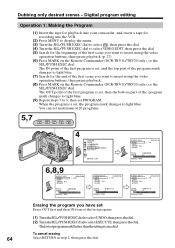
... first program is set, the program mark changes to insert using the video operation buttons, then pause playback (p. 27). (6) Press MARK on the Remote Commander (DCR-TRV11/TRV20 only), or the SEL/PUSH EXEC dial. You can set maximum of 20 programs. 5,7 STOP REW PLAY FF PAUSE 64 4 OTHERS BEEP COMMANDER D I SPL AY V I DEO ED I T READY ED I TSET [MENU] : END 6,8,9 V I DEO ED I T MARK UNDO ERASE ALL START...
... first program is set, the program mark changes to insert using the video operation buttons, then pause playback (p. 27). (6) Press MARK on the Remote Commander (DCR-TRV11/TRV20 only), or the SEL/PUSH EXEC dial. You can set maximum of 20 programs. 5,7 STOP REW PLAY FF PAUSE 64 4 OTHERS BEEP COMMANDER D I SPL AY V I DEO ED I T READY ED I TSET [MENU] : END 6,8,9 V I DEO ED I T MARK UNDO ERASE ALL START...
Operating Instructions
Page 65
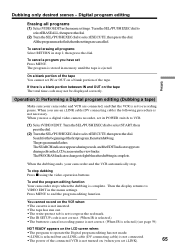
... tape. The PROGRAM indicator changes to recording pause. Editing Operation 2: Performing a Digital program editing (Dubbing a tape) Make sure your camcorder and the VCR automatically stop dubbing Press x using the video operation buttons. When the dubbing ends, your camcorder and VCR are cancelled. Then the display returns to operate the Digital program editing has not made. •i.LINK is selected but an i.LINK cable (DV connecting cable) is not connected. •The power of the connected VCR...
... tape. The PROGRAM indicator changes to recording pause. Editing Operation 2: Performing a Digital program editing (Dubbing a tape) Make sure your camcorder and the VCR automatically stop dubbing Press x using the video operation buttons. When the dubbing ends, your camcorder and VCR are cancelled. Then the display returns to operate the Digital program editing has not made. •i.LINK is selected but an i.LINK cable (DV connecting cable) is not connected. •The power of the connected VCR...
Operating Instructions
Page 92
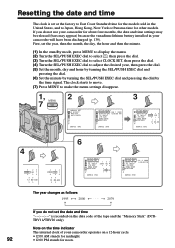
... time indicator The internal clock of the tape and the "Memory Stick" (DCRTRV11/TRV20 only). Resetting the date and time The clock is recorded on the data code of your camcorder for about four months, the date and time settings may be released (bars may appear) because the vanadium-lithium battery installed in the United States, and to Japan, Hong Kong, New York or Panama time for other models. First, set...
... time indicator The internal clock of the tape and the "Memory Stick" (DCRTRV11/TRV20 only). Resetting the date and time The clock is recorded on the data code of your camcorder for about four months, the date and time settings may be released (bars may appear) because the vanadium-lithium battery installed in the United States, and to Japan, Hong Kong, New York or Panama time for other models. First, set...
Operating Instructions
Page 108
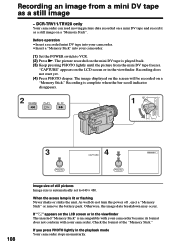
... "Memory Stick." "CAPTURE" appears on a "Memory Stick". Otherwise, the image data breakdown may occur. When the access lamp is automatically set to VCR. (2) Press N. If you press PHOTO lightly in the viewfinder The inserted "Memory Stick" is incompatible with your camcorder because its format does not conform with your camcorder. (1) Set the POWER switch to 640 × 480. DCR-TRV11/TRV20 only Your camcorder can read moving picture data recorded on a mini DV tape and record it as a still image - Recording...
... "Memory Stick." "CAPTURE" appears on a "Memory Stick". Otherwise, the image data breakdown may occur. When the access lamp is automatically set to VCR. (2) Press N. If you press PHOTO lightly in the viewfinder The inserted "Memory Stick" is incompatible with your camcorder because its format does not conform with your camcorder. (1) Set the POWER switch to 640 × 480. DCR-TRV11/TRV20 only Your camcorder can read moving picture data recorded on a mini DV tape and record it as a still image - Recording...
Operating Instructions
Page 111
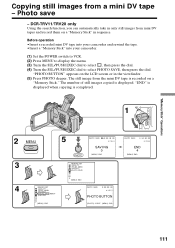
... Photo save - DCR-TRV11/TRV20 only Using the search function, you can automatically take in the viewfinder. (5) Press PHOTO deeper. "PHOTO BUTTON" appears on the LCD screen or in only still images from the mini DV tape is recorded on a "Memory Stick" in sequence. "Memory Stick" Operations Copying still images from a mini DV tape - "END" is displayed when copying is displayed. Before operation •Insert a recorded mini DV tape into your camcorder and rewind the tape. •Insert a "Memory Stick" into your camcorder. (1) Set the POWER switch to VCR. (2) Press MENU...
... Photo save - DCR-TRV11/TRV20 only Using the search function, you can automatically take in the viewfinder. (5) Press PHOTO deeper. "PHOTO BUTTON" appears on the LCD screen or in only still images from the mini DV tape is recorded on a "Memory Stick" in sequence. "Memory Stick" Operations Copying still images from a mini DV tape - "END" is displayed when copying is displayed. Before operation •Insert a recorded mini DV tape into your camcorder and rewind the tape. •Insert a "Memory Stick" into your camcorder. (1) Set the POWER switch to VCR. (2) Press MENU...
Operating Instructions
Page 124
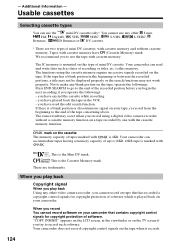
... signal When you play back Using any blank portion on the tape when it records. 124 The IC memory is a blank portion or discontinuous signal on a tape recorded by one with cassette memory. The functions using a digital video camera recorder without cassette memory. Your camcorder can read and write data such as dates of mini DV cassettes: with . These are two types of recording or titles, etc. "COPY INHIBIT" appears on the LCD screen, in the viewfinder...
... signal When you play back Using any blank portion on the tape when it records. 124 The IC memory is a blank portion or discontinuous signal on a tape recorded by one with cassette memory. The functions using a digital video camera recorder without cassette memory. Your camcorder can read and write data such as dates of mini DV cassettes: with . These are two types of recording or titles, etc. "COPY INHIBIT" appears on the LCD screen, in the viewfinder...
Operating Instructions
Page 135
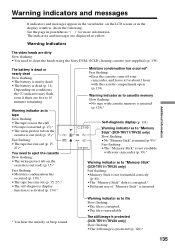
... "Memory Stick" (DCR-TRV11/TRV20 only) Fast flashing: •Memory Stick is not formatted correctly (p. 88). •The "Memory Stick" data is corrupted.* •Different size of "Memory Stick" is out (red) (p. 15).* Fast flashing: •The tape has run out (p. 15, 27).* •The self-diagnosis display function is activated (p. 134).* Moisture condensation has occurred* Fast flashing: •Eject the cassette, turn off your camcorder (p. 93).* Warning indicator as to tape Slow flashing: •The tape is...
... "Memory Stick" (DCR-TRV11/TRV20 only) Fast flashing: •Memory Stick is not formatted correctly (p. 88). •The "Memory Stick" data is corrupted.* •Different size of "Memory Stick" is out (red) (p. 15).* Fast flashing: •The tape has run out (p. 15, 27).* •The self-diagnosis display function is activated (p. 134).* Moisture condensation has occurred* Fast flashing: •Eject the cassette, turn off your camcorder (p. 93).* Warning indicator as to tape Slow flashing: •The tape is...
Operating Instructions
Page 142
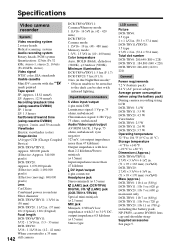
Specifications Video camera recorder System Video recording system 2 rotary heads Helical scanning system Audio recording system Rotary heads, PCM system Quantization: 12 bits (Fs 32 kHz, stereo 1, stereo 2), 16 bits (Fs 48 kHz, stereo) Video signal NTSC color, EIA standards Usable cassette Mini DV cassette with the mark printed Tape speed SP: Approx. 18.81 mm/s LP: Approx. 12.56 mm/s Recording/playback time (using cassette DVM60) SP: 1 hour LP: 1.5 hours Fastforward/rewind time (using LCD DCR-TRV6...
Specifications Video camera recorder System Video recording system 2 rotary heads Helical scanning system Audio recording system Rotary heads, PCM system Quantization: 12 bits (Fs 32 kHz, stereo 1, stereo 2), 16 bits (Fs 48 kHz, stereo) Video signal NTSC color, EIA standards Usable cassette Mini DV cassette with the mark printed Tape speed SP: Approx. 18.81 mm/s LP: Approx. 12.56 mm/s Recording/playback time (using cassette DVM60) SP: 1 hour LP: 1.5 hours Fastforward/rewind time (using LCD DCR-TRV6...
Operating Instructions
Page 148
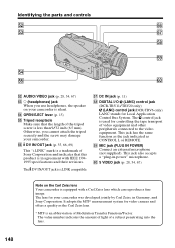
... may damage your camcorder was developed jointly by Carl Zeiss, in Germany, and Sony Corporation. tj DC IN jack (p. 11) tk DIGITAL I/O (LANC) control jack (DCR-TRV11/TRV20 only) (LANC) control jack(DCR-TRV6 only) LANC stands for video camera and offers a quality as CONTROL L or REMOTE. This jack has the same function as the jack indicated as the Carl Zeiss lens. * MTF is...
... may damage your camcorder was developed jointly by Carl Zeiss, in Germany, and Sony Corporation. tj DC IN jack (p. 11) tk DIGITAL I/O (LANC) control jack (DCR-TRV11/TRV20 only) (LANC) control jack(DCR-TRV6 only) LANC stands for video camera and offers a quality as CONTROL L or REMOTE. This jack has the same function as the jack indicated as the Carl Zeiss lens. * MTF is...
Operating Instructions
Page 152
... sound 87 Manual focus 44 Memory chromakey 105 Memory luminancekey ........ 105 MEMORY MIX 105 Memory PB ZOOM 118 Memory photo recording 100 Memory Stick 93 Menu settings 85 Memory overlap 105 M.FADER 35 Mirror mode 17 Moisture condensation ........ 138 MONOTONE 35 NIGHTSHOT 22 Normal charge 11 NTSC system 137 O, P, Q OLD MOVIE 38 Operation indicators 150 OVERLAP 35, 105 PB ZOOM 47 Photo scan 53 Photo search 52 PICTURE EFFECT 37, 45 Picture search 27 Playback pause 27 Power sources...
... sound 87 Manual focus 44 Memory chromakey 105 Memory luminancekey ........ 105 MEMORY MIX 105 Memory PB ZOOM 118 Memory photo recording 100 Memory Stick 93 Menu settings 85 Memory overlap 105 M.FADER 35 Mirror mode 17 Moisture condensation ........ 138 MONOTONE 35 NIGHTSHOT 22 Normal charge 11 NTSC system 137 O, P, Q OLD MOVIE 38 Operation indicators 150 OVERLAP 35, 105 PB ZOOM 47 Photo scan 53 Photo search 52 PICTURE EFFECT 37, 45 Picture search 27 Playback pause 27 Power sources...


