Operating Instructions
Page 6
... with digital effect 66 Enlarging images recorded on a tape - TITLE SEARCH ..... 70 Searching a recording by frame recording - Digital program editing... DCR-TRV16 43 Recording still images on a tape - Introduction 105 Recording still images on a "Memory Stick" (except DCR-TRV16... titles 101 Labeling a cassette 103 "Memory Stick" Operations (except DCR-TRV16) Using a "Memory Stick" - Memory Photo recording ......... 112...- NightShot/Super NightShot/ Color Slow Shutter 34 Self-timer recording (except DCR-TRV16 36 Checking recordings - Tape PB ZOOM 67 Quickly locating a scene...
... with digital effect 66 Enlarging images recorded on a tape - TITLE SEARCH ..... 70 Searching a recording by frame recording - Digital program editing... DCR-TRV16 43 Recording still images on a tape - Introduction 105 Recording still images on a "Memory Stick" (except DCR-TRV16... titles 101 Labeling a cassette 103 "Memory Stick" Operations (except DCR-TRV16) Using a "Memory Stick" - Memory Photo recording ......... 112...- NightShot/Super NightShot/ Color Slow Shutter 34 Self-timer recording (except DCR-TRV16 36 Checking recordings - Tape PB ZOOM 67 Quickly locating a scene...
Operating Instructions
Page 8
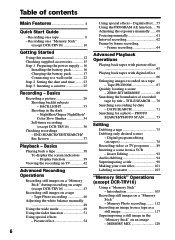
...facing up . 3 Close the cassette compartment by pressing on the cassette compartment. Connecting the power cord (p. 22) Use the battery pack when using your camcorder. Inserting a cassette (p. 25) 1 Slide OPEN/ EJECT in parentheses "( )" for more information. After the cassette compartment goes down completely, close the lid...a tape This chapter introduces you to the basic features to insert the cassette. Open the DC IN jack cover. Quick Start Guide AC power adaptor (supplied) Connect the plug with the window facing up . See the page in the direction of the arrow...
...facing up . 3 Close the cassette compartment by pressing on the cassette compartment. Connecting the power cord (p. 22) Use the battery pack when using your camcorder. Inserting a cassette (p. 25) 1 Slide OPEN/ EJECT in parentheses "( )" for more information. After the cassette compartment goes down completely, close the lid...a tape This chapter introduces you to the basic features to insert the cassette. Open the DC IN jack cover. Quick Start Guide AC power adaptor (supplied) Connect the plug with the window facing up . See the page in the direction of the arrow...

Operating Instructions
Page 9
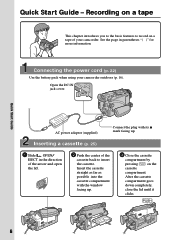
... start playback. The picture appears on the LCD screen (p. 38) 1 Set the POWER switch to CAMERA while pressing the small green button. Your camcorder starts recording. Quick Start Guide Recording a picture (p. 26) 1 Remove the lens cap. 3 Open the LCD panel while pressing OPEN. Monitoring the playback picture on the screen. 2 Set the...
... start playback. The picture appears on the LCD screen (p. 38) 1 Set the POWER switch to CAMERA while pressing the small green button. Your camcorder starts recording. Quick Start Guide Recording a picture (p. 26) 1 Remove the lens cap. 3 Open the LCD panel while pressing OPEN. Monitoring the playback picture on the screen. 2 Set the...
Operating Instructions
Page 10
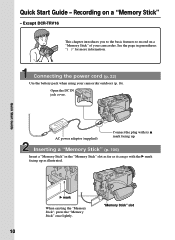
Connecting the power cord (p. 22) Use the battery pack when using your camcorder. B mark When ejecting the "Memory Stick", press the "Memory Stick" once lightly. "Memory Stick" slot 10 Quick Start Guide AC power adaptor (supplied) Connect the plug with the B mark facing up . Inserting a... "Memory Stick" (p. 106) Insert a "Memory Stick" in parentheses "( )" for more information. Except DCR-TRV16 This chapter introduces you to the basic ...
Connecting the power cord (p. 22) Use the battery pack when using your camcorder. B mark When ejecting the "Memory Stick", press the "Memory Stick" once lightly. "Memory Stick" slot 10 Quick Start Guide AC power adaptor (supplied) Connect the plug with the B mark facing up . Inserting a... "Memory Stick" (p. 106) Insert a "Memory Stick" in parentheses "( )" for more information. Except DCR-TRV16 This chapter introduces you to the basic ...

Operating Instructions
Page 11
... and time for a picture, set to MEMORY or VCR while pressing the small green button. LOCK switch POWER VCR OFF(CHG) CAMERA MEMORY Quick Start Guide Viewfinder When the LCD panel is set the clock before recording (p. 23). Adjust the viewfinder lens to select the desired image. If you purchase your... clock setting is closed, use the viewfinder with your eye against the eyecup. PLAY Press MEMORY -/+ to your camcorder by holding the viewfinder, the LCD panel or the battery pack. 11 Recording a still image on a "Memory Stick" (p. 112) 1 Remove the lens cap. 3 Open the ...
... and time for a picture, set to MEMORY or VCR while pressing the small green button. LOCK switch POWER VCR OFF(CHG) CAMERA MEMORY Quick Start Guide Viewfinder When the LCD panel is set the clock before recording (p. 23). Adjust the viewfinder lens to select the desired image. If you purchase your... clock setting is closed, use the viewfinder with your eye against the eyecup. PLAY Press MEMORY -/+ to your camcorder by holding the viewfinder, the LCD panel or the battery pack. 11 Recording a still image on a "Memory Stick" (p. 112) 1 Remove the lens cap. 3 Open the ...
PIXELA ImageMixer 1.0 Manual
Page 4
... program may copy parts thereof for each additional computer. You may not correct, alter, reverse engineer, decompile, or disassemble all usage rights, as the user guide. for backup purposes, with all or part of contract The primary user of this program. You may not allow a third person to PIXELA, Inc.
... program may copy parts thereof for each additional computer. You may not correct, alter, reverse engineer, decompile, or disassemble all usage rights, as the user guide. for backup purposes, with all or part of contract The primary user of this program. You may not allow a third person to PIXELA, Inc.


