Operating Instructions
Page 4
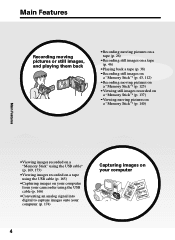
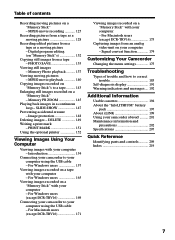
Main Features Recording moving pictures or still images, and playing them back •Recording moving pictures on a tape (p. 26) •Recording still images on a tape (p. 46) •Playing back a tape (p. 38) •Recording still images on a "Memory Stick"* (p. 43, 112) •Recording moving pictures ... (p. 169, 173) •Viewing images recorded on a tape using the USB cable (p. 165) •Capturing images on your computer from your camcorder using the USB cable (p. 166) •Converting an analog signal into digital to capture images onto your computer (p. 174) Capturing images ...
Main Features Recording moving pictures or still images, and playing them back •Recording moving pictures on a tape (p. 26) •Recording still images on a tape (p. 46) •Playing back a tape (p. 38) •Recording still images on a "Memory Stick"* (p. 43, 112) •Recording moving pictures ... (p. 169, 173) •Viewing images recorded on a tape using the USB cable (p. 165) •Capturing images on your computer from your camcorder using the USB cable (p. 166) •Converting an analog signal into digital to capture images onto your computer (p. 174) Capturing images ...
Operating Instructions
Page 5
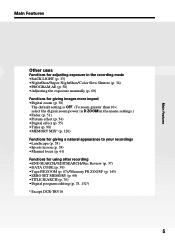
...) •Sports lesson (p. 58) •Manual focus (p. 61) Functions for using after recording •END SEARCH/EDITSEARCH/Rec Review (p. 37) •DATA CODE (p. 39) •Tape PB ZOOM (p. 67)/Memory PB ZOOM* (p. 145) •ZERO SET MEMORY (p. 69) •TITLE SEARCH (p. 70) •Digital program editing (p. 78, 132*) * Except DCR-TRV16 5
...) •Sports lesson (p. 58) •Manual focus (p. 61) Functions for using after recording •END SEARCH/EDITSEARCH/Rec Review (p. 37) •DATA CODE (p. 39) •Tape PB ZOOM (p. 67)/Memory PB ZOOM* (p. 145) •ZERO SET MEMORY (p. 69) •TITLE SEARCH (p. 70) •Digital program editing (p. 78, 132*) * Except DCR-TRV16 5
Operating Instructions
Page 6
... TV 42 Advanced Recording Operations Recording still images on a "Memory Stick" during recording on a tape (except DCR-TRV16 43 Recording still images on a "Memory Stick" - Digital effect ... 55 Using the PROGRAM AE function .... 58 Adjusting the exposure manually ...... 60 Focusing... a recording by date - Frame recording 64 Advanced Playback Operations Playing back tapes with picture effect 65 Playing back tapes with digital effect 66 Enlarging images recorded on a "Memory Stick" (except DCR-TRV16 10 Getting Started Using this manual 12 Checking supplied accessories 15 Step ...
... TV 42 Advanced Recording Operations Recording still images on a "Memory Stick" during recording on a tape (except DCR-TRV16 43 Recording still images on a "Memory Stick" - Digital effect ... 55 Using the PROGRAM AE function .... 58 Adjusting the exposure manually ...... 60 Focusing... a recording by date - Frame recording 64 Advanced Playback Operations Playing back tapes with picture effect 65 Playing back tapes with digital effect 66 Enlarging images recorded on a "Memory Stick" (except DCR-TRV16 10 Getting Started Using this manual 12 Checking supplied accessories 15 Step ...
Operating Instructions
Page 7
...USB cable - Digital program editing (on a "Memory Stick" - Memory PB ZOOM 145 Playing back images in a continuous loop - For Windows users 157 Viewing images recorded on a "Memory Stick" with your computer - Signal convert function 174 Customizing Your Camcorder Changing the ...of contents Recording moving pictures on your computer - PHOTO SAVE 135 Viewing still images - For Windows users (except DCR-TRV16 169 Connecting your camcorder to a tape .......... 143 Enlarging still images recorded on "Memory Stick"s 132 Copying still images from an analog video unit on a...
...USB cable - Digital program editing (on a "Memory Stick" - Memory PB ZOOM 145 Playing back images in a continuous loop - For Windows users 157 Viewing images recorded on a "Memory Stick" with your computer - Signal convert function 174 Customizing Your Camcorder Changing the ...of contents Recording moving pictures on your computer - PHOTO SAVE 135 Viewing still images - For Windows users (except DCR-TRV16 169 Connecting your camcorder to a tape .......... 143 Enlarging still images recorded on "Memory Stick"s 132 Copying still images from an analog video unit on a...
Operating Instructions
Page 8
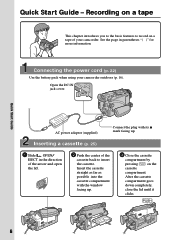
...compartment with its v mark facing up . 3 Close the cassette compartment by pressing on a tape of the cassette back to record on the cassette compartment. Open the DC IN jack cover. Recording on a tape This chapter introduces you to the basic features to insert the cassette. See the page in... the direction of the arrow and open the lid. 2 Push the center of your camcorder outdoors (p. 16). Quick Start Guide -
...compartment with its v mark facing up . 3 Close the cassette compartment by pressing on a tape of the cassette back to record on the cassette compartment. Open the DC IN jack cover. Recording on a tape This chapter introduces you to the basic features to insert the cassette. See the page in... the direction of the arrow and open the lid. 2 Push the center of your camcorder outdoors (p. 16). Quick Start Guide -

Operating Instructions
Page 9
... a picture, set to VCR while pressing the small green button. Monitoring the playback picture on the screen. 2 Set the POWER switch to your camcorder by holding the viewfinder, the LCD panel, or the battery pack. 9 POWER VCR OFF(CHG) CAMERA MEMORY 2 Press m to start playback....Viewfinder When the LCD panel is set the clock before recording (p. 23). REW 3 Press N to rewind the tape. To stop recording, press START/STOP again. If you purchase your camcorder, the clock setting is closed, use the viewfinder with your eye against the eyecup. Quick Start Guide Recording a...
... a picture, set to VCR while pressing the small green button. Monitoring the playback picture on the screen. 2 Set the POWER switch to your camcorder by holding the viewfinder, the LCD panel, or the battery pack. 9 POWER VCR OFF(CHG) CAMERA MEMORY 2 Press m to start playback....Viewfinder When the LCD panel is set the clock before recording (p. 23). REW 3 Press N to rewind the tape. To stop recording, press START/STOP again. If you purchase your camcorder, the clock setting is closed, use the viewfinder with your eye against the eyecup. Quick Start Guide Recording a...

Operating Instructions
Page 13
... different operations depending on a TV, you use a tape with the cassette memory are marked by (Cassette Memory). Labeling a cassette (p. 103) For details of cassette types, see this manual Note on Cassette Memory Your camcorder is based on the country or region. Note on ...title (p. 98) - You see page 194. Cassettes with cassette memory. To view your camcorder. You can operate only with cassette memory . DATE SEARCH (p. 71) - Copyright precautions Television programs, films, video tapes, and other materials may be copyrighted. END SEARCH (p. 37) - We recommend that are ...
... different operations depending on a TV, you use a tape with the cassette memory are marked by (Cassette Memory). Labeling a cassette (p. 103) For details of cassette types, see this manual Note on Cassette Memory Your camcorder is based on the country or region. Note on ...title (p. 98) - You see page 194. Cassettes with cassette memory. To view your camcorder. You can operate only with cassette memory . DATE SEARCH (p. 71) - Copyright precautions Television programs, films, video tapes, and other materials may be copyrighted. END SEARCH (p. 37) - We recommend that are ...

Operating Instructions
Page 24
Note on a 12-hour cycle. •12:00 AM stands for midnight. •12:00 PM stands for noon. 24 Step 2 Setting the date and time The year changes as follows: 1995 T t 2002 T t 2079 If you do not set the date and time and are recorded on the data code of your camcorder operates on the time indicator The internal clock of the tape and the "Memory Stick" (except DCR-TRV16).
Note on a 12-hour cycle. •12:00 AM stands for midnight. •12:00 PM stands for noon. 24 Step 2 Setting the date and time The year changes as follows: 1995 T t 2002 T t 2079 If you do not set the date and time and are recorded on the data code of your camcorder operates on the time indicator The internal clock of the tape and the "Memory Stick" (except DCR-TRV16).
Operating Instructions
Page 26
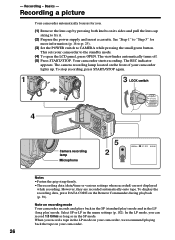
... See "Step 1" to "Step 3" for you can record 1.5 times as long as in the LP mode on your camcorder, we recommend playing back the tape on your camcorder lights up. The REC indicator appears. Note on its sides and pull the lens cap string to fix it. (2) Prepare...8226;The recording data (date/time or various settings when recorded) are recorded automatically onto tape. The camera recording lamp located on the Remote Commander during playback (p. 39). Basics - This sets your camcorder to CAMERA while pressing the small green button. The viewfinder automatically turns off. (5) Press ...
... See "Step 1" to "Step 3" for you can record 1.5 times as long as in the LP mode on your camcorder, we recommend playing back the tape on your camcorder lights up. The REC indicator appears. Note on its sides and pull the lens cap string to fix it. (2) Prepare...8226;The recording data (date/time or various settings when recorded) are recorded automatically onto tape. The camera recording lamp located on the Remote Commander during playback (p. 39). Basics - This sets your camcorder to CAMERA while pressing the small green button. The viewfinder automatically turns off. (5) Press ...
Operating Instructions
Page 27
Basics Recording a picture Note on one tape or you record in the LP mode on the LOCK switch (except DCR-TRV16) When you slide the LOCK ... then back to prevent battery and tape wear. To start recording, press the START/STOP button again without switching the POWER switch. When you leave your camcorder in the standby mode for five ... cassette. (4) Remove the battery pack. 27 To enable smooth transition Transition between scenes. However, your camcorder. When you turn off your camcorder does not turn off . After recording (1) Set the POWER switch to OFF (CHG). - Recording ...
Basics Recording a picture Note on one tape or you record in the LP mode on the LOCK switch (except DCR-TRV16) When you slide the LOCK ... then back to prevent battery and tape wear. To start recording, press the START/STOP button again without switching the POWER switch. When you leave your camcorder in the standby mode for five ... cassette. (4) Remove the battery pack. 27 To enable smooth transition Transition between scenes. However, your camcorder. When you turn off your camcorder does not turn off . After recording (1) Set the POWER switch to OFF (CHG). - Recording ...

Operating Instructions
Page 32
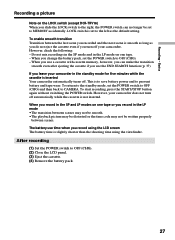
... displayed while recording. The indicator may not be displayed. However, they are recording. Remaining tape indicator The indicator may not be correct, depending on . When you are recorded automatically onto tape. Date The date is turned on the conditions in which you close the LCD panel and... appears when using a cassette with cassette memory. Recording mode STBY/REC 50min REC 0:00:01 45min Time code/Tape counter JUL 4 2002 12:05:56 AM Remaining tape This appears after the power is displayed about five seconds after you insert a cassette and record or play back...
... displayed while recording. The indicator may not be displayed. However, they are recording. Remaining tape indicator The indicator may not be correct, depending on . When you are recorded automatically onto tape. Date The date is turned on the conditions in which you close the LCD panel and... appears when using a cassette with cassette memory. Recording mode STBY/REC 50min REC 0:00:01 45min Time code/Tape counter JUL 4 2002 12:05:56 AM Remaining tape This appears after the power is displayed about five seconds after you insert a cassette and record or play back...
Operating Instructions
Page 35
Recording - Basics Recording a picture Notes •Do not use the NightShot mode in the tape recording or standby mode (except DCR-TRV16). Exposure - Digital effect - Recording still images on a "Memory Stick" in bright places (e.g. Super NightShot ...DCR-TRV16), you cannot use the following functions: - PROGRAM AE - Digital effect - At this time, the motion of the picture may not work normally. 35 The maximum shooting distance using Super NightShot or Color Slow Shutter The shutter speed is about 3 m (10 feet). Exposure - PROGRAM AE - This may cause your camcorder...
Recording - Basics Recording a picture Notes •Do not use the NightShot mode in the tape recording or standby mode (except DCR-TRV16). Exposure - Digital effect - Recording still images on a "Memory Stick" in bright places (e.g. Super NightShot ...DCR-TRV16), you cannot use the following functions: - PROGRAM AE - Digital effect - At this time, the motion of the picture may not work normally. 35 The maximum shooting distance using Super NightShot or Color Slow Shutter The shutter speed is about 3 m (10 feet). Exposure - PROGRAM AE - This may cause your camcorder...
Operating Instructions
Page 37
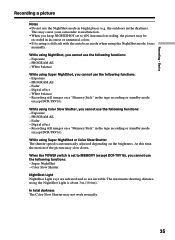
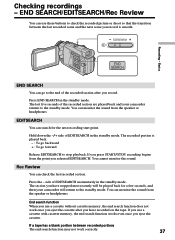
... memory, the end search function does not work correctly. 37 Checking recordings - side of the recorded section are played back and your camcorder will be played back for the next recording start point. If you use these buttons to the standby mode. The last five seconds ... after you eject the cassette. Press END SEARCH in the standby mode. If a tape has a blank portion between the last recorded scene and the next scene you have recorded on the tape. EDITSEARCH Recording - END SEARCH/EDITSEARCH/Rec Review You can go forward Release EDITSEARCH to...
... memory, the end search function does not work correctly. 37 Checking recordings - side of the recorded section are played back and your camcorder will be played back for the next recording start point. If you use these buttons to the standby mode. The last five seconds ... after you eject the cassette. Press END SEARCH in the standby mode. If a tape has a blank portion between the last recorded scene and the next scene you have recorded on the tape. EDITSEARCH Recording - END SEARCH/EDITSEARCH/Rec Review You can go forward Release EDITSEARCH to...

Operating Instructions
Page 38
.... - : To turn the volume down + : To turn the LCD panel over and move it back to the camcorder body with your camcorder. (1) Prepare the power supply and insert the recorded tape. (2) Set the POWER switch to VCR while pressing the small green button. (3) Open the LCD panel while pressing OPEN.... (4) Press m to rewind the tape. (5) Press N to start playback. (6) To adjust the volume, press either of the two buttons on for a long time Your camcorder gets warm. - You can control playback using the Remote Commander supplied with the LCD screen...
.... - : To turn the volume down + : To turn the LCD panel over and move it back to the camcorder body with your camcorder. (1) Prepare the power supply and insert the recorded tape. (2) Set the POWER switch to VCR while pressing the small green button. (3) Open the LCD panel while pressing OPEN.... (4) Press m to rewind the tape. (5) Press N to start playback. (6) To adjust the volume, press either of the two buttons on for a long time Your camcorder gets warm. - You can control playback using the Remote Commander supplied with the LCD screen...

Operating Instructions
Page 39
... recording data, including date/time and various settings on the tape (data code). 1 Set the POWER switch to DATE in the menu settings (p. 184). The indicators appear on the Remote Commander. In addition to images, your camcorder or the Remote Commander. The display changes as follows when ...you press DATA CODE on the Remote Commander: date/time y no indicator Date/time 50min 0:00:23:01 JUL 4 2002 12:05:56 PM [a] Tape counter [b] SteadyShot OFF [c] Exposure mode [d] ...
... recording data, including date/time and various settings on the tape (data code). 1 Set the POWER switch to DATE in the menu settings (p. 184). The indicators appear on the Remote Commander. In addition to images, your camcorder or the Remote Commander. The display changes as follows when ...you press DATA CODE on the Remote Commander: date/time y no indicator Date/time 50min 0:00:23:01 JUL 4 2002 12:05:56 PM [a] Tape counter [b] SteadyShot OFF [c] Exposure mode [d] ...

Operating Instructions
Page 40
...40 The indicator may not be correct, depending on the conditions in the stop mode. To advance the tape Press M in which you are your camcorder's information when you connect your camcorder to the TV. To change the playback direction Press on the Remote Commander. To resume normal playback, press... battery time to VCR. To locate a scene monitoring the picture (picture search) Keep pressing m or M during playback. The tape was recorded by a camcorder without the date and time set the POWER switch to be displayed. Data code The data code is displayed on the Remote Commander...
...40 The indicator may not be correct, depending on the conditions in the stop mode. To advance the tape Press M in which you are your camcorder's information when you connect your camcorder to the TV. To change the playback direction Press on the Remote Commander. To resume normal playback, press... battery time to VCR. To locate a scene monitoring the picture (picture search) Keep pressing m or M during playback. The tape was recorded by a camcorder without the date and time set the POWER switch to be displayed. Data code The data code is displayed on the Remote Commander...

Operating Instructions
Page 41
... during playback. In the various playback modes •Sound is not a malfunction. 41 However, this function does not work for five minutes Your camcorder automatically enters the stop mode. For double speed playback in the stop mode. To resume normal playback, press N. When you play back... on the Remote Commander. Playback - When the playback pause mode lasts for an output signal through the DV IN/OUT jack. Basics Playing back a tape To view pictures at the center, or the top and bottom of the recorded portion plays back and stops. The last five seconds of the...
... during playback. In the various playback modes •Sound is not a malfunction. 41 However, this function does not work for five minutes Your camcorder automatically enters the stop mode. For double speed playback in the stop mode. To resume normal playback, press N. When you play back... on the Remote Commander. Playback - When the playback pause mode lasts for an output signal through the DV IN/OUT jack. Basics Playing back a tape To view pictures at the center, or the top and bottom of the recorded portion plays back and stops. The last five seconds of the...

Operating Instructions
Page 43
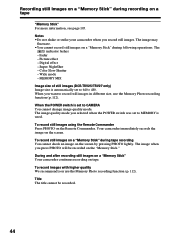
Before operation •Insert a "Memory Stick" into your camcorder (p. 106). •Set PHOTO REC in to MEMORY in the tape recording or standby mode. Recording is MEMORY.) (1) In the standby mode, keep pressing PHOTO lightly until a still image appears. Recording still ... settings. (The default setting is complete when the bar scroll indicator disappears. Advanced Recording Operations - Except DCR-TRV16 You can record still images on a tape (p. 46). You can be recorded on a tape - To change the still image, release PHOTO, select a still image again, and then press and hold...
Before operation •Insert a "Memory Stick" into your camcorder (p. 106). •Set PHOTO REC in to MEMORY in the tape recording or standby mode. Recording is MEMORY.) (1) In the standby mode, keep pressing PHOTO lightly until a still image appears. Recording still ... settings. (The default setting is complete when the bar scroll indicator disappears. Advanced Recording Operations - Except DCR-TRV16 You can record still images on a tape (p. 46). You can be recorded on a tape - To change the still image, release PHOTO, select a still image again, and then press and hold...
Operating Instructions
Page 44
... during following operations. MEMORY MIX Image size of still images (DCR-TRV25/TRV27 only) Image size is automatically set to 640 × 480. During and after recording still images on a "Memory Stick" Your camcorder continues recording on the screen. Title The title cannot be recorded...is set to CAMERA You cannot change image quality mode. Fader - Digital effect - The indicator fashes: - The image quality mode you record still images. Wide mode - Your camcorder immediately records the image on tape. The image when you press PHOTO will be recorded. 44 Super ...
... during following operations. MEMORY MIX Image size of still images (DCR-TRV25/TRV27 only) Image size is automatically set to 640 × 480. During and after recording still images on a "Memory Stick" Your camcorder continues recording on the screen. Title The title cannot be recorded...is set to CAMERA You cannot change image quality mode. Fader - Digital effect - The indicator fashes: - The image quality mode you record still images. Wide mode - Your camcorder immediately records the image on tape. The image when you press PHOTO will be recorded. 44 Super ...
Operating Instructions
Page 45
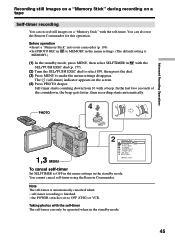
... RETURN [MENU] : END To cancel self-timer Set SELFTIMER to OFF (CHG) or VCR. Before operation •Insert a "Memory Stick" into your camcorder (p. 106). •Set PHOTO REC in to MEMORY in the menu settings. (The default setting is set to OFF in the menu settings in the...can record still images on a "Memory Stick" with the self-timer. Advanced Recording Operations Recording still images on a "Memory Stick" during recording on a tape Self-timer recording You can only be operated when in the standby mode. 45 PHOTO 4 PHOTO 1,3 MENU 2 CAMERA SET SELFTIMER OFF D ZOOM ON PHOTO...
... RETURN [MENU] : END To cancel self-timer Set SELFTIMER to OFF (CHG) or VCR. Before operation •Insert a "Memory Stick" into your camcorder (p. 106). •Set PHOTO REC in to MEMORY in the menu settings. (The default setting is set to OFF in the menu settings in the...can record still images on a "Memory Stick" with the self-timer. Advanced Recording Operations Recording still images on a "Memory Stick" during recording on a tape Self-timer recording You can only be operated when in the standby mode. 45 PHOTO 4 PHOTO 1,3 MENU 2 CAMERA SET SELFTIMER OFF D ZOOM ON PHOTO...


