
Operating Instructions
Page 13
...has a cassette memory are marked by (Cassette Memory). Getting Started Using this mark in the introduction of features that you use only mini DV cassettes with cassette memory. DATE SEARCH (p. 71) - We recommend that are : - Functions that you can use a tape with cassette ... other materials may be copyrighted. Unauthorized recording of cassette types, see this manual Note on Cassette Memory Your camcorder is based on the country or region. To view your camcorder. Superimposing a title (p. 98) - END SEARCH (p. 37) - You can operate only with cassette memory are :...
...has a cassette memory are marked by (Cassette Memory). Getting Started Using this mark in the introduction of features that you use only mini DV cassettes with cassette memory. DATE SEARCH (p. 71) - We recommend that are : - Functions that you can use a tape with cassette ... other materials may be copyrighted. Unauthorized recording of cassette types, see this manual Note on Cassette Memory Your camcorder is based on the country or region. To view your camcorder. Superimposing a title (p. 98) - END SEARCH (p. 37) - You can operate only with cassette memory are :...

Operating Instructions
Page 41
... pause mode. For double speed playback in the reverse direction, press , then press ×2 on your camcorder. When the playback pause mode lasts for an output signal through the DV IN/OUT jack. When you play back a tape in the reverse direction, press c. To view pictures frame... playback modes •Sound is not a malfunction. 41 To resume playback, press N. However, this function does not work for five minutes Your camcorder automatically enters the stop mode. To resume normal playback, press N. The last five seconds of the screen. To resume normal playback, press N. ...
... pause mode. For double speed playback in the reverse direction, press , then press ×2 on your camcorder. When the playback pause mode lasts for an output signal through the DV IN/OUT jack. When you play back a tape in the reverse direction, press c. To view pictures frame... playback modes •Sound is not a malfunction. 41 To resume playback, press N. However, this function does not work for five minutes Your camcorder automatically enters the stop mode. To resume normal playback, press N. The last five seconds of the screen. To resume normal playback, press N. ...
Operating Instructions
Page 42
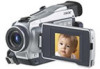
...to the audio input jack on the VCR or the TV. If you power your TV or VCR is already connected to a VCR Connect your camcorder to the LINE IN input on the VCR by using the AC power adaptor (p. 22). When monitoring playback pictures on the TV screen, we ...TV screen. You can be reproduced more faithfully by using the A/V connecting cable supplied with your TV. This connection produces higher quality DV format pictures. Then press DISPLAY on your camcorder again. 42 Open the jack cover. Then, set the TV/VCR selector on the screen. Viewing the recording on TV Connect...
...to the audio input jack on the VCR or the TV. If you power your TV or VCR is already connected to a VCR Connect your camcorder to the LINE IN input on the VCR by using the AC power adaptor (p. 22). When monitoring playback pictures on the TV screen, we ...TV screen. You can be reproduced more faithfully by using the A/V connecting cable supplied with your TV. This connection produces higher quality DV format pictures. Then press DISPLAY on your camcorder again. 42 Open the jack cover. Then, set the TV/VCR selector on the screen. Viewing the recording on TV Connect...

Operating Instructions
Page 65
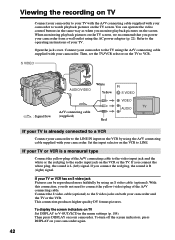
...playing back The picture effect function is automatically canceled. 65 When you have processed using the picture effect function, record images on a "Memory Stick" (except DCR-TRV16) (p. 117, 128), or on a VCR using the following picture effect functions: NEG. ART, SEPIA, B&W and SOLARIZE. (1) In the playback...8226;To record images that you set the POWER switch to OFF in with picture effect During playback, you can process a scene using your camcorder as a player. Playing back tapes with the SEL/PUSH EXEC dial (p. 176). (2) Select the desired mode by the picture effect function ...
...playing back The picture effect function is automatically canceled. 65 When you have processed using the picture effect function, record images on a "Memory Stick" (except DCR-TRV16) (p. 117, 128), or on a VCR using the following picture effect functions: NEG. ART, SEPIA, B&W and SOLARIZE. (1) In the playback...8226;To record images that you set the POWER switch to OFF in with picture effect During playback, you can process a scene using your camcorder as a player. Playing back tapes with the SEL/PUSH EXEC dial (p. 176). (2) Select the desired mode by the picture effect function ...
Operating Instructions
Page 66
...cannot process externally input scenes using your camcorder as a still image. (3) Turn the SEL/PUSH EXEC dial to adjust the effect, then press the dial. Pictures processed by digital effect functions •Pictures processed by digital effect functions are not output through the DV IN/ OUT jack. •You... memory as a player. mode, the image where you have processed the image using the digital effect function, record images on a "Memory Stick" (except DCR-TRV16) (p. 117, 128), or on a VCR using digital effect functions. •To record images that you press the SEL/PUSH EXEC dial is ...
...cannot process externally input scenes using your camcorder as a still image. (3) Turn the SEL/PUSH EXEC dial to adjust the effect, then press the dial. Pictures processed by digital effect functions •Pictures processed by digital effect functions are not output through the DV IN/ OUT jack. •You... memory as a player. mode, the image where you have processed the image using the digital effect function, record images on a "Memory Stick" (except DCR-TRV16) (p. 117, 128), or on a VCR using digital effect functions. •To record images that you press the SEL/PUSH EXEC dial is ...

Operating Instructions
Page 68
Stop playback - Tape PB ZOOM Pictures in the PB ZOOM Pictures in the PB ZOOM mode are not output through the DV IN/OUT jack and the (USB) jack. Display the menu settings - Set the POWER switch to OFF (CHG) - Enlarging images recorded on a tape - Insert a "Memory Stick" (except DCR-TRV16) 68 The PB ZOOM function is automatically canceled when you execute the following functions: -
Stop playback - Tape PB ZOOM Pictures in the PB ZOOM Pictures in the PB ZOOM mode are not output through the DV IN/OUT jack and the (USB) jack. Display the menu settings - Set the POWER switch to OFF (CHG) - Enlarging images recorded on a tape - Insert a "Memory Stick" (except DCR-TRV16) 68 The PB ZOOM function is automatically canceled when you execute the following functions: -

Operating Instructions
Page 75
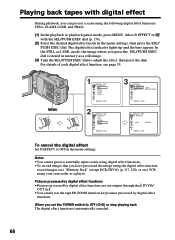
... to the VCR using your camcorder as a player. Before operation •Set DISPLAY in the menu settings. (The defalt setting is LCD.) •Press the following systems: 8 mm, Hi8, VHS, S-VHS, VHSC, S-VHSC, Betamax, ED Betamax, mini DV, DV, Digital8, MICRO MV 75... Editing - Refer to the operating instructions of the VCR. (3) Set the POWER switch to VCR on your camcorder. (4) Play back the recorded tape on your camcorder. (5) Start recording on the Remote Commander (1) Insert a blank...
... to the VCR using your camcorder as a player. Before operation •Set DISPLAY in the menu settings. (The defalt setting is LCD.) •Press the following systems: 8 mm, Hi8, VHS, S-VHS, VHSC, S-VHSC, Betamax, ED Betamax, mini DV, DV, Digital8, MICRO MV 75... Editing - Refer to the operating instructions of the VCR. (3) Set the POWER switch to VCR on your camcorder. (4) Play back the recorded tape on your camcorder. (5) Start recording on the Remote Commander (1) Insert a blank...
Operating Instructions
Page 76
... input selector to the operating instructions of your camcorder and the VCR. With a digital-to-digital connection, video and audio signals are transmitted in digital form for recording. This connection produces higher quality DV format pictures. Set the input selector on the "Memory Stick" index screen (except DCR-TRV16). If your VCR has an S video jack...
... input selector to the operating instructions of your camcorder and the VCR. With a digital-to-digital connection, video and audio signals are transmitted in digital form for recording. This connection produces higher quality DV format pictures. Set the input selector on the "Memory Stick" index screen (except DCR-TRV16). If your VCR has an S video jack...

Operating Instructions
Page 77
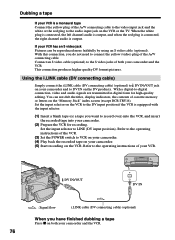
Editing Dubbing a tape You can connect one VCR only using other video equipment, the picture may jitter. 77 Pictures processed by the picture effect, the digital effect or PB ZOOM function Pictures processed by the picture effect, the digital effect or PB ZOOM function are not output through the DV IN/OUT jack. If you play back the picture using the i.LINK cable (DV connecting cable) See page 199 for more information about i.LINK. Also, when you record a playback pause picture with the DV IN/OUT jack The recorded picture becomes rough.
Editing Dubbing a tape You can connect one VCR only using other video equipment, the picture may jitter. 77 Pictures processed by the picture effect, the digital effect or PB ZOOM function Pictures processed by the picture effect, the digital effect or PB ZOOM function are not output through the DV IN/OUT jack. If you play back the picture using the i.LINK cable (DV connecting cable) See page 199 for more information about i.LINK. Also, when you record a playback pause picture with the DV IN/OUT jack The recorded picture becomes rough.
Operating Instructions
Page 78
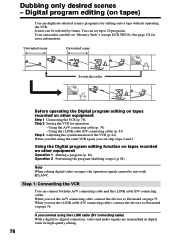
...on tapes) You can be sent with LANC. Digital program editing (on page 75. Step 2 Setting the VCR for more information. When you dub using the i.LINK cable (DV connecting cable) With a digital-to 20 programs. Your camcorder can connect both the A/V connecting cable and ...the i.LINK cable (DV connecting cable). Using the Digital program editing function on tapes recorded on "Memory Stick"s (except DCR-TRV16). Step 1: Connecting the VCR...
...on tapes) You can be sent with LANC. Digital program editing (on page 75. Step 2 Setting the VCR for more information. When you dub using the i.LINK cable (DV connecting cable) With a digital-to 20 programs. Your camcorder can connect both the A/V connecting cable and ...the i.LINK cable (DV connecting cable). Using the Digital program editing function on tapes recorded on "Memory Stick"s (except DCR-TRV16). Step 1: Connecting the VCR...
Operating Instructions
Page 83
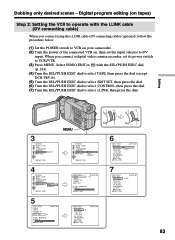
When you connect using the i.LINK cable (DV connecting cable) (optional), follow the procedure below. (1) Set the POWER switch to VCR on your camcorder. (2) Turn the power of the connected VCR on, then ... - Digital program editing (on tapes) Step 2: Setting the VCR to operate with the SEL/PUSH EXEC dial (p. 184). (4) Turn the SEL/PUSH EXEC dial to select TAPE, then press the dial (except DCR-TRV16)....: END 83 Select VIDEO EDIT in with the i.LINK cable (DV connecting cable) When you connect a digital video camera recorder, set the input selector to select i.LINK, then press the dial.
When you connect using the i.LINK cable (DV connecting cable) (optional), follow the procedure below. (1) Set the POWER switch to VCR on your camcorder. (2) Turn the power of the connected VCR on, then ... - Digital program editing (on tapes) Step 2: Setting the VCR to operate with the SEL/PUSH EXEC dial (p. 184). (4) Turn the SEL/PUSH EXEC dial to select TAPE, then press the dial (except DCR-TRV16)....: END 83 Select VIDEO EDIT in with the i.LINK cable (DV connecting cable) When you connect a digital video camera recorder, set the input selector to select i.LINK, then press the dial.

Operating Instructions
Page 84
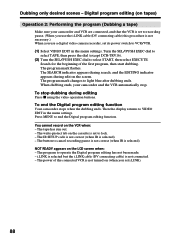
Digital program editing (on tapes) When you do not need to set . (10) Turn the SEL/PUSH EXEC dial to select RETURN, then press the dial. 84 Before operation, eject a cassette from your camcorder. (1) Insert a blank tape (or a tape you select i.LINK in the VCR, then start position for...(4) Rewind the tape in CONTROL, you connect using the i.LINK cable (DV connecting cable) •You cannot dub the titles, display indicators. •You may not be able to select the average number value of your camcorder. Dubbing only desired scenes - The EXECUTING indicator flashes on the VCR. ...
Digital program editing (on tapes) When you do not need to set . (10) Turn the SEL/PUSH EXEC dial to select RETURN, then press the dial. 84 Before operation, eject a cassette from your camcorder. (1) Insert a blank tape (or a tape you select i.LINK in the VCR, then start position for...(4) Rewind the tape in CONTROL, you connect using the i.LINK cable (DV connecting cable) •You cannot dub the titles, display indicators. •You may not be able to select the average number value of your camcorder. Dubbing only desired scenes - The EXECUTING indicator flashes on the VCR. ...

Operating Instructions
Page 85
Video and audio are sent by digital signals. 85 Editing Dubbing only desired scenes - Keep the i.LINK connection and set CONTROL to adjust the syncronization is recorded for about 10 seconds' lead before starting recording. •When you connect with the i.LINK cable (DV connecting cable), you complete step 3, the image used to... ADJ TEST "CUT-IN" "CUT-OUT" IR SETUP PAUSEMODE IR TEST RETURN [MENU] : END 0:08:55:06 0 Notes •When you may not record properly. Digital program editing (on the VCR.
Video and audio are sent by digital signals. 85 Editing Dubbing only desired scenes - Keep the i.LINK connection and set CONTROL to adjust the syncronization is recorded for about 10 seconds' lead before starting recording. •When you connect with the i.LINK cable (DV connecting cable), you complete step 3, the image used to... ADJ TEST "CUT-IN" "CUT-OUT" IR SETUP PAUSEMODE IR TEST RETURN [MENU] : END 0:08:55:06 0 Notes •When you may not record properly. Digital program editing (on the VCR.
Operating Instructions
Page 88
...select START, then select EXECUTE. Turn the SEL/PUSH EXEC dial to select TAPE, then press the dial (except DCR-TRV16). (2) Turn the SEL/PUSH EXEC dial to operate the Digital program editing has not been made. - Search for the beginning of the connected VCR is selected). The program mark... EDIT in the menu settings. i.LINK is selected but the i.LINK cable (DV connecting cable) is selected). - When dubbing ends, your camcorder and VCR are connected, and that the VCR is set to recording pause. (When you use a digital video camera recorder, set i.LINK). 88 The power of the first program,...
...select START, then select EXECUTE. Turn the SEL/PUSH EXEC dial to select TAPE, then press the dial (except DCR-TRV16). (2) Turn the SEL/PUSH EXEC dial to operate the Digital program editing has not been made. - Search for the beginning of the connected VCR is selected). The program mark... EDIT in the menu settings. i.LINK is selected but the i.LINK cable (DV connecting cable) is selected). - When dubbing ends, your camcorder and VCR are connected, and that the VCR is set to recording pause. (When you use a digital video camera recorder, set i.LINK). 88 The power of the first program,...

Operating Instructions
Page 90
With this connection, you do not need to the S video jacks of both your camcorder and the TV or VCR. This connection produces higher quality DV format pictures. 90 Recording video or TV programs If your VCR or TV is recorded. When the white plug is connected, the left channel audio ...
With this connection, you do not need to the S video jacks of both your camcorder and the TV or VCR. This connection produces higher quality DV format pictures. 90 Recording video or TV programs If your VCR or TV is recorded. When the white plug is connected, the left channel audio ...

Operating Instructions
Page 91
...can connect one VCR only using your camcorder. (4) Press N on your camcorder, the picture may appear on the screen. Before recording Make sure that the DV IN indicator appears on both equipment. 91 When you dub a picture in digital form for high-quality editing. (1) ...camcorder, then immediately press X on the VCR to start recording from. 3 REC PAUSE DV IN/OUT Editing DV DV OUT : Signal flow i.LINK cable (DV connecting cable) (optional) When you record the playback paused picture with the DV IN/OUT jack The recorded picture becomes rough. With a digital-to-digital...
...can connect one VCR only using your camcorder. (4) Press N on your camcorder, the picture may appear on the screen. Before recording Make sure that the DV IN indicator appears on both equipment. 91 When you dub a picture in digital form for high-quality editing. (1) ...camcorder, then immediately press X on the VCR to start recording from. 3 REC PAUSE DV IN/OUT Editing DV DV OUT : Signal flow i.LINK cable (DV connecting cable) (optional) When you record the playback paused picture with the DV IN/OUT jack The recorded picture becomes rough. With a digital-to-digital...

Operating Instructions
Page 96
... dial (p. 178). Then follow the procedure below. (1) Insert the recorded tape into your camcorder. (2) Set the POWER switch to VCR on your camcorder to your camcorder at the point where ZERO SET MEMORY was pressed. VCR SET HiFi SOUND AUDIO MI X A / V DV OUT ST1 ST2 RETURN [MENU] : END (3) Turn the SEL/PUSH EXEC dial...
... dial (p. 178). Then follow the procedure below. (1) Insert the recorded tape into your camcorder. (2) Set the POWER switch to VCR on your camcorder to your camcorder at the point where ZERO SET MEMORY was pressed. VCR SET HiFi SOUND AUDIO MI X A / V DV OUT ST1 ST2 RETURN [MENU] : END (3) Turn the SEL/PUSH EXEC dial...

Operating Instructions
Page 97
... add audio on a tape. We recommend that you set the write-protect tab of the tape. If you add audio on a tape recorded with another camcorder, the sound quality may become worse. Editing Audio dubbing Notes • New audio cannot be recorded on a tape already recorded in the 16-bit mode....1 kHz or 48 kHz). • New audio cannot be recorded on a tape already recorded in the LP mode. • You cannot add audio with the DV IN/OUT jack. • You cannot add audio on the blank portion of the cassette to lock You cannot record on a tape recorded with your...
... add audio on a tape. We recommend that you set the write-protect tab of the tape. If you add audio on a tape recorded with another camcorder, the sound quality may become worse. Editing Audio dubbing Notes • New audio cannot be recorded on a tape already recorded in the 16-bit mode....1 kHz or 48 kHz). • New audio cannot be recorded on a tape already recorded in the LP mode. • You cannot add audio with the DV IN/OUT jack. • You cannot add audio on the blank portion of the cassette to lock You cannot record on a tape recorded with your...

Operating Instructions
Page 99
... choices for a LARGE size. If the tape has a blank portion You cannot superimpose a title on the portion. Titles superimposed with your camcorder •Titles are displayed by only the DV format video equipment with an index titler function. •The point you have up to about 20 titles, with each comprising five...
... choices for a LARGE size. If the tape has a blank portion You cannot superimpose a title on the portion. Titles superimposed with your camcorder •Titles are displayed by only the DV format video equipment with an index titler function. •The point you have up to about 20 titles, with each comprising five...

Operating Instructions
Page 119
When recording on a tape that are distorted due to poor radio wave reception when a TV tuner unit is displayed. - Recording an image from a tape as a still image Using the i.LINK cable (DV connecting cable) DV IN/OUT DV DV OUT : Signal flow i.LINK cable (DV connecting cable) (optional) Note In the following instances, recording is interrupted or " REC ERROR" is in a poor recording state, for example, on a tape in use "Memory Stick" Operations 119 When attempting to input images that has been repeatedly used for dubbing -
When recording on a tape that are distorted due to poor radio wave reception when a TV tuner unit is displayed. - Recording an image from a tape as a still image Using the i.LINK cable (DV connecting cable) DV IN/OUT DV DV OUT : Signal flow i.LINK cable (DV connecting cable) (optional) Note In the following instances, recording is interrupted or " REC ERROR" is in a poor recording state, for example, on a tape in use "Memory Stick" Operations 119 When attempting to input images that has been repeatedly used for dubbing -

