Operating Instructions (primary manual)
Page 2
Congratulations on your purchase of Conformity Trade Name: SONY Model No.: DCR-TRV15, DCR-TRV17 Responsible Party:Sony Electronics Inc. You will soon be producing home video that may cause undesired operation. For customers in the sun or under direct sunlight. LITHIUM ION BATTERY...Sony Service Center or Factory Service Center. "Memory Stick" This device complies with Part 15 of uninsulated "dangerous voltage" within the product's enclosure that may call : Sony Customer Information Center 1-800-222-SONY (7669) The number below is intended to alert the user to use. Your Digital...
Congratulations on your purchase of Conformity Trade Name: SONY Model No.: DCR-TRV15, DCR-TRV17 Responsible Party:Sony Electronics Inc. You will soon be producing home video that may cause undesired operation. For customers in the sun or under direct sunlight. LITHIUM ION BATTERY...Sony Service Center or Factory Service Center. "Memory Stick" This device complies with Part 15 of uninsulated "dangerous voltage" within the product's enclosure that may call : Sony Customer Information Center 1-800-222-SONY (7669) The number below is intended to alert the user to use. Your Digital...

Operating Instructions (primary manual)
Page 3
Increase the separation between the equipment and receiver. - "Memory Stick" This Class B digital apparatus complies with the limits for help. Connect the equipment into an outlet on a circuit different from that interference will not occur in a particular installation. ... FCC Rules. For customers in a residential installation. These limits are designed to radio communications. Consult the dealer or an experienced radio/ TV technician for a Class B digital device, pursuant to Part 15 of the following measures: -
Increase the separation between the equipment and receiver. - "Memory Stick" This Class B digital apparatus complies with the limits for help. Connect the equipment into an outlet on a circuit different from that interference will not occur in a particular installation. ... FCC Rules. For customers in a residential installation. These limits are designed to radio communications. Consult the dealer or an experienced radio/ TV technician for a Class B digital device, pursuant to Part 15 of the following measures: -
Operating Instructions (primary manual)
Page 4
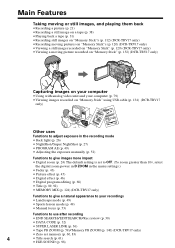
... video unit and your computer (p. 79) •Viewing images recorded on "Memory Stick" using USB cable (p. 134) (DCR-TRV17 only) Other uses Functions to adjust exposure in the recording mode • Back light (p. 26) • NightShot/Super NightShot (p. 27) • PROGRAM AE (p. 49) • Adjusting the exposure manually (p. 52) Functions to give images more impact • Digital...
... video unit and your computer (p. 79) •Viewing images recorded on "Memory Stick" using USB cable (p. 134) (DCR-TRV17 only) Other uses Functions to adjust exposure in the recording mode • Back light (p. 26) • NightShot/Super NightShot (p. 27) • PROGRAM AE (p. 49) • Adjusting the exposure manually (p. 52) Functions to give images more impact • Digital...
Operating Instructions (primary manual)
Page 5
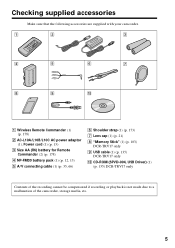
... battery pack (1) (p. 12, 13) 5 A/V connecting cable (1) (p. 35, 66) 6 Shoulder strap (1) (p. 173) 7 Lens cap (1) (p. 21) 8 "Memory Stick" (1) (p. 103) DCR-TRV17 only 9 USB cable (1) (p. 135) DCR-TRV17 only 0 CD-ROM (SPVD-004, USB Driver) (1) (p. 135) DCR-TRV17 only Contents of the recording cannot be compensated if recording or playback is not made due to a malfunction of the camcorder, storage media, etc. 5
... battery pack (1) (p. 12, 13) 5 A/V connecting cable (1) (p. 35, 66) 6 Shoulder strap (1) (p. 173) 7 Lens cap (1) (p. 21) 8 "Memory Stick" (1) (p. 103) DCR-TRV17 only 9 USB cable (1) (p. 135) DCR-TRV17 only 0 CD-ROM (SPVD-004, USB Driver) (1) (p. 135) DCR-TRV17 only Contents of the recording cannot be compensated if recording or playback is not made due to a malfunction of the camcorder, storage media, etc. 5

Operating Instructions (primary manual)
Page 6
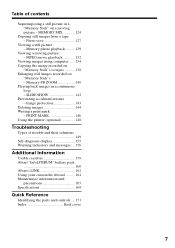
... - Title search 61 Searching a recording by frame recording - Date search 62 Searching for a photo - Digital program editing 68 Using with digital effects 58 Enlarging images recorded on "Memory Stick"s - MPEG movie recording 120 Recording a picture from a tape as ...Memory Stick" Operations (DCR-TRV17 only) Using a "Memory Stick" - Basics Recording a picture 21 Shooting backlit subjects - Tape Photo recording 38 Adjusting the white balance manually 41 Using the wide mode 42 Using the fader function 43 Using special effects - Signal convert function 79 Recording video...
... - Title search 61 Searching a recording by frame recording - Date search 62 Searching for a photo - Digital program editing 68 Using with digital effects 58 Enlarging images recorded on "Memory Stick"s - MPEG movie recording 120 Recording a picture from a tape as ...Memory Stick" Operations (DCR-TRV17 only) Using a "Memory Stick" - Basics Recording a picture 21 Shooting backlit subjects - Tape Photo recording 38 Adjusting the white balance manually 41 Using the wide mode 42 Using the fader function 43 Using special effects - Signal convert function 79 Recording video...
Operating Instructions (primary manual)
Page 7
... 165 Specifications 169 Quick Reference Identifying the parts and controls .... 171 Index Back cover 7 Memory PB ZOOM 140 Playing back images in a "Memory Stick" on "Memory Stick"s - Photo save 127 Viewing a still picture - Image protection 143 Deleting images 144... in a continuous loop - Memory photo playback .......... 129 Viewing a moving picture - MPEG movie playback 132 Viewing images using computer ...... 134 Copying the image recorded on "Memory Stick"s to tapes 138 Enlarging still images recorded on a moving picture - MEMORY MIX 124 Copying still images ...
... 165 Specifications 169 Quick Reference Identifying the parts and controls .... 171 Index Back cover 7 Memory PB ZOOM 140 Playing back images in a "Memory Stick" on "Memory Stick"s - Photo save 127 Viewing a still picture - Image protection 143 Deleting images 144... in a continuous loop - Memory photo playback .......... 129 Viewing a moving picture - MPEG movie playback 132 Viewing images using computer ...... 134 Copying the image recorded on "Memory Stick"s to tapes 138 Enlarging still images recorded on a moving picture - MEMORY MIX 124 Copying still images ...
Operating Instructions (primary manual)
Page 9
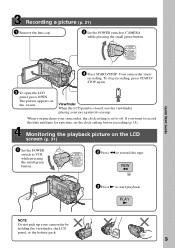
... battery pack. 9 Monitoring the playback picture on the screen. Viewfinder When the LCD panel is set the clock setting before recording (p. 18). POWER VCR OFF(CHG) CAMERA MEMORY 4 Press START/STOP. To stop recording, press START/ STOP again. 3 To open the LCD panel, press OPEN. When you want to rewind the tape. Your camcorder...
... battery pack. 9 Monitoring the playback picture on the screen. Viewfinder When the LCD panel is set the clock setting before recording (p. 18). POWER VCR OFF(CHG) CAMERA MEMORY 4 Press START/STOP. To stop recording, press START/ STOP again. 3 To open the LCD panel, press OPEN. When you want to rewind the tape. Your camcorder...
Operating Instructions (primary manual)
Page 10
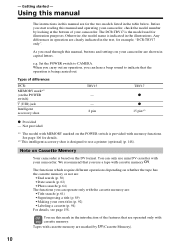
...For details, see this manual and operating your camcorder are clearly indicated in capital letters. Tapes with the cassette memory are operated only with memory functions. The DCR-TRV17 is indicated in the table below. - Using this manual The instructions in this manual, buttons and settings on... introduction of the features that the operation is provided with cassette memory. As you can hear a beep sound to CAMERA. The functions which require different operations depending on whether the tape has the cassette memory or not are: •End search (p. 30) •...
...For details, see this manual and operating your camcorder are clearly indicated in capital letters. Tapes with the cassette memory are operated only with memory functions. The DCR-TRV17 is indicated in the table below. - Using this manual The instructions in this manual, buttons and settings on... introduction of the features that the operation is provided with cassette memory. As you can hear a beep sound to CAMERA. The functions which require different operations depending on whether the tape has the cassette memory or not are: •End search (p. 30) •...
Operating Instructions (primary manual)
Page 13
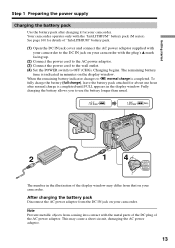
... IN jack on the display window. Charging begins. When the remaining battery indicator changes to use the battery longer than usual. 2 1 4 POWER VCR OFF(CHG) CAMERA MEMORY The number in minutes on your camcorder.
... IN jack on the display window. Charging begins. When the remaining battery indicator changes to use the battery longer than usual. 2 1 4 POWER VCR OFF(CHG) CAMERA MEMORY The number in minutes on your camcorder.
Operating Instructions (primary manual)
Page 18
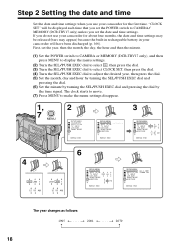
... pressing the dial by the time signal. "CLOCK SET" will be released (bars may be displayed each time that you set the POWER switch to CAMERA/ MEMORY (DCR-TRV17 only) unless you set the year, then the month, the day, the hour and then the minute. (1) Set the POWER switch to... CAMERA or MEMORY (DCR-TRV17 only), and then press MENU to display the menu settings. (2) Turn the SEL/PUSH EXEC dial to select , then press the dial. (3) Turn the SEL/...
... pressing the dial by the time signal. "CLOCK SET" will be released (bars may be displayed each time that you set the POWER switch to CAMERA/ MEMORY (DCR-TRV17 only) unless you set the year, then the month, the day, the hour and then the minute. (1) Set the POWER switch to... CAMERA or MEMORY (DCR-TRV17 only), and then press MENU to display the menu settings. (2) Turn the SEL/PUSH EXEC dial to select , then press the dial. (3) Turn the SEL/...

Operating Instructions (primary manual)
Page 19
Note on the time indicator The internal clock of your camcorder operates on the data code of the tape and the "Memory Stick" (DCRTRV17 only). Getting started Step 2 Setting the date and time If you do not set the date and time is recorded on a 12-hour cycle. •12:00 AM stands for midnight. •12:00 PM stands for noon. 19
Note on the time indicator The internal clock of your camcorder operates on the data code of the tape and the "Memory Stick" (DCRTRV17 only). Getting started Step 2 Setting the date and time If you do not set the date and time is recorded on a 12-hour cycle. •12:00 AM stands for midnight. •12:00 PM stands for noon. 19

Operating Instructions (primary manual)
Page 20
Insert the cassette in a straight line deeply into the cassette compartment with cassette memory Read the instruction about cassette memory to use cassette with the window facing out. (4) Close the cassette compartment by pressing the mark on the cassette to insert. Note Do not press ...
Insert the cassette in a straight line deeply into the cassette compartment with cassette memory Read the instruction about cassette memory to use cassette with the window facing out. (4) Close the cassette compartment by pressing the mark on the cassette to insert. Note Do not press ...
Operating Instructions (primary manual)
Page 21
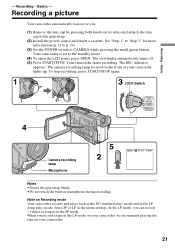
... START/STOP again. 1 3 LOCK Switch POWER VCR OFF(CHG) CAMERA MEMORY 4 Camera recording lamp Microphone 5 2 40min REC 0:00:01 Notes •Fasten the grip strap firmly. •Do not touch the built-in the menu settings. Recording a picture Your camcorder automatically focuses for more information (p. 12 to p. ...20). (3) Set the POWER switch to the grip strap. (2) Install the power source and insert a cassette. The camera recording lamp located on Recording mode Your camcorder records and plays back in the SP (standard play) mode and in the LP (long play) mode. Select SP or ...
... START/STOP again. 1 3 LOCK Switch POWER VCR OFF(CHG) CAMERA MEMORY 4 Camera recording lamp Microphone 5 2 40min REC 0:00:01 Notes •Fasten the grip strap firmly. •Do not touch the built-in the menu settings. Recording a picture Your camcorder automatically focuses for more information (p. 12 to p. ...20). (3) Set the POWER switch to the grip strap. (2) Install the power source and insert a cassette. The camera recording lamp located on Recording mode Your camcorder records and plays back in the SP (standard play) mode and in the LP (long play) mode. Select SP or ...
Operating Instructions (primary manual)
Page 22
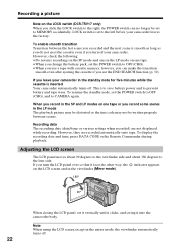
Recording a picture Note on the LOCK switch (DCR-TRV17 only) When you slide the LOCK switch to the right, the...to OFF (CHG). • When you use a tape with cassette memory, however, you can no longer be written properly between the last scene you record in the SP and LP modes on the Remote Commander during playback. ...recorded and the next scene is set the POWER switch to OFF (CHG), and to the lens side. To enable smooth transition Transition between scenes. Adjusting the LCD screen The LCD panel moves about 90 degrees to the viewfinder side and about 180 degrees to CAMERA...
Recording a picture Note on the LOCK switch (DCR-TRV17 only) When you slide the LOCK switch to the right, the...to OFF (CHG). • When you use a tape with cassette memory, however, you can no longer be written properly between the last scene you record in the SP and LP modes on the Remote Commander during playback. ...recorded and the next scene is set the POWER switch to OFF (CHG), and to the lens side. To enable smooth transition Transition between scenes. Adjusting the LCD screen The LCD panel moves about 90 degrees to the viewfinder side and about 180 degrees to CAMERA...

Operating Instructions (primary manual)
Page 23
... The LCD screen may be difficult to OFF (CHG). (2) Close the LCD panel. (3) Eject the cassette. 23 Picture in the mirror mode ZERO SET MEMORY on the LCD screen is a mirror-image. in the menu settings LCD / VF SET LCD BR I GHT [ MENU ] : END MENU LCD screen...of the backlight. Even if you use the viewfinder. Indicators in (p. 98). Select LCD B.L. However, the picture will not be normal when recorded. Basics Recording a picture When you adjust the LCD screen backlight or brightness of the other indicators appear mirror-reversed and others are not displayed...
... The LCD screen may be difficult to OFF (CHG). (2) Close the LCD panel. (3) Eject the cassette. 23 Picture in the mirror mode ZERO SET MEMORY on the LCD screen is a mirror-image. in the menu settings LCD / VF SET LCD BR I GHT [ MENU ] : END MENU LCD screen...of the backlight. Even if you use the viewfinder. Indicators in (p. 98). Select LCD B.L. However, the picture will not be normal when recorded. Basics Recording a picture When you adjust the LCD screen backlight or brightness of the other indicators appear mirror-reversed and others are not displayed...

Operating Instructions (primary manual)
Page 25
...in the wide-angle position. You can shoot a subject that is set to the "W" side until the focus is performed digitally. TRV17 only). Notes on . The digital zooming zone appears when you cannot get a sharp focus, move the power zoom lever to OFF as you move the ...is set to a subject If you select the digital power in the recording mode The indicators are not recorded on . 25 When you shoot close to MEMORY (DCR- Remaining battery time indicator Cassette memory indicator This appears when using a tape with cassette memory. Date indicator The date is displayed about 1/2 inch...
...in the wide-angle position. You can shoot a subject that is set to the "W" side until the focus is performed digitally. TRV17 only). Notes on . The digital zooming zone appears when you cannot get a sharp focus, move the power zoom lever to OFF as you move the ...is set to a subject If you select the digital power in the recording mode The indicators are not recorded on . 25 When you shoot close to MEMORY (DCR- Remaining battery time indicator Cassette memory indicator This appears when using a tape with cassette memory. Date indicator The date is displayed about 1/2 inch...
Operating Instructions (primary manual)
Page 26
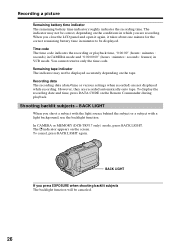
... battery time in VCR mode. BACK LIGHT When you are recording. Recording data The recording data (date/time or various settings when recorded) are recorded automatically onto tape. To display the recording date and time, press DATA CODE on the screen. Shooting backlit subjects - In CAMERA or MEMORY (DCR-TRV17 only) mode, press BACK LIGHT. The . However, they are not...
... battery time in VCR mode. BACK LIGHT When you are recording. Recording data The recording data (date/time or various settings when recorded) are recorded automatically onto tape. To display the recording date and time, press DATA CODE on the screen. Shooting backlit subjects - In CAMERA or MEMORY (DCR-TRV17 only) mode, press BACK LIGHT. The . However, they are not...
Operating Instructions (primary manual)
Page 27
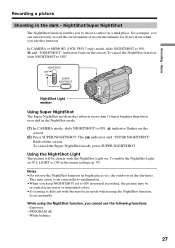
... "NIGHTSHOT" indicators flash on the screen. (2) Press SUPER NIGHTSHOT. indicator flashes on the screen. Using the NightShot Light The picture will be recorded in the menu settings (p. 97). In CAMERA or MEMORY (DCR-TRV17 only) mode, slide NIGHTSHOT to ON. Exposure - To enable the NightShot Light, set to OFF. The indicator and "SUPER NIGHTSHOT" flash...
... "NIGHTSHOT" indicators flash on the screen. (2) Press SUPER NIGHTSHOT. indicator flashes on the screen. Using the NightShot Light The picture will be recorded in the menu settings (p. 97). In CAMERA or MEMORY (DCR-TRV17 only) mode, slide NIGHTSHOT to ON. Exposure - To enable the NightShot Light, set to OFF. The indicator and "SUPER NIGHTSHOT" flash...
Operating Instructions (primary manual)
Page 28
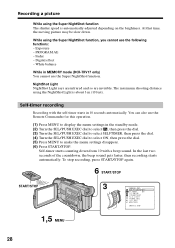
...Light rays are infrared and so are invisible. Self-timer recording Recording with a beep sound. Recording a picture While using the Super NightShot function The shutter speed is about 3 m (10 feet). Exposure - To stop recording, press START/STOP again. 6 START/STOP START/STOP 1,5 MENU 3 CAMERA SET SE L F T I MER OF F D ... MENU to make the menu settings disappear. (6) Press START/STOP. Digital effect - At that time, the moving picture may be slow down from 10 with the self-timer starts in MEMORY mode (DCR-TRV17 only) You cannot use the Super NightShot function. Self-timer starts ...
...Light rays are infrared and so are invisible. Self-timer recording Recording with a beep sound. Recording a picture While using the Super NightShot function The shutter speed is about 3 m (10 feet). Exposure - To stop recording, press START/STOP again. 6 START/STOP START/STOP 1,5 MENU 3 CAMERA SET SE L F T I MER OF F D ... MENU to make the menu settings disappear. (6) Press START/STOP. Digital effect - At that time, the moving picture may be slow down from 10 with the self-timer starts in MEMORY mode (DCR-TRV17 only) You cannot use the Super NightShot function. Self-timer starts ...

Operating Instructions (primary manual)
Page 29
... using the self-timer Press PHOTO in step 6. (p. 39) To cancel self-timer recording Set SELFTIMER to OFF (CHG) or VCR. Self-timer memory photo recording (DCR-TRV17 only) You can also record still images on "Memory Stick"s with the self-timer (p. 116). 29 Self-timer recording is finished. - Recording - Basics Recording a picture To stop the countdown Press START/STOP.
... using the self-timer Press PHOTO in step 6. (p. 39) To cancel self-timer recording Set SELFTIMER to OFF (CHG) or VCR. Self-timer memory photo recording (DCR-TRV17 only) You can also record still images on "Memory Stick"s with the self-timer (p. 116). 29 Self-timer recording is finished. - Recording - Basics Recording a picture To stop the countdown Press START/STOP.


