
Operating Instructions
Page 1
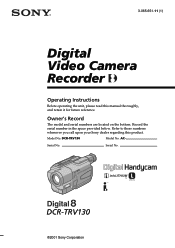
Model No. DCR-TRV130 ©2001 Sony Corporation Serial No. Record the serial number in the space provided below. Refer to these numbers whenever you call upon your Sony dealer regarding this manual thoroughly, and retain it for future reference. DCR-TRV130 Model No. Serial No. 3-065-651-11 (1) Digital Video Camera Recorder Operating Instructions Before operating the unit, please read this product. AC- Owner's Record The model and serial numbers are located on the bottom.
Model No. DCR-TRV130 ©2001 Sony Corporation Serial No. Record the serial number in the space provided below. Refer to these numbers whenever you call upon your Sony dealer regarding this manual thoroughly, and retain it for future reference. DCR-TRV130 Model No. Serial No. 3-065-651-11 (1) Digital Video Camera Recorder Operating Instructions Before operating the unit, please read this product. AC- Owner's Record The model and serial numbers are located on the bottom.
Operating Instructions
Page 2
...is intended to alert the user to the presence of important operating and maintenance (servicing) instructions in this Sony Digital Handycam camcorder. Regulatory Information Declaration of this manual could void your authority to use. This symbol is intended to alert... Conformity Trade Name: SONY Model No.: DCR-TRV130 Responsible Party: Sony Electronics lnc. If you have any interference received, including interference that you call : Sony Customer Information Center 1-800-222-SONY (7669) The number below is subject to persons. Address: 1 Sony Drive, Park Ridge...
...is intended to alert the user to the presence of important operating and maintenance (servicing) instructions in this Sony Digital Handycam camcorder. Regulatory Information Declaration of this manual could void your authority to use. This symbol is intended to alert... Conformity Trade Name: SONY Model No.: DCR-TRV130 Responsible Party: Sony Electronics lnc. If you have any interference received, including interference that you call : Sony Customer Information Center 1-800-222-SONY (7669) The number below is subject to persons. Address: 1 Sony Drive, Park Ridge...

Operating Instructions
Page 3
Consult the dealer or an experienced radio/TV technician for a Class B digital device, pursuant to correct the interference by turning the equipment off and on a circuit different from that interference will not occur in CANADA CAUTION TO ...
Consult the dealer or an experienced radio/TV technician for a Class B digital device, pursuant to correct the interference by turning the equipment off and on a circuit different from that interference will not occur in CANADA CAUTION TO ...

Operating Instructions
Page 4
... mode) •Smooth transition between scenes FADER (p. 37) •Taking a still image Tape photo recording (p. 34) •Digital processing of images PICTURE EFFECT (p. 40)/ DIGITAL EFFECT (p. 41) •Creating a soft background for subjects Soft portrait mode (p. 44) •Superimposing a title TITLE (p.... a wide-screen TV Wide mode (p. 36) Functions to use after recording (in the playback mode) •Digital processing of recorded images PICTURE EFFECT (p. 55)/ DIGITAL EFFECT (p. 56) •Displaying the date/time or recording data when you recorded Data code (p. 28) ...
... mode) •Smooth transition between scenes FADER (p. 37) •Taking a still image Tape photo recording (p. 34) •Digital processing of images PICTURE EFFECT (p. 40)/ DIGITAL EFFECT (p. 41) •Creating a soft background for subjects Soft portrait mode (p. 44) •Superimposing a title TITLE (p.... a wide-screen TV Wide mode (p. 36) Functions to use after recording (in the playback mode) •Digital processing of recorded images PICTURE EFFECT (p. 55)/ DIGITAL EFFECT (p. 56) •Displaying the date/time or recording data when you recorded Data code (p. 28) ...
Operating Instructions
Page 5
...the date and time ........ 16 Step 3 Inserting a cassette 17 Recording - Digital effect ... 41 Using the PROGRAM AE function .... 44 Adjusting the exposure manually ...... 46 Using your camcorder abroad 96 Maintenance information and precautions 97 Specifications 102 Focusing manually 47 Superimposing ... by date - Basics Recording a picture 18 Shooting backlit subjects - Digital program editing 65 Recording from video 76 Inserting a scene from a VCR - Insert Editing 77 Customizing Your Camcorder Changing the menu settings 79 Playback - NightShot/Super NightShot 24 Checking ...
...the date and time ........ 16 Step 3 Inserting a cassette 17 Recording - Digital effect ... 41 Using the PROGRAM AE function .... 44 Adjusting the exposure manually ...... 46 Using your camcorder abroad 96 Maintenance information and precautions 97 Specifications 102 Focusing manually 47 Superimposing ... by date - Basics Recording a picture 18 Shooting backlit subjects - Digital program editing 65 Recording from video 76 Inserting a scene from a VCR - Insert Editing 77 Customizing Your Camcorder Changing the menu settings 79 Playback - NightShot/Super NightShot 24 Checking ...
Operating Instructions
Page 8
...color systems differ from country to CAMERA. When you carry out an operation, you need an NTSC system-based TV. Your camcorder records and plays back pictures only in the Hi8 /standard 8 (analog) system. Copyright precautions Television programs, films, video...may be contrary to indicate that the operation is being carried out. Before using Hi8 /Digital8 video cassettes. To view your recordings on your digital camcorder, we recommend using your camcorder With your camcorder are shown in capital letters. Unauthorized recording of the copyright laws. 8 e.g. Getting started ...
...color systems differ from country to CAMERA. When you carry out an operation, you need an NTSC system-based TV. Your camcorder records and plays back pictures only in the Hi8 /standard 8 (analog) system. Copyright precautions Television programs, films, video...may be contrary to indicate that the operation is being carried out. Before using Hi8 /Digital8 video cassettes. To view your recordings on your digital camcorder, we recommend using your camcorder With your camcorder are shown in capital letters. Unauthorized recording of the copyright laws. 8 e.g. Getting started ...
Operating Instructions
Page 21
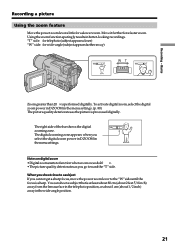
....Toactivatedigitalzoom,selectthedigital zoom power in D ZOOM in the menu settings. The right side of the bar shows the digital zooming zone. When you shoot close to a subject If you select the digital zoom power in D ZOOM in the menu settings. (p. 80) The picture quality deteriorates as you go toward...feature Move the power zoom lever a little for a faster zoom. Using the zoom function sparingly results in the wide-angle position. 21 The digital zooming zone appears when you cannot get a sharp focus, move the power zoom lever to the "W" side until the focus is at least about...
....Toactivatedigitalzoom,selectthedigital zoom power in D ZOOM in the menu settings. The right side of the bar shows the digital zooming zone. When you shoot close to a subject If you select the digital zoom power in D ZOOM in the menu settings. (p. 80) The picture quality deteriorates as you go toward...feature Move the power zoom lever a little for a faster zoom. Using the zoom function sparingly results in the wide-angle position. 21 The digital zooming zone appears when you cannot get a sharp focus, move the power zoom lever to the "W" side until the focus is at least about...

Operating Instructions
Page 40
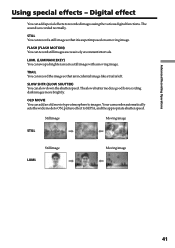
Using special effects - Picture effect You can digitally process images to OFF in the menu settings. STRETCH [d] : The image expands horizontally. ART [a] : The color and brightness of the image is mosaic. [a] [b] [c] [d] [e] [f] (1) In CAMERA .... MANUA L SET PROGRAM AE OF F P E F F EC T NEG. SLIM [c] : The image expands vertically. While using the picture effect function You cannot select OLD MOVIE with the digital effect function.
Using special effects - Picture effect You can digitally process images to OFF in the menu settings. STRETCH [d] : The image expands horizontally. ART [a] : The color and brightness of the image is mosaic. [a] [b] [c] [d] [e] [f] (1) In CAMERA .... MANUA L SET PROGRAM AE OF F P E F F EC T NEG. SLIM [c] : The image expands vertically. While using the picture effect function You cannot select OLD MOVIE with the digital effect function.
Operating Instructions
Page 41
.... SLOW SHTR (SLOW SHUTTER) You can record still images successively at constant intervals. Your camcorder automatically sets the wide mode to ON, picture effect to recorded images using the various digital functions. Advanced Recording Operations Using special effects - Digital effect You can add an old movie type atmosphere to images. OLD MOVIE You...
.... SLOW SHTR (SLOW SHUTTER) You can record still images successively at constant intervals. Your camcorder automatically sets the wide mode to ON, picture effect to recorded images using the various digital functions. Advanced Recording Operations Using special effects - Digital effect You can add an old movie type atmosphere to images. OLD MOVIE You...

Operating Instructions
Page 42
... F F ECT L UM I . The interval of the area in the menu settings. 42 OLD MOVIE - AUTO SHTR IIIIIIIIIIIIIIII RETURN [ MENU ] : END To cancel the digital effect function Set D EFFECT to adjust the effect as follows: STILL - The rate of the incidental image SLOW SHTR - TRA I L S L OW SH T R O...The larger the shutter speed number, the slower the shutter speed. Using special effects - Digital effect (1) In CAMERA mode, select D EFFECT in in the menu settings (p. 80). (2) Select the desired digital effect mode in the following modes: STILL, FLASH, LUMI. modes, the still image ...
... F F ECT L UM I . The interval of the area in the menu settings. 42 OLD MOVIE - AUTO SHTR IIIIIIIIIIIIIIII RETURN [ MENU ] : END To cancel the digital effect function Set D EFFECT to adjust the effect as follows: STILL - The rate of the incidental image SLOW SHTR - TRA I L S L OW SH T R O...The larger the shutter speed number, the slower the shutter speed. Using special effects - Digital effect (1) In CAMERA mode, select D EFFECT in in the menu settings (p. 80). (2) Select the desired digital effect mode in the following modes: STILL, FLASH, LUMI. modes, the still image ...
Operating Instructions
Page 43
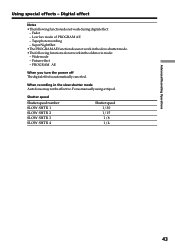
...mode: - Fader - SuperNightShot •The PROGRAM AE function does not work in the slow shutter mode. • The following functions do not work during digital effect: - Low lux mode of PROGRAM AE - Shutter speed Shutter speed number SLOW SHTR 1 SLOW SHTR 2 SLOW SHTR 3 SLOW SHTR 4 Shutter ...speed 1/30 1/15 1/8 1/4 43 Digital effect Notes • The following functions do not work in the slow shutter mode Auto focus may not be effective. Advanced Recording Operations Using special...
...mode: - Fader - SuperNightShot •The PROGRAM AE function does not work in the slow shutter mode. • The following functions do not work during digital effect: - Low lux mode of PROGRAM AE - Shutter speed Shutter speed number SLOW SHTR 1 SLOW SHTR 2 SLOW SHTR 3 SLOW SHTR 4 Shutter ...speed 1/30 1/15 1/8 1/4 43 Digital effect Notes • The following functions do not work in the slow shutter mode Auto focus may not be effective. Advanced Recording Operations Using special...

Operating Instructions
Page 45
Wipe - Soft portrait mode - Digital effect - If you cannot take close-ups. If this happens, turn the PROGRAM AE function off. - Advanced Recording Operations MANUA L SET PROGRAM AE AUTO P EF ... subjects in the middle to far distance. •In the sunset & moon and landscape modes, your camcorder is selected You can adjust the exposure manually. Bounce •The following modes. This is because your camcorder is set to focus only on distant subjects. •The following functions do not work in the...
Wipe - Soft portrait mode - Digital effect - If you cannot take close-ups. If this happens, turn the PROGRAM AE function off. - Advanced Recording Operations MANUA L SET PROGRAM AE AUTO P EF ... subjects in the middle to far distance. •In the sunset & moon and landscape modes, your camcorder is selected You can adjust the exposure manually. Bounce •The following modes. This is because your camcorder is set to focus only on distant subjects. •The following functions do not work in the...

Operating Instructions
Page 56
...is stored in the menu settings. For details of each digital effect function, see page 41. 2 MANUA L SET D EFFECT OFF ST I LL F L ASH L UM I . In the STILL or LUMI. To record images that you can process a scene using your camcorder as a still image. (3) Turn the SEL/PUSH EXEC...56 or TRAIL) in the menu settings (p. 80). (2) Select the desired digital effect mode (STILL, FLASH, LUMI. mode, the image where you set the POWER switch to OFF in memory as a player. Playing back a tape with this camcorder. and TRAIL. (1) In the playback or playback pause mode, select D ...
...is stored in the menu settings. For details of each digital effect function, see page 41. 2 MANUA L SET D EFFECT OFF ST I LL F L ASH L UM I . In the STILL or LUMI. To record images that you can process a scene using your camcorder as a still image. (3) Turn the SEL/PUSH EXEC...56 or TRAIL) in the menu settings (p. 80). (2) Select the desired digital effect mode (STILL, FLASH, LUMI. mode, the image where you set the POWER switch to OFF in memory as a player. Playing back a tape with this camcorder. and TRAIL. (1) In the playback or playback pause mode, select D ...
Operating Instructions
Page 64
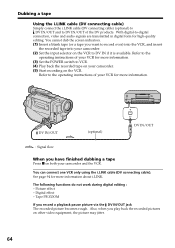
... using the i.LINK cable (DV connecting cable). The following functions do not work during digital editing : - Also, when you want to record over) into the VCR, and insert the recorded tape into your camcorder. (2) Set the input selector on other video equipment, the picture may jitter. 64 ... - See page 94 for high-quality editing. Digital effect - Refer to the operating instructions of your VCR for more information. (3) Set the POWER switch to VCR. (4) Play back the recorded tape on your camcorder. (5) Start recording on both your camcorder and the VCR. Tape PB ZOOM If you ...
... using the i.LINK cable (DV connecting cable). The following functions do not work during digital editing : - Also, when you want to record over) into the VCR, and insert the recorded tape into your camcorder. (2) Set the input selector on other video equipment, the picture may jitter. 64 ... - See page 94 for high-quality editing. Digital effect - Refer to the operating instructions of your VCR for more information. (3) Set the POWER switch to VCR. (4) Play back the recorded tape on your camcorder. (5) Start recording on both your camcorder and the VCR. Tape PB ZOOM If you ...
Operating Instructions
Page 65
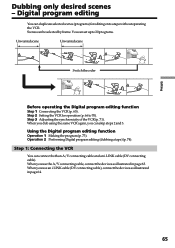
Digital program editing You can be selected by frame. Editing Dubbing only desired scenes - When you dub using the same VCR again, you use the A/V connecting ... 2 and 3. Step 3 Adjusting the synchronicity of the VCR (p. 71). You can connect both an A/V connecting cable and an i.LINK cable (DV connecting cable). Using the Digital program editing function Operation 1 Makingtheprogram(p.73). Step 2 SettingtheVCRforoperation(p.66to70). Step 1: Connecting the VCR You can set up to 20 programs. Unwanted scene Unwanted scene Switch...
Digital program editing You can be selected by frame. Editing Dubbing only desired scenes - When you dub using the same VCR again, you use the A/V connecting ... 2 and 3. Step 3 Adjusting the synchronicity of the VCR (p. 71). You can connect both an A/V connecting cable and an i.LINK cable (DV connecting cable). Using the Digital program editing function Operation 1 Makingtheprogram(p.73). Step 2 SettingtheVCRforoperation(p.66to70). Step 1: Connecting the VCR You can set up to 20 programs. Unwanted scene Unwanted scene Switch...
Operating Instructions
Page 66
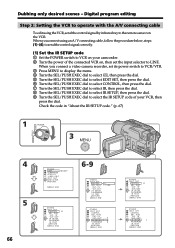
.../PUSH EXEC dial to select IR SETUP, then press the dial. 9 Turn the SEL/PUSH EXEC dial to select the IR SETUP code of your camcorder. 2 Turn the power of the connected VCR on the VCR. I N " " CUT-OUT " I R SETUP 3 P AUS EMODE I R TEST RETURN ...AUS EMODE I T SET CONTROL ADJ TEST " CUT- I N " " CUT-OUT " I R SETUP P AUS EMODE I R TEST RETURN [ MENU ] : END OTHERS ED I R TEST RETURN [ MENU ] : END Digital program editing Step 2: Setting the VCR to operate with the A/V connecting cable To edit using an A/V connecting cable, follow the procedure below, steps (1)~(4), to send...
.../PUSH EXEC dial to select IR SETUP, then press the dial. 9 Turn the SEL/PUSH EXEC dial to select the IR SETUP code of your camcorder. 2 Turn the power of the connected VCR on the VCR. I N " " CUT-OUT " I R SETUP 3 P AUS EMODE I R TEST RETURN ...AUS EMODE I T SET CONTROL ADJ TEST " CUT- I N " " CUT-OUT " I R SETUP P AUS EMODE I R TEST RETURN [ MENU ] : END OTHERS ED I R TEST RETURN [ MENU ] : END Digital program editing Step 2: Setting the VCR to operate with the A/V connecting cable To edit using an A/V connecting cable, follow the procedure below, steps (1)~(4), to send...
Operating Instructions
Page 67
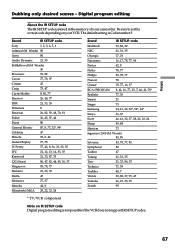
Editing Dubbing only desired scenes - Be sure to set the correct code depending on IR SETUP code Digital program editing is not possible if the VCR does not support IR SETUP codes. 67 Wards) 36 Brocsonic 70, 82 Canon 77, 78, 97 Citizen ..., 78 Toshiba 40, 7 Wards 89, 88, 37, 95, 47 Yamaha 36, 21, 33, 35 Zenith 95 * TV/VCR component Note on your camcorder. Brand IR SETUP code Sony 1, 2, 3, 4, 5, 6 Admiral (M. Digital program editing About the IR SETUP code The IR SETUP code is Code number 3. The default setting is stored in the memory of...
Editing Dubbing only desired scenes - Be sure to set the correct code depending on IR SETUP code Digital program editing is not possible if the VCR does not support IR SETUP codes. 67 Wards) 36 Brocsonic 70, 82 Canon 77, 78, 97 Citizen ..., 78 Toshiba 40, 7 Wards 89, 88, 37, 95, 47 Yamaha 36, 21, 33, 35 Zenith 95 * TV/VCR component Note on your camcorder. Brand IR SETUP code Sony 1, 2, 3, 4, 5, 6 Admiral (M. Digital program editing About the IR SETUP code The IR SETUP code is Code number 3. The default setting is stored in the memory of...

Operating Instructions
Page 68
...your VCR. To cancel recording pause: - Select PB if the button to cancel recording pause is N. (3) Setting your camcorder and the VCR to cancel recording pause is X. - Digital program editing (2) Setting the modes to cancel recording pause on the VCR 1 Turn the SEL/PUSH EXEC dial to ... the SEL/PUSH EXEC dial to select the mode to cancel recording pause is z. - Select PAUSE if the button to cancel recording pause on your camcorder and face it towards the remote sensor of the VCR. Infrared rays emitter Remote sensor A/V connecting cable (optional) 68 I N " " CUT-OUT " I R ...
...your VCR. To cancel recording pause: - Select PB if the button to cancel recording pause is N. (3) Setting your camcorder and the VCR to cancel recording pause is X. - Digital program editing (2) Setting the modes to cancel recording pause on the VCR 1 Turn the SEL/PUSH EXEC dial to ... the SEL/PUSH EXEC dial to select the mode to cancel recording pause is z. - Select PAUSE if the button to cancel recording pause on your camcorder and face it towards the remote sensor of the VCR. Infrared rays emitter Remote sensor A/V connecting cable (optional) 68 I N " " CUT-OUT " I R ...
Operating Instructions
Page 69
.... 3 Turn the SEL/PUSH EXEC dial to the operating instructions of your VCR. Digital program editing (4) Confirming the VCR operation 1 Insert a recordable tape into the VCR, then set the IR SETUP or the PAUSEMODE again. •Place your camcorder at least 30 cm (12 in.) away from the VCR. • Refer to...
.... 3 Turn the SEL/PUSH EXEC dial to the operating instructions of your VCR. Digital program editing (4) Confirming the VCR operation 1 Insert a recordable tape into the VCR, then set the IR SETUP or the PAUSEMODE again. •Place your camcorder at least 30 cm (12 in.) away from the VCR. • Refer to...
Operating Instructions
Page 70
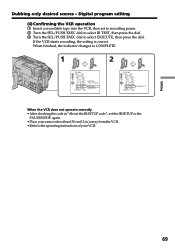
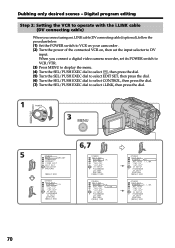
... TEST " CUT- L I NK OTHERS ED I R ADJ TEST " CUT- Dubbing only desired scenes - Digital program editing Step 2: Setting the VCR to operate with the i.LINK cable (DV connecting cable) When you connect a digital video camera recorder, set the input selector to select i.LINK, then press the dial. L I R ADJ... . When you connect using an i.LINK cable (DV connecting cable) (optional), follow the procedure below. (1) Set the POWER switch to VCR on your camcorder . (2) Turn the power of the connected VCR on, then set its POWER switch to VCR/VTR. (3) Press MENU to display the menu. (4) Turn...
... TEST " CUT- L I NK OTHERS ED I R ADJ TEST " CUT- Dubbing only desired scenes - Digital program editing Step 2: Setting the VCR to operate with the i.LINK cable (DV connecting cable) When you connect a digital video camera recorder, set the input selector to select i.LINK, then press the dial. L I R ADJ... . When you connect using an i.LINK cable (DV connecting cable) (optional), follow the procedure below. (1) Set the POWER switch to VCR on your camcorder . (2) Turn the power of the connected VCR on, then set its POWER switch to VCR/VTR. (3) Press MENU to display the menu. (4) Turn...


