
Operating Instructions
Page 1
Refer to these numbers whenever you call upon your Sony dealer regarding this manual thoroughly, and retain it for future reference. DCR-TRV130 Model No. Serial No. Model No. Owner's Record The model and serial numbers are located on the bottom. Record the serial number in the space provided below. AC- Serial No. DCR-TRV130 ©2001 Sony Corporation 3-065-651-11 (1) Digital Video Camera Recorder Operating Instructions Before operating the unit, please read this product.
Refer to these numbers whenever you call upon your Sony dealer regarding this manual thoroughly, and retain it for future reference. DCR-TRV130 Model No. Serial No. Model No. Owner's Record The model and serial numbers are located on the bottom. Record the serial number in the space provided below. AC- Serial No. DCR-TRV130 ©2001 Sony Corporation 3-065-651-11 (1) Digital Video Camera Recorder Operating Instructions Before operating the unit, please read this product.
Operating Instructions
Page 8
... cannot play back tapes recorded in the Digital8 system. Using this manual As you can hear a beep sound to country. Before using your camcorder With your digital camcorder, we recommend using Hi8 /Digital8 video cassettes. Unauthorized recording of such materials may be contrary to CAMERA. - Copyright precautions Television programs, films, video tapes, and other materials may be...
... cannot play back tapes recorded in the Digital8 system. Using this manual As you can hear a beep sound to country. Before using your camcorder With your digital camcorder, we recommend using Hi8 /Digital8 video cassettes. Unauthorized recording of such materials may be contrary to CAMERA. - Copyright precautions Television programs, films, video tapes, and other materials may be...
Operating Instructions
Page 34
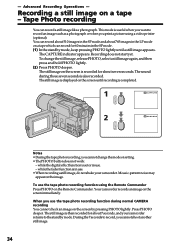
...still image again, and then press and hold PHOTO lightly. (2) Press PHOTO deeper. Your camcorder records an image on a tape which can record for about 765 images in the LP ... record a still image like a photograph. The still image on a tape - The sound during normal CAMERA recording You cannot check an image on the Remote Commander. - The CAPTURE indicator appears. whilethedigitaleffectfunctionissetorinuse. - ... another still image. 34 When you use the tape photo recording function using a video printer (optional). To use the tape photo recording function during those seven seconds is...
...still image again, and then press and hold PHOTO lightly. (2) Press PHOTO deeper. Your camcorder records an image on a tape which can record for about 765 images in the LP ... record a still image like a photograph. The still image on a tape - The sound during normal CAMERA recording You cannot check an image on the Remote Commander. - The CAPTURE indicator appears. whilethedigitaleffectfunctionissetorinuse. - ... another still image. 34 When you use the tape photo recording function using a video printer (optional). To use the tape photo recording function during those seven seconds is...
Operating Instructions
Page 36
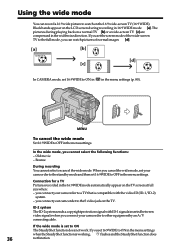
...set the screen mode of normal images [d]. [a] [b] 16:9WIDE [c] [d] In CAMERA mode, set 16:9WIDE to ON in in the menu settings (p. 80). you connect your camcorder to the S video jack on the TV. If you connect your camcorder to the standby mode and then set 16:9WIDE to OFF in 16:9 WIDE... mode, you connect your camcorder to a TV that is working, flashes and the SteadyShot function does 36 not function. If the wide mode is set 16:9WIDE to ON in the menu settings when the SteadyShot function is compatible with ID-1 signals inserted between video signals when you set to...
...set the screen mode of normal images [d]. [a] [b] 16:9WIDE [c] [d] In CAMERA mode, set 16:9WIDE to ON in in the menu settings (p. 80). you connect your camcorder to the S video jack on the TV. If you connect your camcorder to the standby mode and then set 16:9WIDE to OFF in 16:9 WIDE... mode, you connect your camcorder to a TV that is working, flashes and the SteadyShot function does 36 not function. If the wide mode is set 16:9WIDE to ON in the menu settings when the SteadyShot function is compatible with ID-1 signals inserted between video signals when you set to...
Operating Instructions
Page 66
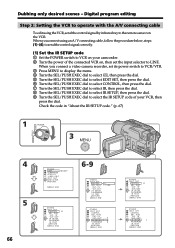
...on your VCR, then press the dial. Check the code in "About the IR SETUP code." (p. 67) OFF (CHARGE) 1 POWER VCR 3 MENU CAMERA 4 5 66 OTHERS BEEP ME LODY COMMA ND E R D I SPLAY V I DEO ED I T ED I T SET I ND I CATOR ...TEST RETURN [ MENU ] : END IR i . L I NK OTHERS ED I T SET CONTROL ADJ TEST " CUT- When you connect a video camera recorder, set its power switch to VCR/VTR. 3 Press MENU to display the menu. 4 Turn the SEL/PUSH EXEC dial to select , then... the IR SETUP code of your camcorder. 2 Turn the power of the connected VCR on, then set the input selector to LINE.
...on your VCR, then press the dial. Check the code in "About the IR SETUP code." (p. 67) OFF (CHARGE) 1 POWER VCR 3 MENU CAMERA 4 5 66 OTHERS BEEP ME LODY COMMA ND E R D I SPLAY V I DEO ED I T ED I T SET I ND I CATOR ...TEST RETURN [ MENU ] : END IR i . L I NK OTHERS ED I T SET CONTROL ADJ TEST " CUT- When you connect a video camera recorder, set its power switch to VCR/VTR. 3 Press MENU to display the menu. 4 Turn the SEL/PUSH EXEC dial to select , then... the IR SETUP code of your camcorder. 2 Turn the power of the connected VCR on, then set the input selector to LINE.
Operating Instructions
Page 70
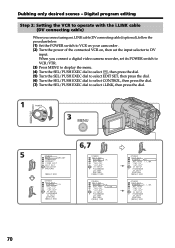
... OTHERS ED I R ADJ TEST " CUT- Digital program editing Step 2: Setting the VCR to operate with the i.LINK cable (DV connecting cable) When you connect a digital video camera recorder, set the input selector to select i.LINK, then press the dial. I N " " CUT-OUT " I R SETUP P AUS EMODE I R TEST RETURN [ MENU ].... When you connect using an i.LINK cable (DV connecting cable) (optional), follow the procedure below. (1) Set the POWER switch to VCR on your camcorder . (2) Turn the power of the connected VCR on, then set its POWER switch to VCR/VTR. (3) Press MENU to display the menu. (4) ...
... OTHERS ED I R ADJ TEST " CUT- Digital program editing Step 2: Setting the VCR to operate with the i.LINK cable (DV connecting cable) When you connect a digital video camera recorder, set the input selector to select i.LINK, then press the dial. I N " " CUT-OUT " I R SETUP P AUS EMODE I R TEST RETURN [ MENU ].... When you connect using an i.LINK cable (DV connecting cable) (optional), follow the procedure below. (1) Set the POWER switch to VCR on your camcorder . (2) Turn the power of the connected VCR on, then set its POWER switch to VCR/VTR. (3) Press MENU to display the menu. (4) ...
Operating Instructions
Page 74
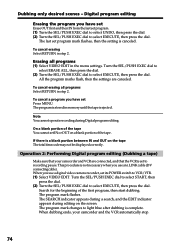
Operation 2: Performing Digital program editing (Dubbing a tape) Make sure that your camcorder and the VCR automatically stop. 74 To cancel erasing all programs (1) Select VIDEO EDIT in step 2. The program is stored in step 2. If there is complete. Turn the SEL/PUSH EXEC dial...To cancel erasing Select RETURN in the menu settings. Note You cannot operate recording during editing on the screen. When you use a digital video camera recorder, set to select EXECUTE, then press the dial. The SEARCH indicator appears during a search, and the EDIT indicator appears during ...
Operation 2: Performing Digital program editing (Dubbing a tape) Make sure that your camcorder and the VCR automatically stop. 74 To cancel erasing all programs (1) Select VIDEO EDIT in step 2. The program is stored in step 2. If there is complete. Turn the SEL/PUSH EXEC dial...To cancel erasing Select RETURN in the menu settings. Note You cannot operate recording during editing on the screen. When you use a digital video camera recorder, set to select EXECUTE, then press the dial. The SEARCH indicator appears during a search, and the EDIT indicator appears during ...
Operating Instructions
Page 83
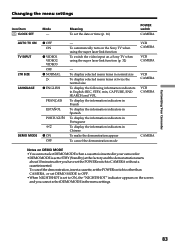
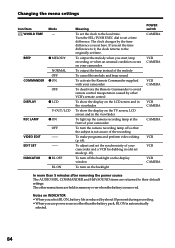
...To automatically turn on the Sony TV when using the super laser link function To switch the video input on DEMO MODE •You cannot select DEMO MODE when a cassette is inserted in your camcorder. •DEMO MODE is set to CAMERA without a cassette inserted. Customizing Your Camcorder Changing the menu settings Icon... indicators in Portuguese To display the information indicators in Chinese To make the demonstration appear To cancel the demonstration mode VCR CAMERA VCR CAMERA VCR CAMERA VCR CAMERA CAMERA Notes on a Sony TV when using the super laser link function (p. 32) -
...To automatically turn on the Sony TV when using the super laser link function To switch the video input on DEMO MODE •You cannot select DEMO MODE when a cassette is inserted in your camcorder. •DEMO MODE is set to CAMERA without a cassette inserted. Customizing Your Camcorder Changing the menu settings Icon... indicators in Portuguese To display the information indicators in Chinese To make the demonstration appear To cancel the demonstration mode VCR CAMERA VCR CAMERA VCR CAMERA VCR CAMERA CAMERA Notes on a Sony TV when using the super laser link function (p. 32) -
Operating Instructions
Page 84
...stop recording or when an unusual condition occurs on your camcorder To output the beep instead of your camcorder To turn the camera recording lamp off the backlight on the backlight POWER switch CAMERA VCR CAMERA VCR CAMERA VCR CAMERA CAMERA VCR VCR VCR CAMERA In more than the battery pack, BL ON is removed... TV screen, LCD screen and in the viewfinder To light up the camera recording lamp at the front of the recording To make programs and perform video editing (p. 65). BEEP z MELODY COMMANDER NORMAL OFF z ON OFF DISPLAY REC LAMP VIDEO EDIT EDIT SET z LCD V-OUT/LCD z ON OFF -- --...
...stop recording or when an unusual condition occurs on your camcorder To output the beep instead of your camcorder To turn the camera recording lamp off the backlight on the backlight POWER switch CAMERA VCR CAMERA VCR CAMERA VCR CAMERA CAMERA VCR VCR VCR CAMERA In more than the battery pack, BL ON is removed... TV screen, LCD screen and in the viewfinder To light up the camera recording lamp at the front of the recording To make programs and perform video editing (p. 65). BEEP z MELODY COMMANDER NORMAL OFF z ON OFF DISPLAY REC LAMP VIDEO EDIT EDIT SET z LCD V-OUT/LCD z ON OFF -- --...
Operating Instructions
Page 86
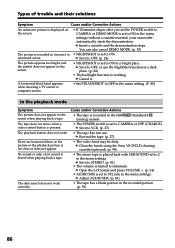
...ON in the menu settings without a cassette inserted, your camcorder automatically starts the demonstration. c Insert a cassette and the demonstration stops. c Set it to CAMERA or OFF (CHARGE). Cause and/or Corrective Actions •...; The volume is working. c Set it to minimum. The tape does not move when a video control button is set to OFF, or use the NightShot function in the Hi8 (analog) system.... not appear on the screen. • NIGHTSHOT is pressed. c Clean the heads using the Sony V8-25CLD cleaning cassette (optional). (p. 98) • The stereo tape is set to OFF in...
...ON in the menu settings without a cassette inserted, your camcorder automatically starts the demonstration. c Insert a cassette and the demonstration stops. c Set it to CAMERA or OFF (CHARGE). Cause and/or Corrective Actions •...; The volume is working. c Set it to minimum. The tape does not move when a video control button is set to OFF, or use the NightShot function in the Hi8 (analog) system.... not appear on the screen. • NIGHTSHOT is pressed. c Clean the heads using the Sony V8-25CLD cleaning cassette (optional). (p. 98) • The stereo tape is set to OFF in...
Operating Instructions
Page 92
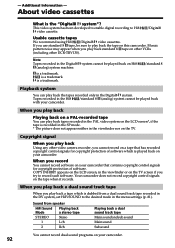
...is a trademark. Copyright signal When you record You cannot record software on this camcorder. Your camcorder does not record copyright control signals on your camcorder. About video cassettes What is a trademark. is the "Digital8 system"? COPY INHIBIT appears on the LCD screen, in the menu settings (p. ...you play back standard 8 tape on other VCRs (including other video camera recorder, you play back Playing back on a PAL-recorded tape You can play back Using any other DCR-TRV130). Tapes recorded in the Digital8 system. is recorded in the SP mode. * The picture ...
...is a trademark. Copyright signal When you record You cannot record software on this camcorder. Your camcorder does not record copyright control signals on your camcorder. About video cassettes What is a trademark. is the "Digital8 system"? COPY INHIBIT appears on the LCD screen, in the menu settings (p. ...you play back standard 8 tape on other VCRs (including other video camera recorder, you play back Playing back on a PAL-recorded tape You can play back Using any other DCR-TRV130). Tapes recorded in the Digital8 system. is recorded in the SP mode. * The picture ...

Operating Instructions
Page 98
... the picture and if the above problem occurs, clean the video heads with a commercially available blower for a still camera. (3) Turn the eyecup in a counterclockwise direction and pull it out. (2) Clean the surface with the Sony V8-25CLD cleaning cassette (optional). Caution Do not remove any..., then replace the screw. or If the above problems persist, repeat cleaning. Cleaning the video head To ensure normal recording and clear pictures, clean the video heads. The video head may remove only the screw to clean the LCD screen. mosaic-patternnoiseappearsontheplaybackpicture. - You ...
... the picture and if the above problem occurs, clean the video heads with a commercially available blower for a still camera. (3) Turn the eyecup in a counterclockwise direction and pull it out. (2) Clean the surface with the Sony V8-25CLD cleaning cassette (optional). Caution Do not remove any..., then replace the screw. or If the above problems persist, repeat cleaning. Cleaning the video head To ensure normal recording and clear pictures, clean the video heads. The video head may remove only the screw to clean the LCD screen. mosaic-patternnoiseappearsontheplaybackpicture. - You ...
Operating Instructions
Page 100
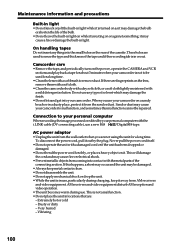
... cable (DV connecting cable), use your camcorder. To disconnect the power cord, pull ...CAMERA and VCR sections and play back a tape for about 3 minutes when your camcorder is resting on or against something; AM receivers and video equipment disturb AM reception and video... or out. Do not use . Connection to your camcorder to sense the type and thickness of the tape and...place, protect it from AM receivers and video equipment. Maintenance information and precautions Built-in ...On handling tapes Do not insert anything into your camcorder on a sandy beach or in light. When ...
... cable (DV connecting cable), use your camcorder. To disconnect the power cord, pull ...CAMERA and VCR sections and play back a tape for about 3 minutes when your camcorder is resting on or against something; AM receivers and video equipment disturb AM reception and video... or out. Do not use . Connection to your camcorder to sense the type and thickness of the tape and...place, protect it from AM receivers and video equipment. Maintenance information and precautions Built-in ...On handling tapes Do not insert anything into your camcorder on a sandy beach or in light. When ...
Operating Instructions
Page 102
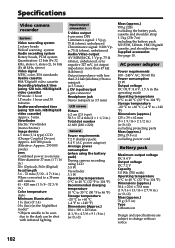
... Video camera recorder System Video recording system 2 rotary heads Helical scanning system Audio recording system Rotary heads, PCM system Quantization: 12 bits (Fs 32 kHz, stereo 1, stereo 2), 16 bits (Fs 48 kHz, stereo) Video signal NTSC color, EIA standards Usable cassette Hi8/Digital8 video cassette Recording/playback time (using 120 min. Hi8/Digital8 video cassette) Approx. 5 min. Hi8/Digital8 video...
... Video camera recorder System Video recording system 2 rotary heads Helical scanning system Audio recording system Rotary heads, PCM system Quantization: 12 bits (Fs 32 kHz, stereo 1, stereo 2), 16 bits (Fs 48 kHz, stereo) Video signal NTSC color, EIA standards Usable cassette Hi8/Digital8 video cassette Recording/playback time (using 120 min. Hi8/Digital8 video cassette) Approx. 5 min. Hi8/Digital8 video...
Operating Instructions
Page 104
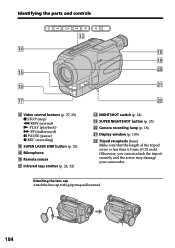
... cap Attach the lens cap to the grip strap as illustrated. 104 Otherwise, you cannot attach the tripod securely and the screw may damage your camcorder. Camera recording lamp (p. 18) wa Display window (p. 109) ws Tripod receptacle (base) Make sure that the length of the tripod screw is less than ...6.5 mm (9/32 inch). qg qh wa qj ws qd Video control buttons (p. 27, 30) x STOP (stop) m REW (rewind) N PLAY (playback) M FF (fastforward) X PAUSE (pause) z REC (recording) qf SUPER LASER LINK button (p. 32)...
... cap Attach the lens cap to the grip strap as illustrated. 104 Otherwise, you cannot attach the tripod securely and the screw may damage your camcorder. Camera recording lamp (p. 18) wa Display window (p. 109) ws Tripod receptacle (base) Make sure that the length of the tripod screw is less than ...6.5 mm (9/32 inch). qg qh wa qj ws qd Video control buttons (p. 27, 30) x STOP (stop) m REW (rewind) N PLAY (playback) M FF (fastforward) X PAUSE (pause) z REC (recording) qf SUPER LASER LINK button (p. 32)...

Operating Instructions
Page 109
DV IN indicator (p. 76) wa Audio mode indicator (p. 82) ws Warning indicators (p. 90) wd Camera recording lamp (p. 18) This indicator appears in light indicator (p. 52) qf STBY/REC indicator (p. 18)/Video control mode (p. 30) qg Tape counter indicator (p. 23)/Time code indicator (p. 23)/Self-diagnosis display indicator (p. 89)/Tape photo recording indicator (p. 34...
DV IN indicator (p. 76) wa Audio mode indicator (p. 82) ws Warning indicators (p. 90) wd Camera recording lamp (p. 18) This indicator appears in light indicator (p. 52) qf STBY/REC indicator (p. 18)/Video control mode (p. 30) qg Tape counter indicator (p. 23)/Time code indicator (p. 23)/Self-diagnosis display indicator (p. 89)/Tape photo recording indicator (p. 34...


