
Operating Instructions
Page 2
... the appliance. Never expose the battery pack to persons. This symbol is for years to operate this Sony Digital Handycam camcorder. LITHIUM ION BATTERY. Your Digital Handycam is subject to use. Note: In some areas the disposal of lithium ion batteries in household or... Telephone No.: 201-930-6972 This device complies with Part15 of Conformity Trade Name: SONY Model No.: DCR-TRV130 Responsible Party: Sony Electronics lnc. If you call : Sony Customer Information Center 1-800-222-SONY (7669) The number below is intended to alert the user to the presence of ...
... the appliance. Never expose the battery pack to persons. This symbol is for years to operate this Sony Digital Handycam camcorder. LITHIUM ION BATTERY. Your Digital Handycam is subject to use. Note: In some areas the disposal of lithium ion batteries in household or... Telephone No.: 201-930-6972 This device complies with Part15 of Conformity Trade Name: SONY Model No.: DCR-TRV130 Responsible Party: Sony Electronics lnc. If you call : Sony Customer Information Center 1-800-222-SONY (7669) The number below is intended to alert the user to the presence of ...
Operating Instructions
Page 5
...Index 110 5 END SEARCH 26 Advanced Playback Operations Playing back a tape with picture effects 55 Playing back a tape with digital effects 56 Enlarging images recorded on tapes - Table of trouble and their solutions .. 85 Self-diagnosis display 89 Warning ...still image on a tape - Insert Editing 77 Customizing Your Camcorder Changing the menu settings 79 Playback - Digital effect ... 41 Using the PROGRAM AE function .... 44 Adjusting the exposure manually ...... 46 Using your camcorder abroad 96 Maintenance information and precautions 97 Specifications 102 Focusing manually...
...Index 110 5 END SEARCH 26 Advanced Playback Operations Playing back a tape with picture effects 55 Playing back a tape with digital effects 56 Enlarging images recorded on tapes - Table of trouble and their solutions .. 85 Self-diagnosis display 89 Warning ...still image on a tape - Insert Editing 77 Customizing Your Camcorder Changing the menu settings 79 Playback - Digital effect ... 41 Using the PROGRAM AE function .... 44 Adjusting the exposure manually ...... 46 Using your camcorder abroad 96 Maintenance information and precautions 97 Specifications 102 Focusing manually...
Operating Instructions
Page 8
e.g. Before using Hi8 /Digital8 video cassettes. Unauthorized recording of the copyright laws. 8 Copyright precautions Television programs, films, video tapes, and other materials may be copyrighted. Getting started - Set the ... NTSC system-based TV. To view your digital camcorder, we recommend using your camcorder With your recordings on TV color systems TV color systems differ from country to the provision of such materials may be contrary to country. - Your camcorder records and plays back pictures only in the Digital8 system. Note on a TV, you can...
e.g. Before using Hi8 /Digital8 video cassettes. Unauthorized recording of the copyright laws. 8 Copyright precautions Television programs, films, video tapes, and other materials may be copyrighted. Getting started - Set the ... NTSC system-based TV. To view your digital camcorder, we recommend using your camcorder With your recordings on TV color systems TV color systems differ from country to the provision of such materials may be contrary to country. - Your camcorder records and plays back pictures only in the Digital8 system. Note on a TV, you can...
Operating Instructions
Page 41
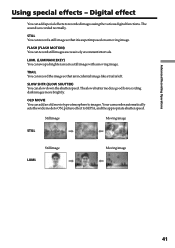
...You can slow down the shutter speed. OLD MOVIE You can add an old movie type atmosphere to recorded images using the various digital functions. Digital effect You can record the image so that it is left. The slow shutter mode is recorded normally. Still image Moving image ...STILL Still image LUMI. Moving image 41 SLOW SHTR (SLOW SHUTTER) You can record still images successively at constant intervals. Your camcorder automatically sets the...
...You can slow down the shutter speed. OLD MOVIE You can add an old movie type atmosphere to recorded images using the various digital functions. Digital effect You can record the image so that it is left. The slow shutter mode is recorded normally. Still image Moving image ...STILL Still image LUMI. Moving image 41 SLOW SHTR (SLOW SHUTTER) You can record still images successively at constant intervals. Your camcorder automatically sets the...

Operating Instructions
Page 45
...PROGRAM AE function Set PROGRAM AE to far distance. •In the sunset & moon and landscape modes, your camcorder is set to focus only on subjects in the middle to AUTO in the PROGRAM AE mode: - Notes ... the SEL/PUSH EXEC dial. Overlap - If you cannot take close-ups. This is because your camcorder is selected You can adjust the exposure manually. Using the PROGRAM AE function (1) In CAMERA mode, select... - Old movie - Wipe - Sports lesson mode 45 Slow shutter - Digital effect - Bounce •The following modes. If this happens, turn the PROGRAM AE function off. -
...PROGRAM AE function Set PROGRAM AE to far distance. •In the sunset & moon and landscape modes, your camcorder is set to focus only on subjects in the middle to AUTO in the PROGRAM AE mode: - Notes ... the SEL/PUSH EXEC dial. Overlap - If you cannot take close-ups. This is because your camcorder is selected You can adjust the exposure manually. Using the PROGRAM AE function (1) In CAMERA mode, select... - Old movie - Wipe - Sports lesson mode 45 Slow shutter - Digital effect - Bounce •The following modes. If this happens, turn the PROGRAM AE function off. -

Operating Instructions
Page 56
...to OFF (CHARGE) or stop playing back The digital effect function is stored in memory as a player. Playing back a tape with digital effects During playback, you have processed using the digital effect function with this camcorder. In the STILL or LUMI. mode, the ...SET P EFFECT D EFFECT RETURN L UM I . Notes • You cannot process externally input scenes using the digital effect function. • You cannot record images that you can process a scene using your camcorder as a still image. (3) Turn the SEL/PUSH EXEC dial to OFF in the menu settings. and TRAIL. (1)...
...to OFF (CHARGE) or stop playing back The digital effect function is stored in memory as a player. Playing back a tape with digital effects During playback, you have processed using the digital effect function with this camcorder. In the STILL or LUMI. mode, the ...SET P EFFECT D EFFECT RETURN L UM I . Notes • You cannot process externally input scenes using the digital effect function. • You cannot record images that you can process a scene using your camcorder as a still image. (3) Turn the SEL/PUSH EXEC dial to OFF in the menu settings. and TRAIL. (1)...
Operating Instructions
Page 64
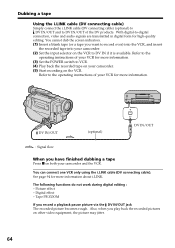
...) Simply connect the i.LINK cable (DV connecting cable) (optional) to DV IN/OUT and to -digital connection, video and audio signals are transmitted in digital form for high-quality editing. Refer to the operating instructions of your camcorder and the VCR. DV IN/OUT (optional) DV S VIDEO DV IN/OUT : Signal flow When...
...) Simply connect the i.LINK cable (DV connecting cable) (optional) to DV IN/OUT and to -digital connection, video and audio signals are transmitted in digital form for high-quality editing. Refer to the operating instructions of your camcorder and the VCR. DV IN/OUT (optional) DV S VIDEO DV IN/OUT : Signal flow When...
Operating Instructions
Page 66
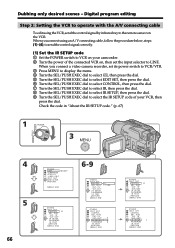
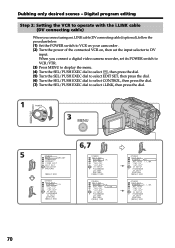
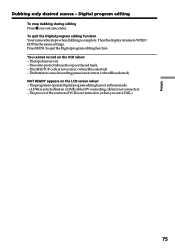
...I R SETUP 3 P AUS EMODE I R TEST RETURN [ MENU ] : END OTHERS ED I T SET CONTROL I R TEST RETURN [ MENU ] : END Dubbing only desired scenes - Digital program editing Step 2: Setting the VCR to operate with the A/V connecting cable To edit using an A/V connecting cable, follow the procedure below, steps (1)~(4), to send... the control signal correctly. (1) Set the IR SETUP code 1 Set the POWER switch to select the IR SETUP code of your camcorder. 2 Turn the power of the connected VCR on the VCR. I N " " CUT-OUT " I R SETUP P AUS EMODE I R TEST RETURN [...
...I R SETUP 3 P AUS EMODE I R TEST RETURN [ MENU ] : END OTHERS ED I T SET CONTROL I R TEST RETURN [ MENU ] : END Dubbing only desired scenes - Digital program editing Step 2: Setting the VCR to operate with the A/V connecting cable To edit using an A/V connecting cable, follow the procedure below, steps (1)~(4), to send... the control signal correctly. (1) Set the IR SETUP code 1 Set the POWER switch to select the IR SETUP code of your camcorder. 2 Turn the power of the connected VCR on the VCR. I N " " CUT-OUT " I R SETUP P AUS EMODE I R TEST RETURN [...
Operating Instructions
Page 67
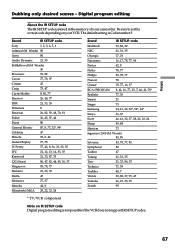
... Wards 89, 88, 37, 95, 47 Yamaha 36, 21, 33, 35 Zenith 95 * TV/VCR component Note on your camcorder. Brand IR SETUP code Sony 1, 2, 3, 4, 5, 6 Admiral (M. Digital program editing About the IR SETUP code The IR SETUP code is Code number 3. Be sure to set the correct code depending on... IR SETUP code Digital program editing is not possible if the VCR does not support IR SETUP codes. 67 ...
... Wards 89, 88, 37, 95, 47 Yamaha 36, 21, 33, 35 Zenith 95 * TV/VCR component Note on your camcorder. Brand IR SETUP code Sony 1, 2, 3, 4, 5, 6 Admiral (M. Digital program editing About the IR SETUP code The IR SETUP code is Code number 3. Be sure to set the correct code depending on... IR SETUP code Digital program editing is not possible if the VCR does not support IR SETUP codes. 67 ...

Operating Instructions
Page 68
...to cancel recording pause is X. - Select PAUSE if the button to cancel recording pause is N. (3) Setting your camcorder and the VCR to cancel recording pause on your camcorder and face it towards the remote sensor of your VCR. Set the devices about 30 cm (12 in.) apart,... and remove any obstacles between the devices. Infrared rays emitter Remote sensor A/V connecting cable (optional) 68 Dubbing only desired scenes - Digital program editing (2) ...
...to cancel recording pause is X. - Select PAUSE if the button to cancel recording pause is N. (3) Setting your camcorder and the VCR to cancel recording pause on your camcorder and face it towards the remote sensor of your VCR. Set the devices about 30 cm (12 in.) apart,... and remove any obstacles between the devices. Infrared rays emitter Remote sensor A/V connecting cable (optional) 68 Dubbing only desired scenes - Digital program editing (2) ...
Operating Instructions
Page 69
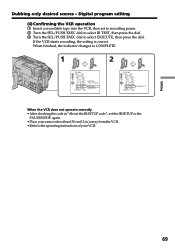
... does not operate correctly •After checking the code in .) away from the VCR. • Refer to select EXECUTE, then press the dial. Editing 69 Digital program editing (4) Confirming the VCR operation 1 Insert a recordable tape into the VCR, then set the IR SETUP or the PAUSEMODE again. •Place your... camcorder at least 30 cm (12 in "About the IR SETUP code", set to recording pause. 2 Turn the SEL/PUSH EXEC dial to select IR TEST, ...
... does not operate correctly •After checking the code in .) away from the VCR. • Refer to select EXECUTE, then press the dial. Editing 69 Digital program editing (4) Confirming the VCR operation 1 Insert a recordable tape into the VCR, then set the IR SETUP or the PAUSEMODE again. •Place your... camcorder at least 30 cm (12 in "About the IR SETUP code", set to recording pause. 2 Turn the SEL/PUSH EXEC dial to select IR TEST, ...
Operating Instructions
Page 70
... . When you connect using an i.LINK cable (DV connecting cable) (optional), follow the procedure below. (1) Set the POWER switch to VCR on your camcorder . (2) Turn the power of the connected VCR on, then set its POWER switch to VCR/VTR. (3) Press MENU to display the menu. (4) Turn... [ MENU ] : END OTHERS ED I T SET CONTROL ADJ TEST " CUT- L I R ADJ TEST " CUT- Digital program editing Step 2: Setting the VCR to operate with the i.LINK cable (DV connecting cable) When you connect a digital video camera recorder, set the input selector to select i.LINK, then press the dial. OFF (CHARGE...
... . When you connect using an i.LINK cable (DV connecting cable) (optional), follow the procedure below. (1) Set the POWER switch to VCR on your camcorder . (2) Turn the power of the connected VCR on, then set its POWER switch to VCR/VTR. (3) Press MENU to display the menu. (4) Turn... [ MENU ] : END OTHERS ED I T SET CONTROL ADJ TEST " CUT- L I R ADJ TEST " CUT- Digital program editing Step 2: Setting the VCR to operate with the i.LINK cable (DV connecting cable) When you connect a digital video camera recorder, set the input selector to select i.LINK, then press the dial. OFF (CHARGE...
Operating Instructions
Page 71
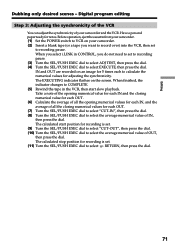
...you select i.LINK in the VCR, then start position for adjusting the synchronicity. Editing Dubbing only desired scenes - The calculated start slow playback. Digital program editing Step 3: Adjusting the synchronicity of the VCR You can adjust the synchronicity of OUT, then press the dial. When finished, the indicator...dial to select "CUT-OUT", then press the dial. (10) Turn the SEL/PUSH EXEC dial to select the average numerical value of your camcorder. (2) Insert a blank tape (or a tape you do not need to set to select the average numerical value of all the opening numerical ...
...you select i.LINK in the VCR, then start position for adjusting the synchronicity. Editing Dubbing only desired scenes - The calculated start slow playback. Digital program editing Step 3: Adjusting the synchronicity of the VCR You can adjust the synchronicity of OUT, then press the dial. When finished, the indicator...dial to select "CUT-OUT", then press the dial. (10) Turn the SEL/PUSH EXEC dial to select the average numerical value of your camcorder. (2) Insert a blank tape (or a tape you do not need to set to select the average numerical value of all the opening numerical ...

Operating Instructions
Page 72
...TEST RETURN [ MENU ] : END OTHERS ED I T SET CONTROL ADJ TEST RETURN " CUT- Set CONTROL to IR in digital format for about 10 seconds of your camcorder . • When you may not record properly. Be sure to adjust the syncronicity is recorded for high-quality editing. 72...] : END OTHERS ED I T SET CONTROL AD J T E S T COMP L E T E " CUT- If you connect using an i.LINK cable (DV connecting cable) With a digital-to operate the dubbing function correctly, depending on the VCR. Dubbing only desired scenes - I N " EXECUTE " CUT-OUT " I R SETUP P AUS EMODE I R TEST [ ME OTHERS...
...TEST RETURN [ MENU ] : END OTHERS ED I T SET CONTROL ADJ TEST RETURN " CUT- Set CONTROL to IR in digital format for about 10 seconds of your camcorder . • When you may not record properly. Be sure to adjust the syncronicity is recorded for high-quality editing. 72...] : END OTHERS ED I T SET CONTROL AD J T E S T COMP L E T E " CUT- If you connect using an i.LINK cable (DV connecting cable) With a digital-to operate the dubbing function correctly, depending on the VCR. Dubbing only desired scenes - I N " EXECUTE " CUT-OUT " I R SETUP P AUS EMODE I R TEST [ ME OTHERS...
Operating Instructions
Page 73
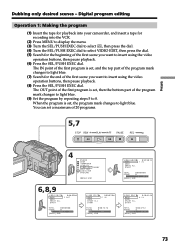
... using the video operation buttons, then pause playback. (8) Press the SEL/PUSH EXEC dial. Editing Dubbing only desired scenes - Digital program editing Operation 1: Making the program (1) Insert the tape for playback into your camcorder, and insert a tape for recording into the VCR. (2) Press MENU to display the menu. (3) Turn the SEL/PUSH...
... using the video operation buttons, then pause playback. (8) Press the SEL/PUSH EXEC dial. Editing Dubbing only desired scenes - Digital program editing Operation 1: Making the program (1) Insert the tape for playback into your camcorder, and insert a tape for recording into the VCR. (2) Press MENU to display the menu. (3) Turn the SEL/PUSH...
Operating Instructions
Page 74
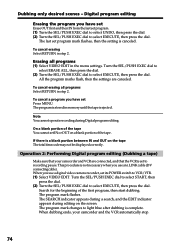
... program marks flash, then the settings are connected, and that your camcorder and the VCR automatically stop. 74 To cancel a program you use an i.LINK cable (DV connecting cable). If there is complete. Operation 2: Performing Digital program editing (Dubbing a tape) Make sure that the VCR is ...Turn the SEL/PUSH EXEC dial to select EXECUTE, then press the dial. When dubbing ends, your camcorder and VCR are canceled. Digital program editing Erasing the program you use a digital video camera recorder, set IN or OUT on the screen. To cancel erasing Select RETURN in memory until...
... program marks flash, then the settings are connected, and that your camcorder and the VCR automatically stop. 74 To cancel a program you use an i.LINK cable (DV connecting cable). If there is complete. Operation 2: Performing Digital program editing (Dubbing a tape) Make sure that the VCR is ...Turn the SEL/PUSH EXEC dial to select EXECUTE, then press the dial. When dubbing ends, your camcorder and VCR are canceled. Digital program editing Erasing the program you use a digital video camera recorder, set IN or OUT on the screen. To cancel erasing Select RETURN in memory until...
Operating Instructions
Page 75
... EDIT in the menu settings. The power of the connected VCR is selected) - You cannot record on . (when you set i.LINK.) 75 To quit the Digital program editing function Your camcorder stops when dubbing is not connected. - Thewrite-protecttabissettoexposetheredmark. - TheprogramtooperateDigitalprogrameditinghasnotyetbeenmade. - i.LINK is selected but an i.LINK cable (DV connecting cable) is complete...
... EDIT in the menu settings. The power of the connected VCR is selected) - You cannot record on . (when you set i.LINK.) 75 To quit the Digital program editing function Your camcorder stops when dubbing is not connected. - Thewrite-protecttabissettoexposetheredmark. - TheprogramtooperateDigitalprogrameditinghasnotyetbeenmade. - i.LINK is selected but an i.LINK cable (DV connecting cable) is complete...
Operating Instructions
Page 76
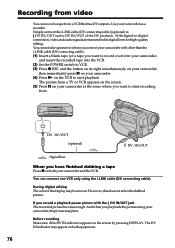
...right simultaneously on your camcorder, then immediately press X on your camcorder. (4) Press N on your camcorder at the scene where you connect your camcorder, the picture may jitter. Before recording Make sure if the DV IN indicator appears on both equipment. 76 With digital-to-digital connection, video and ...audio signals are transmitted in when you want to record over) into your camcorder, and insert the recorded tape into the VCR. (2) Set the POWER switch ...
...right simultaneously on your camcorder, then immediately press X on your camcorder. (4) Press N on your camcorder at the scene where you connect your camcorder, the picture may jitter. Before recording Make sure if the DV IN indicator appears on both equipment. 76 With digital-to-digital connection, video and ...audio signals are transmitted in when you want to record over) into your camcorder, and insert the recorded tape into the VCR. (2) Set the POWER switch ...
Operating Instructions
Page 80
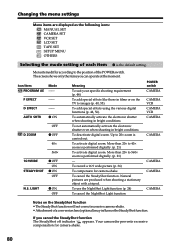
... effects using the various digital functions (p. 42, 56). Natural pictures are displayed as the following icons: MANUAL SET CAMERA SET VCR SET LCD SET TAPE SET SETUP MENU OTHERS Selecting the mode setting of the POWER switch. Your camcorder prevents excessive compensation for camera...-shake To cancel the SteadyShot function. Menu items differ according to 20× zoom is performed digitally. (p. 21) - Up to the position of each item z is performed digitally. (p. 21) To activate digital zoom. More than ...
... effects using the various digital functions (p. 42, 56). Natural pictures are displayed as the following icons: MANUAL SET CAMERA SET VCR SET LCD SET TAPE SET SETUP MENU OTHERS Selecting the mode setting of the POWER switch. Your camcorder prevents excessive compensation for camera...-shake To cancel the SteadyShot function. Menu items differ according to 20× zoom is performed digitally. (p. 21) - Up to the position of each item z is performed digitally. (p. 21) To activate digital zoom. More than ...
Operating Instructions
Page 82
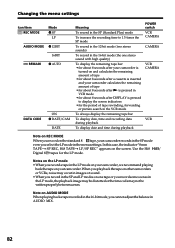
.... Notes on the LP mode •When you cannot adjust the balance in the LP mode on your camcorder, we recommend playing back the tape on the standard 8 tape, your camcorder. Use the Hi8 / Digital 8 tapes for the period of tape rewinding, forwarding or picture search in the VCR mode To always display... playback To display date and time during playback POWER switch VCR CAMERA CAMERA VCR CAMERA VCR Note on REC MODE When you record on your camcorder records in the SP mode even you select the LP mode in the LP mode, the playback image may be written properly between scenes. Note...
.... Notes on the LP mode •When you cannot adjust the balance in the LP mode on your camcorder, we recommend playing back the tape on the standard 8 tape, your camcorder. Use the Hi8 / Digital 8 tapes for the period of tape rewinding, forwarding or picture search in the VCR mode To always display... playback To display date and time during playback POWER switch VCR CAMERA CAMERA VCR CAMERA VCR Note on REC MODE When you record on your camcorder records in the SP mode even you select the LP mode in the LP mode, the playback image may be written properly between scenes. Note...


