Operating Guide
Page 8
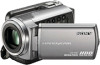
... ) are lit or flashing. Otherwise, the recording media may be damaged, recorded images may damage the hard disk drive of the camcorder. Pushing the plug forcibly into an outlet on the camcorder in a low-pressure area, where the altitude is connected. Consult the... Only for DCR-SR87: NP-FH50 (1) CD-ROM "Handycam Application Software" (1) (p. 25) "PMB" (software) including "PMB Guide" "Handycam Handbook" (PDF) "Operating Guide" (This manual) (1) See page 39 for "Memory Stick" media you may not be able to the camcorder. ...
... ) are lit or flashing. Otherwise, the recording media may be damaged, recorded images may damage the hard disk drive of the camcorder. Pushing the plug forcibly into an outlet on the camcorder in a low-pressure area, where the altitude is connected. Consult the... Only for DCR-SR87: NP-FH50 (1) CD-ROM "Handycam Application Software" (1) (p. 25) "PMB" (software) including "PMB Guide" "Handycam Handbook" (PDF) "Operating Guide" (This manual) (1) See page 39 for "Memory Stick" media you may not be able to the camcorder. ...
Operating Guide
Page 9
... if recording or playback is not possible due to the copyright laws. To prevent your image data from being lost, save all your recorded images on the operating system of the camcorder and "Memory Stick PRO Duo" media are called "recording media." In this manual for...DVD writer, VCR, or DVD/HDD recorder. These points are normal results of the LCD screen used for effective use. About this Operating Guide, the hard disk of the computer. Also, you repeat recording/deleting images for illustration purposes are captured using the camcorder if necessary (p. 16). The...
... if recording or playback is not possible due to the copyright laws. To prevent your image data from being lost, save all your recorded images on the operating system of the camcorder and "Memory Stick PRO Duo" media are called "recording media." In this manual for...DVD writer, VCR, or DVD/HDD recorder. These points are normal results of the LCD screen used for effective use. About this Operating Guide, the hard disk of the computer. Also, you repeat recording/deleting images for illustration purposes are captured using the camcorder if necessary (p. 16). The...
Operating Guide
Page 11
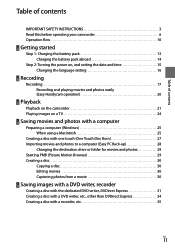
...Changing the language setting 16 Recording Recording 17 Recording and playing movies and photos easily (Easy Handycam operation 20 Playback Playback on the camcorder 21 Playing images on a TV 24 Saving movies and photos with a computer Preparing a computer (Windows 25 When using a Macintosh 25 Creating a... 29 Starting PMB (Picture Motion Browser 29 Creating a disc 30 Copying a disc 30 Editing movies 30 Capturing photos from a movie 30 Saving images with a DVD writer, recorder Creating a disc with the dedicated DVD writer, DVDirect Express 31 Creating a disc with a DVD writer, etc.,...
...Changing the language setting 16 Recording Recording 17 Recording and playing movies and photos easily (Easy Handycam operation 20 Playback Playback on the camcorder 21 Playing images on a TV 24 Saving movies and photos with a computer Preparing a computer (Windows 25 When using a Macintosh 25 Creating a... 29 Starting PMB (Picture Motion Browser 29 Creating a disc 30 Copying a disc 30 Editing movies 30 Capturing photos from a movie 30 Saving images with a DVD writer, recorder Creating a disc with the dedicated DVD writer, DVDirect Express 31 Creating a disc with a DVD writer, etc.,...
Operating Guide
Page 15
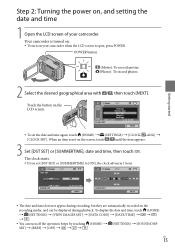
...photos 2 Select the desired geographical area with / , then touch [NEXT]. To display the date and time, touch (HOME) (SETTINGS) [VIEW IMAGES SET] [DATA CODE] [DATE/TIME You can be displayed during recording, but they are automatically recorded on the recording media, and can...SET] or [SUMMERTIME], date and time, then touch . When an item is open, press POWER. Getting started Step 2: Turning the power on your camcorder. Your camcorder is turned on. To turn on , and setting the date and time 1 Open the LCD screen of your...
...photos 2 Select the desired geographical area with / , then touch [NEXT]. To display the date and time, touch (HOME) (SETTINGS) [VIEW IMAGES SET] [DATA CODE] [DATE/TIME You can be displayed during recording, but they are automatically recorded on the recording media, and can...SET] or [SUMMERTIME], date and time, then touch . When an item is open, press POWER. Getting started Step 2: Turning the power on your camcorder. Your camcorder is turned on. To turn on , and setting the date and time 1 Open the LCD screen of your...
Operating Guide
Page 18
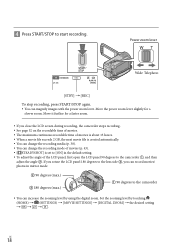
...a slower zoom. If you rotate the LCD panel 180 degrees to the lens side , you close the LCD screen during recording, the camcorder stops recording. See page 52 on the recordable time of movies. The maximum continuous recordable time of movies is about 13.... 90 degrees (max.) 180 degrees (max.) 90 degrees to the camcorder You can magnify images with the power zoom lever. US 18 Press START/STOP to the camcorder , and then adjust the angle . Move the power zoom lever slightly for a faster zoom...
...a slower zoom. If you rotate the LCD panel 180 degrees to the lens side , you close the LCD screen during recording, the camcorder stops recording. See page 52 on the recordable time of movies. The maximum continuous recordable time of movies is about 13.... 90 degrees (max.) 180 degrees (max.) 90 degrees to the camcorder You can magnify images with the power zoom lever. US 18 Press START/STOP to the camcorder , and then adjust the angle . Move the power zoom lever slightly for a faster zoom...
Operating Guide
Page 20
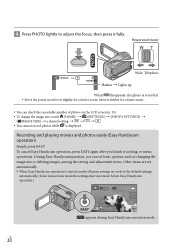
...after you can check the recordable number of photos on the LCD screen (p. 55). To change the image size, touch (HOME) (SETTINGS) [PHOTO SETTINGS] [ IMAGE SIZE] a desired setting You cannot record photos while is started, nearly all menu settings are set ...basic options, such as changing the image size or deleting images, among the setting and adjustment items. Other items are reset to adjust the focus, then press it further for a slower zoom....
...after you can check the recordable number of photos on the LCD screen (p. 55). To change the image size, touch (HOME) (SETTINGS) [PHOTO SETTINGS] [ IMAGE SIZE] a desired setting You cannot record photos while is started, nearly all menu settings are set ...basic options, such as changing the image size or deleting images, among the setting and adjustment items. Other items are reset to adjust the focus, then press it further for a slower zoom....

Operating Guide
Page 21
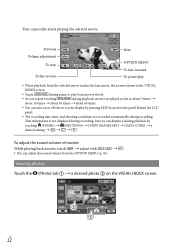
...on the LCD screen as well. Touch the (Movie) tab a desired movie . Your camcorder is already open, press POWER (p. 15). Press (VIEW IMAGES). If you can display the VISUAL INDEX screen by a certain interval (Film Roll Index) Previous To the index screen of face...; To turn on the internal hard disk are played (p. 38). Playing movies Open the LCD screen of scenes by pressing (VIEW IMAGES) on the "Memory Stick PRO Duo" media.) US 21 Playback Playback on the camcorder In the default setting, movies and photos on your...
...on the LCD screen as well. Touch the (Movie) tab a desired movie . Your camcorder is already open, press POWER (p. 15). Press (VIEW IMAGES). If you can display the VISUAL INDEX screen by a certain interval (Film Roll Index) Previous To the index screen of face...; To turn on the internal hard disk are played (p. 38). Playing movies Open the LCD screen of scenes by pressing (VIEW IMAGES) on the "Memory Stick PRO Duo" media.) US 21 Playback Playback on the camcorder In the default setting, movies and photos on your...
Operating Guide
Page 22
... during playback, movies are recorded automatically during pause to the VISUAL INDEX screen. Touch / during recording. US 22 Your camcorder starts playing the selected movie. Previous Volume adjustment To stop To fast-reverse Next OPTION MENU To fast-forward To pause/play back ...times about 60 times. You can turn on or off the on-screen display by touching (HOME) (SETTINGS) [VIEW IMAGES SET] [DATA CODE] a desired setting To adjust the sound volume of movies While playing back movies, touch adjust with / ...
... during playback, movies are recorded automatically during pause to the VISUAL INDEX screen. Touch / during recording. US 22 Your camcorder starts playing the selected movie. Previous Volume adjustment To stop To fast-reverse Next OPTION MENU To fast-forward To pause/play back ...times about 60 times. You can turn on or off the on-screen display by touching (HOME) (SETTINGS) [VIEW IMAGES SET] [DATA CODE] a desired setting To adjust the sound volume of movies While playing back movies, touch adjust with / ...
Operating Guide
Page 24
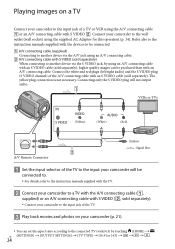
... TV. Play back movies and photos on a TV Connect your camcorder to the input jack of a TV or VCR using an A/V connecting cable with an S VIDEO cable (sold separately), higher quality images can set the aspect ratio according to the connected TV (wide/4:3) by using...VCRs or TVs (Yellow) :Signal flow A/V Remote Connector Set the input selector of the TV to the input your camcorder will not output audio. Playing images on your camcorder (p. 21). You can be produced than with an A/V connecting cable. The yellow plug connection is not necessary. Connecting ...
... TV. Play back movies and photos on a TV Connect your camcorder to the input jack of a TV or VCR using an A/V connecting cable with an S VIDEO cable (sold separately), higher quality images can set the aspect ratio according to the connected TV (wide/4:3) by using...VCRs or TVs (Yellow) :Signal flow A/V Remote Connector Set the input selector of the TV to the input your camcorder will not output audio. Playing images on your camcorder (p. 21). You can be produced than with an A/V connecting cable. The yellow plug connection is not necessary. Connecting ...
Operating Guide
Page 25
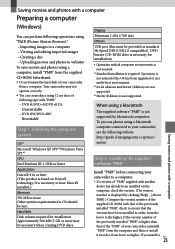
... installed "PMB," check to ensure that of the "PMB" of your camcorder from a computer. http://guide.d-imaging.sony.co.jp/mac/ ms/us/ Step 2 Installing the supplied software "PMB" Install "PMB" before connecting your camcorder to a computer. If a version of following website. Operation... a computer Preparing a computer Saving movies and photos with a computer (Windows) You can create discs using a Macintosh computer connected to your camcorder, see the following type with "PMB." DVD-R/DVD+R/DVD+R DL: Unrewritable DVD-RW/DVD+RW: Rewritable Step 1 Checking...
... installed "PMB," check to ensure that of the "PMB" of your camcorder from a computer. http://guide.d-imaging.sony.co.jp/mac/ ms/us/ Step 2 Installing the supplied software "PMB" Install "PMB" before connecting your camcorder to a computer. If a version of following website. Operation... a computer Preparing a computer Saving movies and photos with a computer (Windows) You can create discs using a Macintosh computer connected to your camcorder, see the following type with "PMB." DVD-R/DVD+R/DVD+R DL: Unrewritable DVD-RW/DVD+RW: Rewritable Step 1 Checking...
Operating Guide
Page 28
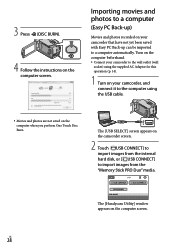
... photos are not saved on the computer screen. The [Handycam Utility] window appears on the camcorder screen. 2 Touch [ USB CONNECT] to import images from the internal hard disk, or [ USB CONNECT] to import images from the "Memory Stick PRO Duo" media. Turn on the computer beforehand. Connect... your camcorder to the wall outlet (wall socket) using the supplied AC Adaptor for this operation (p. 14). 1 Turn on your camcorder that have not yet been saved ...
... photos are not saved on the computer screen. The [Handycam Utility] window appears on the camcorder screen. 2 Touch [ USB CONNECT] to import images from the internal hard disk, or [ USB CONNECT] to import images from the "Memory Stick PRO Duo" media. Turn on the computer beforehand. Connect... your camcorder to the wall outlet (wall socket) using the supplied AC Adaptor for this operation (p. 14). 1 Turn on your camcorder that have not yet been saved ...
Operating Guide
Page 29
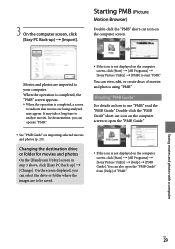
...from [Help] of movies and photos using "PMB." Reading "PMB Guide" For details on the computer screen, click [Start] [All Programs] [Sony Picture Utility] [Help] [PMB Guide]. Changing the destination drive or folder for movies and photos On the [Handycam Utility] screen in step 3...discs of "PMB." Saving movies and photos with a computer US 29 On the screen displayed, you can select the drive or folder where the images are imported to be saved. If the icon is not displayed on the computer screen. 3 On the computer screen, click [Easy...
...from [Help] of movies and photos using "PMB." Reading "PMB Guide" For details on the computer screen, click [Start] [All Programs] [Sony Picture Utility] [Help] [PMB Guide]. Changing the destination drive or folder for movies and photos On the [Handycam Utility] screen in step 3...discs of "PMB." Saving movies and photos with a computer US 29 On the screen displayed, you can select the drive or folder where the images are imported to be saved. If the icon is not displayed on the computer screen. 3 On the computer screen, click [Easy...
Operating Guide
Page 31
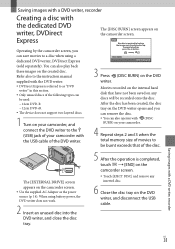
... internal hard disk that of the DVD writer. Operating by the camcorder screen, you can remove the disc. You can also operate with (DISC BURN) on your camcorder with a DVD writer, recorder US 31 Saving images with the USB cable of the disc. 5 After the operation ...is referred to the instruction manual supplied with the DVD writer. DVDirect Express is completed, touch [END] on the camcorder screen. Touch [...
... internal hard disk that of the DVD writer. Operating by the camcorder screen, you can remove the disc. You can also operate with (DISC BURN) on your camcorder with a DVD writer, recorder US 31 Saving images with the USB cable of the disc. 5 After the operation ...is referred to the instruction manual supplied with the DVD writer. DVDirect Express is completed, touch [END] on the camcorder screen. Touch [...

Operating Guide
Page 32
...;Touch [DISC BURN OPTION] in step 3 above. US 32 Turn on your camcorder, and connect the DVD writer to confirm the image. The movies on the disc appear as VISUAL INDEX on the camcorder screen. Press the play back movies on the TV screen by connecting the... media containing the movie(s) you can also operate by date. Touch [YES] on the camcorder screen. The movie plays back on the camcorder screen. You can search for images by the camcorder screen (p. 21). Touch [END] [EJECT DISC] on the disc. Movie thumbnails appear...
...;Touch [DISC BURN OPTION] in step 3 above. US 32 Turn on your camcorder, and connect the DVD writer to confirm the image. The movies on the disc appear as VISUAL INDEX on the camcorder screen. Press the play back movies on the TV screen by connecting the... media containing the movie(s) you can also operate by date. Touch [YES] on the camcorder screen. The movie plays back on the camcorder screen. You can search for images by the camcorder screen (p. 21). Touch [END] [EJECT DISC] on the disc. Movie thumbnails appear...
Operating Guide
Page 33
.... It may not be cut off. Disc creation time to dub movies to the DVD writer, and then play back created discs on the camcorder screen. DVDirect Express may take more time depending on the recording mode or the number of the disc is reached. If playback is not... possible for any reason, connect the camcorder to the limit of scenes. You can play back. The disc mark appears on a general DVD player. US 33 Saving...
.... It may not be cut off. Disc creation time to dub movies to the DVD writer, and then play back created discs on the camcorder screen. DVDirect Express may take more time depending on the recording mode or the number of the disc is reached. If playback is not... possible for any reason, connect the camcorder to the limit of scenes. You can play back. The disc mark appears on a general DVD player. US 33 Saving...
Operating Guide
Page 35
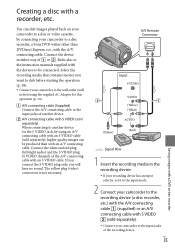
... white and red plug (left/right audio) and the S VIDEO plug (S VIDEO channel) of or . US 35 Saving images with a recorder, etc. You can be connected. The yellow plug (video) connection is not necessary. Connect the device in the recording device... with the devices to the input jacks of another device. A/V connecting cable with S VIDEO (sold separately). Connect your camcorder to a disc recorder, a Sony DVD writer other than DVDirect Express, ect., with S VIDEO (sold separately) When connecting to another device via the S VIDEO jack...
... white and red plug (left/right audio) and the S VIDEO plug (S VIDEO channel) of or . US 35 Saving images with a recorder, etc. You can be connected. The yellow plug (video) connection is not necessary. Connect the device in the recording device... with the devices to the input jacks of another device. A/V connecting cable with S VIDEO (sold separately). Connect your camcorder to a disc recorder, a Sony DVD writer other than DVDirect Express, ect., with S VIDEO (sold separately) When connecting to another device via the S VIDEO jack...
Operating Guide
Page 36
... When dubbing is finished, stop the recording device, and then your camcorder. Since dubbing is performed via analog data transfer, the image quality may deteriorate. To hide the screen indicators (such as...PANEL] (the default setting To record the date/time or camera settings data, touch (HOME) (SETTINGS) [VIEW IMAGES SET] [DATA CODE] a desired setting In addidion, touch (HOME) (SETTINGS) [OUTPUT SETTINGS] &#... input jack on the device. Sony DVD writer may not be available in some countries/regions.
... When dubbing is finished, stop the recording device, and then your camcorder. Since dubbing is performed via analog data transfer, the image quality may deteriorate. To hide the screen indicators (such as...PANEL] (the default setting To record the date/time or camera settings data, touch (HOME) (SETTINGS) [VIEW IMAGES SET] [DATA CODE] a desired setting In addidion, touch (HOME) (SETTINGS) [OUTPUT SETTINGS] &#... input jack on the device. Sony DVD writer may not be available in some countries/regions.
Operating Guide
Page 37
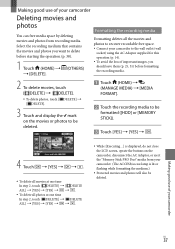
...socket) using the AC Adaptor supplied for this operation (p. 14). To avoid the loss of important images, you want to be deleted. Making good use of your camcorder US 37 Select the recording medium that contains the movies and photos you should save them (p. 25, 31...) before formatting the recording media. Touch (HOME) (MANAGE MEDIA) [MEDIA FORMAT]. Touch the recording media to be formatted ([HDD] or [MEMORY ...
...socket) using the AC Adaptor supplied for this operation (p. 14). To avoid the loss of important images, you want to be deleted. Making good use of your camcorder US 37 Select the recording medium that contains the movies and photos you should save them (p. 25, 31...) before formatting the recording media. Touch (HOME) (MANAGE MEDIA) [MEDIA FORMAT]. Touch the recording media to be formatted ([HDD] or [MEMORY ...

Operating Guide
Page 39
...the wrong direction, the "Memory Stick PRO Duo" media, the "Memory Stick Duo" media slot, or image data may be used. "Memory Stick PRO Duo" media of your camcorder For recording movies, it is changed. To check the recording media settings Light up to 16 ...). The [PHOTO MEDIA SET] screen appears. Touch the desired recording medium. Touch [YES] . Making good use with your camcorder Inserting "Memory Stick PRO Duo" media Set the recording medium to [MEMORY STICK] to check the recording medium used for movies, or the (Photo...
...the wrong direction, the "Memory Stick PRO Duo" media, the "Memory Stick Duo" media slot, or image data may be used. "Memory Stick PRO Duo" media of your camcorder For recording movies, it is changed. To check the recording media settings Light up to 16 ...). The [PHOTO MEDIA SET] screen appears. Touch the desired recording medium. Touch [YES] . Making good use with your camcorder Inserting "Memory Stick PRO Duo" media Set the recording medium to [MEMORY STICK] to check the recording medium used for movies, or the (Photo...

Operating Guide
Page 40
The [Create a new Image Database File.] screen appears when you insert new "Memory Stick PRO Duo" media while the (Movie) lamp is displayed in once. Do not open ...) (OTHERS) [MOVIE DUB]/[PHOTO COPY], then follow the displays on "Memory Stick PRO Duo" media, touch [NO]. If [Failed to create a new Image Database File.
The [Create a new Image Database File.] screen appears when you insert new "Memory Stick PRO Duo" media while the (Movie) lamp is displayed in once. Do not open ...) (OTHERS) [MOVIE DUB]/[PHOTO COPY], then follow the displays on "Memory Stick PRO Duo" media, touch [NO]. If [Failed to create a new Image Database File.


