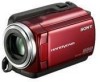
Operating Guide
Page 17
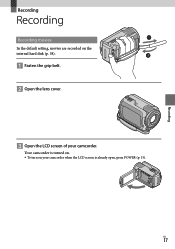
US 17 Your camcorder is turned on. To turn on the internal hard disk (p. 38). Fasten the grip belt. Open the lens cover. Open the LCD screen of your camcorder when the LCD screen is already open, press POWER (p. 15). Recording Recording Recording Recording movies In the default setting, movies are recorded on your camcorder.
US 17 Your camcorder is turned on. To turn on the internal hard disk (p. 38). Fasten the grip belt. Open the lens cover. Open the LCD screen of your camcorder when the LCD screen is already open, press POWER (p. 15). Recording Recording Recording Recording movies In the default setting, movies are recorded on your camcorder.
Operating Guide
Page 18
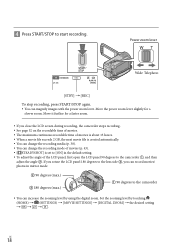
...). You can magnify images with the power zoom lever. If you rotate the LCD panel 180 degrees to the lens side , you close the LCD screen during recording, the camcorder stops recording. See page 52 on the recordable time of movies. The maximum continuous recordable time of ... movies/ photos in the default setting. To adjust the angle of the LCD panel, first open the LCD panel 90 degrees to the camcorder , and then adjust the angle . US 18 Set the zooming level by using the digital zoom. Move it further for a slower zoom...
...). You can magnify images with the power zoom lever. If you rotate the LCD panel 180 degrees to the lens side , you close the LCD screen during recording, the camcorder stops recording. See page 52 on the recordable time of movies. The maximum continuous recordable time of ... movies/ photos in the default setting. To adjust the angle of the LCD panel, first open the LCD panel 90 degrees to the camcorder , and then adjust the angle . US 18 Set the zooming level by using the digital zoom. Move it further for a slower zoom...
Operating Guide
Page 19
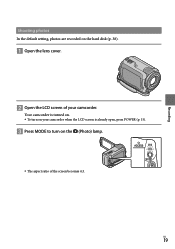
Recording Shooting photos In the default setting, photos are recorded on the (Photo) lamp. The aspect ratio of your camcorder when the LCD screen is already open, press POWER (p. 15). Press MODE to turn on the hard disk (p. 38). Open the lens cover. Open the LCD screen of the screen becomes 4:3. Your camcorder is turned on. To turn on your camcorder. US 19
Recording Shooting photos In the default setting, photos are recorded on the (Photo) lamp. The aspect ratio of your camcorder when the LCD screen is already open, press POWER (p. 15). Press MODE to turn on the hard disk (p. 38). Open the lens cover. Open the LCD screen of the screen becomes 4:3. Your camcorder is turned on. To turn on your camcorder. US 19
Operating Guide
Page 49
...On handling the casing If the casing is not a malfunction. The camcorder may not be repaired. Near windows or outdoors, where the LCD screen or the lens may heat up. This damages the inside of the lens. Keep the LCD screen closed when you are not using your...malfunction cannot be able to direct sunlight. Be particularly careful of the LCD screen. Operate your camcorder on the LCD screen, as by placing anything heavy on and let it run by a Sony dealer before storing it. When you use a deformed or damaged battery pack. Keep metal ...
...On handling the casing If the casing is not a malfunction. The camcorder may not be repaired. Near windows or outdoors, where the LCD screen or the lens may heat up. This damages the inside of the lens. Keep the LCD screen closed when you are not using your...malfunction cannot be able to direct sunlight. Be particularly careful of the LCD screen. Operate your camcorder on the LCD screen, as by placing anything heavy on and let it run by a Sony dealer before storing it. When you use a deformed or damaged battery pack. Keep metal ...
Operating Guide
Page 50
... hands Leaving the casing in a well-ventilated location subject to take possession of the camcorder, it is recommended that you destroy the actual body of the lens clean with the LCD screen closed for more than 24 hours. However, even if the preinstalled ...care and storage of the lens Wipe the surface of the "Memory Stick PRO Duo" media. US 50 The rechargeable battery will not be entirely deleted from the "Handycam Handbook" " on a computer. On charging the pre-installed rechargeable battery Your camcorder has a pre-installed rechargeable...
... hands Leaving the casing in a well-ventilated location subject to take possession of the camcorder, it is recommended that you destroy the actual body of the lens clean with the LCD screen closed for more than 24 hours. However, even if the preinstalled ...care and storage of the lens Wipe the surface of the "Memory Stick PRO Duo" media. US 50 The rechargeable battery will not be entirely deleted from the "Handycam Handbook" " on a computer. On charging the pre-installed rechargeable battery Your camcorder has a pre-installed rechargeable...
Operating Guide
Page 51
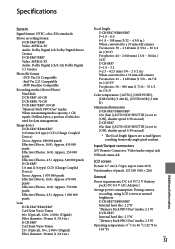
... number of which is set to [ON], shutter speed 1/30 second) DCR-SR87 8 lx (lux) ([AUTO SLW SHUTTR] is used for data management. Image device DCR-SR47/SR48/SR67 2.25 mm (1/8 type) CCD (Charge Coupled Device) Gross: Approx. 680 000 pixels Effective (Movie, 16:9): Approx. 410 000 pixels Effective (Photos... 000 pixels Effective (Movie, 16:9): Approx. 670 000 pixels Effective (Photos, 16:9): Approx. 750 000 pixels Effective (Photos, 4:3): Approx. 1 000 000 pixels Lens DCR-SR47/SR48/SR67 Carl Zeiss Vario-Tessar 60× (Optical), 120×, 2 000× (Digital) Filter diameter: 30 mm (1 3/16 in...
... number of which is set to [ON], shutter speed 1/30 second) DCR-SR87 8 lx (lux) ([AUTO SLW SHUTTR] is used for data management. Image device DCR-SR47/SR48/SR67 2.25 mm (1/8 type) CCD (Charge Coupled Device) Gross: Approx. 680 000 pixels Effective (Movie, 16:9): Approx. 410 000 pixels Effective (Photos... 000 pixels Effective (Movie, 16:9): Approx. 670 000 pixels Effective (Photos, 16:9): Approx. 750 000 pixels Effective (Photos, 4:3): Approx. 1 000 000 pixels Lens DCR-SR47/SR48/SR67 Carl Zeiss Vario-Tessar 60× (Optical), 120×, 2 000× (Digital) Filter diameter: 30 mm (1 3/16 in...
Operating Guide
Page 56
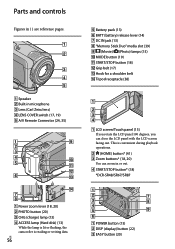
... controls Figures in ( ) are reference pages. Speaker Built-in microphone Lens (Carl Zeiss lens) LENS COVER switch (17, 19) A/V Remote Connector (24, 35) Battery pack (13...the LCD panel 180 degrees, you can zoom in or out. START/STOP button* (18) *DCR-SR48/SR67/SR87 Power zoom lever (18, 20) PHOTO button (20) ...lamp (13) ACCESS lamp (Hard disk) (13) While the lamp is lit or flashing, the camcorder is convenient during playback operations. (HOME) button* (41) Zoom buttons* (18, ...
... controls Figures in ( ) are reference pages. Speaker Built-in microphone Lens (Carl Zeiss lens) LENS COVER switch (17, 19) A/V Remote Connector (24, 35) Battery pack (13...the LCD panel 180 degrees, you can zoom in or out. START/STOP button* (18) *DCR-SR48/SR67/SR87 Power zoom lever (18, 20) PHOTO button (20) ...lamp (13) ACCESS lamp (Hard disk) (13) While the lamp is lit or flashing, the camcorder is convenient during playback operations. (HOME) button* (41) Zoom buttons* (18, ...


