Operating Guide
Page 3
... the set has been exposed to the plugs, receptacles, and the point where the cord exits from the wall outlet and disconnect the antenna or cable system. If the set is in safe operating condition. 3 Unauthorized substitutions may fall, causing serious injury to a child or an adult, and serious damage to...
... the set has been exposed to the plugs, receptacles, and the point where the cord exits from the wall outlet and disconnect the antenna or cable system. If the set is in safe operating condition. 3 Unauthorized substitutions may fall, causing serious injury to a child or an adult, and serious damage to...
Operating Guide
Page 5
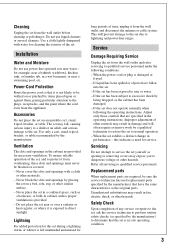
...the receiving antenna. - Declaration of Conformity Trade Name: SONY Model No.: DCR-SR200 Responsible Party: Sony Electronics Inc. Operation is no guarantee that may cause undesired operation. Notes DCR-SR42, DCR-SR62, DCR-SR82, DCR-SR200 and DCR-SR300 are to be used with the instructions, may cause harmful..., including interference that may cause undesired operation. The supplied interface cable must accept any interference received, including interference that interference will not occur in accordance with the Handycam Station Model DCRA-C171 and AC Adaptor Model AC-L200/L200B....
...the receiving antenna. - Declaration of Conformity Trade Name: SONY Model No.: DCR-SR200 Responsible Party: Sony Electronics Inc. Operation is no guarantee that may cause undesired operation. Notes DCR-SR42, DCR-SR62, DCR-SR82, DCR-SR200 and DCR-SR300 are to be used with the instructions, may cause harmful..., including interference that may cause undesired operation. The supplied interface cable must accept any interference received, including interference that interference will not occur in accordance with the Handycam Station Model DCRA-C171 and AC Adaptor Model AC-L200/L200B....

Operating Guide
Page 9
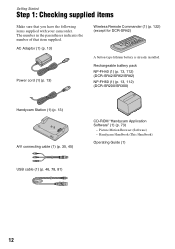
... battery is already installed. Rechargeable battery pack NP-FH40 (1) (p.11) (DCR-SR42/SR62/ SR82) NP-FH60 (1) (p.11) (DCR-SR200/SR300) Handycam Station (1) (p.11) A/V connecting cable (1) (p.25) USB cable (1) (p.27) CD-ROM "Handycam Application Software" (1) (p.26) - The number in the parentheses indicates the number of that you have the following items supplied with your camcorder. Picture Motion Browser (Software) -
... battery is already installed. Rechargeable battery pack NP-FH40 (1) (p.11) (DCR-SR42/SR62/ SR82) NP-FH60 (1) (p.11) (DCR-SR200/SR300) Handycam Station (1) (p.11) A/V connecting cable (1) (p.25) USB cable (1) (p.27) CD-ROM "Handycam Application Software" (1) (p.26) - The number in the parentheses indicates the number of that you have the following items supplied with your camcorder. Picture Motion Browser (Software) -

Operating Guide
Page 20
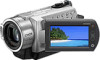
...date and time. qg Shoulder belt hook Attach the shoulder belt (optional). Connecting to other devices 3 A/V OUT jack Connect with the A/V connecting cable. 4 REMOTE jack*3 Connect other optional accessories. 5 Active Interface Shoe *3 The Active Interface Shoe supplies power to 5 times the original size (Playback... zoom). • When you touch the screen during playback zoom, the point you operate the POWER switch on your camcorder. The accessory can magnify still images from about 1.1 to optional accessories such as you touched will be turned on . qh NIGHTSHOT ...
...date and time. qg Shoulder belt hook Attach the shoulder belt (optional). Connecting to other devices 3 A/V OUT jack Connect with the A/V connecting cable. 4 REMOTE jack*3 Connect other optional accessories. 5 Active Interface Shoe *3 The Active Interface Shoe supplies power to 5 times the original size (Playback... zoom). • When you touch the screen during playback zoom, the point you operate the POWER switch on your camcorder. The accessory can magnify still images from about 1.1 to optional accessories such as you touched will be turned on . qh NIGHTSHOT ...
Operating Guide
Page 21
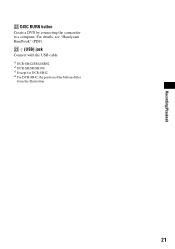
Recording/Playback ws DISC BURN button Create a DVD by connecting the camcorder to a computer. For details, see "Handycam Handbook" (PDF). wd (USB) jack Connect with the USB cable. *1 DCR-SR42/SR62/SR82 *2 DCR-SR200/SR300 *3 Except for DCR-SR42 *4 For DCR-SR42, the position of the buttons differ from the illustration. 21
Recording/Playback ws DISC BURN button Create a DVD by connecting the camcorder to a computer. For details, see "Handycam Handbook" (PDF). wd (USB) jack Connect with the USB cable. *1 DCR-SR42/SR62/SR82 *2 DCR-SR200/SR300 *3 Except for DCR-SR42 *4 For DCR-SR42, the position of the buttons differ from the illustration. 21
Operating Guide
Page 25
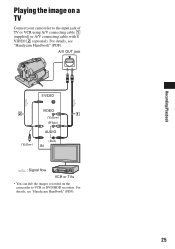
Recording/Playback Playing the image on the camcorder to the input jack of TV or VCR using A/V connecting cable 1 (supplied) or A/V connecting cable with S VIDEO 2 (optional). For details, see "Handycam Handbook" (PDF). For details, see "Handycam Handbook" (PDF). 25 A/V OUT jack S VIDEO VIDEO (Yellow) (White) AUDIO (Yellow) (Red) IN : Signal flow VCR or TVs • You can dub the images recorded on a TV Connect your camcorder to VCR or DVD/HDD recorders.
Recording/Playback Playing the image on the camcorder to the input jack of TV or VCR using A/V connecting cable 1 (supplied) or A/V connecting cable with S VIDEO 2 (optional). For details, see "Handycam Handbook" (PDF). For details, see "Handycam Handbook" (PDF). 25 A/V OUT jack S VIDEO VIDEO (Yellow) (White) AUDIO (Yellow) (Red) IN : Signal flow VCR or TVs • You can dub the images recorded on a TV Connect your camcorder to VCR or DVD/HDD recorders.

Operating Guide
Page 27
... the camcorder and the Handycam Station, and a USB cable beforehand. Otherwise, the software will not be affected. • Operations are guaranteed, frames may be dropped from movies, resulting in the disc drive of your...camcorder onto the Handycam Station, then turn the POWER switch to turn on. 9 Connect the Handycam Station to restart it to the computer. 2 Turn on the computer. • Log on computers fulfilling the above system requirements. • Picture Motion Browser does not support 5.1ch surround sound reproduction. Recording/Playback Hard disk: Available free hard disk...
... the camcorder and the Handycam Station, and a USB cable beforehand. Otherwise, the software will not be affected. • Operations are guaranteed, frames may be dropped from movies, resulting in the disc drive of your...camcorder onto the Handycam Station, then turn the POWER switch to turn on. 9 Connect the Handycam Station to restart it to the computer. 2 Turn on the computer. • Log on computers fulfilling the above system requirements. • Picture Motion Browser does not support 5.1ch surround sound reproduction. Recording/Playback Hard disk: Available free hard disk...

Operating Guide
Page 28
...[ ] (Picture Motion Browser), appear on the computer, you register on the HOME MENU (HELP) 1 Press (HOME). 28 For details, see "Handycam Handbook" (PDF). 1 Turn on your camcorder, then press (HOME) A (or B). 2 Touch the desired setup item. 3 Follow the guide on the screen for further operation. • ...qa Remove the CD-ROM from the disc drive of each item on the website, you install the software, a shortcut icon for your computer. • For disconnecting the USB cable, see the explanation of the function of your convenience. http://www.sony.net/registration/di/ • For the...
...[ ] (Picture Motion Browser), appear on the computer, you register on the HOME MENU (HELP) 1 Press (HOME). 28 For details, see "Handycam Handbook" (PDF). 1 Turn on your camcorder, then press (HOME) A (or B). 2 Touch the desired setup item. 3 Follow the guide on the screen for further operation. • ...qa Remove the CD-ROM from the disc drive of each item on the website, you install the software, a shortcut icon for your computer. • For disconnecting the USB cable, see the explanation of the function of your convenience. http://www.sony.net/registration/di/ • For the...
Handycam® Handbook
Page 2
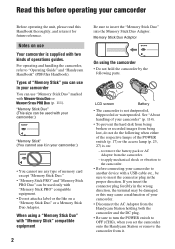
...camcorder. • Before connecting your camcorder to another device with a USB cable etc., be sure to remove the battery pack or AC Adaptor from the camcorder. - "Memory Stick Duo" (This size can be damaged, or this may cause a malfunction of your camcorder. • Disconnect the AC Adaptor from the Handycam... may be used with two kinds of your camcorder" (p. 114). • To prevent the hard disk from being broken or recorded images from it for future reference. If you set the camcorder onto the Handycam Station or remove the camcorder from being lost, do not do the following...
...camcorder. • Before connecting your camcorder to another device with a USB cable etc., be sure to remove the battery pack or AC Adaptor from the camcorder. - "Memory Stick Duo" (This size can be damaged, or this may cause a malfunction of your camcorder. • Disconnect the AC Adaptor from the Handycam... may be used with two kinds of your camcorder" (p. 114). • To prevent the hard disk from being broken or recorded images from it for future reference. If you set the camcorder onto the Handycam Station or remove the camcorder from being lost, do not do the following...
Handycam® Handbook
Page 12
...) Operating Guide (1) USB cable (1) (p. 46, 78, 81) 12 Rechargeable battery pack NP-FH40 (1) (p. 13, 112) (DCR-SR42/SR62/SR82) NP-FH60 (1) (p. 13, 112) (DCR-SR200/SR300) Handycam Station (1) (p. 13) A/V connecting cable (1) (p. 35, 45) CD-ROM "Handycam Application Software" (1) (p. 73) - The number in the parentheses indicates the number of that you have the following items supplied with your camcorder.
...) Operating Guide (1) USB cable (1) (p. 46, 78, 81) 12 Rechargeable battery pack NP-FH40 (1) (p. 13, 112) (DCR-SR42/SR62/SR82) NP-FH60 (1) (p. 13, 112) (DCR-SR200/SR300) Handycam Station (1) (p. 13) A/V connecting cable (1) (p. 35, 45) CD-ROM "Handycam Application Software" (1) (p. 73) - The number in the parentheses indicates the number of that you have the following items supplied with your camcorder.
Handycam® Handbook
Page 35
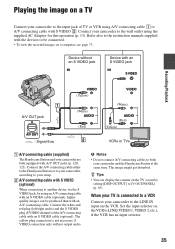
...: Signal flow VIDEO (Yellow) (White) AUDIO (Red) VIDEO (White) AUDIO (Red) (Yellow) VCRs or TVs 1 A/V connecting cable (supplied) The Handycam Station and your camcorder are both your camcorder to the LINE IN input on the VCR to LINE (VIDEO 1, VIDEO 2, etc.), if the VCR has an input selector. 35...via the S VIDEO jack, by setting [DISP OUTPUT] to a VCR Connect your camcorder and the Handycam Station at the same time. Refer also to the wall outlet using an A/V connecting cable with an S VIDEO cable (optional), higher quality images can be connected. • To view the recorded ...
...: Signal flow VIDEO (Yellow) (White) AUDIO (Red) VIDEO (White) AUDIO (Red) (Yellow) VCRs or TVs 1 A/V connecting cable (supplied) The Handycam Station and your camcorder are both your camcorder to the LINE IN input on the VCR to LINE (VIDEO 1, VIDEO 2, etc.), if the VCR has an input selector. 35...via the S VIDEO jack, by setting [DISP OUTPUT] to a VCR Connect your camcorder and the Handycam Station at the same time. Refer also to the wall outlet using an A/V connecting cable with an S VIDEO cable (optional), higher quality images can be connected. • To view the recorded ...
Handycam® Handbook
Page 36
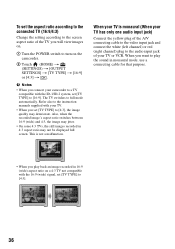
... between 16:9 (wide) and 4:3, the image may jitter. • On some 4:3 TVs, the still images recorded in monaural mode, use a connecting cable for that purpose. • When you connect your camcorder to a TV compatible with the 16:9 (wide) signal, set [TV TYPE] to [4:3]. 36 The TV switches to play the sound in...
... between 16:9 (wide) and 4:3, the image may jitter. • On some 4:3 TVs, the still images recorded in monaural mode, use a connecting cable for that purpose. • When you connect your camcorder to a TV compatible with the 16:9 (wide) signal, set [TV TYPE] to [4:3]. 36 The TV switches to play the sound in...

Handycam® Handbook
Page 45
... : Video/Signal flow (White) AUDIO (Red) (White) AUDIO (Red) (Yellow) VCRs or DVD/ HDD recorders A A/V connecting cable (supplied) The Handycam Station and your camcorder are connecting your camcorder to the wall outlet using an A/V connecting cable with an S VIDEO cable (optional), higher quality images can dub images played back on the screen (p. 60). • When you...
... : Video/Signal flow (White) AUDIO (Red) (White) AUDIO (Red) (Yellow) VCRs or DVD/ HDD recorders A A/V connecting cable (supplied) The Handycam Station and your camcorder are connecting your camcorder to the wall outlet using an A/V connecting cable with an S VIDEO cable (optional), higher quality images can dub images played back on the screen (p. 60). • When you...

Handycam® Handbook
Page 46
... the "Memory Stick Duo" containing them into your camcorder to the input jacks of the Handycam Station to a computer. Connect your camcorder to the printer 1 Connect the Handycam Station to the wall outlet using a PictBridge compliant printer, without connecting the camcorder to the printer using the supplied USB cable. 46 Set [TV TYPE] according to obtain...
... the "Memory Stick Duo" containing them into your camcorder to the input jacks of the Handycam Station to a computer. Connect your camcorder to the printer 1 Connect the Handycam Station to the wall outlet using a PictBridge compliant printer, without connecting the camcorder to the printer using the supplied USB cable. 46 Set [TV TYPE] according to obtain...

Handycam® Handbook
Page 47
...your camcorder from the Handycam Station - You can print. 47 You can guarantee the operation of [ PRINT] • If the printer stops working, disconnect the USB cable, turn the printer off and on again, and restart the operation from the Handycam ...camcorder, in the case of only models that the printer can select a still image on the image selection screen. To disconnect the USB cable (supplied) from the beginning. • You can select only the paper sizes that are PictBridge compatible. Editing [USB SELECT] appears on the screen automatically. 4 Touch [ PRINT] (hard disk...
...your camcorder from the Handycam Station - You can print. 47 You can guarantee the operation of [ PRINT] • If the printer stops working, disconnect the USB cable, turn the printer off and on again, and restart the operation from the Handycam ...camcorder, in the case of only models that the printer can select a still image on the image selection screen. To disconnect the USB cable (supplied) from the beginning. • You can select only the paper sizes that are PictBridge compatible. Editing [USB SELECT] appears on the screen automatically. 4 Touch [ PRINT] (hard disk...

Handycam® Handbook
Page 51
...original data. DCR-SR200/SR300: approx. 40 minutes • If you stop performing [ EMPTY] between step 4 and 5, be saved (p. 37) before performing [ EMPTY]. • You cannot perform [ EMPTY] unless you connect the AC adaptor to write non important data onto the hard disk of the ...Utilizing recording media Preventing data on . In this operation (p. 13) b Notes • If you perform [ EMPTY], all cables except the AC Adaptor. DCR-SR82: approx. 60 minutes - z Tips • You can perform this operation, whichever position of the camcorder. DCR-SR42/SR62: approx. 30 minutes -
...original data. DCR-SR200/SR300: approx. 40 minutes • If you stop performing [ EMPTY] between step 4 and 5, be saved (p. 37) before performing [ EMPTY]. • You cannot perform [ EMPTY] unless you connect the AC adaptor to write non important data onto the hard disk of the ...Utilizing recording media Preventing data on . In this operation (p. 13) b Notes • If you perform [ EMPTY], all cables except the AC Adaptor. DCR-SR82: approx. 60 minutes - z Tips • You can perform this operation, whichever position of the camcorder. DCR-SR42/SR62: approx. 30 minutes -

Handycam® Handbook
Page 74
...camcorder through a computer. CPU: MMX Pentium 200 MHz or faster Others: USB port (this must be provided as it may be affected. • Operations are not guaranteed, even on DirectX technology. Use a special caution for creating a DVD, 5 GB or more Hard disk: Available free hard disk... not insert the connector forcibly as standard), DVD burner (CD-ROM drive is necessary for English version is not assured if the above OS ... Operation is used. When you install the application, you can select other cable, make sure you use the supplied software when operating images recorded on the...
...camcorder through a computer. CPU: MMX Pentium 200 MHz or faster Others: USB port (this must be provided as it may be affected. • Operations are not guaranteed, even on DirectX technology. Use a special caution for creating a DVD, 5 GB or more Hard disk: Available free hard disk... not insert the connector forcibly as standard), DVD burner (CD-ROM drive is necessary for English version is not assured if the above OS ... Operation is used. When you install the application, you can select other cable, make sure you use the supplied software when operating images recorded on the...
Handycam® Handbook
Page 75
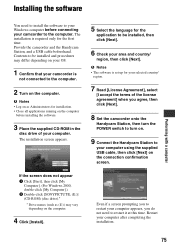
... restart your computer appears, you agree, then click [Next]. 8 Set the camcorder onto the Handycam Station, then turn the POWER switch to turn on. 9 Connect the Handycam Station to your computer using the supplied USB cable, then click [Next] on the computer. 4 Click [Install]. Installing the ... Windows computer before installing the software. 3 Place the supplied CD-ROM in the disc drive of your computer after completing the installation. Provide the camcorder and the Handycam Station, and a USB cable beforehand. b Notes • The software is required only for the application to be ...
... restart your computer appears, you agree, then click [Next]. 8 Set the camcorder onto the Handycam Station, then turn the POWER switch to turn on. 9 Connect the Handycam Station to your computer using the supplied USB cable, then click [Next] on the computer. 4 Click [Install]. Installing the ... Windows computer before installing the software. 3 Place the supplied CD-ROM in the disc drive of your computer after completing the installation. Provide the camcorder and the Handycam Station, and a USB cable beforehand. b Notes • The software is required only for the application to be ...

Handycam® Handbook
Page 76
... disconnecting the USB cable, see page 79. 76 Depending on the computer, you may need to install the software. http://www.sony.net/registration/di/ • For the information about Picture Motion Browser, visit the following URL: http://www.sony.net/support-disoft/ 11Remove the CD-ROM from the disc drive of your computer...
... disconnecting the USB cable, see page 79. 76 Depending on the computer, you may need to install the software. http://www.sony.net/registration/di/ • For the information about Picture Motion Browser, visit the following URL: http://www.sony.net/support-disoft/ 11Remove the CD-ROM from the disc drive of your computer...

Handycam® Handbook
Page 78
... DVD. • If any software starts on the computer automatically, close it may damage the cable, the Handycam Station or your computer. z Tips • Your camcorder is recommended that of the Handycam Station to a computer, make sure you connect a USB interface not compatible with Hi-Speed USB... be saved in the correct direction. b Notes • When connecting your camcorder to a computer using a computer compatible with Hi-Speed USB (USB 2.0). When you insert the connector in the DVD drive of your computer. You can perform this operation, whichever position of the (...
... DVD. • If any software starts on the computer automatically, close it may damage the cable, the Handycam Station or your computer. z Tips • Your camcorder is recommended that of the Handycam Station to a computer, make sure you connect a USB interface not compatible with Hi-Speed USB... be saved in the correct direction. b Notes • When connecting your camcorder to a computer using a computer compatible with Hi-Speed USB (USB 2.0). When you insert the connector in the DVD drive of your computer. You can perform this operation, whichever position of the (...


