Operating Guide
Page 3
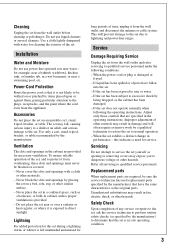
... operating condition. 3 Cleaning Unplug the set from the wall outlet and refer servicing to qualified service personnel under the following the operating instructions. Use a cloth lightly dampened with a cloth or other similar surface. - for necessary ventilation. Accessories Do not place the set on or pinched by items placed upon or against...
... operating condition. 3 Cleaning Unplug the set from the wall outlet and refer servicing to qualified service personnel under the following the operating instructions. Use a cloth lightly dampened with a cloth or other similar surface. - for necessary ventilation. Accessories Do not place the set on or pinched by items placed upon or against...
Operating Guide
Page 11
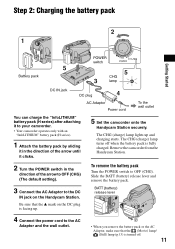
... and the wall outlet. • When you remove the battery pack or the AC Adaptor, make sure that the v mark on the Handycam Station. Remove the camcorder from the Handycam Station. 2 Turn the POWER switch in the direction of the arrow to OFF (CHG) (The default setting). 3 Connect the AC Adaptor...) release lever and remove the battery pack. Be sure that the (Movie) lamp/ (Still) lamp (p.13) is fully charged. The CHG (charge) lamp lights up . Step 2: Charging the battery pack Getting Started POWER switch Battery pack CHG lamp DC IN jack DC plug AC Adaptor Power cord To the...
... and the wall outlet. • When you remove the battery pack or the AC Adaptor, make sure that the v mark on the Handycam Station. Remove the camcorder from the Handycam Station. 2 Turn the POWER switch in the direction of the arrow to OFF (CHG) (The default setting). 3 Connect the AC Adaptor...) release lever and remove the battery pack. Be sure that the (Movie) lamp/ (Still) lamp (p.13) is fully charged. The CHG (charge) lamp lights up . Step 2: Charging the battery pack Getting Started POWER switch Battery pack CHG lamp DC IN jack DC plug AC Adaptor Power cord To the...

Operating Guide
Page 13
... displayed during recording, but they are automatically recorded on the hard disc, and can change the on the LCD screen. 1 While pressing the green button, turn the POWER switch repeatedly in the direction of the arrow until the respective lamp lights up . To reset the date and time Touch (HOME...) t (SETTINGS) t [CLOCK/ LANG] t [CLOCK SET], and set the date and time. POWER switch When using the camcorder for the first time, the [CLOCK SET] screen appears on ...
... displayed during recording, but they are automatically recorded on the hard disc, and can change the on the LCD screen. 1 While pressing the green button, turn the POWER switch repeatedly in the direction of the arrow until the respective lamp lights up . To reset the date and time Touch (HOME...) t (SETTINGS) t [CLOCK/ LANG] t [CLOCK SET], and set the date and time. POWER switch When using the camcorder for the first time, the [CLOCK SET] screen appears on ...
Operating Guide
Page 15
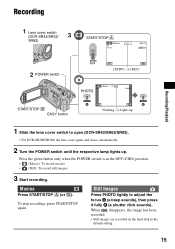
...(a beep sounds), then press it fully B (a shutter click sounds). To stop recording, press START/STOP again. Still Images Press PHOTO lightly to open (DCR-SR42/SR62/SR82). • For DCR-SR200/SR300, the lens cover opens and closes automatically. 2 Turn the POWER switch until the respective lamp... lights up. Press the green button only when the POWER switch is in the default setting. 15 Movies Press START/STOP A (or B). When disappears, the image has been recorded. • Still images are recorded on the hard disk in the OFF (CHG) position....
...(a beep sounds), then press it fully B (a shutter click sounds). To stop recording, press START/STOP again. Still Images Press PHOTO lightly to open (DCR-SR42/SR62/SR82). • For DCR-SR200/SR300, the lens cover opens and closes automatically. 2 Turn the POWER switch until the respective lamp... lights up. Press the green button only when the POWER switch is in the default setting. 15 Movies Press START/STOP A (or B). When disappears, the image has been recorded. • Still images are recorded on the hard disk in the OFF (CHG) position....

Operating Guide
Page 16
... images, then touch . DCR-SR42: 5,900 ([VGA (0.3M)]) DCR-SR62/SR82: 1,800 ([1.0M]) DCR-SR200: 480 ([4.0M]) DCR-SR300: 315 ([6.1M]) ...Handycam operation, press EASY again. • You cannot use only a "Memory Stick Duo" marked with or . ACCESS lamp ("Memory Stick Duo") To eject a "Memory Stick Duo," open the LCD panel, lightly...Handycam operation By pressing the EASY button, nearly all settings on the camcorder will be damaged. • The numbers of still images 1 Touch (OPTION) t tab t [STILL MEDIA]. 2 Select the media in ( )); • You can check the free hard disk space by Sony...
... images, then touch . DCR-SR42: 5,900 ([VGA (0.3M)]) DCR-SR62/SR82: 1,800 ([1.0M]) DCR-SR200: 480 ([4.0M]) DCR-SR300: 315 ([6.1M]) ...Handycam operation, press EASY again. • You cannot use only a "Memory Stick Duo" marked with or . ACCESS lamp ("Memory Stick Duo") To eject a "Memory Stick Duo," open the LCD panel, lightly...Handycam operation By pressing the EASY button, nearly all settings on the camcorder will be damaged. • The numbers of still images 1 Touch (OPTION) t tab t [STILL MEDIA]. 2 Select the media in ( )); • You can check the free hard disk space by Sony...

Operating Guide
Page 20
...touch the screen during playback zoom, the point you operate the POWER switch on your camcorder. Zoom buttons Press for date and time. qd EASY button See page 16. w; To cancel the back light function, press BACK LIGHT again. When you press while the power is set to OFF (CHG), you press... mm (7/32 in mirror mode, open the LCD screen 90 degrees to the camcorder (1), then rotate it 180 degrees to the lens side (2). The accessory can select the settings for backlit subjects, press BACK LIGHT to display .. qa BACK LIGHT button*4 To adjust the exposure for the flash. qf (flash) button*2 You...
...touch the screen during playback zoom, the point you operate the POWER switch on your camcorder. Zoom buttons Press for date and time. qd EASY button See page 16. w; To cancel the back light function, press BACK LIGHT again. When you press while the power is set to OFF (CHG), you press... mm (7/32 in mirror mode, open the LCD screen 90 degrees to the camcorder (1), then rotate it 180 degrees to the lens side (2). The accessory can select the settings for backlit subjects, press BACK LIGHT to display .. qa BACK LIGHT button*4 To adjust the exposure for the flash. qf (flash) button*2 You...
Operating Guide
Page 30
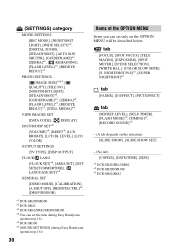
... SLW SHUTTR], [GUIDEFRAME]*1, [ZEBRA]*1, [ REMAINING], [FLASH LEVEL]*1, [REDEYE REDUC]*1 PHOTO SETTINGS [ IMAGE SIZE]*3*4, [ QUALITY], [FILE NO.], [NIGHTSHOT LIGHT], [STEADYSHOT]*5, [GUIDEFRAME]*1, [ZEBRA]*1, [FLASH LEVEL]*3, [REDEYE REDUC]*3, [STILL MEDIA]*4 VIEW IMAGES SET [DATA CODE], [ DISPLAY] SOUND/DISP SET*6 ... [A.SHUT OFF], [REMOTE CTRL]*3, [DROP SENSOR] *1 DCR-SR200/SR300 *2 DCR-SR42 *3 DCR-SR62/SR82/SR200/SR300 *4 You can set the item during Easy Handycam operation (p.16). *5 DCR-SR300 *6 [SOUND SETTINGS] (during Easy Handycam operation (p.16)) 30 Items of the OPTION MENU Items you...
... SLW SHUTTR], [GUIDEFRAME]*1, [ZEBRA]*1, [ REMAINING], [FLASH LEVEL]*1, [REDEYE REDUC]*1 PHOTO SETTINGS [ IMAGE SIZE]*3*4, [ QUALITY], [FILE NO.], [NIGHTSHOT LIGHT], [STEADYSHOT]*5, [GUIDEFRAME]*1, [ZEBRA]*1, [FLASH LEVEL]*3, [REDEYE REDUC]*3, [STILL MEDIA]*4 VIEW IMAGES SET [DATA CODE], [ DISPLAY] SOUND/DISP SET*6 ... [A.SHUT OFF], [REMOTE CTRL]*3, [DROP SENSOR] *1 DCR-SR200/SR300 *2 DCR-SR42 *3 DCR-SR62/SR82/SR200/SR300 *4 You can set the item during Easy Handycam operation (p.16). *5 DCR-SR300 *6 [SOUND SETTINGS] (during Easy Handycam operation (p.16)) 30 Items of the OPTION MENU Items you...

Operating Guide
Page 32
...(DCR-SR42/ SR62/SR82). • When you can fix by yourself. Use an "InfoLITHIUM" battery pack (p.11). • Connect the DC plug of times, contact your Sony dealer or local authorized Sony service facility. Contact your Sony dealer or local authorized Sony service facility. Lights... appear on the screen even if the lens cover is closed , lights through gaps of the Handycam Station or your camcorder again. Inform them of ...
...(DCR-SR42/ SR62/SR82). • When you can fix by yourself. Use an "InfoLITHIUM" battery pack (p.11). • Connect the DC plug of times, contact your Sony dealer or local authorized Sony service facility. Contact your Sony dealer or local authorized Sony service facility. Lights... appear on the screen even if the lens cover is closed , lights through gaps of the Handycam Station or your camcorder again. Inform them of ...
Operating Guide
Page 33
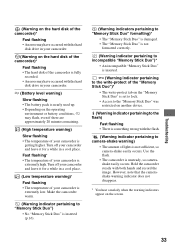
... it for a while in a cool place. Hold the camcorder steady with the hard disk drive in your camcorder. Troubleshooting (Warning on the hard disk of the camcorder)* Fast flashing • An error may have occurred with the hard disk drive in your camcorder. (Warning on the hard disk of the camcorder)* Fast flashing • The hard disk of the camcorder is fully recorded. • An error may flash...Duo")* • The write-protect tab on the "Memory Stick Duo" is set to lock. • Access to camera-shake warning) • The amount of lights is unsteady, so camerashake easily occurs.
... it for a while in a cool place. Hold the camcorder steady with the hard disk drive in your camcorder. Troubleshooting (Warning on the hard disk of the camcorder)* Fast flashing • An error may have occurred with the hard disk drive in your camcorder. (Warning on the hard disk of the camcorder)* Fast flashing • The hard disk of the camcorder is fully recorded. • An error may flash...Duo")* • The write-protect tab on the "Memory Stick Duo" is set to lock. • Access to camera-shake warning) • The amount of lights is unsteady, so camerashake easily occurs.
Operating Guide
Page 34
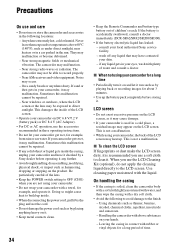
... consult your camcorder for a long time • Periodically turn it on and let it run such as by a Sony dealer before storing it any solid object or liquid gets inside of water and consult a doctor. This is accidentally swallowed, consult a doctor immediately (DCR-SR62/SR82/SR200/SR300). ...not exert excessive pressure on the LCD screen, as hammering, dropping or stepping on the LCD screen. This is soiled, clean the camcorder body with a soft cloth lightly moistened with water, and then wipe the casing with above substances on DC 6.8 V/7.2 V (battery pack) or DC 8.4 V ...
... consult your camcorder for a long time • Periodically turn it on and let it run such as by a Sony dealer before storing it any solid object or liquid gets inside of water and consult a doctor. This is accidentally swallowed, consult a doctor immediately (DCR-SR62/SR82/SR200/SR300). ...not exert excessive pressure on the LCD screen, as hammering, dropping or stepping on the LCD screen. This is soiled, clean the camcorder body with a soft cloth lightly moistened with water, and then wipe the casing with above substances on DC 6.8 V/7.2 V (battery pack) or DC 8.4 V ...


