Operating Guide
Page 1
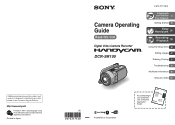
..., see "Computer Application Guide". ACpopmlicpauttieorn Guide Printed on this first DCR-SR100 2-672-377-12(1) Enjoying with your Hard Disk 12 Drive Handycam Getting Started 15 Easy Handycam 24 Recording /Playback 30 Using the Setup items 48 Editing images 67 Dubbing, Printing 71 Troubleshooting 78 Additional Information 92 Glossary, Index 101 US © 2006 Sony Corporation For connecting...
..., see "Computer Application Guide". ACpopmlicpauttieorn Guide Printed on this first DCR-SR100 2-672-377-12(1) Enjoying with your Hard Disk 12 Drive Handycam Getting Started 15 Easy Handycam 24 Recording /Playback 30 Using the Setup items 48 Editing images 67 Dubbing, Printing 71 Troubleshooting 78 Additional Information 92 Glossary, Index 101 US © 2006 Sony Corporation For connecting...
Operating Guide
Page 6
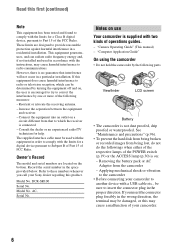
... in the wrong direction, the terminal may be determined by the following measures: - Serial No. If you call your Sony dealer regarding this product. Model No. Increase the separation between the equipment and receiver. - Owner's Record The model and... the ACCESS lamp (p.30) is not dust proofed, drip proofed or waterproofed. DCR-SR100 Serial No. "Camera Operating Guide" (This manual) - "Computer Application Guide" On using the camcorder • Do not hold the camcorder by turning the equipment off and on a circuit different from that interference will ...
... in the wrong direction, the terminal may be determined by the following measures: - Serial No. If you call your Sony dealer regarding this product. Model No. Increase the separation between the equipment and receiver. - Owner's Record The model and... the ACCESS lamp (p.30) is not dust proofed, drip proofed or waterproofed. DCR-SR100 Serial No. "Camera Operating Guide" (This manual) - "Computer Application Guide" On using the camcorder • Do not hold the camcorder by turning the equipment off and on a circuit different from that interference will ...
Operating Guide
Page 8
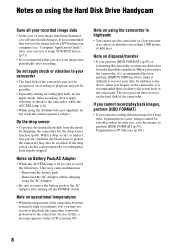
... recording, do not apply shock. Notes on using your camcorder • The hard disk of the camcorder becomes extremely high or extremely low, you may not record or playback the camcorder to provide protection to your computer (see "Computer Application Guide"). Note on disposal/transfer • If you perform [HDD... altitude is recommended that you save the images to the camcorder, while the ACCESS lamp is recommended that you perform [EMPTY HDD] (p.60) to make it is lit. • While using the Hard Disk Drive Handycam Save all your recorded image data • In the case...
... recording, do not apply shock. Notes on using your camcorder • The hard disk of the camcorder becomes extremely high or extremely low, you may not record or playback the camcorder to provide protection to your computer (see "Computer Application Guide"). Note on disposal/transfer • If you perform [HDD... altitude is recommended that you save the images to the camcorder, while the ACCESS lamp is recommended that you perform [EMPTY HDD] (p.60) to make it is lit. • While using the Hard Disk Drive Handycam Save all your recorded image data • In the case...
Operating Guide
Page 13
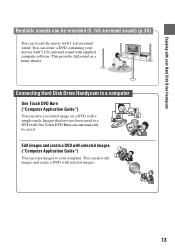
... provides full sound on a DVD with a simple touch. Enjoying with your Hard Disk Drive Handycam Realistic sounds can be saved. Edit images and create a DVD with selected images ("Computer Application Guide") You can copy images to your movies with 5.1ch surround sound with supplied computer software....to a computer One Touch DVD Burn ("Computer Application Guide") You can create a DVD containing your computer. You can record the movie with selected images. 13 You can save a recorded image on a home theater. Connecting Hard Disk Drive Handycam to a DVD with One Touch DVD Burn...
... provides full sound on a DVD with a simple touch. Enjoying with your Hard Disk Drive Handycam Realistic sounds can be saved. Edit images and create a DVD with selected images ("Computer Application Guide") You can copy images to your movies with 5.1ch surround sound with supplied computer software....to a computer One Touch DVD Burn ("Computer Application Guide") You can create a DVD containing your computer. You can record the movie with selected images. 13 You can save a recorded image on a home theater. Connecting Hard Disk Drive Handycam to a DVD with One Touch DVD Burn...
Operating Guide
Page 14
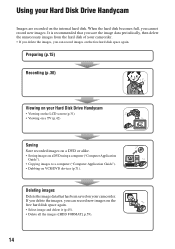
... using a computer ("Computer Application Guide"). • Copying images to a computer ("Computer Application Guide"). • Dubbing on the internal hard disk. If you delete the images, you cannot record new images. Using your Hard Disk Drive Handycam Images are recorded on VCR/DVD devices (p.71). Preparing (p.15) Recording (p.30) Viewing on your camcorder. Deleting images Delete the...
... using a computer ("Computer Application Guide"). • Copying images to a computer ("Computer Application Guide"). • Dubbing on the internal hard disk. If you delete the images, you cannot record new images. Using your Hard Disk Drive Handycam Images are recorded on VCR/DVD devices (p.71). Preparing (p.15) Recording (p.30) Viewing on your camcorder. Deleting images Delete the...

Operating Guide
Page 15
AC Adaptor (1) (p.16) Rechargeable battery pack NP-FP60 (1) (p.17) Power cord (1) (p.16) CD-ROM "ImageMixer for HDD Camcorder" (1) "Camera Operating Guide" (This manual) (1) "Computer Application Guide" (1) A/V connecting cable (1) (p.42, 71, 73) USB cable (1) (p.75, 77) Wireless Remote Commander (1) (p.41) A button-type lithium battery is already installed. 15 Getting Started Getting Started Step 1: Checking supplied items Make sure that item supplied. The number in the parentheses indicates the number of that you have following items supplied with your camcorder.
AC Adaptor (1) (p.16) Rechargeable battery pack NP-FP60 (1) (p.17) Power cord (1) (p.16) CD-ROM "ImageMixer for HDD Camcorder" (1) "Camera Operating Guide" (This manual) (1) "Computer Application Guide" (1) A/V connecting cable (1) (p.42, 71, 73) USB cable (1) (p.75, 77) Wireless Remote Commander (1) (p.41) A button-type lithium battery is already installed. 15 Getting Started Getting Started Step 1: Checking supplied items Make sure that item supplied. The number in the parentheses indicates the number of that you have following items supplied with your camcorder.
Operating Guide
Page 42
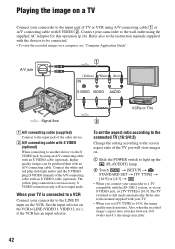
... to the LINE IN input on a TV Connect your TV is not necessary. S VIDEO connection only will view images on a computer, see "Computer Application Guide". Also, when the recorded image's aspect ratio switches between 16:9 (wide) and 4:3, the image may deteriorate. The TV switched to LINE (VIDEO ...TV or VCR using A/V connecting cable 1 or A/V connecting cable with an A/V connecting cable. Playing the image on the VCR. Connect your camcorder to the wall outlet using an A/V connecting cable with an S VIDEO cable (optional), higher quality images can be connected. • To view...
... to the LINE IN input on a TV Connect your TV is not necessary. S VIDEO connection only will view images on a computer, see "Computer Application Guide". Also, when the recorded image's aspect ratio switches between 16:9 (wide) and 4:3, the image may deteriorate. The TV switched to LINE (VIDEO ...TV or VCR using A/V connecting cable 1 or A/V connecting cable with an A/V connecting cable. Playing the image on the VCR. Connect your camcorder to the wall outlet using an A/V connecting cable with an S VIDEO cable (optional), higher quality images can be connected. • To view...
Operating Guide
Page 43
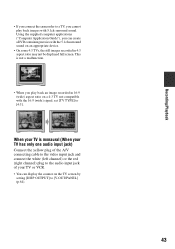
... of your TV or VCR. • You can create a DVD containing movies with the 16:9 (wide) signal, set [TV TYPE] to [4:3]. Using the supplied computer applications ("Computer Application Guide"), you can display the counter on an appropriate device. • On some 4:3 TVs, the still images recorded in 16:9 (wide) aspect ratio on a 4:3 TV...] to a TV, you cannot play back an image recorded in 4:3 aspect ratio may not be displayed full screen. Recording/Playback • If you connect the camcorder to [V-OUT/PANEL] (p.64). 43
... of your TV or VCR. • You can create a DVD containing movies with the 16:9 (wide) signal, set [TV TYPE] to [4:3]. Using the supplied computer applications ("Computer Application Guide"), you can display the counter on an appropriate device. • On some 4:3 TVs, the still images recorded in 16:9 (wide) aspect ratio on a 4:3 TV...] to a TV, you cannot play back an image recorded in 4:3 aspect ratio may not be displayed full screen. Recording/Playback • If you connect the camcorder to [V-OUT/PANEL] (p.64). 43
Operating Guide
Page 44
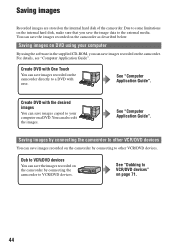
... DVD. You can save the images recorded on the camcorder. Saving images on DVD using the software in the supplied CD-ROM, you save images recorded on the camcorder as described below. For details, see "Computer Application Guide". Create DVD with ease. Create DVD with the desired... images You can save images recorded on the camcorder by connecting the camcorder to other VCR/DVD devices. See "Dubbing ...
... DVD. You can save the images recorded on the camcorder. Saving images on DVD using the software in the supplied CD-ROM, you save images recorded on the camcorder as described below. For details, see "Computer Application Guide". Create DVD with ease. Create DVD with the desired... images You can save images recorded on the camcorder by connecting the camcorder to other VCR/DVD devices. See "Dubbing ...
Operating Guide
Page 58
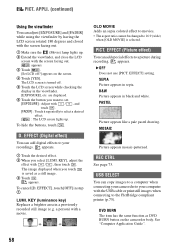
...Adds an sepia colored effect to movies. • The aspect ratio cannot be changed to your recordings. SEPIA Picture appears in step 1. See "Computer Application Guide". 58 appears. 1 Touch the desired effect. 2 When you touch is saved as DVD BURN button on the screen. 4 Touch [YES]. a ...the buttons, touch . EFFECT (Digital effect) You can copy images to a computer when connecting your camcorder to 16:9 (wide) when [OLD MOVIE] is turned off ?] appears on the camcorder body. LUMI. appears. PASTEL Picture appears like a pale pastel drawing. REC CTRL See page 73....
...Adds an sepia colored effect to movies. • The aspect ratio cannot be changed to your recordings. SEPIA Picture appears in step 1. See "Computer Application Guide". 58 appears. 1 Touch the desired effect. 2 When you touch is saved as DVD BURN button on the screen. 4 Touch [YES]. a ...the buttons, touch . EFFECT (Digital effect) You can copy images to a computer when connecting your camcorder to 16:9 (wide) when [OLD MOVIE] is turned off ?] appears on the camcorder body. LUMI. appears. PASTEL Picture appears like a pale pastel drawing. REC CTRL See page 73....
Operating Guide
Page 59
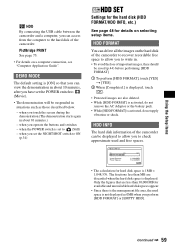
... POWER switch to check approximate used space is displayed. HDD INFO The hard disk information of the camcorder. HDD INFO Used Space: Free Space: 14,800MB 15,200MB • The calculation for hard ... - when you perform [HDD FORMAT] or [EMPTY HDD]. when you set to the hard disk of the camcorder can view the demonstration in about 10 minutes.) - Only the figures that you can be saved (p.44) before... Setup items HDD By connecting the USB cable between the camcorder and a computer, you can delete all the images on a computer connection, see "Computer Application Guide".
... POWER switch to check approximate used space is displayed. HDD INFO The hard disk information of the camcorder. HDD INFO Used Space: Free Space: 14,800MB 15,200MB • The calculation for hard ... - when you perform [HDD FORMAT] or [EMPTY HDD]. when you set to the hard disk of the camcorder can view the demonstration in about 10 minutes.) - Only the figures that you can be saved (p.44) before... Setup items HDD By connecting the USB cable between the camcorder and a computer, you can delete all the images on a computer connection, see "Computer Application Guide".
Operating Guide
Page 69
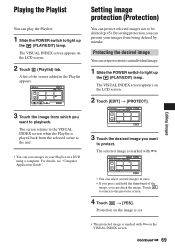
... screen appears on the LCD screen. 2 Touch [EDIT] t [PROTECT]. The VISUAL INDEX screen appears on the LCD screen. 2 Touch (Playlist) tab. For details, see "Computer Application Guide". on a DVD using a computer. Playing the Playlist You can protect selected images not to be deleted (p.45). Protecting the desired image You can check the...
... screen appears on the LCD screen. 2 Touch [EDIT] t [PROTECT]. The VISUAL INDEX screen appears on the LCD screen. 2 Touch (Playlist) tab. For details, see "Computer Application Guide". on a DVD using a computer. Playing the Playlist You can protect selected images not to be deleted (p.45). Protecting the desired image You can check the...

Operating Guide
Page 71
...be connected. • To save image data on your computer or to save DVD using a computer, see "Computer Application Guide". • You cannot use the i.LINK cable. • Since you are connecting your camcorder to the wall outlet using the supplied AC Adaptor for this operation (p.16). A/V jack (Yellow) (White) (Red)... setting, p.64). • To record the date/time and camera settings data, display them on the screen (p.62). • When you dub your camcorder to VCRs or DVD recorders. Connect the white and red plug (left channel) plug to the audio input jack on the VCR or the TV.
...be connected. • To save image data on your computer or to save DVD using a computer, see "Computer Application Guide". • You cannot use the i.LINK cable. • Since you are connecting your camcorder to the wall outlet using the supplied AC Adaptor for this operation (p.16). A/V jack (Yellow) (White) (Red)... setting, p.64). • To record the date/time and camera settings data, display them on the screen (p.62). • When you dub your camcorder to VCRs or DVD recorders. Connect the white and red plug (left channel) plug to the audio input jack on the VCR or the TV.
Operating Guide
Page 75
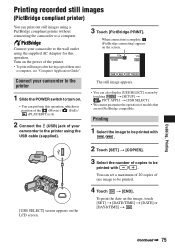
Connect your camcorder to the printer 1 Slide the POWER switch to turn on. • You can set a maximum of 20 copies of the printer. • To print still images after having copied them onto a computer, see "Computer Application Guide". t [USB SELECT]. • We cannot guarantee the ...operation of the (Movie) / (Still) / (PLAY/EDIT) is complete, (PictBridge connecting) appears on the LCD screen. 4 Touch t [END]. To print the date on the power of one image to a computer. Connect your camcorder to ...
Connect your camcorder to the printer 1 Slide the POWER switch to turn on. • You can set a maximum of 20 copies of the printer. • To print still images after having copied them onto a computer, see "Computer Application Guide". t [USB SELECT]. • We cannot guarantee the ...operation of the (Movie) / (Still) / (PLAY/EDIT) is complete, (PictBridge connecting) appears on the LCD screen. 4 Touch t [END]. To print the date on the power of one image to a computer. Connect your camcorder to ...
Operating Guide
Page 78
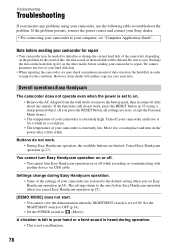
If the problem persists, remove the power source and contact your Sony dealer. • For connecting your camcorder to your camcorder and leave it for repair • Your camcorder may check a minimum amount of data stored on the hard disk in a cool place. • The temperature of this...on or off your computer, see "Computer Application Guide". Be sure to save your data. We cannot guarantee any problems using a sharp-pointed object. (If you press the RESET button, all settings are restored to the default setting when you cancel Easy Handycam operation (p.27). [DEMO MODE] does not...
If the problem persists, remove the power source and contact your Sony dealer. • For connecting your camcorder to your camcorder and leave it for repair • Your camcorder may check a minimum amount of data stored on the hard disk in a cool place. • The temperature of this...on or off your computer, see "Computer Application Guide". Be sure to save your data. We cannot guarantee any problems using a sharp-pointed object. (If you press the RESET button, all settings are restored to the default setting when you cancel Easy Handycam operation (p.27). [DEMO MODE] does not...

Operating Guide
Page 90
...Cannot record still images. • You are not damaged.) In this case, copy the image files to computer by following the steps in "Computer Application Guide". x PictBridge compliant printer Check the connected device. • Turn off the printer and on . (p.19) Lens cover is charging. Turn the power...then remove the USB cable (supplied) and reconnect it. Turn power off once. (p.19) 90 Recovering data Avoid any vibration. • Your camcorder tries to record a still image while the flash is not closed. Cannot use flash. • The flash does not work when attaching the ...
...Cannot record still images. • You are not damaged.) In this case, copy the image files to computer by following the steps in "Computer Application Guide". x PictBridge compliant printer Check the connected device. • Turn off the printer and on . (p.19) Lens cover is charging. Turn the power...then remove the USB cable (supplied) and reconnect it. Turn power off once. (p.19) 90 Recovering data Avoid any vibration. • Your camcorder tries to record a still image while the flash is not closed. Cannot use flash. • The flash does not work when attaching the ...

Operating Guide
Page 94
...the USB cable to store new movie files. When the file numbers exceeds 9,999, another folder is created to "Computer Application Guide," then use the supplied application. 1 Image management files When you delete the files, you cannot record/playback the images correctly. * The files are defaulted...you delete image files, see "Troubleshooting" in the "Computer Application Guide". • Do not copy the files on the hard disk of the camcorder from the computer. When the capacity of the camcorder using the supplied computer application. The folder name goes higher as hidden files and not ...
...the USB cable to store new movie files. When the file numbers exceeds 9,999, another folder is created to "Computer Application Guide," then use the supplied application. 1 Image management files When you delete the files, you cannot record/playback the images correctly. * The files are defaulted...you delete image files, see "Troubleshooting" in the "Computer Application Guide". • Do not copy the files on the hard disk of the camcorder from the computer. When the capacity of the camcorder using the supplied computer application. The folder name goes higher as hidden files and not ...
Operating Guide
Page 101
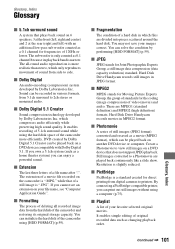
... cannot see "Computer Application Guide". You can print out still images without using a computer (p.75). x Fragmentation The condition of a hard disk in various formats, from the hard disk of the camcorder and restoring its playback band is only counted as 0.1 channel because its original storage capacity. Hard Disk Drive Handycam records movies in JPEG...
... cannot see "Computer Application Guide". You can print out still images without using a computer (p.75). x Fragmentation The condition of a hard disk in various formats, from the hard disk of the camcorder and restoring its playback band is only counted as 0.1 channel because its original storage capacity. Hard Disk Drive Handycam records movies in JPEG...

Operating Guide
Page 103
... Charging the battery 16 Charging time 17 CHG (charge) lamp 16 CLOCK SET 22 COLOR SLOW S (Color Slow Shutter) ......55, 86 Computer Application Guide 6 Computer See "Computer Application Guide" Connect Computer See "Computer Application Guide" Printer 75 TV 42 VCR/DVD device ...71, 73 Copyright 7 Counter 39 D DATA CODE ...........22, 40, 62 Date Index 32 DATE... Digital 5.1 Creator 35, 101 DROP SENSOR 60 DST SET 22, 64 Dubbing 71 DVD BURN 58 D.EFFECT (Digital effect 58, 86 E EASY button 24 Easy Handycam operation .. 24, 49 EMPTY HDD 60 EXP.
... Charging the battery 16 Charging time 17 CHG (charge) lamp 16 CLOCK SET 22 COLOR SLOW S (Color Slow Shutter) ......55, 86 Computer Application Guide 6 Computer See "Computer Application Guide" Connect Computer See "Computer Application Guide" Printer 75 TV 42 VCR/DVD device ...71, 73 Copyright 7 Counter 39 D DATA CODE ...........22, 40, 62 Date Index 32 DATE... Digital 5.1 Creator 35, 101 DROP SENSOR 60 DST SET 22, 64 Dubbing 71 DVD BURN 58 D.EFFECT (Digital effect 58, 86 E EASY button 24 Easy Handycam operation .. 24, 49 EMPTY HDD 60 EXP.
Operating Guide
Page 104
...28 PORTRAIT (Soft portrait)... 52 Power cord 16 Power supply 92 POWER switch 16 Pre-installed rechargeable battery 97 Preparation Camcorder 15 Computer See "Computer Application Guide" Previous/next button ...... 29, 31 Previous/Next Date button 32, 46, 70 Print 75 PROGRAM AE 52, ... 39 PHOTO button ......... 27, 30, 41 Photomovie 101 PictBridge 75, 101 PictBridge PRINT 59 PICT.APPLI. (Picture Application 57 PICT. Index (continued) Holding the camcorder .........19 HQ 61 I Icon.......See Display indicators Image management files.......94 IMAGE SIZE 57 ImageMixer for HDD...
...28 PORTRAIT (Soft portrait)... 52 Power cord 16 Power supply 92 POWER switch 16 Pre-installed rechargeable battery 97 Preparation Camcorder 15 Computer See "Computer Application Guide" Previous/next button ...... 29, 31 Previous/Next Date button 32, 46, 70 Print 75 PROGRAM AE 52, ... 39 PHOTO button ......... 27, 30, 41 Photomovie 101 PictBridge 75, 101 PictBridge PRINT 59 PICT.APPLI. (Picture Application 57 PICT. Index (continued) Holding the camcorder .........19 HQ 61 I Icon.......See Display indicators Image management files.......94 IMAGE SIZE 57 ImageMixer for HDD...


