Operating Guide
Page 3
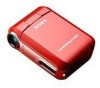
...technician for the FCC related matters only. Bernardo Dr, San Diego, CA 92127 U.S.A. CAUTION You are designed to comply with the Handycam Station Model DCRA-C131 and AC Adaptor Model AC-L200. Note This equipment has been tested and found to provide reasonable protection ... this device must be used in this manual could void your Sony dealer regarding this product, you have any changes or modifications not expressly approved in accordance with Part 15 of Conformity Trade Name: SONY Model No.: DCR-PC55 Responsible Party: Sony Electronics Inc. Model No. Connect the equipment...
...technician for the FCC related matters only. Bernardo Dr, San Diego, CA 92127 U.S.A. CAUTION You are designed to comply with the Handycam Station Model DCRA-C131 and AC Adaptor Model AC-L200. Note This equipment has been tested and found to provide reasonable protection ... this device must be used in this manual could void your Sony dealer regarding this product, you have any changes or modifications not expressly approved in accordance with Part 15 of Conformity Trade Name: SONY Model No.: DCR-PC55 Responsible Party: Sony Electronics Inc. Model No. Connect the equipment...
Operating Guide
Page 4
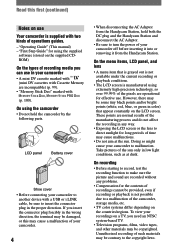
... that appear constantly on use in low light conditions, such as at the sun. To view your camcorder off before inserting it into or removing it from the Handycam Station, hold the camcorder by the following parts. "First Step Guide" for effective use. These points are recorded without any way...media you insert the connector plug forcibly in the proper direction. "Operating Guide" (This manual) - On using the supplied software (stored on the countries/regions. If you can use Your camcorder is not possible due to make sure the picture and sound are normal results of the...
... that appear constantly on use in low light conditions, such as at the sun. To view your camcorder off before inserting it into or removing it from the Handycam Station, hold the camcorder by the following parts. "First Step Guide" for effective use. These points are recorded without any way...media you insert the connector plug forcibly in the proper direction. "Operating Guide" (This manual) - On using the supplied software (stored on the countries/regions. If you can use Your camcorder is not possible due to make sure the picture and sound are normal results of the...
Operating Guide
Page 6
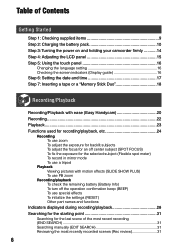
... supplied items 9 Step 2: Charging the battery pack 10 Step 3: Turning the power on and holding your camcorder firmly ...........14 Step 4: Adjusting the LCD panel 15 Step 5: Using the touch panel 16 Changing the...17 Step 7: Inserting a tape or a "Memory Stick Duo 18 Recording/Playback Recording/Playback with ease (Easy Handycam 20 Recording 22 Playback 23 Functions used for recording/playback, etc 24 Recording To use zoom To adjust the ...of the most recent recording (END SEARCH 31 Searching manually (EDIT SEARCH 31 Reviewing the most recently recorded scenes (Rec review 31 6
... supplied items 9 Step 2: Charging the battery pack 10 Step 3: Turning the power on and holding your camcorder firmly ...........14 Step 4: Adjusting the LCD panel 15 Step 5: Using the touch panel 16 Changing the...17 Step 7: Inserting a tape or a "Memory Stick Duo 18 Recording/Playback Recording/Playback with ease (Easy Handycam 20 Recording 22 Playback 23 Functions used for recording/playback, etc 24 Recording To use zoom To adjust the ...of the most recent recording (END SEARCH 31 Searching manually (EDIT SEARCH 31 Reviewing the most recently recorded scenes (Rec review 31 6
Operating Guide
Page 9
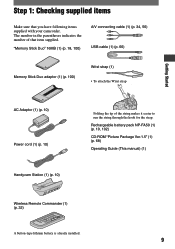
...string through the hook for the strap. Rechargeable battery pack NP-FA50 (1) (p. 10, 102) CD-ROM "Picture Package Ver.1.5" (1) (p. 68) Operating Guide (This manual) (1) Wireless Remote Commander (1) (p. 32) A button-type lithium battery is already installed. 9 Step 1: Checking supplied items Make sure that item supplied. "Memory Stick ... Memory Stick Duo adaptor (1) (p. 100) Wrist strap (1) • To attach the Wrist strap Getting Started AC Adaptor (1) (p. 10) Power cord (1) (p. 10) Handycam Station (1) (p. 10) Folding the tip of that you have following items supplied with your...
...string through the hook for the strap. Rechargeable battery pack NP-FA50 (1) (p. 10, 102) CD-ROM "Picture Package Ver.1.5" (1) (p. 68) Operating Guide (This manual) (1) Wireless Remote Commander (1) (p. 32) A button-type lithium battery is already installed. 9 Step 1: Checking supplied items Make sure that item supplied. "Memory Stick ... Memory Stick Duo adaptor (1) (p. 100) Wrist strap (1) • To attach the Wrist strap Getting Started AC Adaptor (1) (p. 10) Power cord (1) (p. 10) Handycam Station (1) (p. 10) Folding the tip of that you have following items supplied with your...
Operating Guide
Page 16
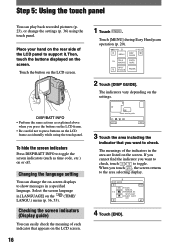
... 3 Touch the area including the indicator that appears on the (TIME/ LANGU.) menu (p. 36, 53). DISP GUIDE END FOCUS: MANUAL 1/2 PROGRAM AE: SPOTLIGHT STEADY SHOT: OFF 4 Touch [END]. Touch [MENU] during Easy Handycam operation (p. 20). 60min MENU 0:00:00 DISP GUIDE 1/3 TELE MACRO EXPOSURE SPOT FOCUS FADER 2 Touch [DISP GUIDE]. Select the...
... 3 Touch the area including the indicator that appears on the (TIME/ LANGU.) menu (p. 36, 53). DISP GUIDE END FOCUS: MANUAL 1/2 PROGRAM AE: SPOTLIGHT STEADY SHOT: OFF 4 Touch [END]. Touch [MENU] during Easy Handycam operation (p. 20). 60min MENU 0:00:00 DISP GUIDE 1/3 TELE MACRO EXPOSURE SPOT FOCUS FADER 2 Touch [DISP GUIDE]. Select the...
Operating Guide
Page 34
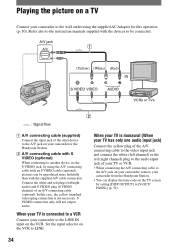
...) and S VIDEO plug (S VIDEO channel) of an A/V connecting cable (optional). When your TV is not necessary. Refer also to the instruction manuals supplied with the supplied A/V cable connection. Set the input selector on the VCR to LINE. Connect the white and red plugs (left channel) or... the red (right channel) plug to the audio input jack of the other device to the A/V jack on your camcorder or the Handycam Station. A/V connecting cable with S VIDEO (optional) When connecting to another device via the S VIDEO jack, by setting [DISP OUTPUT] to...
...) and S VIDEO plug (S VIDEO channel) of an A/V connecting cable (optional). When your TV is not necessary. Refer also to the instruction manuals supplied with the supplied A/V cable connection. Set the input selector on the VCR to LINE. Connect the white and red plugs (left channel) or... the red (right channel) plug to the audio input jack of the other device to the A/V jack on your camcorder or the Handycam Station. A/V connecting cable with S VIDEO (optional) When connecting to another device via the S VIDEO jack, by setting [DISP OUTPUT] to...
Operating Guide
Page 56
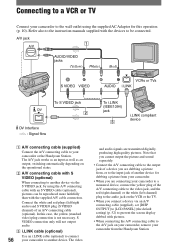
...with an S VIDEO cable (optional), pictures can be connected. In this operation (p. 10). The video and audio signals are connecting your camcorder to a monaural device, connect the yellow plug of an A/V connecting cable (optional). S VIDEO connection only will not output audio. &#... camcorder or the Handycam Station. The A/V jack works as an input as well as an output, switching automatically depending on your camcorder, remove your camcorder from your camcorder. • When you are transmitted digitally, producing high quality pictures. Refer also to the instruction manuals ...
...with an S VIDEO cable (optional), pictures can be connected. In this operation (p. 10). The video and audio signals are connecting your camcorder to a monaural device, connect the yellow plug of an A/V connecting cable (optional). S VIDEO connection only will not output audio. &#... camcorder or the Handycam Station. The A/V jack works as an input as well as an output, switching automatically depending on your camcorder, remove your camcorder from your camcorder. • When you are transmitted digitally, producing high quality pictures. Refer also to the instruction manuals ...
Operating Guide
Page 83
... [DIGITAL ZOOM] does not function. • [DIGITAL ZOOM] does not function when you set [TELE MACRO] to [ON]. Adjusting the image during Easy Handycam operation. The external flash (optional) does not work. • The power of the flash is not turned on, or the flash...; Set [BEEP] to "Menu" (p. 86). The BACK LIGHT function does not function. • The BACK LIGHT function is canceled when you set [EXPOSURE] to [MANUAL] (p. 41) or select [SPOT METER] (p. 41). • The BACK LIGHT function does not work correctly. • There is new and has nothing recorded. ...
... [DIGITAL ZOOM] does not function. • [DIGITAL ZOOM] does not function when you set [TELE MACRO] to [ON]. Adjusting the image during Easy Handycam operation. The external flash (optional) does not work. • The power of the flash is not turned on, or the flash...; Set [BEEP] to "Menu" (p. 86). The BACK LIGHT function does not function. • The BACK LIGHT function is canceled when you set [EXPOSURE] to [MANUAL] (p. 41) or select [SPOT METER] (p. 41). • The BACK LIGHT function does not work correctly. • There is new and has nothing recorded. ...


