
Operating Guide
Page 2
... important operating and maintenance (servicing) instructions in the U.S.A. Operation is subject to the following two conditions: (1) This device may not cause harmful interference, and (2) this manual thoroughly, and retain it for future reference. This Class B digital apparatus complies with Part 15 of rechargeable batteries, call toll free 1-800-8228837, or visit...
... important operating and maintenance (servicing) instructions in the U.S.A. Operation is subject to the following two conditions: (1) This device may not cause harmful interference, and (2) this manual thoroughly, and retain it for future reference. This Class B digital apparatus complies with Part 15 of rechargeable batteries, call toll free 1-800-8228837, or visit...
Operating Guide
Page 3
... to these numbers whenever you call : Sony Customer Information Center 1-800-222SONY (7669). Address: 16450 W. Bernardo Dr, San Diego, CA 92127 U.S.A. DCR-PC55 Serial No. CAUTION You are cautioned that to Part 15 of the FCC Rules. This equipment generates, uses, and can be used with the Handycam Station Model DCRA-C131 and AC...
... to these numbers whenever you call : Sony Customer Information Center 1-800-222SONY (7669). Address: 16450 W. Bernardo Dr, San Diego, CA 92127 U.S.A. DCR-PC55 Serial No. CAUTION You are cautioned that to Part 15 of the FCC Rules. This equipment generates, uses, and can be used with the Handycam Station Model DCRA-C131 and AC...
Operating Guide
Page 4
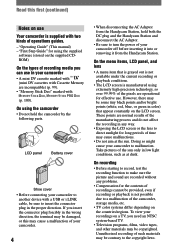
... insert the connector plug in low light conditions, such as at the sun. To view your recordings on the countries/regions. "Operating Guide" (This manual) - On the menu items, LCD panel, and lens • A menu item that appear constantly on use in color) that is grayed out is... direction, the terminal may be some tiny black points and/or bright points (white, red, blue, or green in your camcorder off before inserting it into or removing it from the Handycam Station. These points are incompatible) (p. 99). • "Memory Stick Duo" marked with two kinds of such materials may...
... insert the connector plug in low light conditions, such as at the sun. To view your recordings on the countries/regions. "Operating Guide" (This manual) - On the menu items, LCD panel, and lens • A menu item that appear constantly on use in color) that is grayed out is... direction, the terminal may be some tiny black points and/or bright points (white, red, blue, or green in your camcorder off before inserting it into or removing it from the Handycam Station. These points are incompatible) (p. 99). • "Memory Stick Duo" marked with two kinds of such materials may...
Operating Guide
Page 5
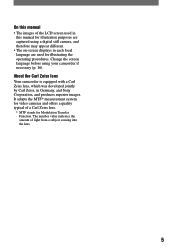
About the Carl Zeiss lens Your camcorder is equipped with a Carl Zeiss lens, which was developed jointly by Carl Zeiss, in Germany, and Sony Corporation, and produces superior images. The number value indicates the amount of a Carl Zeiss lens. * MTF stands for Modulation Transfer ...appear different. • The on-screen displays in each local language are captured using your camcorder if necessary (p. 16). On this manual • The images of the LCD screen used in this manual for illustration purposes are used for illustrating the operating procedures. It adopts the MTF* measurement ...
About the Carl Zeiss lens Your camcorder is equipped with a Carl Zeiss lens, which was developed jointly by Carl Zeiss, in Germany, and Sony Corporation, and produces superior images. The number value indicates the amount of a Carl Zeiss lens. * MTF stands for Modulation Transfer ...appear different. • The on-screen displays in each local language are captured using your camcorder if necessary (p. 16). On this manual • The images of the LCD screen used in this manual for illustration purposes are used for illustrating the operating procedures. It adopts the MTF* measurement ...
Operating Guide
Page 6
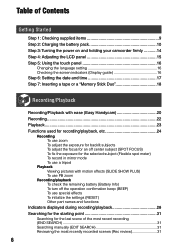
... supplied items 9 Step 2: Charging the battery pack 10 Step 3: Turning the power on and holding your camcorder firmly ...........14 Step 4: Adjusting the LCD panel 15 Step 5: Using the touch panel 16 Changing the...17 Step 7: Inserting a tape or a "Memory Stick Duo 18 Recording/Playback Recording/Playback with ease (Easy Handycam 20 Recording 22 Playback 23 Functions used for recording/playback, etc 24 Recording To use zoom To adjust the ...of the most recent recording (END SEARCH 31 Searching manually (EDIT SEARCH 31 Reviewing the most recently recorded scenes (Rec review 31 6
... supplied items 9 Step 2: Charging the battery pack 10 Step 3: Turning the power on and holding your camcorder firmly ...........14 Step 4: Adjusting the LCD panel 15 Step 5: Using the touch panel 16 Changing the...17 Step 7: Inserting a tape or a "Memory Stick Duo 18 Recording/Playback Recording/Playback with ease (Easy Handycam 20 Recording 22 Playback 23 Functions used for recording/playback, etc 24 Recording To use zoom To adjust the ...of the most recent recording (END SEARCH 31 Searching manually (EDIT SEARCH 31 Reviewing the most recently recorded scenes (Rec review 31 6
Operating Guide
Page 9
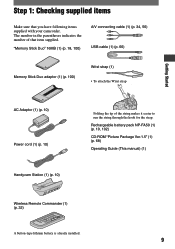
Rechargeable battery pack NP-FA50 (1) (p. 10, 102) CD-ROM "Picture Package Ver.1.5" (1) (p. 68) Operating Guide (This manual) (1) Wireless Remote Commander (1) (p. 32) A button-type lithium battery is already installed. 9 The number in the parentheses indicates the ...) Memory Stick Duo adaptor (1) (p. 100) Wrist strap (1) • To attach the Wrist strap Getting Started AC Adaptor (1) (p. 10) Power cord (1) (p. 10) Handycam Station (1) (p. 10) Folding the tip of that you have following items supplied with your camcorder. Step 1: Checking supplied items Make sure that item supplied.
Rechargeable battery pack NP-FA50 (1) (p. 10, 102) CD-ROM "Picture Package Ver.1.5" (1) (p. 68) Operating Guide (This manual) (1) Wireless Remote Commander (1) (p. 32) A button-type lithium battery is already installed. 9 The number in the parentheses indicates the ...) Memory Stick Duo adaptor (1) (p. 100) Wrist strap (1) • To attach the Wrist strap Getting Started AC Adaptor (1) (p. 10) Power cord (1) (p. 10) Handycam Station (1) (p. 10) Folding the tip of that you have following items supplied with your camcorder. Step 1: Checking supplied items Make sure that item supplied.
Operating Guide
Page 16
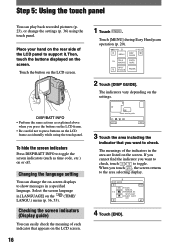
... the screen indicators Press DISP/BATT INFO to show messages in a specified language. DISP GUIDE END FOCUS: MANUAL 1/2 PROGRAM AE: SPOTLIGHT STEADY SHOT: OFF 4 Touch [END]. Touch [MENU] during Easy Handycam operation (p. 20). 60min MENU 0:00:00 DISP GUIDE 1/3 TELE MACRO EXPOSURE SPOT FOCUS FADER 2 Touch [DISP GUIDE]. Place your...
... the screen indicators Press DISP/BATT INFO to show messages in a specified language. DISP GUIDE END FOCUS: MANUAL 1/2 PROGRAM AE: SPOTLIGHT STEADY SHOT: OFF 4 Touch [END]. Touch [MENU] during Easy Handycam operation (p. 20). 60min MENU 0:00:00 DISP GUIDE 1/3 TELE MACRO EXPOSURE SPOT FOCUS FADER 2 Touch [DISP GUIDE]. Place your...
Operating Guide
Page 30
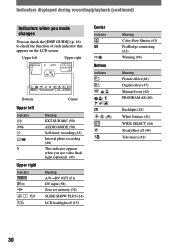
... (24) LCD backlight off (15) Meaning Color Slow Shutter (43) PictBridge connecting (63) Warning (94) Meaning Picture effect (48) Digital effect (47) Manual focus (42) PROGRAM AE (40) Backlight (24) White balance (41) WIDE SELECT (44) SteadyShot off (44) Tele macro (42) 30 Upper left Upper right Center...
... (24) LCD backlight off (15) Meaning Color Slow Shutter (43) PictBridge connecting (63) Warning (94) Meaning Picture effect (48) Digital effect (47) Manual focus (42) PROGRAM AE (40) Backlight (24) White balance (41) WIDE SELECT (44) SteadyShot off (44) Tele macro (42) 30 Upper left Upper right Center...
Operating Guide
Page 31
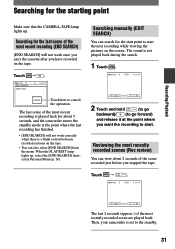
...finished. • [END SEARCH] will not work correctly when there is set to start point to cancel the operation. Then, your camcorder is a blank section between recorded sections on the tape. When the PLAY/EDIT lamp lights up . The last scene of the most recent ...you have recorded on the tape. • You can also select [END SEARCH] from the menu. Searching manually (EDIT SEARCH) You can view about 5 seconds, and the camcorder enters the standby mode at the point where you stopped the tape. Reviewing the most recently recorded scene are played...
...finished. • [END SEARCH] will not work correctly when there is set to start point to cancel the operation. Then, your camcorder is a blank section between recorded sections on the tape. When the PLAY/EDIT lamp lights up . The last scene of the most recent ...you have recorded on the tape. • You can also select [END SEARCH] from the menu. Searching manually (EDIT SEARCH) You can view about 5 seconds, and the camcorder enters the standby mode at the point where you stopped the tape. Reviewing the most recently recorded scene are played...
Operating Guide
Page 34
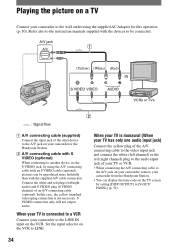
... plugs (left channel) or the red (right channel) plug to the audio input jack of the other device to the A/V jack on your camcorder or the Handycam Station. A/V connecting cable with S VIDEO (optional) When connecting to the wall outlet using the A/V connecting cable with an S VIDEO... S VIDEO connection only will not output audio. In this operation (p. 10). When your TV is not necessary. Refer also to the instruction manuals supplied with the supplied A/V cable connection. Set the input selector on the VCR to be reproduced more faithfully than with the devices to LINE...
... plugs (left channel) or the red (right channel) plug to the audio input jack of the other device to the A/V jack on your camcorder or the Handycam Station. A/V connecting cable with S VIDEO (optional) When connecting to the wall outlet using the A/V connecting cable with an S VIDEO... S VIDEO connection only will not output audio. In this operation (p. 10). When your TV is not necessary. Refer also to the instruction manuals supplied with the supplied A/V cable connection. Set the input selector on the VCR to be reproduced more faithfully than with the devices to LINE...
Operating Guide
Page 41
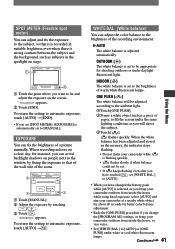
... , set [WHITE BAL.] to [AUTO]. • When you have changed the battery pack while [AUTO] is selected, or you bring your camcorder at a nearby white object for about 10 seconds for better color balance adjustment. • Redo the [ONE PUSH] procedure if you will be ... white balance will shoot the subject. Touch [ ]. flashes quickly. WHITE BAL. (White balance) You can fix the brightness of a picture manually. When the white balance has been adjusted and stored in the spotlight on stage. 1 2 Touch the point where you set [SPOT METER], [EXPOSURE] is...
... , set [WHITE BAL.] to [AUTO]. • When you have changed the battery pack while [AUTO] is selected, or you bring your camcorder at a nearby white object for about 10 seconds for better color balance adjustment. • Redo the [ONE PUSH] procedure if you will be ... white balance will shoot the subject. Touch [ ]. flashes quickly. WHITE BAL. (White balance) You can fix the brightness of a picture manually. When the white balance has been adjusted and stored in the spotlight on stage. 1 2 Touch the point where you set [SPOT METER], [EXPOSURE] is...
Operating Guide
Page 42
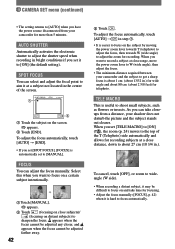
... W (wide angle) to shoot small subjects, such as flowers or insects. As you have the power source disconnected from a distance, your camcorder and the subject to [ON] (the default setting). CAMERA SET menu (continued) • The setting returns to [AUTO] when you can take ...time for focusing. • Adjust the focus manually ([FOCUS], p. 42) when it is hard to focus automatically. AUTO SHUTTER Automatically activates the electronic shutter to adjust the shutter speed when recording in...
... W (wide angle) to shoot small subjects, such as flowers or insects. As you have the power source disconnected from a distance, your camcorder and the subject to [ON] (the default setting). CAMERA SET menu (continued) • The setting returns to [AUTO] when you can take ...time for focusing. • Adjust the focus manually ([FOCUS], p. 42) when it is hard to focus automatically. AUTO SHUTTER Automatically activates the electronic shutter to adjust the shutter speed when recording in...
Operating Guide
Page 43
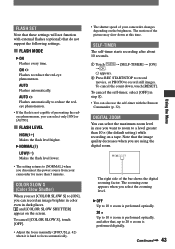
.... FLASH MODE ON Flashes every time. AUTO Flashes automatically. To cancel [COLOR SLOW S], touch [OFF]. • Adjust the focus manually ([FOCUS], p. 42) when it is not capable of the picture may slow down , touch [RESET]. DIGITAL ZOOM You can select only [ON] or... ) LOW( ) Makes the flash level lower. • The setting returns to [NORMAL] when you disconnect the power source from your camcorder changes depending on the screen. The motion of preventing the redeye phenomenon, you can select the maximum zoom level in dark places. COLOR SLOW S ...
.... FLASH MODE ON Flashes every time. AUTO Flashes automatically. To cancel [COLOR SLOW S], touch [OFF]. • Adjust the focus manually ([FOCUS], p. 42) when it is not capable of the picture may slow down , touch [RESET]. DIGITAL ZOOM You can select only [ON] or... ) LOW( ) Makes the flash level lower. • The setting returns to [NORMAL] when you disconnect the power source from your camcorder changes depending on the screen. The motion of preventing the redeye phenomenon, you can select the maximum zoom level in dark places. COLOR SLOW S ...
Operating Guide
Page 44
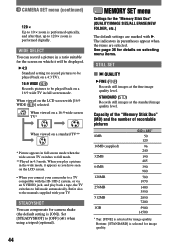
... viewed on selecting menu items. STILL SET QUALITY FINE ( ) Records still images at the standard image quality level. Refer also to the manuals supplied with your camcorder to a TV compatible with [16:9 WIDE ( )] selected. CAMERA SET menu (continued) 120 × Up to 10 × zoom is performed optically, and after...
... viewed on selecting menu items. STILL SET QUALITY FINE ( ) Records still images at the standard image quality level. Refer also to the manuals supplied with your camcorder to a TV compatible with [16:9 WIDE ( )] selected. CAMERA SET menu (continued) 120 × Up to 10 × zoom is performed optically, and after...
Operating Guide
Page 47
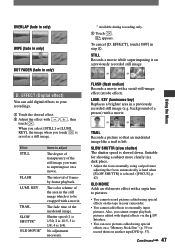
... frameby-frame playback. Also, you cannot output playback pictures edited with digital effects via the DV Interface. • You can add digital effects to your camcorder. • You cannot add effects to be swapped with touch . / , then When you select [STILL] or [LUMI. EFFECT (Digital effect) You can ... (luminance key) Replaces a brighter area in only) * Available during recording only. Touch . EFFECT], touch [OFF] in a dark place. • Adjust the focus manually using a tripod since adjusting the focus automatically is hard when [SLOW SHUTTR] is 1/4).
... frameby-frame playback. Also, you cannot output playback pictures edited with digital effects via the DV Interface. • You can add digital effects to your camcorder. • You cannot add effects to be swapped with touch . / , then When you select [STILL] or [LUMI. EFFECT (Digital effect) You can ... (luminance key) Replaces a brighter area in only) * Available during recording only. Touch . EFFECT], touch [OFF] in a dark place. • Adjust the focus manually using a tripod since adjusting the focus automatically is hard when [SLOW SHUTTR] is 1/4).
Operating Guide
Page 56
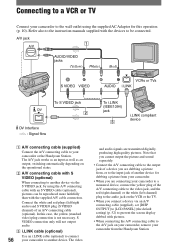
...camcorder... A/V connecting cable (supplied) Connect the A/V connecting cable to your camcorder to the A/V jack on the VCR or the TV. • When you...(left channel) plug to the audio jack on your camcorder, remove your camcorder from , or to the input jack of an A/V...AC Adaptor for dubbing a picture from your camcorder. • When you are connecting your camcorder to a monaural device, connect the yellow ...Refer also to connect 56 your camcorder or the Handycam Station. The video and audio signals are dubbing a picture from the Handycam Station. S VIDEO connection only...
...camcorder... A/V connecting cable (supplied) Connect the A/V connecting cable to your camcorder to the A/V jack on the VCR or the TV. • When you...(left channel) plug to the audio jack on your camcorder, remove your camcorder from , or to the input jack of an A/V...AC Adaptor for dubbing a picture from your camcorder. • When you are connecting your camcorder to a monaural device, connect the yellow ...Refer also to connect 56 your camcorder or the Handycam Station. The video and audio signals are dubbing a picture from the Handycam Station. S VIDEO connection only...
Operating Guide
Page 67
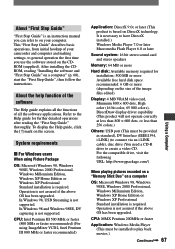
... on a computer" (p. 68), start the "First Step Guide", then follow the instructions. About "First Step Guide" "First Step Guide" is an instruction manual you can refer to on your camcorder and computer and making settings, to general operation the first time you use the software stored on the CDROM (supplied). CPU...
... on a computer" (p. 68), start the "First Step Guide", then follow the instructions. About "First Step Guide" "First Step Guide" is an instruction manual you can refer to on your camcorder and computer and making settings, to general operation the first time you use the software stored on the CDROM (supplied). CPU...
Operating Guide
Page 69
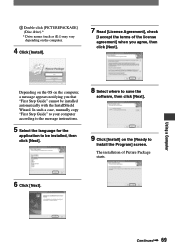
... appears notifying you agree, then click [Next]. Depending on the OS on the [Ready to be installed automatically with the InstallShield Wizard. In such a case, manually copy "First Step Guide" to your computer according to the message instructions. 5 Select the language for the application to Install the Program] screen. Using a Computer...
... appears notifying you agree, then click [Next]. Depending on the OS on the [Ready to be installed automatically with the InstallShield Wizard. In such a case, manually copy "First Step Guide" to your computer according to the message instructions. 5 Select the language for the application to Install the Program] screen. Using a Computer...
Operating Guide
Page 83
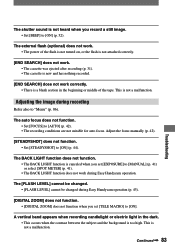
...not function. • Set [FOCUS] to [ON] (p. 44). The [FLASH LEVEL] cannot be changed. • [FLASH LEVEL] cannot be changed during Easy Handycam operation (p. 43). [DIGITAL ZOOM] does not function. • [DIGITAL ZOOM] does not function when you record a still image. • Set [BEEP] to...and the background is not a malfunction. The external flash (optional) does not work. • The power of the tape. Adjust the focus manually (p. 42). [STEADYSHOT] does not function. • Set [STEADYSHOT] to [AUTO] (p. 42). • The recording conditions are not suitable for...
...not function. • Set [FOCUS] to [ON] (p. 44). The [FLASH LEVEL] cannot be changed. • [FLASH LEVEL] cannot be changed during Easy Handycam operation (p. 43). [DIGITAL ZOOM] does not function. • [DIGITAL ZOOM] does not function when you record a still image. • Set [BEEP] to...and the background is not a malfunction. The external flash (optional) does not work. • The power of the tape. Adjust the focus manually (p. 42). [STEADYSHOT] does not function. • Set [STEADYSHOT] to [AUTO] (p. 42). • The recording conditions are not suitable for...
Operating Guide
Page 115
... Macintosh, Mac OS, PowerBook and PowerMac are trademarks or registered trademarks of Macromedia, Inc. Microsoft Corporation in this manual. All other countries. • eMac is trademark of Apple Computer, Inc. • QuickTime and the QuickTime logo...and "MagicGate Memory Stick Duo" are trademarks or registered trademarks of Sony Corporation. • "InfoLITHIUM" is a trademark of Sony Corporation. • i.LINK and are trademarks of Sony Corporation. • Picture Package is a trademark of Sony Corporation. • is a trademark or registered trademark of Intel ...
... Macintosh, Mac OS, PowerBook and PowerMac are trademarks or registered trademarks of Macromedia, Inc. Microsoft Corporation in this manual. All other countries. • eMac is trademark of Apple Computer, Inc. • QuickTime and the QuickTime logo...and "MagicGate Memory Stick Duo" are trademarks or registered trademarks of Sony Corporation. • "InfoLITHIUM" is a trademark of Sony Corporation. • i.LINK and are trademarks of Sony Corporation. • Picture Package is a trademark of Sony Corporation. • is a trademark or registered trademark of Intel ...


