Operating Instructions
Page 1
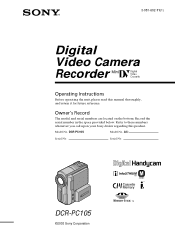
DCR-PC105 ©2003 Sony Corporation Model No. DCR-PC105 Model No. Refer to these numbers whenever you call upon your Sony dealer regarding this manual thoroughly, and retain it for future reference. 3-081-602-11(1) Digital Video Camera Recorder Operating Instructions Before operating the unit, please read this product. AC- Serial No. Owner's Record The model and serial numbers are located on the bottom. Record the serial number in the space provided below. Serial No.
DCR-PC105 ©2003 Sony Corporation Model No. DCR-PC105 Model No. Refer to these numbers whenever you call upon your Sony dealer regarding this manual thoroughly, and retain it for future reference. 3-081-602-11(1) Digital Video Camera Recorder Operating Instructions Before operating the unit, please read this product. AC- Serial No. Owner's Record The model and serial numbers are located on the bottom. Record the serial number in the space provided below. Serial No.
Operating Instructions
Page 3
...not cause harmful interference, and (2) this device must be determined by one or more of Conformity Trade Name: SONY Model No.: DCR-PC105 Responsible Party: Sony Electronics Inc. Address: 680 Kinderkamack Road, Oradell, NJ07649 U.S.A. If this product, you may cause harmful interference ...device, pursuant to comply with the limits for the FCC related matters only. CAUTION You are designed to operate this manual could void your authority to provide reasonable protection against harmful interference in a particular installation. These limits are cautioned that ...
...not cause harmful interference, and (2) this device must be determined by one or more of Conformity Trade Name: SONY Model No.: DCR-PC105 Responsible Party: Sony Electronics Inc. Address: 680 Kinderkamack Road, Oradell, NJ07649 U.S.A. If this product, you may cause harmful interference ...device, pursuant to comply with the limits for the FCC related matters only. CAUTION You are designed to operate this manual could void your authority to provide reasonable protection against harmful interference in a particular installation. These limits are cautioned that ...
Operating Instructions
Page 5
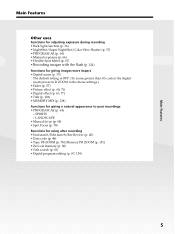
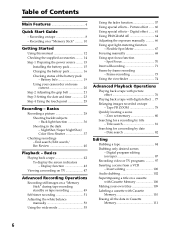
... uses Functions for adjusting exposure during recording •Back light function (p. 36) •NightShot/Super NightShot/Color Slow Shutter (p. 37) •PROGRAM AE (p. 64) •Manual exposure (p. 66) •Flexible Spot Meter (p. 67) •Recording images with the flash (p. 124) Functions for giving images more impact •Digital zoom (p. 35) The...
... uses Functions for adjusting exposure during recording •Back light function (p. 36) •NightShot/Super NightShot/Color Slow Shutter (p. 37) •PROGRAM AE (p. 64) •Manual exposure (p. 66) •Flexible Spot Meter (p. 67) •Recording images with the flash (p. 124) Functions for giving images more impact •Digital zoom (p. 35) The...
Operating Instructions
Page 6
... back a tape with picture effect 76 Playing back a tape with Cassette Memory 106 Making your camcorder on a "Memory Stick 10 Getting Started Using this manual 12 Checking the supplied accessories .......... 14 Step 1 Preparing the power source ......... 15 Installing the... (on tape 8 - Basics Recording a picture 28 Shooting backlit subjects - Digital effect ....... 61 Using PROGRAM AE 64 Adjusting the exposure manually 66 Using spot light-metering function - Insert editing 100 Audio dubbing 102 Superimposing a title on a cassette with digital effect ... 77 Enlarging...
... back a tape with picture effect 76 Playing back a tape with Cassette Memory 106 Making your camcorder on a "Memory Stick 10 Getting Started Using this manual 12 Checking the supplied accessories .......... 14 Step 1 Preparing the power source ......... 15 Installing the... (on tape 8 - Basics Recording a picture 28 Shooting backlit subjects - Digital effect ....... 61 Using PROGRAM AE 64 Adjusting the exposure manually 66 Using spot light-metering function - Insert editing 100 Audio dubbing 102 Superimposing a title on a cassette with digital effect ... 77 Enlarging...
Operating Instructions
Page 12
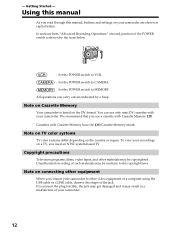
... can use a cassette with Cassette Memory . Cassettes with your camcorder are indicated by the icons below. Unauthorized recording of the POWER switch is based on the country or region. Using this manual, buttons and settings on connecting other materials may be contrary to MEMORY. In ...Operations" onward, position of such materials may result in capital letters. Note on Cassette Memory Your camcorder is shown by a beep. We recommend that you read through this manual As you use only mini DV cassettes with Cassette Memory have the (Cassette Memory) mark. Note ...
... can use a cassette with Cassette Memory . Cassettes with your camcorder are indicated by the icons below. Unauthorized recording of the POWER switch is based on the country or region. Using this manual, buttons and settings on connecting other materials may be contrary to MEMORY. In ...Operations" onward, position of such materials may result in capital letters. Note on Cassette Memory Your camcorder is shown by a beep. We recommend that you read through this manual As you use only mini DV cassettes with Cassette Memory have the (Cassette Memory) mark. Note ...
Operating Instructions
Page 13
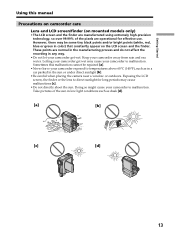
...in a car parked in any way. •Do not let your camcorder to direct sunlight for effective use. Keep your camcorder to temperatures above 60°C (140°F), such as dusk [d]. [a] [b] [c] [d] 13 Letting your camcorder get wet. Exposing the LCD screen, the finder or the lens to ...malfunction. Doing so might cause your camcorder get wet may cause malfunctions [c]. •Do not directly shoot the sun. Sometimes this manual Precautions on camcorder care Lens and LCD screen/finder (on the LCD screen and the finder. These ...
...in a car parked in any way. •Do not let your camcorder to direct sunlight for effective use. Keep your camcorder to temperatures above 60°C (140°F), such as dusk [d]. [a] [b] [c] [d] 13 Letting your camcorder get wet. Exposing the LCD screen, the finder or the lens to ...malfunction. Doing so might cause your camcorder get wet may cause malfunctions [c]. •Do not directly shoot the sun. Sometimes this manual Precautions on camcorder care Lens and LCD screen/finder (on the LCD screen and the finder. These ...

Operating Instructions
Page 25
... on your finger to operate each function. 3 When the POWER switch is not on the LCD screen. You can control the display with your camcorder. (4) Press PAGE2/PAGE3 to FN Press EXIT. Operation buttons on PAGE2/PAGE3 are displayed on the LCD screen. (5) Press the desired operation item.... See relevant pages of this manual for each function. (1) Set the POWER switch to CAMERA for recording, VCR for playback, or MEMORY to use a "Memory Stick." (2) Press ...
... on your finger to operate each function. 3 When the POWER switch is not on the LCD screen. You can control the display with your camcorder. (4) Press PAGE2/PAGE3 to FN Press EXIT. Operation buttons on PAGE2/PAGE3 are displayed on the LCD screen. (5) Press the desired operation item.... See relevant pages of this manual for each function. (1) Set the POWER switch to CAMERA for recording, VCR for playback, or MEMORY to use a "Memory Stick." (2) Press ...
Operating Instructions
Page 36
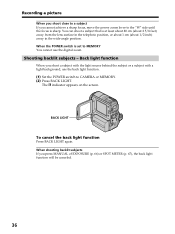
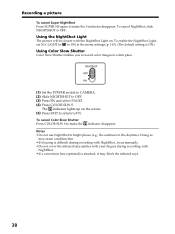
..., use the back light function. (1) Set the POWER switch to MEMORY You cannot use the digital zoom. The . When shooting backlit subjects If you press MANUAL of EXPOSURE (p. 66) or SPOT METER (p. 67), the back light function will be canceled. 36 indicator appears on the screen. BACK LIGHT To cancel the...
..., use the back light function. (1) Set the POWER switch to MEMORY You cannot use the digital zoom. The . When shooting backlit subjects If you press MANUAL of EXPOSURE (p. 66) or SPOT METER (p. 67), the back light function will be canceled. 36 indicator appears on the screen. BACK LIGHT To cancel the...
Operating Instructions
Page 38
... may block the infrared rays. 38 LIGHT in to ON in the menu settings (p. 193). (The default setting is difficult during recording with NightShot, focus manually. •Do not cover the infrared rays emitter with your fingers during recording with the NightShot Light on the screen. (5) Press EXIT to return to...
... may block the infrared rays. 38 LIGHT in to ON in the menu settings (p. 193). (The default setting is difficult during recording with NightShot, focus manually. •Do not cover the infrared rays emitter with your fingers during recording with the NightShot Light on the screen. (5) Press EXIT to return to...

Operating Instructions
Page 39
... When the POWER switch is automatically adjusted to MEMORY You cannot use the following functions: - Manual exposure - Color Slow Shutter NightShot Light NightShot Light rays are infrared and so are invisible. Digital effect - Manual exposure - Super NightShot - Manual exposure - While using Super NightShot, you cannot use the following functions: - Basics Recording a picture While...
... When the POWER switch is automatically adjusted to MEMORY You cannot use the following functions: - Manual exposure - Color Slow Shutter NightShot Light NightShot Light rays are infrared and so are invisible. Digital effect - Manual exposure - Super NightShot - Manual exposure - While using Super NightShot, you cannot use the following functions: - Basics Recording a picture While...
Operating Instructions
Page 53
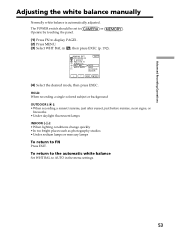
... WHT BAL AUTO SHTR EXIT AUTO HOLD OUTDOOR INDOOR EXEC RET. (4) Select the desired mode, then press EXEC. Advanced Recording Operations Adjusting the white balance manually Normally white balance is automatically adjusted. To return to the automatic white balance Set WHT BAL to or . Operate by touching the panel. (1) Press FN...
... WHT BAL AUTO SHTR EXIT AUTO HOLD OUTDOOR INDOOR EXEC RET. (4) Select the desired mode, then press EXEC. Advanced Recording Operations Adjusting the white balance manually Normally white balance is automatically adjusted. To return to the automatic white balance Set WHT BAL to or . Operate by touching the panel. (1) Press FN...
Operating Instructions
Page 54
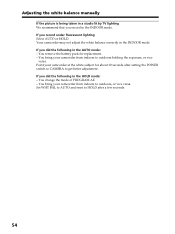
... to get better adjustment. You change the mode of PROGRAM AE. - If you record under fluorescent lighting Select AUTO or HOLD. You bring your camcorder at the white subject for replacement. - Set WHT BAL to AUTO and reset to HOLD after setting the POWER switch to CAMERA to outdoors, or... HOLD mode: - You remove the battery pack for about 10 seconds after a few seconds. 54 Point your camcorder from indoors to outdoors holding the exposure, or vice versa. Adjusting the white balance manually If the picture is being taken in a studio lit by TV lighting We recommend that you record in...
... to get better adjustment. You change the mode of PROGRAM AE. - If you record under fluorescent lighting Select AUTO or HOLD. You bring your camcorder at the white subject for replacement. - Set WHT BAL to AUTO and reset to HOLD after setting the POWER switch to CAMERA to outdoors, or... HOLD mode: - You remove the battery pack for about 10 seconds after a few seconds. 54 Point your camcorder from indoors to outdoors holding the exposure, or vice versa. Adjusting the white balance manually If the picture is being taken in a studio lit by TV lighting We recommend that you record in...
Operating Instructions
Page 59
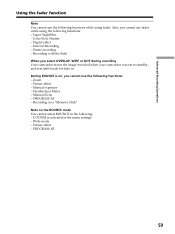
...Using the fader function Note You cannot use fader while using fader. Frame recording - During BOUNCE is activated in the menu settings - Manual exposure - Manual focus - Super NightShot - Color Slow Shutter - Recording with the flash When you cannot use the following : - PROGRAM AE - ...Spot Meter - Interval Recording - Wide mode - Also, you select OVERLAP, WIPE or DOT during recording Your camcorder stores the image recorded when your camcorder was set to standby, and sets itself ready for fade in the following functions while using the following functions...
...Using the fader function Note You cannot use fader while using fader. Frame recording - During BOUNCE is activated in the menu settings - Manual exposure - Manual focus - Super NightShot - Color Slow Shutter - Recording with the flash When you cannot use the following : - PROGRAM AE - ...Spot Meter - Interval Recording - Wide mode - Also, you select OVERLAP, WIPE or DOT during recording Your camcorder stores the image recorded when your camcorder was set to standby, and sets itself ready for fade in the following functions while using the following functions...

Operating Instructions
Page 60
... (p. 192). Using special effects - PASTEL [c]: The picture looks like an illustration with strong contrast. Picture effect NEG. SEPIA: The picture is monochrome (black-and-white). MANUAL SET PROGRAM AE P EFFECT RED EYE R FLASH LVL WHT BAL AUTO SHTR EXIT OFF NEG.
... (p. 192). Using special effects - PASTEL [c]: The picture looks like an illustration with strong contrast. Picture effect NEG. SEPIA: The picture is monochrome (black-and-white). MANUAL SET PROGRAM AE P EFFECT RED EYE R FLASH LVL WHT BAL AUTO SHTR EXIT OFF NEG.

Operating Instructions
Page 63
... 1 SLOW SHTR 2 SLOW SHTR 3 SLOW SHTR 4 Shutter speed 1/30 1/15 1/8 1/4 Notes •While using a tripod. 63 Super NightShot - Digital effect To return to PAGE2. Focus manually using digital effect, you cannot use the following functions do not work in the SLOW SHTR mode. •The following functions: - PROGRAM AE When recording...
... 1 SLOW SHTR 2 SLOW SHTR 3 SLOW SHTR 4 Shutter speed 1/30 1/15 1/8 1/4 Notes •While using a tripod. 63 Super NightShot - Digital effect To return to PAGE2. Focus manually using digital effect, you cannot use the following functions do not work in the SLOW SHTR mode. •The following functions: - PROGRAM AE When recording...

Operating Instructions
Page 65
MANUAL SET PROGRAM AE P EFFECT RED EYE R FLASH LVL WHT BAL AUTO SHTR EXIT AUTO SPOTLIGHT PORTRAIT SPORTS BEACH&SKI SUNSETMOON LANDSCAPE EXEC RET. (4) Select the ...
MANUAL SET PROGRAM AE P EFFECT RED EYE R FLASH LVL WHT BAL AUTO SHTR EXIT AUTO SPOTLIGHT PORTRAIT SPORTS BEACH&SKI SUNSETMOON LANDSCAPE EXEC RET. (4) Select the ...
Operating Instructions
Page 66
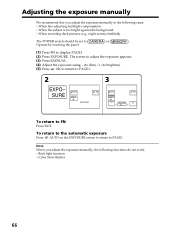
... screen to return to display PAGE1. (2) Press EXPOSURE. AL EXPOSURE AUTO OK MANU- Adjusting the exposure manually We recommend that you adjust the exposure manually, the following cases: - The screen to adjust the exposure appears. (3) Press MANUAL. (4) Adjust the exposure using - (to dim) /+ (to brighten). (5) Press OK to return to PAGE1. 2 3 EXPO- When...
... screen to return to display PAGE1. (2) Press EXPOSURE. AL EXPOSURE AUTO OK MANU- Adjusting the exposure manually We recommend that you adjust the exposure manually, the following cases: - The screen to adjust the exposure appears. (3) Press MANUAL. (4) Adjust the exposure using - (to dim) /+ (to brighten). (5) Press OK to return to PAGE1. 2 3 EXPO- When...
Operating Instructions
Page 67
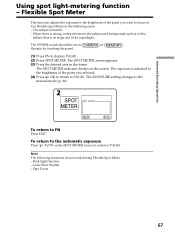
... brightness of the point you want to focus on the SPOT METER screen to return to FN Press EXIT. The EXPOSURE setting changes to the manual mode (p. 66). 2 SPOT METER SPOT METER AUTO OK To return to PAGE1. Color Slow Shutter - The subject is adjusted to the brightness of the point...
... brightness of the point you want to focus on the SPOT METER screen to return to FN Press EXIT. The EXPOSURE setting changes to the manual mode (p. 66). 2 SPOT METER SPOT METER AUTO OK To return to PAGE1. Color Slow Shutter - The subject is adjusted to the brightness of the point...

Operating Instructions
Page 68
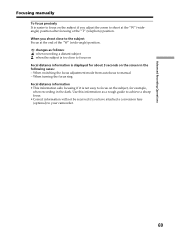
... change the focus from a subject in the foreground to a subject in the following cases. Subjects with little contrast with water droplets - Focusing manually You can gain better results by manually adjusting the focus in the background The POWER switch should be set to turn off 9, or indicator. 68 Horizontal stripes - The 9 indicator...
... change the focus from a subject in the foreground to a subject in the following cases. Subjects with little contrast with water droplets - Focusing manually You can gain better results by manually adjusting the focus in the background The POWER switch should be set to turn off 9, or indicator. 68 Horizontal stripes - The 9 indicator...
Operating Instructions
Page 69
...recording a distant subject when the subject is too close to the subject Focus at the "T" (telephoto) position. When you shoot close to your camcorder. 69 When switching the focus adjustment mode from autofocus to shoot at the "W" (wideangle) position after focusing at the end of the "W" (... displayed for example, when recording in the following cases: - Advanced Recording Operations Focusing manually To focus precisely It is easier to focus on the subject if you adjust the zoom to manual - When turning the focus ring Focal distance information •This information aids focusing if...
...recording a distant subject when the subject is too close to the subject Focus at the "T" (telephoto) position. When you shoot close to your camcorder. 69 When switching the focus adjustment mode from autofocus to shoot at the "W" (wideangle) position after focusing at the end of the "W" (... displayed for example, when recording in the following cases: - Advanced Recording Operations Focusing manually To focus precisely It is easier to focus on the subject if you adjust the zoom to manual - When turning the focus ring Focal distance information •This information aids focusing if...


