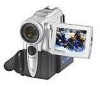
Operating Instructions
Page 2
... MATCH WIDE BLADE OF PLUG TO WIDE SLOT, FULLY INSERT. Trade Name: SONY Model No.: DCR-PC101 Responsible Party: Sony Electronics Inc. You can enjoy for the FCC related matters only. Welcome! With your Handycam, you may call toll free 1-800-822-8837, or visit http://www....rbrc.org/. Your Handycam is very easy to persons. WARNING To prevent fire or shock hazard, do not expose the unit to Part...
... MATCH WIDE BLADE OF PLUG TO WIDE SLOT, FULLY INSERT. Trade Name: SONY Model No.: DCR-PC101 Responsible Party: Sony Electronics Inc. You can enjoy for the FCC related matters only. Welcome! With your Handycam, you may call toll free 1-800-822-8837, or visit http://www....rbrc.org/. Your Handycam is very easy to persons. WARNING To prevent fire or shock hazard, do not expose the unit to Part...
Operating Instructions
Page 7
... 203 About the "InfoLITHIUM" battery pack 205 About i.LINK 206 Using your camcorder abroad .......... 208 Maintenance information and precautions 209 Specifications 214 Quick Reference Identifying the parts and controls .... 216 Index 223 7 Digital program editing (on "Memory Stick...your computer - Image protection 156 Deleting images - PHOTO SAVE 146 Viewing a still image - Signal convert function 183 Customizing Your Camcorder Changing the menu settings 184 Troubleshooting Types of contents Recording a picture from a tape as a moving picture 139 Recording edited pictures...
... 203 About the "InfoLITHIUM" battery pack 205 About i.LINK 206 Using your camcorder abroad .......... 208 Maintenance information and precautions 209 Specifications 214 Quick Reference Identifying the parts and controls .... 216 Index 223 7 Digital program editing (on "Memory Stick...your computer - Image protection 156 Deleting images - PHOTO SAVE 146 Viewing a still image - Signal convert function 183 Customizing Your Camcorder Changing the menu settings 184 Troubleshooting Types of contents Recording a picture from a tape as a moving picture 139 Recording edited pictures...
Operating Instructions
Page 18
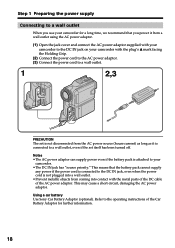
...adaptor. (1) Open the jack cover and connect the AC power adaptor supplied with your camcorder to the DC IN jack on your camcorder. •The DC IN jack has "source priority." Using a car battery Use Sony Car Battery Adaptor (optional). Refer to the operating instructions of the AC power adaptor.... Notes •The AC power adaptor can supply power even if the battery pack is connected to your camcorder with the metal parts of the DC cable of the Car...
...adaptor. (1) Open the jack cover and connect the AC power adaptor supplied with your camcorder to the DC IN jack on your camcorder. •The DC IN jack has "source priority." Using a car battery Use Sony Car Battery Adaptor (optional). Refer to the operating instructions of the AC power adaptor.... Notes •The AC power adaptor can supply power even if the battery pack is connected to your camcorder with the metal parts of the DC cable of the Car...
Operating Instructions
Page 21
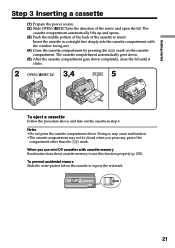
The cassette compartment automatically goes down. (5) After the cassette compartment goes down . When you press any part of the compartment other than the mark. Getting started Step 3 Inserting a cassette (1) Prepare the power source. (2) Slide OPEN/ZEJECT in step 3. Insert the cassette in a ...
The cassette compartment automatically goes down. (5) After the cassette compartment goes down . When you press any part of the compartment other than the mark. Getting started Step 3 Inserting a cassette (1) Prepare the power source. (2) Slide OPEN/ZEJECT in step 3. Insert the cassette in a ...

Operating Instructions
Page 75
... ZOOM The PB ZOOM function is automatically canceled when you press DISPLAY/TOUCH PANEL, the frame on tapes - Stop playing back. - You cannot move the part you pressed to OFF (CHARGE). - In PB ZOOM If you operate the following functions: - Advanced Playback Operations Enlarging images recorded on the PB ZOOM screen...
... ZOOM The PB ZOOM function is automatically canceled when you press DISPLAY/TOUCH PANEL, the frame on tapes - Stop playing back. - You cannot move the part you pressed to OFF (CHARGE). - In PB ZOOM If you operate the following functions: - Advanced Playback Operations Enlarging images recorded on the PB ZOOM screen...
Operating Instructions
Page 94
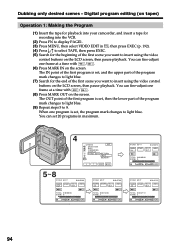
... can fine-adjust one frame at a time with / . (8) Press MARK OUT on tapes) Operation 1: Making the Program (1) Insert the tape for playback into your camcorder, and insert a tape for recording into the VCR. (2) Press FN to display PAGE1. (3) Press MENU, then select VIDEO EDIT in maximum. 4 OTHERS DATA CODE ... START ED I T UNDO I N SET TOTAL 0:00:47:12 SCENE 3 END 94 The IN point of the first program is set , and the upper part of the program mark changes to light blue. (7) Search for the beginning of the program mark changes to light blue. (9) Repeat steps 5 to insert using...
... can fine-adjust one frame at a time with / . (8) Press MARK OUT on tapes) Operation 1: Making the Program (1) Insert the tape for playback into your camcorder, and insert a tape for recording into the VCR. (2) Press FN to display PAGE1. (3) Press MENU, then select VIDEO EDIT in maximum. 4 OTHERS DATA CODE ... START ED I T UNDO I N SET TOTAL 0:00:47:12 SCENE 3 END 94 The IN point of the first program is set , and the upper part of the program mark changes to light blue. (7) Search for the beginning of the program mark changes to light blue. (9) Repeat steps 5 to insert using...
Operating Instructions
Page 107
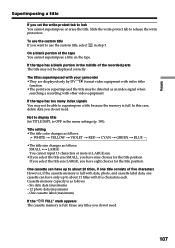
... to about 11 titles with index titler function. •The point you superimposed the title may not be displayed correctly. The titles superimposed with your camcorder •They are displayed only by DV format video equipment with five characters each. If you select the title size LARGE, you have only up... to use the custom title, select in the middle of the recorded parts The title may not be able to OFF in LARGE size. •If you select the title size SMALL, you have nine choices for the...
... to about 11 titles with index titler function. •The point you superimposed the title may not be displayed correctly. The titles superimposed with your camcorder •They are displayed only by DV format video equipment with five characters each. If you select the title size LARGE, you have only up... to use the custom title, select in the middle of the recorded parts The title may not be able to OFF in LARGE size. •If you select the title size SMALL, you have nine choices for the...

Operating Instructions
Page 113
... "Memory Stick"s in the following cases: - Introduction You can record and play back, record or delete images. Moving picture (MPEG) Your camcorder compresses picture data in JPEG format (extension .jpg). Moving picture MOV00001: This file name appears on the display of your computer. Under direct ... can exchange image data with your camcorder. If you remove the "Memory Stick", turn the power off or detach the battery for "Memory Stick" supplied with the metal parts of your camcorder. Typical image data file name Still image 100-0001: This file name appears on ...
... "Memory Stick"s in the following cases: - Introduction You can record and play back, record or delete images. Moving picture (MPEG) Your camcorder compresses picture data in JPEG format (extension .jpg). Moving picture MOV00001: This file name appears on the display of your computer. Under direct ... can exchange image data with your camcorder. If you remove the "Memory Stick", turn the power off or detach the battery for "Memory Stick" supplied with the metal parts of your camcorder. Typical image data file name Still image 100-0001: This file name appears on ...
Operating Instructions
Page 121
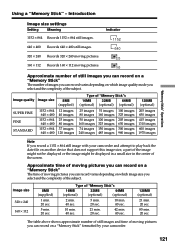
... 415 images 1310 images 600 images 1970 images Note If you can record varies depending on another device that does not support this image size, a part of the image might not be displayed or the image might be displayed in a small size in the center of the subject. The table above... 160 Approximate number of still images you can record on a "Memory Stick" The number of images you can record on a "Memory Stick" formatted by your camcorder and attempt to play back the date file on which image size you select and the complexity of the screen. "Memory Stick" Operations Using a "Memory...
... 415 images 1310 images 600 images 1970 images Note If you can record varies depending on another device that does not support this image size, a part of the image might not be displayed or the image might be displayed in a small size in the center of the subject. The table above... 160 Approximate number of still images you can record on a "Memory Stick" The number of images you can record on a "Memory Stick" formatted by your camcorder and attempt to play back the date file on which image size you select and the complexity of the screen. "Memory Stick" Operations Using a "Memory...
Operating Instructions
Page 132
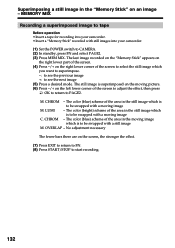
... MIX Recording a superimposed image to tape Before operation •Insert a tape for recording into your camcorder. •Insert a "Memory Stick" recorded with a moving image M. M. The last image recorded on the "Memory Stick" appears on the right lower part of the screen. (4) Press -/+ on the left lower corner of the area in the...
... MIX Recording a superimposed image to tape Before operation •Insert a tape for recording into your camcorder. •Insert a "Memory Stick" recorded with a moving image M. M. The last image recorded on the "Memory Stick" appears on the right lower part of the screen. (4) Press -/+ on the left lower corner of the area in the...
Operating Instructions
Page 143
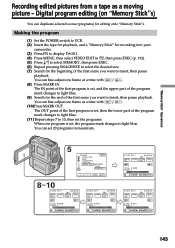
...one program is set , the program mark changes to insert, then pause playback. The OUT point of the first program is set, then the lower part of the first scene you want to light blue. You can fine-adjust one frame at a time with / . (8) Press MARK IN. Making ...START I N 0:10:01:23 320 15sec IMAGE UNDO SIZE TOTAL 0:30:11 SCENE 3 END 143 You can duplicate selected scenes (programs) for recording into your camcorder. (3) Press FN to VCR. (2) Insert the tape for playback, and a "Memory Stick" for editing onto "Memory Stick"s. "Memory Stick" Operations Recording edited ...
...one program is set , the program mark changes to insert, then pause playback. The OUT point of the first program is set, then the lower part of the first scene you want to light blue. You can fine-adjust one frame at a time with / . (8) Press MARK IN. Making ...START I N 0:10:01:23 320 15sec IMAGE UNDO SIZE TOTAL 0:30:11 SCENE 3 END 143 You can duplicate selected scenes (programs) for recording into your camcorder. (3) Press FN to VCR. (2) Insert the tape for playback, and a "Memory Stick" for editing onto "Memory Stick"s. "Memory Stick" Operations Recording edited ...

Operating Instructions
Page 152
Before operation Insert a "Memory Stick" into 23 parts. MPEG movie playback Playback picture from desired part The moving picture recorded on the "Memory Stick" is set to the right (unlock) position. (2) Press PLAY. To see the previous picture, press -. You can select every each one point and playback pictures. to MEMORY. Make sure that the LOCK switch is divided into your camcorder. (1) Set the POWER switch to select the desired moving picture - The last recorded image is displayed. (3) Press +/- To see the next picture, press +. (4) Press Viewing a moving pictures.
Before operation Insert a "Memory Stick" into 23 parts. MPEG movie playback Playback picture from desired part The moving picture recorded on the "Memory Stick" is set to the right (unlock) position. (2) Press PLAY. To see the previous picture, press -. You can select every each one point and playback pictures. to MEMORY. Make sure that the LOCK switch is divided into your camcorder. (1) Set the POWER switch to select the desired moving picture - The last recorded image is displayed. (3) Press +/- To see the next picture, press +. (4) Press Viewing a moving pictures.

Operating Instructions
Page 154
... ratio by Memory PB ZOOM on "Memory Stick"s - To record an image processed by the zoom lever. Before operation Insert a "Memory Stick" into your camcorder. (1) In memory playback, press FN and select PAGE2. (2) Press PB ZOOM. If you pressed to tapes or "Memory Stick"s. You can select and view... you can enlarge still images recorded on "Memory Stick"s The PB ZOOM function does not work. Memory PB ZOOM You can copy the desired part of the enlarged still image to the center of the screen. Moving pictures recorded on a "Memory Stick". Enlarging still images recorded on "Memory...
... ratio by Memory PB ZOOM on "Memory Stick"s - To record an image processed by the zoom lever. Before operation Insert a "Memory Stick" into your camcorder. (1) In memory playback, press FN and select PAGE2. (2) Press PB ZOOM. If you pressed to tapes or "Memory Stick"s. You can select and view... you can enlarge still images recorded on "Memory Stick"s The PB ZOOM function does not work. Memory PB ZOOM You can copy the desired part of the enlarged still image to the center of the screen. Moving pictures recorded on a "Memory Stick". Enlarging still images recorded on "Memory...

Operating Instructions
Page 212
... it away from a wall outlet when you are used for a long time. Dusty or dirty - This is not a malfunction. •While using your camcorder. •Do not wrap your camcorder with the metal parts of the cassette. To remove dust, clean the terminals with a sharp-pointed object. •If your.... •Do not press the LCD screen with a soft cloth. Doing so might cause heat to remove dust. Camcorder care •Remove the tape, and periodically turn on it out by a Sony dealer before operating it any type of solvent which may heat up inside the casing, unplug your...
... it away from a wall outlet when you are used for a long time. Dusty or dirty - This is not a malfunction. •While using your camcorder. •Do not wrap your camcorder with the metal parts of the cassette. To remove dust, clean the terminals with a sharp-pointed object. •If your.... •Do not press the LCD screen with a soft cloth. Doing so might cause heat to remove dust. Camcorder care •Remove the tape, and periodically turn on it out by a Sony dealer before operating it any type of solvent which may heat up inside the casing, unplug your...
Operating Instructions
Page 214
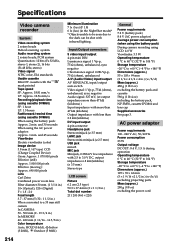
...: 42 - 420 mm (1 11/16 - 16 5/8 in.) Color temperature Auto, HOLD (Hold), nIndoor (3 200K), Outdoor (5 800K) Minimum illumination 7 lx (lux) (F 1.8) 0 lx (lux) (in .) (w/h/d) excluding projecting parts Mass (approx.) 280 g (9.8 oz) excluding the power cord 214 AC power adaptor Power requirements 100 - 240 V AC, 50/60 Hz Power consumption 23 W Output voltage...
...: 42 - 420 mm (1 11/16 - 16 5/8 in.) Color temperature Auto, HOLD (Hold), nIndoor (3 200K), Outdoor (5 800K) Minimum illumination 7 lx (lux) (F 1.8) 0 lx (lux) (in .) (w/h/d) excluding projecting parts Mass (approx.) 280 g (9.8 oz) excluding the power cord 214 AC power adaptor Power requirements 100 - 240 V AC, 50/60 Hz Power consumption 23 W Output voltage...

Operating Instructions
Page 216
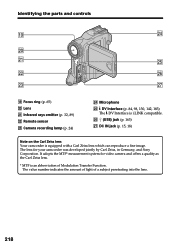
- Quick Reference - Identifying the parts and controls Camcorder 1 6 2 7 8 3 9 4 q; 5 qa 1 Lens cap (p. 24) 2 LCD screen/Touch panel (p. 22, 26, 116) 3 OPEN button (p. 24) 4 CHARGE lamp (p. 15) 5 Battery pack/Battery terminal cover (p. 14) 6 Eyecup 7 Viewfinder (p. 28) 8 LOCK switch (p. 25) 9 POWER switch (p. 24) 0 START/STOP button (p. 24) qa BATT (battery) release lever (p. 14) 216
- Quick Reference - Identifying the parts and controls Camcorder 1 6 2 7 8 3 9 4 q; 5 qa 1 Lens cap (p. 24) 2 LCD screen/Touch panel (p. 22, 26, 116) 3 OPEN button (p. 24) 4 CHARGE lamp (p. 15) 5 Battery pack/Battery terminal cover (p. 14) 6 Eyecup 7 Viewfinder (p. 28) 8 LOCK switch (p. 25) 9 POWER switch (p. 24) 0 START/STOP button (p. 24) qa BATT (battery) release lever (p. 14) 216

Operating Instructions
Page 217
... the same function as the jack indicated as illustrated. Quick Reference 217 The control jack is used for Local Application Control Bus System. Identifying the parts and controls qs qd qf qg qh qj qk qs MIC (PLUG IN POWER) jack (red) (p. 102) Connect an external microphone (optional). This jack also...
... the same function as the jack indicated as illustrated. Quick Reference 217 The control jack is used for Local Application Control Bus System. Identifying the parts and controls qs qd qf qg qh qj qk qs MIC (PLUG IN POWER) jack (red) (p. 102) Connect an external microphone (optional). This jack also...
Operating Instructions
Page 218
...equipped with a Carl Zeiss lens which can reproduce a fine image. It adopts the MTF* measurement system for your camcorder was developed jointly by Carl Zeiss, in Germany, and Sony Corporation. Identifying the parts and controls ql wf w; wh (USB) jack (p. 163) wj DC IN jack (p. 15, 18) Note on... the Carl Zeiss lens Your camcorder is i.LINK compatible. The value number indicates the amount of light of Modulation ...
...equipped with a Carl Zeiss lens which can reproduce a fine image. It adopts the MTF* measurement system for your camcorder was developed jointly by Carl Zeiss, in Germany, and Sony Corporation. Identifying the parts and controls ql wf w; wh (USB) jack (p. 163) wj DC IN jack (p. 15, 18) Note on... the Carl Zeiss lens Your camcorder is i.LINK compatible. The value number indicates the amount of light of Modulation ...

Operating Instructions
Page 219
.... •To remove an accessory, loosen the screw, and then press down and push it to turn the power supplied by the shoe on your camcorder is linked to the POWER switch, allowing you use headphones, the speaker on and off. Identifying the...
.... •To remove an accessory, loosen the screw, and then press down and push it to turn the power supplied by the shoe on your camcorder is linked to the POWER switch, allowing you use headphones, the speaker on and off. Identifying the...

Operating Instructions
Page 220
Fasten the grip strap firmly. 220 Identifying the parts and controls el rs r; "Memory Stick" slot ra Viewfinder lens adjustment lever (p. 28) rs Cassette lid (p. 21) Fastening the grip strap rd MEMORY EJECT lever (p. 115) rf OPEN/ZEJECT lever (p. 21) rg Tripod receptacle Make sure that the length of the tripod screw is less than 5.5 mm (7/32 inch). Otherwise, you cannot attach the tripod securely and the screw may damage your camcorder. rd rf ra rg el Grip Strap r;
Fasten the grip strap firmly. 220 Identifying the parts and controls el rs r; "Memory Stick" slot ra Viewfinder lens adjustment lever (p. 28) rs Cassette lid (p. 21) Fastening the grip strap rd MEMORY EJECT lever (p. 115) rf OPEN/ZEJECT lever (p. 21) rg Tripod receptacle Make sure that the length of the tripod screw is less than 5.5 mm (7/32 inch). Otherwise, you cannot attach the tripod securely and the screw may damage your camcorder. rd rf ra rg el Grip Strap r;


