Operating Instructions
Page 3
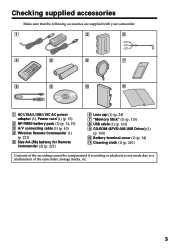
... cover (1) (p. 14) qa Cleaning cloth (1) (p. 210) Contents of the recording cannot be compensated if recording or playback is not made due to a malfunction of the camcorder, storage media, etc. 3 Getting started Checking supplied accessories Make sure that the following accessories are supplied with your...
... cover (1) (p. 14) qa Cleaning cloth (1) (p. 210) Contents of the recording cannot be compensated if recording or playback is not made due to a malfunction of the camcorder, storage media, etc. 3 Getting started Checking supplied accessories Make sure that the following accessories are supplied with your...
Operating Instructions
Page 4
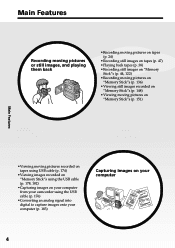
... using USB cable (p. 174) •Viewing images recorded on "Memory Stick"s using the USB cable (p. 178, 182) •Capturing images on your computer from your camcorder using the USB cable (p. 176) •Converting an analog signal into digital to capture images onto your computer (p. 183) Capturing images on your computer 44
... using USB cable (p. 174) •Viewing images recorded on "Memory Stick"s using the USB cable (p. 178, 182) •Capturing images on your computer from your camcorder using the USB cable (p. 176) •Converting an analog signal into digital to capture images onto your computer (p. 183) Capturing images on your computer 44
Operating Instructions
Page 7
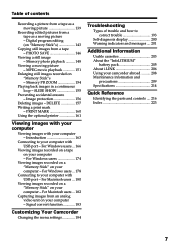
...image - DELETE 157 Writing a print mark - For Macintosh users ... 180 Viewing images recorded on a "Memory Stick" on your camcorder abroad .......... 208 Maintenance information and precautions 209 Specifications 214 Quick Reference Identifying the parts and controls .... 216 Index 223 7 Digital ...Windows users ... 166 Viewing images recorded on a tape on your computer with USB port - Signal convert function 183 Customizing Your Camcorder Changing the menu settings 184 Troubleshooting Types of contents Recording a picture from a tape as a moving picture 139 Recording edited ...
...image - DELETE 157 Writing a print mark - For Macintosh users ... 180 Viewing images recorded on a "Memory Stick" on your camcorder abroad .......... 208 Maintenance information and precautions 209 Specifications 214 Quick Reference Identifying the parts and controls .... 216 Index 223 7 Digital ...Windows users ... 166 Viewing images recorded on a tape on your computer with USB port - Signal convert function 183 Customizing Your Camcorder Changing the menu settings 184 Troubleshooting Types of contents Recording a picture from a tape as a moving picture 139 Recording edited ...
Operating Instructions
Page 8
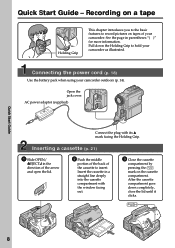
...in the direction of the arrow and open the lid. 2 Push the middle portion of the back of your camcorder. Connecting the power cord (p. 18) Use the battery pack when using your camcorder as illustrated. AC power adaptor (supplied) Connect the plug with the window facing out. 3 Close the cassette ... lid until it clicks. Quick Start Guide 8 Recording on a tape Holding Grip This chapter introduces you to the basic features to hold your camcorder outdoors (p. 14). After the cassette compartment goes down the Holding Grip to record pictures on the cassette compartment.
...in the direction of the arrow and open the lid. 2 Push the middle portion of the back of your camcorder. Connecting the power cord (p. 18) Use the battery pack when using your camcorder as illustrated. AC power adaptor (supplied) Connect the plug with the window facing out. 3 Close the cassette ... lid until it clicks. Quick Start Guide 8 Recording on a tape Holding Grip This chapter introduces you to the basic features to hold your camcorder outdoors (p. 14). After the cassette compartment goes down the Holding Grip to record pictures on the cassette compartment.
Operating Instructions
Page 9
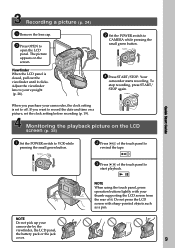
...3 Press OPEN to start playback. Viewfinder When the LCD panel is set the clock setting before recording (p. 19). If you purchase your camcorder by the viewfinder, the LCD panel, the battery pack or the jack cover. POWER LOCK VCR MEMORY OFF CAMERA (CHARGE) When you want... to VCR while pressing the small green button. Your camcorder starts recording. Quick Start Guide MEMORY OFF CAMERA (CHARGE) NOTE Do not pick up your camcorder, the clock setting is closed, pull out the viewfinder until it . Monitoring the playback...
...3 Press OPEN to start playback. Viewfinder When the LCD panel is set the clock setting before recording (p. 19). If you purchase your camcorder by the viewfinder, the LCD panel, the battery pack or the jack cover. POWER LOCK VCR MEMORY OFF CAMERA (CHARGE) When you want... to VCR while pressing the small green button. Your camcorder starts recording. Quick Start Guide MEMORY OFF CAMERA (CHARGE) NOTE Do not pick up your camcorder, the clock setting is closed, pull out the viewfinder until it . Monitoring the playback...
Operating Instructions
Page 10
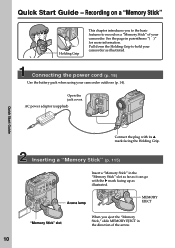
Quick Start Guide - Connecting the power cord (p. 18) Use the battery pack when using your camcorder as illustrated. AC power adaptor (supplied) Quick Start Guide Connect the plug with the B mark facing up...its v mark facing the Holding Grip. Access lamp MEMORY EJECT "Memory Stick" slot When you to the basic features to hold your camcorder outdoors (p. 14). Recording on a "Memory Stick" of the arrow. 10 Open the jack cover. See the page in the "...Holding Grip This chapter introduces you eject the "Memory Stick," slide MEMORY EJECT in the direction of your camcorder.
Quick Start Guide - Connecting the power cord (p. 18) Use the battery pack when using your camcorder as illustrated. AC power adaptor (supplied) Quick Start Guide Connect the plug with the B mark facing up...its v mark facing the Holding Grip. Access lamp MEMORY EJECT "Memory Stick" slot When you to the basic features to hold your camcorder outdoors (p. 14). Recording on a "Memory Stick" of the arrow. 10 Open the jack cover. See the page in the "...Holding Grip This chapter introduces you eject the "Memory Stick," slide MEMORY EJECT in the direction of your camcorder.

Operating Instructions
Page 11
... lens to your eyesight (p. 28). 5 Press PHOTO deeper. 2 Set the POWER switch to record the date and time on the screen. If you purchase your camcorder by the viewfinder, the LCD panel, the battery pack or the jack cover. POWER LOCK VCR MEMORY OFF CAMERA (CHARGE) 2 Press PLAY. Make sure that... the LOCK switch is set to off. Quick Start Guide NOTE Do not pick up your camcorder, the clock setting is set to the right (unlock) position.
... lens to your eyesight (p. 28). 5 Press PHOTO deeper. 2 Set the POWER switch to record the date and time on the screen. If you purchase your camcorder by the viewfinder, the LCD panel, the battery pack or the jack cover. POWER LOCK VCR MEMORY OFF CAMERA (CHARGE) 2 Press PLAY. Make sure that... the LOCK switch is set to off. Quick Start Guide NOTE Do not pick up your camcorder, the clock setting is set to the right (unlock) position.
Operating Instructions
Page 12
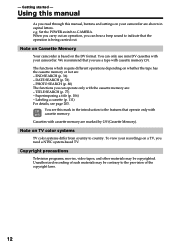
... this mark in capital letters. e.g. Set the POWER switch to indicate that operate only with cassette memory. Note on Cassette Memory Your camcorder is being carried out. We recommend that you use mini DV cassettes with cassette memory . Note on the DV format. Copyright precautions ... has the cassette memory or not are marked by (Cassette Memory). TITLE SEARCH (p. 77) - To view your recordings on your camcorder. Cassettes with the cassette memory are shown in the introduction to the features that the operation is based on TV color systems TV...
... this mark in capital letters. e.g. Set the POWER switch to indicate that operate only with cassette memory. Note on Cassette Memory Your camcorder is being carried out. We recommend that you use mini DV cassettes with cassette memory . Note on the DV format. Copyright precautions ... has the cassette memory or not are marked by (Cassette Memory). TITLE SEARCH (p. 77) - To view your recordings on your camcorder. Cassettes with the cassette memory are shown in the introduction to the features that the operation is based on TV color systems TV...
Operating Instructions
Page 13
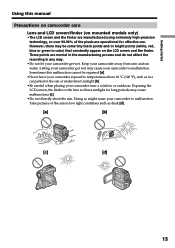
...°F), such as dusk [d]. [a] [b] [c] [d] 13 Doing so might cause your camcorder away from rain and sea water. Letting your camcorder get wet. However, there may be repaired [a]. •Never leave your camcorder exposed to malfunction. Getting started Using this malfunction cannot be some tiny black points and/...99.99% of the sun in any way. •Do not let your camcorder get wet may cause malfunctions [c]. •Do not directly shoot the sun. Sometimes this manual Precautions on camcorder care Lens and LCD screen/finder (on the LCD screen and the finder. ...
...°F), such as dusk [d]. [a] [b] [c] [d] 13 Doing so might cause your camcorder away from rain and sea water. Letting your camcorder get wet. However, there may be repaired [a]. •Never leave your camcorder exposed to malfunction. Getting started Using this malfunction cannot be some tiny black points and/...99.99% of the sun in any way. •Do not let your camcorder get wet may cause malfunctions [c]. •Do not directly shoot the sun. Sometimes this manual Precautions on camcorder care Lens and LCD screen/finder (on the LCD screen and the finder. ...
Operating Instructions
Page 15
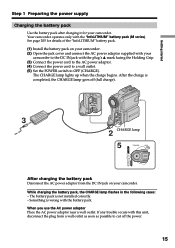
...completed, the CHARGE lamp goes off the power. 15 The battery pack is wrong with the "InfoLITHIUM" battery pack (M series). See page 205 for your camcorder. If any trouble occurs with the plug's v mark facing the Holding Grip. (3) Connect the power cord to the AC power adaptor. (4) Connect the power... the battery pack Use the battery pack after charging it for details of the "InfoLITHIUM" battery pack. (1) Install the battery pack on your camcorder. Your camcorder operates only with the battery pack. While charging the battery pack, the CHARGE lamp flashes in the following cases: -
...completed, the CHARGE lamp goes off the power. 15 The battery pack is wrong with the "InfoLITHIUM" battery pack (M series). See page 205 for your camcorder. If any trouble occurs with the plug's v mark facing the Holding Grip. (3) Connect the power cord to the AC power adaptor. (4) Connect the power... the battery pack Use the battery pack after charging it for details of the "InfoLITHIUM" battery pack. (1) Install the battery pack on your camcorder. Your camcorder operates only with the battery pack. While charging the battery pack, the CHARGE lamp flashes in the following cases: -
Operating Instructions
Page 17
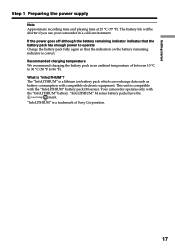
... is compatible with the "InfoLITHIUM" battery. What is a lithium ion battery pack which can exchange data such as battery consumption with compatible electronic equipment. Your camcorder operates only with the "InfoLITHIUM" battery pack (M series). The battery life will be shorter if you use your...
... is compatible with the "InfoLITHIUM" battery. What is a lithium ion battery pack which can exchange data such as battery consumption with compatible electronic equipment. Your camcorder operates only with the "InfoLITHIUM" battery pack (M series). The battery life will be shorter if you use your...
Operating Instructions
Page 18
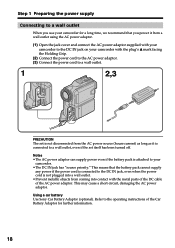
Using a car battery Use Sony Car Battery Adaptor (optional). Refer to the operating instructions of the AC power adaptor. Step ... AC power adaptor. (1) Open the jack cover and connect the AC power adaptor supplied with your camcorder to the DC IN jack on your camcorder with the metal parts of the DC cable of the Car Battery Adaptor for a long time,... the DC IN jack, even when the power cord is connected to your camcorder. •The DC IN jack has "source priority." This means that you use your camcorder for further information. 18 This may cause a short-circuit, damaging the AC...
Using a car battery Use Sony Car Battery Adaptor (optional). Refer to the operating instructions of the AC power adaptor. Step ... AC power adaptor. (1) Open the jack cover and connect the AC power adaptor supplied with your camcorder to the DC IN jack on your camcorder with the metal parts of the DC cable of the Car Battery Adaptor for a long time,... the DC IN jack, even when the power cord is connected to your camcorder. •The DC IN jack has "source priority." This means that you use your camcorder for further information. 18 This may cause a short-circuit, damaging the AC...
Operating Instructions
Page 19
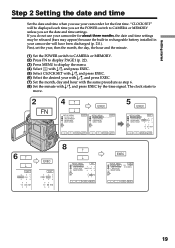
... Setting the date and time Set the date and time when you use your camcorder for about three months, the date and time settings may appear) because the built-in rechargeable battery installed... in your camcorder for the first time. If you set the date and time settings. "CLOCK ...bars may be displayed each time you set the POWER switch to CAMERA or MEMORY unless you do not use your camcorder will have been discharged (p. 211). r R EXEC RET. 5 EXEC SETUP MENU EXIT CLOCK SET USB STREAM LANGUAGE...
... Setting the date and time Set the date and time when you use your camcorder for about three months, the date and time settings may appear) because the built-in rechargeable battery installed... in your camcorder for the first time. If you set the date and time settings. "CLOCK ...bars may be displayed each time you set the POWER switch to CAMERA or MEMORY unless you do not use your camcorder will have been discharged (p. 211). r R EXEC RET. 5 EXEC SETUP MENU EXIT CLOCK SET USB STREAM LANGUAGE...
Operating Instructions
Page 20
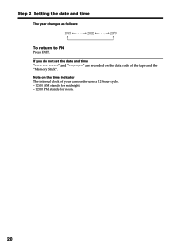
If you do not set the date and time and are recorded on the time indicator The internal clock of the tape and the "Memory Stick". Note on the data code of your camcorder uses a 12-hour cycle. - 12:00 AM stands for midnight. - 12:00 PM stands for noon. 20 Step 2 Setting the date and time The year changes as follows: 1995 2002 2079 To return to FN Press EXIT.
If you do not set the date and time and are recorded on the time indicator The internal clock of the tape and the "Memory Stick". Note on the data code of your camcorder uses a 12-hour cycle. - 12:00 AM stands for midnight. - 12:00 PM stands for noon. 20 Step 2 Setting the date and time The year changes as follows: 1995 2002 2079 To return to FN Press EXIT.
Operating Instructions
Page 22
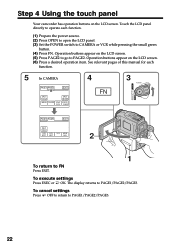
.... To execute settings Press EXEC or OK. The display returns to PAGE2. Operation buttons appear on the LCD screen. Step 4 Using the touch panel Your camcorder has operation buttons on the LCD screen. (6) Press a desired operation item. Operation buttons appear on the LCD screen. (5) Press PAGE2 to go to PAGE1/PAGE2...
.... To execute settings Press EXEC or OK. The display returns to PAGE2. Operation buttons appear on the LCD screen. Step 4 Using the touch panel Your camcorder has operation buttons on the LCD screen. (6) Press a desired operation item. Operation buttons appear on the LCD screen. (5) Press PAGE2 to go to PAGE1/PAGE2...
Operating Instructions
Page 23
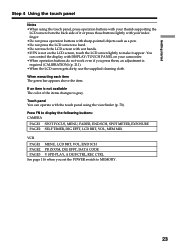
... wet hands. •If FN is not available The color of it appear. Press FN to make it or press those buttons lightly with your camcorder. •When operation buttons do not work even if you set the POWER switch to MEMORY . 23 If an item is not on your index...
... wet hands. •If FN is not available The color of it appear. Press FN to make it or press those buttons lightly with your camcorder. •When operation buttons do not work even if you set the POWER switch to MEMORY . 23 If an item is not on your index...

Operating Instructions
Page 24
...pull the lens cap string to fix it. (2) Install the power source and insert a cassette. Hold your camcorder lights up. The picture appears on the front of your camcorder firmly as illustrated. (4) Set the POWER switch to 21). (3) Pull down the Holding Grip. The camera ... 14 to CAMERA while pressing the small green button. The REC indicator appears. Your camcorder is in standby. (5) Press OPEN to the previous position. (3) Eject the cassette. (4) Remove the battery pack. 24 Your camcorder starts recording. To stop recording, press START/STOP again. 4 LOCK 1 LOCK VCR...
...pull the lens cap string to fix it. (2) Install the power source and insert a cassette. Hold your camcorder lights up. The picture appears on the front of your camcorder firmly as illustrated. (4) Set the POWER switch to 21). (3) Pull down the Holding Grip. The camera ... 14 to CAMERA while pressing the small green button. The REC indicator appears. Your camcorder is in standby. (5) Press OPEN to the previous position. (3) Eject the cassette. (4) Remove the battery pack. 24 Your camcorder starts recording. To stop recording, press START/STOP again. 4 LOCK 1 LOCK VCR...
Operating Instructions
Page 25
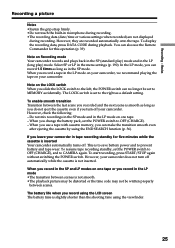
... switch can make the transition smooth even after ejecting the cassette by using the END SEARCH function (p. 36). Note on Recording mode Your camcorder records and plays back in the SP (standard play ) mode. If you record using the viewfinder. 25 The battery life when you leave ...for five minutes while the cassette is smooth as long as a default setting. When you recorded and the next scene is inserted Your camcorder automatically turns off. To display the recording data, press DATA CODE during recording. The LOCK switch is not inserted. When you turn off your...
... switch can make the transition smooth even after ejecting the cassette by using the END SEARCH function (p. 36). Note on Recording mode Your camcorder records and plays back in the SP (standard play ) mode. If you record using the viewfinder. 25 The battery life when you leave ...for five minutes while the cassette is smooth as long as a default setting. When you recorded and the next scene is inserted Your camcorder automatically turns off. To display the recording data, press DATA CODE during recording. The LOCK switch is not inserted. When you turn off your...
Operating Instructions
Page 26
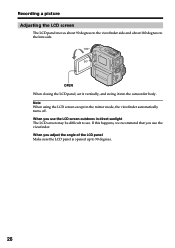
... is opened up to the lens side. 180° 90° OPEN When closing the LCD panel, set it vertically, and swing it into the camcorder body.
... is opened up to the lens side. 180° 90° OPEN When closing the LCD panel, set it vertically, and swing it into the camcorder body.
Operating Instructions
Page 28
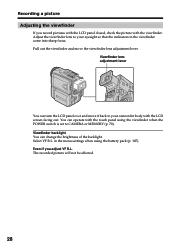
.... 28 Viewfinder lens adjustment lever You can operate with the touch panel using the battery pack (p. 187). Select VF B.L. Adjust the viewfinder lens to your camcorder body with the viewfinder. Even if you record pictures with the LCD panel closed, check the picture with the LCD screen facing out. Viewfinder backlight...
.... 28 Viewfinder lens adjustment lever You can operate with the touch panel using the battery pack (p. 187). Select VF B.L. Adjust the viewfinder lens to your camcorder body with the viewfinder. Even if you record pictures with the LCD panel closed, check the picture with the LCD screen facing out. Viewfinder backlight...


