
Operating Instructions
Page 1
Owner's Record The model and serial numbers are located on the bottom. Refer to these numbers whenever you call upon your Sony dealer regarding this manual thoroughly, and retain it for future reference. 3-867-752-12 (1) Digital Video Camera Recorder Operating Instructions Before operating the unit, please read this product. Record the serial number in the space provided below. Serial No. Serial No. DCR-PC100 Model No. DCR-PC100 ©1999 Sony Corporation Model No. AC-
Owner's Record The model and serial numbers are located on the bottom. Refer to these numbers whenever you call upon your Sony dealer regarding this manual thoroughly, and retain it for future reference. 3-867-752-12 (1) Digital Video Camera Recorder Operating Instructions Before operating the unit, please read this product. Record the serial number in the space provided below. Serial No. Serial No. DCR-PC100 Model No. DCR-PC100 ©1999 Sony Corporation Model No. AC-
Operating Instructions
Page 7
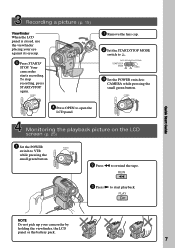
... cap. 2 Set the START/STOP MODE switch to rewind the tape. REW 3 Press N to VTR VTR while pressing the small green button. Your camcorder starts recording. MEMORY OFF CAMERA MEMORY OFF CAMERA Monitoring the playback picture on the LCD screen (p. 25) 1 Set the POWER POWER switch to start playback. Quick Start Guide...
... cap. 2 Set the START/STOP MODE switch to rewind the tape. REW 3 Press N to VTR VTR while pressing the small green button. Your camcorder starts recording. MEMORY OFF CAMERA MEMORY OFF CAMERA Monitoring the playback picture on the LCD screen (p. 25) 1 Set the POWER POWER switch to start playback. Quick Start Guide...
Operating Instructions
Page 8
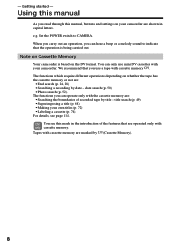
... 8 title search (p. 49) • Superimposing a title (p. 68) • Making your camcorder are : •End search (p. 24, 28) •Searching a recording by title - The functions which require different operations depending on your own titles (p. 72) • Labeling a cassette (p. 74). e.g. When you carry out an operation, ...read through this mark in capital letters. Tapes with cassette memory . You can hear a beep or a melody sound to CAMERA. For details, see this manual, buttons and settings on whether the tape has the cassette memory or not are shown in the introduction...
... 8 title search (p. 49) • Superimposing a title (p. 68) • Making your camcorder are : •End search (p. 24, 28) •Searching a recording by title - The functions which require different operations depending on your own titles (p. 72) • Labeling a cassette (p. 74). e.g. When you carry out an operation, ...read through this mark in capital letters. Tapes with cassette memory . You can hear a beep or a melody sound to CAMERA. For details, see this manual, buttons and settings on whether the tape has the cassette memory or not are shown in the introduction...

Operating Instructions
Page 11
... the battery pack Use the battery pack after charging it for approximately one hour after the CHARGE lamp goes out. 1 4 POWER LOCK VTR MEMORY OFF CAMERA 2 CHARGE lamp Note Prevent metallic objects from coming into contact with the plug's v mark facing up .
... the battery pack Use the battery pack after charging it for approximately one hour after the CHARGE lamp goes out. 1 4 POWER LOCK VTR MEMORY OFF CAMERA 2 CHARGE lamp Note Prevent metallic objects from coming into contact with the plug's v mark facing up .

Operating Instructions
Page 15
... focuses for more information (p. 10 to p. 14). (3) Set the POWER switch to open the LCD panel. (5) Press START/STOP. Basics VTR MEMORY OFF CAMERA MEMORY OFF CAMERA VTR 4 2 5 POWER LOCK 40min REC 0:00:01 Camera recording lamp Note Fasten the grip strap firmly. Your camcorder is set to the standby mode. (4) Press OPEN to...
... focuses for more information (p. 10 to p. 14). (3) Set the POWER switch to open the LCD panel. (5) Press START/STOP. Basics VTR MEMORY OFF CAMERA MEMORY OFF CAMERA VTR 4 2 5 POWER LOCK 40min REC 0:00:01 Camera recording lamp Note Fasten the grip strap firmly. Your camcorder is set to the standby mode. (4) Press OPEN to...

Operating Instructions
Page 16
... SEARCH function (p. 24). To resume the standby mode, set to OFF. • Do not mix recordings in the SP mode and ones in the standby mode for five minutes while the cassette is smooth as...slide the LOCK switch to MEMORY accidentally. To enable smooth transition Transition between the last scene you recorded and the next scene is inserted Your camcorder automatically turns off. Note When using the LCD screen...off your camcorder does not turn the LCD panel over so that it into the camcorder body. Recording a picture Note on the LOCK switch When you turn off. This is set the POWER ...
... SEARCH function (p. 24). To resume the standby mode, set to OFF. • Do not mix recordings in the SP mode and ones in the standby mode for five minutes while the cassette is smooth as...slide the LOCK switch to MEMORY accidentally. To enable smooth transition Transition between the last scene you recorded and the next scene is inserted Your camcorder automatically turns off. Note When using the LCD screen...off your camcorder does not turn the LCD panel over so that it into the camcorder body. Recording a picture Note on the LOCK switch When you turn off. This is set the POWER ...

Operating Instructions
Page 21
... with the light source behind the subject or a subject with a light background, use the backlight function. Recording - Basics Recording a picture Time code The time code indicates the recording or playback time, "0:00:00" (hours : minutes : seconds) in CAMERA mode and "0:00:00:00" (hours : minutes : seconds : frames) in the viewfinder. You cannot rewrite only...
... with the light source behind the subject or a subject with a light background, use the backlight function. Recording - Basics Recording a picture Time code The time code indicates the recording or playback time, "0:00:00" (hours : minutes : seconds) in CAMERA mode and "0:00:00:00" (hours : minutes : seconds : frames) in the viewfinder. You cannot rewrite only...

Operating Instructions
Page 25
...picture on VOLUME. 6+ VOLUME - Basics - VTR 3 POWER LOCK MEMORY OFF CAMERA 2 1 To stop playback Press x. 4 REW 5 PLAY 25 Playing back a tape You can monitor the playback picture in the viewfinder. Playback - The video control buttons light up. (4) Press m to rewind the tape. (5) Press ...N to VTR while pressing the small green button. Playback - You can control playback using the Remote Commander supplied with your camcorder. (1) Install the power source and insert the recorded tape. ...
...picture on VOLUME. 6+ VOLUME - Basics - VTR 3 POWER LOCK MEMORY OFF CAMERA 2 1 To stop playback Press x. 4 REW 5 PLAY 25 Playing back a tape You can monitor the playback picture in the viewfinder. Playback - The video control buttons light up. (4) Press m to rewind the tape. (5) Press ...N to VTR while pressing the small green button. Playback - You can control playback using the Remote Commander supplied with your camcorder. (1) Install the power source and insert the recorded tape. ...

Operating Instructions
Page 31
...is then recorded for about 765 pictures in use the photo recording function during those seven seconds is also recorded. If you record a moving subject with photo recording function When you record on "Memory Stick"s. 31 You can record a still picture. The sound during normal CAMERA recording You cannot...in the viewfinder by pressing PHOTO lightly. Tape photo recording You can record about 510 pictures in use the photo recording function using a video printer (not supplied). The CAPTURE indicator appears. While the digital effect function is set or in the SP mode and...
...is then recorded for about 765 pictures in use the photo recording function during those seven seconds is also recorded. If you record a moving subject with photo recording function When you record on "Memory Stick"s. 31 You can record a still picture. The sound during normal CAMERA recording You cannot...in the viewfinder by pressing PHOTO lightly. Tape photo recording You can record about 510 pictures in use the photo recording function using a video printer (not supplied). The CAPTURE indicator appears. While the digital effect function is set or in the SP mode and...

Operating Instructions
Page 32
... Commander. The POWER switch is useful when you want to record yourself. (1) Set the POWER switch to OFF or VTR. 32 Tape photo recording Self-timer photo recording You can make a photo recording with a beep sound. This mode is set to CAMERA. (2) Press (self-timer). Self-timer recording is automatically canceled when: - Note The self-timer...
... Commander. The POWER switch is useful when you want to record yourself. (1) Set the POWER switch to OFF or VTR. 32 Tape photo recording Self-timer photo recording You can make a photo recording with a beep sound. This mode is set to CAMERA. (2) Press (self-timer). Self-timer recording is automatically canceled when: - Note The self-timer...

Operating Instructions
Page 34
In the automatic white balance mode Point your camcorder at a white subject for about 10 seconds after setting the POWER switch to CAMERA to get a better adjustment when: •You detach the battery for replacement. •You bring your camcorder to the outdoors from ...) : • Lighting condition changes quickly • Too bright place such as photography studios • Under sodium lamps or mercury lamps (OUTDOOR) : • Recording a sunset/sunrise, just after a few seconds when: •You change the PROGRAM AE mode. •You bring your camcorder to AUTO in the n indoor ...
In the automatic white balance mode Point your camcorder at a white subject for about 10 seconds after setting the POWER switch to CAMERA to get a better adjustment when: •You detach the battery for replacement. •You bring your camcorder to the outdoors from ...) : • Lighting condition changes quickly • Too bright place such as photography studios • Under sodium lamps or mercury lamps (OUTDOOR) : • Recording a sunset/sunrise, just after a few seconds when: •You change the PROGRAM AE mode. •You bring your camcorder to AUTO in the n indoor ...

Operating Instructions
Page 49
...that you selected. 1 POWER LOCK 3 SEARCH MODE TITLE SEARCH 1 HELLO! 2 CONGRATULATIONS! 3 HAPPY NEW YEAR! 4 PRESENT 5 GOOD MORNING 6 WEDDING VTR MEMORY OFF CAMERA 4 TITLE SEARCH 3 HAPPY NEW YEAR! 4 PRESENT 5 GOOD MORNING 6 WEDDING 7 NIGHT 8 BASEBALL To stop searching Press x. The indicator changes as follows: TITLE ...DATE SEARCH t PHOTO SEARCH t PHOTO SCAN t no indicator (4) Press . If you are trying to select the title for the boundaries of recorded tape by title - Title search If you use a tape without cassette memory You cannot superimpose or search a title. or > on the ...
...that you selected. 1 POWER LOCK 3 SEARCH MODE TITLE SEARCH 1 HELLO! 2 CONGRATULATIONS! 3 HAPPY NEW YEAR! 4 PRESENT 5 GOOD MORNING 6 WEDDING VTR MEMORY OFF CAMERA 4 TITLE SEARCH 3 HAPPY NEW YEAR! 4 PRESENT 5 GOOD MORNING 6 WEDDING 7 NIGHT 8 BASEBALL To stop searching Press x. The indicator changes as follows: TITLE ...DATE SEARCH t PHOTO SEARCH t PHOTO SCAN t no indicator (4) Press . If you are trying to select the title for the boundaries of recorded tape by title - Title search If you use a tape without cassette memory You cannot superimpose or search a title. or > on the ...

Operating Instructions
Page 50
... PHOTO SCAN t no indicator (4) Press . Use this operation. or > on the Remote Commander repeatedly, until the date search indicator appears. Searching a recording by using cassette memory You can automatically search for playback. Use a tape with cassette memory (p. 114). (1) Set the POWER switch to VTR. (2) ... SEARCH MODE DATE SEARCH 1 SEP / 5 / 99 2 SEP / 6 / 99 3 DEC / 24 / 99 4 JAN / 1 / 00 5 FEB / 11 / 00 6 APR / 29 / 00 VTR MEMORY OFF CAMERA 4 DATE SEARCH 1 SEP / 5 / 99 2 SEP / 6 / 99 3 DEC / 24 / 99 4 JAN / 1 / 00 5 FEB / 11 / 00 6 APR / 29 / 00 To stop searching Press x....
... PHOTO SCAN t no indicator (4) Press . Use this operation. or > on the Remote Commander repeatedly, until the date search indicator appears. Searching a recording by using cassette memory You can automatically search for playback. Use a tape with cassette memory (p. 114). (1) Set the POWER switch to VTR. (2) ... SEARCH MODE DATE SEARCH 1 SEP / 5 / 99 2 SEP / 6 / 99 3 DEC / 24 / 99 4 JAN / 1 / 00 5 FEB / 11 / 00 6 APR / 29 / 00 VTR MEMORY OFF CAMERA 4 DATE SEARCH 1 SEP / 5 / 99 2 SEP / 6 / 99 3 DEC / 24 / 99 4 JAN / 1 / 00 5 FEB / 11 / 00 6 APR / 29 / 00 To stop searching Press x....

Operating Instructions
Page 52
... 8 : 50 AM 3 DEC / 24 / 99 1 0 : 30 AM 4 JAN / 1 / 00 11 : 25 PM 5 FEB / 11 / 00 4 : 11 PM 6 ARP / 29 / 00 1 : 45 PM VTR MEMORY OFF CAMERA 4 PHOTO SEARCH 1 SEP / 5 / 99 5 : 30 PM 2 SEP / 6 / 99 8 : 50 AM 3 DEC / 24 / 99 1 0 : 30 AM 4 JAN / 1 / 00 11 : 25 PM 5 FEB / 11 / 00 4... SCAN t no indicator (4) Press . indicates the actual point you are trying to check or edit still pictures. If a tape has a blank portion between recorded portions The photo search function may not work correctly. Searching for these operations. In the mark • The bar in the • The mark in...
... 8 : 50 AM 3 DEC / 24 / 99 1 0 : 30 AM 4 JAN / 1 / 00 11 : 25 PM 5 FEB / 11 / 00 4 : 11 PM 6 ARP / 29 / 00 1 : 45 PM VTR MEMORY OFF CAMERA 4 PHOTO SEARCH 1 SEP / 5 / 99 5 : 30 PM 2 SEP / 6 / 99 8 : 50 AM 3 DEC / 24 / 99 1 0 : 30 AM 4 JAN / 1 / 00 11 : 25 PM 5 FEB / 11 / 00 4... SCAN t no indicator (4) Press . indicates the actual point you are trying to check or edit still pictures. If a tape has a blank portion between recorded portions The photo search function may not work correctly. Searching for these operations. In the mark • The bar in the • The mark in...

Operating Instructions
Page 53
.... Scanning photo (1) Set the POWER switch to select the photo for about five seconds automatically. 1 POWER LOCK 2 SEARCH MODE PHOTO 00 SCAN VTR MEMORY OFF CAMERA 3 To stop searching Press x. or >, your camcorder searches for a photo - To stop scanning Press x. 53 Photo search/Photo scan Searching for a photo without using cassette...
.... Scanning photo (1) Set the POWER switch to select the photo for about five seconds automatically. 1 POWER LOCK 2 SEARCH MODE PHOTO 00 SCAN VTR MEMORY OFF CAMERA 3 To stop searching Press x. or >, your camcorder searches for a photo - To stop scanning Press x. 53 Photo search/Photo scan Searching for a photo without using cassette...

Operating Instructions
Page 73
If you take five minutes or longer to CAMERA again, then complete your title. Set the POWER switch to OFF once and then to enter characters in the standby mode while a cassette is in ...
If you take five minutes or longer to CAMERA again, then complete your title. Set the POWER switch to OFF once and then to enter characters in the standby mode while a cassette is in ...

Operating Instructions
Page 76
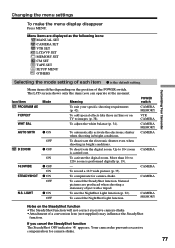
For details, see "Selecting the mode setting of each item" (p. 77). 1 MENU CAMERA MANUAL SET PROGRAM AE P EFFECT WHT BAL AUTO SHTR [MENU] : END MEMORY MANUAL SET PROGRAM AE WHT BAL VTR MANUAL SET P EFFECT [MENU] : END [MENU] : ...
For details, see "Selecting the mode setting of each item" (p. 77). 1 MENU CAMERA MANUAL SET PROGRAM AE P EFFECT WHT BAL AUTO SHTR [MENU] : END MEMORY MANUAL SET PROGRAM AE WHT BAL VTR MANUAL SET P EFFECT [MENU] : END [MENU] : ...
Operating Instructions
Page 77
...films or on TV to 120× zoom is carried out. Up to 10× zoom is performed digitally (p. 19). - More than 10× to images (p. 38). To record a 16:9 wide picture (p. 35). If you can operate at the moment. The LCD screen shows only.... To deactivate the electronic shutter even when shooting in bright conditions. To cancel the SteadyShot function. POWER switch CAMERA MEMORY VTR CAMERA CAMERA MEMORY CAMERA CAMERA CAMERA CAMERA CAMERA MEMORY Notes on the position of a conversion lens (not supplied) may influence the SteadyShot function. Icon/item Mode ...
...films or on TV to 120× zoom is carried out. Up to 10× zoom is performed digitally (p. 19). - More than 10× to images (p. 38). To record a 16:9 wide picture (p. 35). If you can operate at the moment. The LCD screen shows only.... To deactivate the electronic shutter even when shooting in bright conditions. To cancel the SteadyShot function. POWER switch CAMERA MEMORY VTR CAMERA CAMERA MEMORY CAMERA CAMERA CAMERA CAMERA CAMERA MEMORY Notes on the position of a conversion lens (not supplied) may influence the SteadyShot function. Icon/item Mode ...

Operating Instructions
Page 78
VTR CAMERA MEMORY VTR CAMERA MEMORY VTR CAMERA MEMORY VTR CAMERA MEMORY To darken To lighten When LCD B. Changing the menu settings Icon/item HiFi SOUND Mode z STEREO 1 2 AUDIO MIX Meaning To play back a stereo tape ...
VTR CAMERA MEMORY VTR CAMERA MEMORY VTR CAMERA MEMORY VTR CAMERA MEMORY To darken To lighten When LCD B. Changing the menu settings Icon/item HiFi SOUND Mode z STEREO 1 2 AUDIO MIX Meaning To play back a stereo tape ...

Operating Instructions
Page 80
... (Standard Play) mode. Not to 1.5 times the SP mode. POWER switch VTR VTR CAMERA VTR VTR CAMERA VTR CAMERA VTR CAMERA VTR CAMERA Notes on the LP mode • When you record a tape in the LP mode on your camcorder, we recommend using a Sony Excellence/Master mini DV cassette so that you can get the most out...
... (Standard Play) mode. Not to 1.5 times the SP mode. POWER switch VTR VTR CAMERA VTR VTR CAMERA VTR CAMERA VTR CAMERA VTR CAMERA Notes on the LP mode • When you record a tape in the LP mode on your camcorder, we recommend using a Sony Excellence/Master mini DV cassette so that you can get the most out...


