
Operating Instructions
Page 5
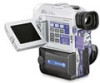
... Commander (2) (p. 137) 5 Serial port adaptor for Memory Stick (1), PC serial cable (1), AC adaptor for Serial port adaptor (1) (p. 105) 6 "Memory Stick" (1) (p. 84) 7 A/V connecting cable (1) (p. 29, 54) 8 Lens cap (1) (p. 15) 9 Application software: PictureGear 3.2Lite (CD ROM) (1) (p. 105) 0 Battery terminal cover (1) (p. 10) qa...
... Commander (2) (p. 137) 5 Serial port adaptor for Memory Stick (1), PC serial cable (1), AC adaptor for Serial port adaptor (1) (p. 105) 6 "Memory Stick" (1) (p. 84) 7 A/V connecting cable (1) (p. 29, 54) 8 Lens cap (1) (p. 15) 9 Application software: PictureGear 3.2Lite (CD ROM) (1) (p. 105) 0 Battery terminal cover (1) (p. 10) qa...
Operating Instructions
Page 7
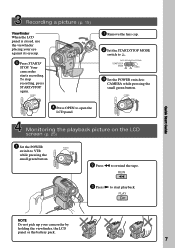
... on the LCD screen (p. 25) 1 Set the POWER POWER switch to CAMERA while pressing the small green button. PLAY NOTE Do not pick up your eye against its eyecup. 5 Press START/ STOP. POWER 1 Remove the lens cap. 2 Set the START/STOP MODE switch to rewind the tape. MEMORY... OFF CAMERA 2 Press m to . REW 3 Press N to open the LCD panel. Quick Start Guide Recording a picture (p. 15) Viewfinder When the LCD panel is closed, use the...
... on the LCD screen (p. 25) 1 Set the POWER POWER switch to CAMERA while pressing the small green button. PLAY NOTE Do not pick up your eye against its eyecup. 5 Press START/ STOP. POWER 1 Remove the lens cap. 2 Set the START/STOP MODE switch to rewind the tape. MEMORY... OFF CAMERA 2 Press m to . REW 3 Press N to open the LCD panel. Quick Start Guide Recording a picture (p. 15) Viewfinder When the LCD panel is closed, use the...

Operating Instructions
Page 15
..., you can record 1.5 times as long as in microphone during recording. Recording - To stop recording, press START/STOP again. 3 LOCK 1 POWER Microphone LOCK Recording - Basics VTR MEMORY OFF CAMERA MEMORY OFF CAMERA VTR 4 2 5 POWER LOCK 40min REC 0:00:01 Camera recording lamp Note Fasten...starts recording. - Recording a picture Your camcorder automatically focuses for more information (p. 10 to p. 14). (3) Set the POWER switch to open the LCD panel. (5) Press START/STOP. The "REC" indicator appears. When you . (1) Remove the lens cap and pull the lens cap...
..., you can record 1.5 times as long as in microphone during recording. Recording - To stop recording, press START/STOP again. 3 LOCK 1 POWER Microphone LOCK Recording - Basics VTR MEMORY OFF CAMERA MEMORY OFF CAMERA VTR 4 2 5 POWER LOCK 40min REC 0:00:01 Camera recording lamp Note Fasten...starts recording. - Recording a picture Your camcorder automatically focuses for more information (p. 10 to p. 14). (3) Set the POWER switch to open the LCD panel. (5) Press START/STOP. The "REC" indicator appears. When you . (1) Remove the lens cap and pull the lens cap...

Operating Instructions
Page 16
To enable smooth transition Transition between the last scene you recorded and the next scene is smooth as long as a default setting. However, check the following: • When you change the battery pack, set the POWER switch to the lens side. When you use the END SEARCH function (p. 24)..... The LOCK switch is inserted Your camcorder automatically turns off . To resume the standby mode, set to CAMERA again. When a cassette is to save battery power and to MEMORY accidentally. Recording a picture Note on the LOCK switch When you slide the LOCK switch to the left, the POWER switch...
To enable smooth transition Transition between the last scene you recorded and the next scene is smooth as long as a default setting. However, check the following: • When you change the battery pack, set the POWER switch to the lens side. When you use the END SEARCH function (p. 24)..... The LOCK switch is inserted Your camcorder automatically turns off . To resume the standby mode, set to CAMERA again. When a cassette is to save battery power and to MEMORY accidentally. Recording a picture Note on the LOCK switch When you slide the LOCK switch to the left, the POWER switch...

Operating Instructions
Page 18
... ray emitted from the Remote Commander. •You will attach a filter (not supplied). Adjust the viewfinder lens to attach the lens hood. Attaching the supplied lens hood To record fine pictures under strong light, we recommend you to your eyesight so that the indicators in the viewfinder come... into sharp focus. Recording a picture Adjusting the viewfinder If you record pictures with the LCD panel closed, check the picture with the Remote Commander. Move the viewfinder lens adjustment lever. In this case, the lens hood may be eclipsed by the...
... ray emitted from the Remote Commander. •You will attach a filter (not supplied). Adjust the viewfinder lens to attach the lens hood. Attaching the supplied lens hood To record fine pictures under strong light, we recommend you to your eyesight so that the indicators in the viewfinder come... into sharp focus. Recording a picture Adjusting the viewfinder If you record pictures with the LCD panel closed, check the picture with the Remote Commander. Move the viewfinder lens adjustment lever. In this case, the lens hood may be eclipsed by the...

Operating Instructions
Page 19
...toward the "T" side. •You cannot use the digital zoom when the POWER switch is at least about 2 feet 5/8 inch (about 80 cm) away from the lens surface in the telephoto position, or about 1/2 inch (about 1 cm) away in better-looking recordings. When you shoot close to a subject If you ...set D ZOOM to the "W" side until the focus is set to MEMORY. 19 Notes on digital zoom •Digital zoom starts to function...
...toward the "T" side. •You cannot use the digital zoom when the POWER switch is at least about 2 feet 5/8 inch (about 80 cm) away from the lens surface in the telephoto position, or about 1/2 inch (about 1 cm) away in better-looking recordings. When you shoot close to a subject If you ...set D ZOOM to the "W" side until the focus is set to MEMORY. 19 Notes on digital zoom •Digital zoom starts to function...

Operating Instructions
Page 22
...To cancel the NightShot +Slow shutter mode, slide NIGHTSHOT to OFF. While your camcorder to ON. Using the NightShot Light The picture will be recorded in incorrect or unnatural colors. •If autofocusing is in the standby or memory mode, slide NIGHTSHOT to malfunction. •When you keep ... using the NightShot function, focus manually. •Do not cover the NightShot Light emitter when using the NightShot function. •Detach the lens hood when you to ON in the menu settings (p. 76). NIGHTSHOT +SLOW SHTR OFF ON NightShot Light emitter Using +SLOW SHTR The ...
...To cancel the NightShot +Slow shutter mode, slide NIGHTSHOT to OFF. While your camcorder to ON. Using the NightShot Light The picture will be recorded in incorrect or unnatural colors. •If autofocusing is in the standby or memory mode, slide NIGHTSHOT to malfunction. •When you keep ... using the NightShot function, focus manually. •Do not cover the NightShot Light emitter when using the NightShot function. •Detach the lens hood when you to ON in the menu settings (p. 76). NIGHTSHOT +SLOW SHTR OFF ON NightShot Light emitter Using +SLOW SHTR The ...
Operating Instructions
Page 30
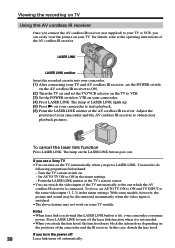
If you use a Sony TV •You can switch the video input of the TV automatically to the one which the AV cordless IR receiver is not needed. •When you attach the lens hood, the lens hood may be disconnected momentarily when the video input is lit), your camcorder. (4) Press LASER LINK...sound may block the infrared ray depending on the positions of the camcorder and the IR receiver. LASER LINK LASER LINK emitter Insert the recorded cassette into your camcorder. (1) After connecting your camcorder and the AV cordless IR receiver to obtain clear playback pictures. The lamp on ...
If you use a Sony TV •You can switch the video input of the TV automatically to the one which the AV cordless IR receiver is not needed. •When you attach the lens hood, the lens hood may be disconnected momentarily when the video input is lit), your camcorder. (4) Press LASER LINK...sound may block the infrared ray depending on the positions of the camcorder and the IR receiver. LASER LINK LASER LINK emitter Insert the recorded cassette into your camcorder. (1) After connecting your camcorder and the AV cordless IR receiver to obtain clear playback pictures. The lamp on ...
Operating Instructions
Page 77
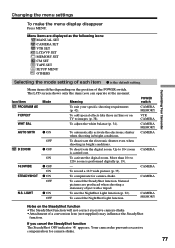
...following icons: MANUAL SET CAMERA SET VTR SET LCD/VF SET MEMORY SET CM SET TAPE SET SETUP MENU OTHERS Customizing Your Camcorder Selecting the mode setting of each item z is carried out. Menu items differ depending on the position of a conversion lens (not supplied) may influence... for camera-shake. The LCD screen shows only the items you cancel the SteadyShot function The SteadyShot OFF indicator appears. AUTO SHTR z ON OFF D ZOOM z OFF ON 16:9WIDE STEADYSHOT z OFF ON z ON OFF N.S. To activate the digital zoom. To adjust the white balance (p. 34). To record a 16...
...following icons: MANUAL SET CAMERA SET VTR SET LCD/VF SET MEMORY SET CM SET TAPE SET SETUP MENU OTHERS Customizing Your Camcorder Selecting the mode setting of each item z is carried out. Menu items differ depending on the position of a conversion lens (not supplied) may influence... for camera-shake. The LCD screen shows only the items you cancel the SteadyShot function The SteadyShot OFF indicator appears. AUTO SHTR z ON OFF D ZOOM z OFF ON 16:9WIDE STEADYSHOT z OFF ON z ON OFF N.S. To activate the digital zoom. To adjust the white balance (p. 34). To record a 16...

Operating Instructions
Page 116
... charged battery pack. (p. 10, 11) • The viewfinder lens is set to . (p. 20) • While being operated in CAMERA mode, your camcorder for autofocus. The power goes off. A vertical.... c Set it to CAMERA. c Adjust focus manually. (p. 45) • START/STOP MODE is not adjusted. c Set it . (p. 39) • The video heads may be dirty. If...Sony DVM12CL cleaning cassette (not supplied). (p. 127) • The contrast between the subject and background is not set to ON. (p. 76) • The camcorder is not a malfunction. 116 c Cancel it to . (p. 20) • The digital...
... charged battery pack. (p. 10, 11) • The viewfinder lens is set to . (p. 20) • While being operated in CAMERA mode, your camcorder for autofocus. The power goes off. A vertical.... c Set it to CAMERA. c Adjust focus manually. (p. 45) • START/STOP MODE is not adjusted. c Set it . (p. 39) • The video heads may be dirty. If...Sony DVM12CL cleaning cassette (not supplied). (p. 127) • The contrast between the subject and background is not set to ON. (p. 76) • The camcorder is not a malfunction. 116 c Cancel it to . (p. 20) • The digital...

Operating Instructions
Page 126
... it for about one hour with the cassette compartment open. If moisture condensation occurred None of the tape, or on the lens, the indicator will work. If moisture condenses on the lens. Eject the cassette, turn off your camcorder. Your camcorder can be damaged or your camcorder, the beep sounds and the...
... it for about one hour with the cassette compartment open. If moisture condensation occurred None of the tape, or on the lens, the indicator will work. If moisture condenses on the lens. Eject the cassette, turn off your camcorder. Your camcorder can be damaged or your camcorder, the beep sounds and the...

Operating Instructions
Page 128
...by a Sony dealer before operating it any further. • Avoid rough handling or mechanical shock. AM receivers and video equipment disturb AM reception and video operation. To... operating instructions. • If any type of the tape and if the recording tab is in or out. • Do not open the tape protect.... • Avoid touching or damaging the terminals. Be particularly careful of the lens. • Keep the POWER switch set to be used in a cold place...Remove the tape, and periodically turn on the power, operate the CAMERA and VTR sections and play back a tape for about three minutes ...
...by a Sony dealer before operating it any further. • Avoid rough handling or mechanical shock. AM receivers and video equipment disturb AM reception and video operation. To... operating instructions. • If any type of the tape and if the recording tab is in or out. • Do not open the tape protect.... • Avoid touching or damaging the terminals. Be particularly careful of the lens. • Keep the POWER switch set to be used in a cold place...Remove the tape, and periodically turn on the power, operate the CAMERA and VTR sections and play back a tape for about three minutes ...
Operating Instructions
Page 130
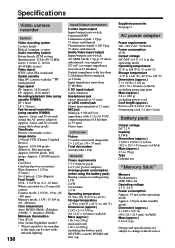
...using cassette DVM60) Approx. 1 min. Specifications Video camera recorder System Video recording system 2 rotary heads Helical scanning system Audio recording system Rotary heads, PCM system Quantization: 12 bits (Fs 32 kHz, stereo 1, stereo 2), 16 bits (Fs 48 kHz, stereo) Video signal NTSC color, EIA standards Usable cassette Mini... image: Approx. 1,000,000 pixels) Lens Carl Zeiss Combined power zoom lens Filter diameter 1 1/2 in. (37 mm.) 10× (Optical), 120× (Digital) Focal length 3/16 - 1 11/16 in. (4.2 - 42 mm) When converted to a 35 mm still camera Camera mode: 1 15/16 - 19 in...
...using cassette DVM60) Approx. 1 min. Specifications Video camera recorder System Video recording system 2 rotary heads Helical scanning system Audio recording system Rotary heads, PCM system Quantization: 12 bits (Fs 32 kHz, stereo 1, stereo 2), 16 bits (Fs 48 kHz, stereo) Video signal NTSC color, EIA standards Usable cassette Mini... image: Approx. 1,000,000 pixels) Lens Carl Zeiss Combined power zoom lens Filter diameter 1 1/2 in. (37 mm.) 10× (Optical), 120× (Digital) Focal length 3/16 - 1 11/16 in. (4.2 - 42 mm) When converted to a 35 mm still camera Camera mode: 1 15/16 - 19 in...

Operating Instructions
Page 131
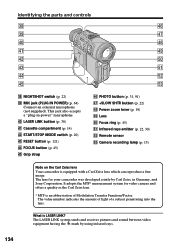
... are trademarks. Refer to the operating instructions of the accessory for further information. •The intelligent accessory shoe has a safety device for Sony video products. Identifying the parts and controls Camcorder 1 4 5 6 7 2 8 3 9 0 1 Lens cap (p. 15) 2 OPEN button (p. 16, 25) 3 LCD screen (p. 16) 4 Microphone (p. 65) 5 Intelligent accessory shoe (p. 64) 6 Eyecup 7 Viewfinder (p. 18) 8 MEMORY RELEASE button...
... are trademarks. Refer to the operating instructions of the accessory for further information. •The intelligent accessory shoe has a safety device for Sony video products. Identifying the parts and controls Camcorder 1 4 5 6 7 2 8 3 9 0 1 Lens cap (p. 15) 2 OPEN button (p. 16, 25) 3 LCD screen (p. 16) 4 Microphone (p. 65) 5 Intelligent accessory shoe (p. 64) 6 Eyecup 7 Viewfinder (p. 18) 8 MEMORY RELEASE button...

Operating Instructions
Page 132
MENU button (p. 76) wh wj wk wl wa LOCK switch (p. 16) ws (self-timer) button (p. 23, 32, 94) wd Viewfinder lens adjustment lever (p. 18) wf START/STOP button (p. 15) wg POWER switch (p. 15) wh SEL/PUSH EXEC dial (p. 76) wj Cassette lid (p. 14) wk BACK LIGHT ... (p. 44) 132 buttons (p. 96, 103) ql DISPLAY button (p. 26) w; wa ws wd wf wg qa MEMORY PLAY button (p. 96) qs END SEARCH button (p. 24) qd DIGITAL EFFECT button (p. 40) qf VOLUME buttons (p. 25) qg TITLE button (p. 68) qh MEMORY INDEX button (p. 104) qj MEMORY DELETE button (p. 110) qk MEMORY +/- Identifying the...
MENU button (p. 76) wh wj wk wl wa LOCK switch (p. 16) ws (self-timer) button (p. 23, 32, 94) wd Viewfinder lens adjustment lever (p. 18) wf START/STOP button (p. 15) wg POWER switch (p. 15) wh SEL/PUSH EXEC dial (p. 76) wj Cassette lid (p. 14) wk BACK LIGHT ... (p. 44) 132 buttons (p. 96, 103) ql DISPLAY button (p. 26) w; wa ws wd wf wg qa MEMORY PLAY button (p. 96) qs END SEARCH button (p. 24) qd DIGITAL EFFECT button (p. 40) qf VOLUME buttons (p. 25) qg TITLE button (p. 68) qh MEMORY INDEX button (p. 104) qj MEMORY DELETE button (p. 110) qk MEMORY +/- Identifying the...
Operating Instructions
Page 134
...Sony Corporation. The value number indicates the amount of light of Modulation Transfer Function/Factor. rk ra rl rs t; Focus ring (p. 45) ta Infrared rays emitter (p. 22, 30) ts Remote sensor td Camera recording lamp (p. 15) Note on the Carl Zeiss lens Your camcorder is LASER LINK? The lens for video camera... and offers a quality as the Carl Zeiss lens. * MTF is an abbreviation of a subject penetrating into the lens. The LASER LINK system...
...Sony Corporation. The value number indicates the amount of light of Modulation Transfer Function/Factor. rk ra rl rs t; Focus ring (p. 45) ta Infrared rays emitter (p. 22, 30) ts Remote sensor td Camera recording lamp (p. 15) Note on the Carl Zeiss lens Your camcorder is LASER LINK? The lens for video camera... and offers a quality as the Carl Zeiss lens. * MTF is an abbreviation of a subject penetrating into the lens. The LASER LINK system...

Operating Instructions
Page 140
...LUMINANCEKEY 39 C, D M, N Camera chromakey 95 Carl Zeiss lens 134 Cassette memory 8, 114 ...Charging battery 11 Charging vanadium-lithium battery 127 Clock set 83 Connection (dubbing a tape 54 (viewing on TV 29 Continuous 92 Data code 27 Date/time indicator ....... 27, 103 Date search 50 DEMO 81 DIGITAL... AE 42 Sony Corporation Printed in Japan R Recording time 12... Remaining battery time indicator 20 Remaining tape indicator ...... 20 Remote commander 136 Remote control jack (LANC) 135 Remote sensor 134 RESET 121 S S video...
...LUMINANCEKEY 39 C, D M, N Camera chromakey 95 Carl Zeiss lens 134 Cassette memory 8, 114 ...Charging battery 11 Charging vanadium-lithium battery 127 Clock set 83 Connection (dubbing a tape 54 (viewing on TV 29 Continuous 92 Data code 27 Date/time indicator ....... 27, 103 Date search 50 DEMO 81 DIGITAL... AE 42 Sony Corporation Printed in Japan R Recording time 12... Remaining battery time indicator 20 Remaining tape indicator ...... 20 Remote commander 136 Remote control jack (LANC) 135 Remote sensor 134 RESET 121 S S video...


