MovieShaker v3.1 Operating Instructions
Page 1
3-070-303-12(1) MovieShaker Ver.3.1 for MICROMV Operating Instructions Before using MovieShaker, be sure to read carefully the END-USER LICENSE AGREEMENT (the Software License Agreement) at the end of the Operating Instructions. © 2001 Sony Corporation
3-070-303-12(1) MovieShaker Ver.3.1 for MICROMV Operating Instructions Before using MovieShaker, be sure to read carefully the END-USER LICENSE AGREEMENT (the Software License Agreement) at the end of the Operating Instructions. © 2001 Sony Corporation
MovieShaker v3.1 Operating Instructions
Page 2
...2 All rights reserved. Program © 2001 Sony Corporation Documentation © 2001 Sony Corporation © 2001 Sony Corporation. About the copyright: Video or audio files recorded using this software, or for loss due to any inability to make video or audio files recordings that specified. ❒ The software specifications may... unless prior permission from the replacement of this software should not be used in the U.S. and other countries. , , and MICROMV logo are not shown in a system other than those you actually see on your own computer; this is registered in this ...
...2 All rights reserved. Program © 2001 Sony Corporation Documentation © 2001 Sony Corporation © 2001 Sony Corporation. About the copyright: Video or audio files recorded using this software, or for loss due to any inability to make video or audio files recordings that specified. ❒ The software specifications may... unless prior permission from the replacement of this software should not be used in the U.S. and other countries. , , and MICROMV logo are not shown in a system other than those you actually see on your own computer; this is registered in this ...

MovieShaker v3.1 Operating Instructions
Page 3
Table of Contents Before Use What you can do with MovieShaker 5 Precautions for Use 6 About the MICROMV 6 Using MovieShaker 7 How to Use this Manual 9 How to Use this Help 9 Installing the software 11 To install MovieShaker 11 To Install QuickTime 5 16 To ...
Table of Contents Before Use What you can do with MovieShaker 5 Precautions for Use 6 About the MICROMV 6 Using MovieShaker 7 How to Use this Manual 9 How to Use this Help 9 Installing the software 11 To install MovieShaker 11 To Install QuickTime 5 16 To ...

MovieShaker v3.1 Operating Instructions
Page 5
... a scene You can add an effect, such as a cross-fade or wipe effect, between scenes on the Storyboard to provide an interesting transition from the MICROMV device connected to your final movie product to those on the Clip tray at random, simply by other people. 5 A scene is automatically created and may...
... a scene You can add an effect, such as a cross-fade or wipe effect, between scenes on the Storyboard to provide an interesting transition from the MICROMV device connected to your final movie product to those on the Clip tray at random, simply by other people. 5 A scene is automatically created and may...
MovieShaker v3.1 Operating Instructions
Page 6
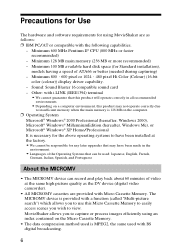
...; The MICROMV device can be responsible for Standard installation), models having a speed of ATA66 or better (needed during capturing) - Minimum 100 MB available hard disk space (for any later upgrades that can record and play back about 60 minutes of the Operating Systems ... It is necessary for the above operating systems to capture or process images efficiently using MovieShaker are as the DV device (digital video camcorder). • All MICROMV cassettes are provided with i.LINK (IEEE1394) terminal • We cannot guarantee that this product will operate correctly in the ...
...; The MICROMV device can be responsible for Standard installation), models having a speed of ATA66 or better (needed during capturing) - Minimum 100 MB available hard disk space (for any later upgrades that can record and play back about 60 minutes of the Operating Systems ... It is necessary for the above operating systems to capture or process images efficiently using MovieShaker are as the DV device (digital video camcorder). • All MICROMV cassettes are provided with i.LINK (IEEE1394) terminal • We cannot guarantee that this product will operate correctly in the ...
MovieShaker v3.1 Operating Instructions
Page 7
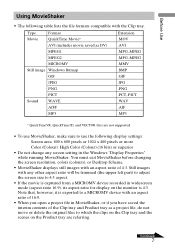
... lists the file formats compatible with an aspect ratio of the Clip tray and Product tray as DV) .AVI MPEG1 .MPG,.MPEG MPEG2 .MPG,.MPEG MICROMV .MMV Still image Windows Bitmap .BMP GIF .GIF JPEG .JPG PNG .PNG PICT .PCT,.PICT Sound WAVE .WAV AIFF .AIF MP3 .MP3 * QuickTimeVR... ratio will be trimmed (the upper left part) to adjust the screen size to 4:3 aspect. • If the movie is captured from a MICROMV device recorded in widescreen mode (aspect ratio 16:9), its aspect ratio for display on the Product tray are not supported. • To use MovieShaker, make sure...
... lists the file formats compatible with an aspect ratio of the Clip tray and Product tray as DV) .AVI MPEG1 .MPG,.MPEG MPEG2 .MPG,.MPEG MICROMV .MMV Still image Windows Bitmap .BMP GIF .GIF JPEG .JPG PNG .PNG PICT .PCT,.PICT Sound WAVE .WAV AIFF .AIF MP3 .MP3 * QuickTimeVR... ratio will be trimmed (the upper left part) to adjust the screen size to 4:3 aspect. • If the movie is captured from a MICROMV device recorded in widescreen mode (aspect ratio 16:9), its aspect ratio for display on the Product tray are not supported. • To use MovieShaker, make sure...
MovieShaker v3.1 Operating Instructions
Page 8
... Loss of data transferring between your computer and a MICROMV device due to a heavy load put on the system that may occur if a heavy load is put your computer into System Suspend mode or the System Hibernation mode. • Digital recording is not possible if the audio source is not installed... on your computer, you capture images from or export files to MICROMV devices, see "Configuring your computer Depending on the CPU or hard disk ...
... Loss of data transferring between your computer and a MICROMV device due to a heavy load put on the system that may occur if a heavy load is put your computer into System Suspend mode or the System Hibernation mode. • Digital recording is not possible if the audio source is not installed... on your computer, you capture images from or export files to MICROMV devices, see "Configuring your computer Depending on the CPU or hard disk ...
MovieShaker v3.1 Operating Instructions
Page 9
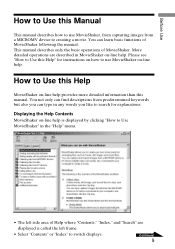
... -line help . How to search for instructions on -line help is called the left side area of MovieShaker. You not only can find descriptions from a MICROMV device to Use this manual. Please see "How to creating a movie. Continued 9 Displaying the Help Contents MovieShaker on how to switch displays. You can type...
... -line help . How to search for instructions on -line help is called the left side area of MovieShaker. You not only can find descriptions from a MICROMV device to Use this manual. Please see "How to creating a movie. Continued 9 Displaying the Help Contents MovieShaker on how to switch displays. You can type...
MovieShaker v3.1 Operating Instructions
Page 11
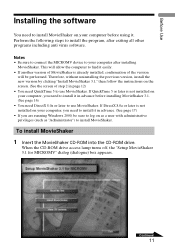
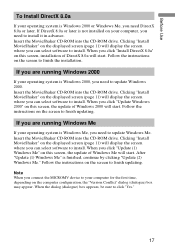
... QuickTime 5 or later is not installed on your computer, you need to install it . Notes • Be sure to connect the MICROMV device to install the program, after installing MovieShaker. Therefore, without uninstalling the previous version, install the new version by clicking "Install MovieShaker ...12) • You need QuickTime 5 to use MovieShaker. When the CD-ROM drive access lamp turns off, the "Setup MovieShaker 3.1 for MICROMV" dialog (dialogue) box appears. This will be sure to log on as a user with administrative privileges (such as "Administrator") to install ...
... QuickTime 5 or later is not installed on your computer, you need to install it . Notes • Be sure to connect the MICROMV device to install the program, after installing MovieShaker. Therefore, without uninstalling the previous version, install the new version by clicking "Install MovieShaker ...12) • You need QuickTime 5 to use MovieShaker. When the CD-ROM drive access lamp turns off, the "Setup MovieShaker 3.1 for MICROMV" dialog (dialogue) box appears. This will be sure to log on as a user with administrative privileges (such as "Administrator") to install ...

MovieShaker v3.1 Operating Instructions
Page 14
...appears. z Hints • If you click "OK" to confirm your hard disk. Please check the system written on the screen to your digital signature. Note When you install MovieShaker without installing QuickTime 5, the warning dialog (dialogue) box shown below may be displayed inviting you to finish installation.... When the dialog (dialogue) box appears, be copied from which you can install QuickTime 5. 14 Follow the instructions on the MICROMV device or package. The necessary files will be sure to click "Yes." 6 Click to display the "Choose Folder" dialog (dialogue) box.
...appears. z Hints • If you click "OK" to confirm your hard disk. Please check the system written on the screen to your digital signature. Note When you install MovieShaker without installing QuickTime 5, the warning dialog (dialogue) box shown below may be displayed inviting you to finish installation.... When the dialog (dialogue) box appears, be copied from which you can install QuickTime 5. 14 Follow the instructions on the MICROMV device or package. The necessary files will be sure to click "Yes." 6 Click to display the "Choose Folder" dialog (dialogue) box.
MovieShaker v3.1 Operating Instructions
Page 17
Clicking "Install MovieShaker" on the displayed screen (page 11) will display the screen where you connect the MICROMV device to your computer for the first time, depending on the displayed screen (page 11) will display the screen where you can select software to ...
Clicking "Install MovieShaker" on the displayed screen (page 11) will display the screen where you connect the MICROMV device to your computer for the first time, depending on the displayed screen (page 11) will display the screen where you can select software to ...
MovieShaker v3.1 Operating Instructions
Page 18
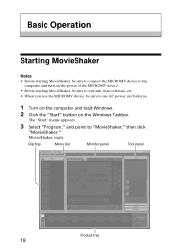
Basic Operation Starting MovieShaker Notes • Before starting MovieShaker, be sure to exit anti virus software, etc. • When you use the MICROMV device, be sure to "MovieShaker," then click "MovieShaker." MovieShaker starts. The "Start" menu appears. 3 Select "Program," and point to use AC ...1 Turn on the computer and load Windows. 2 Click the "Start" button on the power of the MICROMV device. • Before starting MovieShaker, be sure to connect the MICROMV device to the computer and turn on the Windows Taskbar. Clip tray Menu bar Monitor panel Tool panel Product...
Basic Operation Starting MovieShaker Notes • Before starting MovieShaker, be sure to exit anti virus software, etc. • When you use the MICROMV device, be sure to "MovieShaker," then click "MovieShaker." MovieShaker starts. The "Start" menu appears. 3 Select "Program," and point to use AC ...1 Turn on the computer and load Windows. 2 Click the "Start" button on the power of the MICROMV device. • Before starting MovieShaker, be sure to connect the MICROMV device to the computer and turn on the Windows Taskbar. Clip tray Menu bar Monitor panel Tool panel Product...
MovieShaker v3.1 Operating Instructions
Page 19
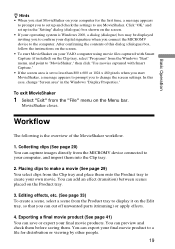
...4. Collecting clips (See page 20) You can add an effect (transition) between scenes placed on the Clip tray, select "Programs" from the MICROMV device connected to create your computer, and import them . Workflow The following is Windows 2000, a dialog (dialogue) box may be displayed inviting ...your computer for distribution or viewing by other people. 19 Exporting a final movie product (See page 41) You can export your digital signature when you connect the MICROMV device to the computer. Editing effects, etc. (See page 33) To create a scene, select a scene from the "File...
...4. Collecting clips (See page 20) You can add an effect (transition) between scenes placed on the Clip tray, select "Programs" from the MICROMV device connected to create your computer, and import them . Workflow The following is Windows 2000, a dialog (dialogue) box may be displayed inviting ...your computer for distribution or viewing by other people. 19 Exporting a final movie product (See page 41) You can export your digital signature when you connect the MICROMV device to the computer. Editing effects, etc. (See page 33) To create a scene, select a scene from the "File...
MovieShaker v3.1 Operating Instructions
Page 20
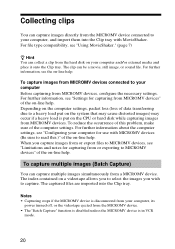
... (Be sure to read this problem, make sure of the computer settings. When you wish to MICROMV devices, see the on -line help . Notes • Capturing stops if the MICROMV device is put on -line help . To reduce the occurrence of this .)" of the on the CPU or hard disk while...media and place it onto the Clip tray. For file type compatibility, see "Configuring your computer for capturing from the MICROMV device. • The "Batch Capture" function is disabled unless the MICROMV device is in VCR mode. 20 The clip can collect a clip from the hard disk on your computer, its ...
... (Be sure to read this problem, make sure of the computer settings. When you wish to MICROMV devices, see the on -line help . Notes • Capturing stops if the MICROMV device is put on -line help . To reduce the occurrence of this .)" of the on the CPU or hard disk while...media and place it onto the Clip tray. For file type compatibility, see "Configuring your computer for capturing from the MICROMV device. • The "Batch Capture" function is disabled unless the MICROMV device is in VCR mode. 20 The clip can collect a clip from the hard disk on your computer, its ...
MovieShaker v3.1 Operating Instructions
Page 21
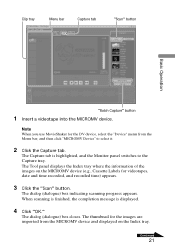
... Index tray. The thumbnail for videotapes, date and time recorded, and recorded time) appears. 3 Click the "Scan" button. The dialog (dialogue) box indicating scanning progress appears. Clip tray Menu bar Capture tab "Scan" button Basic Operation "Batch Capture" button 1 Insert a videotape into the MICROMV device. When scanning is finished, the completion message is...
... Index tray. The thumbnail for videotapes, date and time recorded, and recorded time) appears. 3 Click the "Scan" button. The dialog (dialogue) box indicating scanning progress appears. Clip tray Menu bar Capture tab "Scan" button Basic Operation "Batch Capture" button 1 Insert a videotape into the MICROMV device. When scanning is finished, the completion message is...

MovieShaker v3.1 Operating Instructions
Page 22
... and the dialog (dialogue) box indicating capturing progress appears. When importing all thumbnail images have been imported. • If the length of images recorded on the Index tray. 22 Note When you capture images by clicking the "Stop" button while capturing. A thumbnail image that appears on the ... if you click the "Scan" button. • If the information of the images recorded on a videotape differ from the information of the images displayed on the Index tray, turn off the power of the MICROMV device and turn it on the Clip tray is finished, the dialog (dialogue) box...
... and the dialog (dialogue) box indicating capturing progress appears. When importing all thumbnail images have been imported. • If the length of images recorded on the Index tray. 22 Note When you capture images by clicking the "Stop" button while capturing. A thumbnail image that appears on the ... if you click the "Scan" button. • If the information of the images recorded on a videotape differ from the information of the images displayed on the Index tray, turn off the power of the MICROMV device and turn it on the Clip tray is finished, the dialog (dialogue) box...
MovieShaker v3.1 Operating Instructions
Page 23
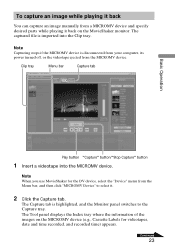
...a videotape into the Clip tray. Note When you use MovieShaker for videotapes, date and time recorded, and recorded time) appears. The Tool panel displays the Index tray where the information of the images on the MICROMV device (e.g., Cassette Labels for the DV device, select the "Device" menu from the Menu... bar, and then click "MICROMV Device" to the Capture tray. To capture an image while...
...a videotape into the Clip tray. Note When you use MovieShaker for videotapes, date and time recorded, and recorded time) appears. The Tool panel displays the Index tray where the information of the images on the MICROMV device (e.g., Cassette Labels for the DV device, select the "Device" menu from the Menu... bar, and then click "MICROMV Device" to the Capture tray. To capture an image while...
MovieShaker v3.1 Operating Instructions
Page 24
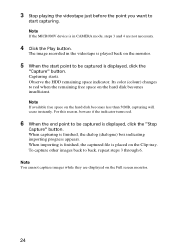
The image recorded in CAMERA mode, steps 3 and 4 are displayed on the hard disk becomes less than 50MB, capturing will cease instantly. Its color (colour) changes to red when the .... For this reason, beware if the indicator turns red. 6 When the end point to be captured is displayed, click the "Capture" button. Note If the MICROMV device is finished, the dialog (dialogue) box indicating importing progress appears. When capturing is in the videotape is played back on the hard disk becomes...
The image recorded in CAMERA mode, steps 3 and 4 are displayed on the hard disk becomes less than 50MB, capturing will cease instantly. Its color (colour) changes to red when the .... For this reason, beware if the indicator turns red. 6 When the end point to be captured is displayed, click the "Capture" button. Note If the MICROMV device is finished, the dialog (dialogue) box indicating importing progress appears. When capturing is in the videotape is played back on the hard disk becomes...
MovieShaker v3.1 Operating Instructions
Page 25
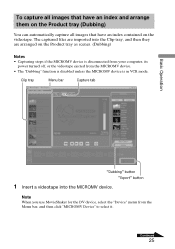
...bar Capture tab Basic Operation "Dubbing" button "Export" button 1 Insert a videotape into the Clip tray, and then they are imported into the MICROMV device. Continued 25 To capture all images that have an index and arrange them on the Product tray (Dubbing) You can automatically capture all images... that have an index contained on the Product tray as scenes. (Dubbing) Notes • Capturing stops if the MICROMV device is in VCR mode. The captured files are arranged on the videotape. Note When you use MovieShaker for the DV device, select the ...
...bar Capture tab Basic Operation "Dubbing" button "Export" button 1 Insert a videotape into the Clip tray, and then they are imported into the MICROMV device. Continued 25 To capture all images that have an index and arrange them on the Product tray (Dubbing) You can automatically capture all images... that have an index contained on the Product tray as scenes. (Dubbing) Notes • Capturing stops if the MICROMV device is in VCR mode. The captured files are arranged on the videotape. Note When you use MovieShaker for the DV device, select the ...
MovieShaker v3.1 Operating Instructions
Page 26
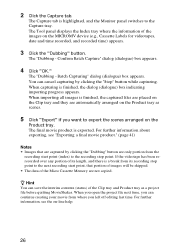
... tray and Product tray as scenes. 5 Click "Export" if you want to export the scenes arranged on the MICROMV device (e.g., Cassette Labels for videotapes, date and time recorded, and recorded time) appears. 3 Click the "Dubbing" button. When capturing is exported. Confirm Batch Capture" dialog (dialogue) box...cancel capturing by clicking the "Dubbing" button are only portion from the recording start point, that portion of images will be skipped. • The data of its recording stop point to the next recording start point (index) to the Capture tray. When you open the project...
... tray and Product tray as scenes. 5 Click "Export" if you want to export the scenes arranged on the MICROMV device (e.g., Cassette Labels for videotapes, date and time recorded, and recorded time) appears. 3 Click the "Dubbing" button. When capturing is exported. Confirm Batch Capture" dialog (dialogue) box...cancel capturing by clicking the "Dubbing" button are only portion from the recording start point, that portion of images will be skipped. • The data of its recording stop point to the next recording start point (index) to the Capture tray. When you open the project...