Operating Instructions
Page 1
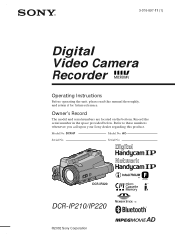
Record the serial number in the space provided below. Owner's Record The model and serial numbers are located on the bottom. Serial No. AC- Model No. 3-076-897-11 (1) Digital Video Camera Recorder Operating Instructions Before operating the unit, please read this product. DCR-IP Model No. Serial No. Refer to these numbers whenever you call upon your Sony dealer regarding this manual thoroughly, and retain it for future reference. DCR-IP220 DCR-IP210/IP220 ©2002 Sony Corporation
Record the serial number in the space provided below. Owner's Record The model and serial numbers are located on the bottom. Serial No. AC- Model No. 3-076-897-11 (1) Digital Video Camera Recorder Operating Instructions Before operating the unit, please read this product. DCR-IP Model No. Serial No. Refer to these numbers whenever you call upon your Sony dealer regarding this manual thoroughly, and retain it for future reference. DCR-IP220 DCR-IP210/IP220 ©2002 Sony Corporation
Operating Instructions
Page 2
...toll free 1-800-8228837, or visit http://www.rbrc.org/. This Class B digital apparatus complies with Part 15 of this device must accept any interference received, including interference that you . DCR-IP220 only Countries and areas where you can enjoy for years to the separate Network... to the presence of uninsulated "dangerous voltage" within the product's enclosure that may be producing home video that may not cause harmful interference, and (2) this Sony Handycam. For more information regarding recycling of optical instruments with superior picture and sound quality. Caution:...
...toll free 1-800-8228837, or visit http://www.rbrc.org/. This Class B digital apparatus complies with Part 15 of this device must accept any interference received, including interference that you . DCR-IP220 only Countries and areas where you can enjoy for years to the separate Network... to the presence of uninsulated "dangerous voltage" within the product's enclosure that may be producing home video that may not cause harmful interference, and (2) this Sony Handycam. For more information regarding recycling of optical instruments with superior picture and sound quality. Caution:...
Operating Instructions
Page 3
... received, including interference that may cause harmful interference to Part 15 of FCC Rules. DCR-IP220 only IMPORTANT NOTE To comply with the limits for a Class B digital device, pursuant to radio communications. This equipment generates, uses, and can radiate radio ... guarantee that to provide reasonable protection against harmful interference in conjuctions with Part 15 of Conformity Trade Name: SONY Model No.: DCR-IP220 Responsible Party: Sony Electronics Inc. Increase the separation between the equipment and receiver. - This device and its antenna (s) must...
... received, including interference that may cause harmful interference to Part 15 of FCC Rules. DCR-IP220 only IMPORTANT NOTE To comply with the limits for a Class B digital device, pursuant to radio communications. This equipment generates, uses, and can radiate radio ... guarantee that to provide reasonable protection against harmful interference in conjuctions with Part 15 of Conformity Trade Name: SONY Model No.: DCR-IP220 Responsible Party: Sony Electronics Inc. Increase the separation between the equipment and receiver. - This device and its antenna (s) must...

Operating Instructions
Page 4
... the i.LINK cable (p. 153) (The i.LINK of your computer Main Features Recording moving pictures or still images, and playing them back •Recording moving pictures on tapes (p. 29) •Playing back tapes (p. 42) •Recording still images on a "Memory Stick" (p. 47, 111) •Recording moving pictures on a "Memory Stick" (p. 130) •Viewing still images...
... the i.LINK cable (p. 153) (The i.LINK of your computer Main Features Recording moving pictures or still images, and playing them back •Recording moving pictures on tapes (p. 29) •Playing back tapes (p. 42) •Recording still images on a "Memory Stick" (p. 47, 111) •Recording moving pictures on a "Memory Stick" (p. 130) •Viewing still images...
Operating Instructions
Page 5
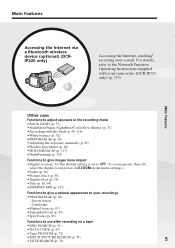
... Network Function Operating Instructions supplied with your camcorder. (DCR-IP220 only) (p. 175) Main Features Other uses Functions to adjust exposure in the recording mode •BACK LIGHT (p. 37) •NightShot/Super NightShot/Color Slow Shutter (p. 37) •Recording with the flash (p. 49, 116) •White...HOLOGRAM AF (p. 117) •NightFraming (p. 119) Functions to give images more impact •Digital zoom (p. 33) The default setting is set to OFF. (To zoom greater than 10×, select the digital zoom power in D ZOOM in the menu settings.) •Fader (p. 56) •Picture...
... Network Function Operating Instructions supplied with your camcorder. (DCR-IP220 only) (p. 175) Main Features Other uses Functions to adjust exposure in the recording mode •BACK LIGHT (p. 37) •NightShot/Super NightShot/Color Slow Shutter (p. 37) •Recording with the flash (p. 49, 116) •White...HOLOGRAM AF (p. 117) •NightFraming (p. 119) Functions to give images more impact •Digital zoom (p. 33) The default setting is set to OFF. (To zoom greater than 10×, select the digital zoom power in D ZOOM in the menu settings.) •Fader (p. 56) •Picture...
Operating Instructions
Page 6
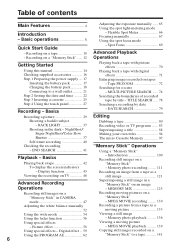
... contents Main Features 4 Introduction - Picture effect 58 - MPEG MOVIE playback .......... 139 Using special effects - Basics - Digital effect ... 59 Copying still images recorded on a Using the PROGRAM AE 62 "Memory Stick" to a wall outlet 21 Step 2 Setting the date and ... mode - TITLE SEARCH ..... 78 Searching a recording by title - MEMORY MIX 125 Recording still images on a Recording moving pictures on an image Operations - BACK LIGHT 37 Recording video or TV programs ....... 83 Shooting in CAMERA "Memory Stick" mode 47 - Memory photo ...
... contents Main Features 4 Introduction - Picture effect 58 - MPEG MOVIE playback .......... 139 Using special effects - Basics - Digital effect ... 59 Copying still images recorded on a Using the PROGRAM AE 62 "Memory Stick" to a wall outlet 21 Step 2 Setting the date and ... mode - TITLE SEARCH ..... 78 Searching a recording by title - MEMORY MIX 125 Recording still images on a Recording moving pictures on an image Operations - BACK LIGHT 37 Recording video or TV programs ....... 83 Shooting in CAMERA "Memory Stick" mode 47 - Memory photo ...
Operating Instructions
Page 7
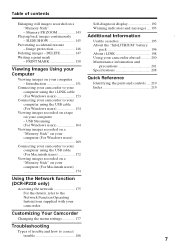
... a print mark - Customizing Your Camcorder Changing the menu settings 177 Troubleshooting Types of contents Getting Started Enlarging still images recorded on your computer (For Macintosh users 174 Self-diagnosis display 192 Warning indicators and messages .... 193 Additional Information Usable cassettes...210 Index 219 Using the Network function (DCR-IP220 only) Accessing the network 175 For the details, refer to the Network Function Operating Instructions supplied with your computer using the USB cable (For Macintosh users 172 Viewing images recorded on a "Memory Stick" on a "...
... a print mark - Customizing Your Camcorder Changing the menu settings 177 Troubleshooting Types of contents Getting Started Enlarging still images recorded on your computer (For Macintosh users 174 Self-diagnosis display 192 Warning indicators and messages .... 193 Additional Information Usable cassettes...210 Index 219 Using the Network function (DCR-IP220 only) Accessing the network 175 For the details, refer to the Network Function Operating Instructions supplied with your computer using the USB cable (For Macintosh users 172 Viewing images recorded on a "Memory Stick" on a "...
Operating Instructions
Page 8
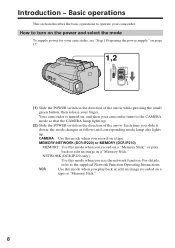
... you play back or edit an image in the direction of the arrow. How to the CAMERA mode so that the CAMERA lamp lights up . MEMORY/NETWORK (DCR-IP220) or MEMORY (DCR-IP210) MEMORY: Use this mode when you record on a tape. Introduction - Basic operations This section describes the basic operations to the supplied Network Function...
... you play back or edit an image in the direction of the arrow. How to the CAMERA mode so that the CAMERA lamp lights up . MEMORY/NETWORK (DCR-IP220) or MEMORY (DCR-IP210) MEMORY: Use this mode when you record on a tape. Introduction - Basic operations This section describes the basic operations to the supplied Network Function...

Operating Instructions
Page 9
If this happens, we recommend that you adjust the angle of the LCD panel Make sure if the LCD panel is opened in the direction of the arrow. (2) Turn the LCD panel 180 degrees counter-clockwise. (3) Close the LCD panel with the LCD screen facing out. When you use the viewfinder. When you set it vertically, and swing it into your camcorder body. When closing the LCD panel, set the LCD screen outdoors in the mirror mode (p. 35), the viewfinder automatically turns off. Notes • The LCD panel rotates 180 degrees anticlockwise and 90 degrees clockwise. • When using the LCD ...
If this happens, we recommend that you adjust the angle of the LCD panel Make sure if the LCD panel is opened in the direction of the arrow. (2) Turn the LCD panel 180 degrees counter-clockwise. (3) Close the LCD panel with the LCD screen facing out. When you use the viewfinder. When you set it vertically, and swing it into your camcorder body. When closing the LCD panel, set the LCD screen outdoors in the mirror mode (p. 35), the viewfinder automatically turns off. Notes • The LCD panel rotates 180 degrees anticlockwise and 90 degrees clockwise. • When using the LCD ...
Operating Instructions
Page 10
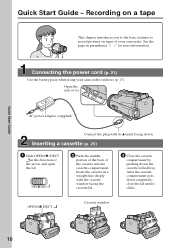
... back of your camcorder outdoors (p. 17). See the page in the direction of the arrow and open the lid. Quick Start Guide Quick Start Guide - Recording on a tape This chapter introduces you to the basic features to record pictures on tapes of the cassette into the cassette compartment.
... back of your camcorder outdoors (p. 17). See the page in the direction of the arrow and open the lid. Quick Start Guide Quick Start Guide - Recording on a tape This chapter introduces you to the basic features to record pictures on tapes of the cassette into the cassette compartment.
Operating Instructions
Page 11
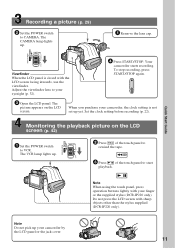
... playback picture on the LCD screen. CAMERA (CHG)OFF ON MODE 2 Press of the touch panel to rewind the tape. 3 Press of the touch panel to VCR. Do not press the LCD screen with your finger or the supplied stylus (DCR-IP220 only). Set the clock setting before recording (p. 22). Note Do not pick...
... playback picture on the LCD screen. CAMERA (CHG)OFF ON MODE 2 Press of the touch panel to rewind the tape. 3 Press of the touch panel to VCR. Do not press the LCD screen with your finger or the supplied stylus (DCR-IP220 only). Set the clock setting before recording (p. 22). Note Do not pick...
Operating Instructions
Page 12
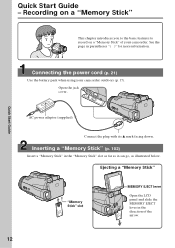
... Stick" This chapter introduces you to the basic features to record on a "Memory Stick" of the arrow. 12 Quick Start Guide AC power adaptor (supplied) Connect the plug with its v mark facing down. Inserting a "Memory Stick" (p. ...
... Stick" This chapter introduces you to the basic features to record on a "Memory Stick" of the arrow. 12 Quick Start Guide AC power adaptor (supplied) Connect the plug with its v mark facing down. Inserting a "Memory Stick" (p. ...

Operating Instructions
Page 13
... camcorder, the clock setting is closed with the LCD screen facing inwards, use the viewfinder. Quick Start Guide Recording a still image on a "Memory Stick" (p. 111) 2 Set the POWER CAMERA switch to your eyesight (p. 32). 4 Press PHOTO lightly. When the green z mark stops flashing, then ...lights up, you pressed PHOTO deeper will be recorded on a "Memory Stick." CAMERA VCR (CHG)OFF ON MODE MEMORY/NETWORK 2 Press PLAY or displayed. Monitoring the still image on the LCD screen. The image when you can record a still image. The picture appears on the LCD screen...
... camcorder, the clock setting is closed with the LCD screen facing inwards, use the viewfinder. Quick Start Guide Recording a still image on a "Memory Stick" (p. 111) 2 Set the POWER CAMERA switch to your eyesight (p. 32). 4 Press PHOTO lightly. When the green z mark stops flashing, then ...lights up, you pressed PHOTO deeper will be recorded on a "Memory Stick." CAMERA VCR (CHG)OFF ON MODE MEMORY/NETWORK 2 Press PLAY or displayed. Monitoring the still image on the LCD screen. The image when you can record a still image. The picture appears on the LCD screen...
Operating Instructions
Page 14
...DCR-IP220 only." Set the POWER switch to indicate that the operation is indicated on a TV, you recorded and the next scene is provided with all MICROMV cassettes. Your camcorder can hear a beep to CAMERA. To view your recordings on the MICROMV cassette. IP220 MEMORY/NETWORK z z Provided - Record ...equal quality when compared to the provision of differences DCRMark on the country or area. e.g. Unauthorized recording of such materials may be contrary to DV (digital video). •The micro Cassette Memory feature is the still image. Not provided Note on the ...
...DCR-IP220 only." Set the POWER switch to indicate that the operation is indicated on a TV, you recorded and the next scene is provided with all MICROMV cassettes. Your camcorder can hear a beep to CAMERA. To view your recordings on the MICROMV cassette. IP220 MEMORY/NETWORK z z Provided - Record ...equal quality when compared to the provision of differences DCRMark on the country or area. e.g. Unauthorized recording of such materials may be contrary to DV (digital video). •The micro Cassette Memory feature is the still image. Not provided Note on the ...
Operating Instructions
Page 15
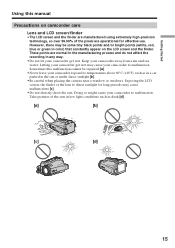
...black points and/or bright points (white, red, blue or green in the sun or under direct sunlight [b]. • Be careful when placing the camera near a window or outdoors. Keep your camcorder to direct sunlight for effective use. Exposing the LCD screen, the finder or the lens to malfunction....sun. Sometimes this manual Precautions on the LCD screen and the finder. These points are normal in the manufacturing process and do not affect the recording in low light conditions such as in a car parked in color) that constantly appear on camcorder care Lens and LCD screen/finder • ...
...black points and/or bright points (white, red, blue or green in the sun or under direct sunlight [b]. • Be careful when placing the camera near a window or outdoors. Keep your camcorder to direct sunlight for effective use. Exposing the LCD screen, the finder or the lens to malfunction....sun. Sometimes this manual Precautions on the LCD screen and the finder. These points are normal in the manufacturing process and do not affect the recording in low light conditions such as in a car parked in color) that constantly appear on camcorder care Lens and LCD screen/finder • ...
Operating Instructions
Page 16
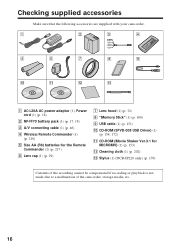
...-FF70 battery pack (1) (p. 17, 18) 3 A/V connecting cable (1) (p. 46) 4 Wireless Remote Commander (1) (p. 216) 5 Size AA (R6) batteries for MICROMV) (1) (p. 153) qs Cleaning cloth (1) (p. 202) qd Stylus (1) (DCR-IP220 only) (p. 176) Contents of the recording cannot be compensated if recording or playback is not made due to a malfunction of the camcorder, storage media, etc. 16
...-FF70 battery pack (1) (p. 17, 18) 3 A/V connecting cable (1) (p. 46) 4 Wireless Remote Commander (1) (p. 216) 5 Size AA (R6) batteries for MICROMV) (1) (p. 153) qs Cleaning cloth (1) (p. 202) qd Stylus (1) (DCR-IP220 only) (p. 176) Contents of the recording cannot be compensated if recording or playback is not made due to a malfunction of the camcorder, storage media, etc. 16

Operating Instructions
Page 17
Getting Started Step 1 Preparing the power supply Inserting the battery pack Your camcorder operates only with the NP-FF70 battery pack. (1) Slide OPEN in the direction of the arrow and open the battery compartment lid. (2) Insert the battery pack with the NP-FF70 battery pack. You cannot use the NPFF50 battery pack. 17 Lever Note Your camcorder operates only with its terminal side facing your camcorder. (3) Close the battery compartment lid. 1 2 3 To take out the battery pack Open the battery compartment lid and slide the lever to take out the battery pack.
Getting Started Step 1 Preparing the power supply Inserting the battery pack Your camcorder operates only with the NP-FF70 battery pack. (1) Slide OPEN in the direction of the arrow and open the battery compartment lid. (2) Insert the battery pack with the NP-FF70 battery pack. You cannot use the NPFF50 battery pack. 17 Lever Note Your camcorder operates only with its terminal side facing your camcorder. (3) Close the battery compartment lid. 1 2 3 To take out the battery pack Open the battery compartment lid and slide the lever to take out the battery pack.

Operating Instructions
Page 18
... the power cord to the AC power adaptor. (3) Connect the power cord to a wall outlet. (4) Set the POWER switch to (CHG) OFF. Battery CHG lamp 4 CAMERA POWER (CHG)OFF ON MODE VCR MEMORY/NETWORK 2 3 To a wall outlet 1 After charging the battery pack Disconnect the AC power adaptor from the DC IN...
... the power cord to the AC power adaptor. (3) Connect the power cord to a wall outlet. (4) Set the POWER switch to (CHG) OFF. Battery CHG lamp 4 CAMERA POWER (CHG)OFF ON MODE VCR MEMORY/NETWORK 2 3 To a wall outlet 1 After charging the battery pack Disconnect the AC power adaptor from the DC IN...

Operating Instructions
Page 19
...time Battery pack NP-FF70 (supplied) Playing time on LCD screen 140 Playing time with LCD closed 175 Approximate minutes when you repeat recording start/stop, zooming and turning the power on Backlighting off Continuous Typical* Continuous Typical* 115 60 130 70 Approximate minutes when you ...use a fully charged battery * Approximate recording time when you use the AC power adaptor Place the AC power adaptor near the wall outlet. The battery pack is extremely high ...
...time Battery pack NP-FF70 (supplied) Playing time on LCD screen 140 Playing time with LCD closed 175 Approximate minutes when you repeat recording start/stop, zooming and turning the power on Backlighting off Continuous Typical* Continuous Typical* 115 60 130 70 Approximate minutes when you ...use a fully charged battery * Approximate recording time when you use the AC power adaptor Place the AC power adaptor near the wall outlet. The battery pack is extremely high ...

Operating Instructions
Page 20
... can exchange data such as battery consumption with the "InfoLITHIUM" battery pack (NP-FF70). Step 1 Preparing the power supply Note Approximate recording time and playing time at 25°C (77°F). This unit is "InfoLITHIUM"? The battery life will be shorter if you use... your camcorder in an ambient temperature of Sony Corporation. 20 Your camcorder operates only with the "InfoLITHIUM" battery. Recommended charging temperature We recommend charging the battery pack in a cold environment...
... can exchange data such as battery consumption with the "InfoLITHIUM" battery pack (NP-FF70). Step 1 Preparing the power supply Note Approximate recording time and playing time at 25°C (77°F). This unit is "InfoLITHIUM"? The battery life will be shorter if you use... your camcorder in an ambient temperature of Sony Corporation. 20 Your camcorder operates only with the "InfoLITHIUM" battery. Recommended charging temperature We recommend charging the battery pack in a cold environment...