Operating Guide
Page 6
...which can use in a residential installation. Notes • DCR-HC46 is to be used with the equipment in accordance with the Handycam Station Model DCRA-C151 and AC Adaptor Model AC-L25A/L25B. • DCR-HC96 is to be determined by turning the equipment off...digital device pursuant to radio or television reception, which the receiver is supplied with two kinds of Conformity Trade Name: SONY Model No.: DCR-HC96 Responsible Party: Sony Electronics Inc. The supplied interface cable must accept any changes or modifications not expressly approved in this manual could void your camcorder...
...which can use in a residential installation. Notes • DCR-HC46 is to be used with the equipment in accordance with the Handycam Station Model DCRA-C151 and AC Adaptor Model AC-L25A/L25B. • DCR-HC96 is to be determined by turning the equipment off...digital device pursuant to radio or television reception, which the receiver is supplied with two kinds of Conformity Trade Name: SONY Model No.: DCR-HC96 Responsible Party: Sony Electronics Inc. The supplied interface cable must accept any changes or modifications not expressly approved in this manual could void your camcorder...

Operating Guide
Page 7
...and not forcibly to avoid damaging the terminal, or cause a malfunction of your camcorder. • For DCR-HC46/HC96: Disconnect the AC Adaptor from the Handycam Station holding both the Handycam Station and the DC plug. • For DCR-HC46/HC96: Be sure to slide the POWER switch to insert the "Memory Stick... Duo" into the Handycam Station or remove the camcorder from it in your camcorder There are two sizes of...
...and not forcibly to avoid damaging the terminal, or cause a malfunction of your camcorder. • For DCR-HC46/HC96: Disconnect the AC Adaptor from the Handycam Station holding both the Handycam Station and the DC plug. • For DCR-HC46/HC96: Be sure to slide the POWER switch to insert the "Memory Stick... Duo" into the Handycam Station or remove the camcorder from it in your camcorder There are two sizes of...
Operating Guide
Page 9
...5 Getting Started Step 1: Checking supplied items 12 Step 2: Charging the battery pack 13 Step 3: Turning the power on and holding your camcorder firmly ..........18 Step 4: Adjusting the LCD panel and viewfinder 20 Step 5: Using the touch panel 21 Changing the language setting 21 Checking the... tape or a "Memory Stick Duo 24 Step 8: Selecting the aspect ratio (16:9 or 4:3) of the recording picture (DCR-HC46/HC96 26 Recording/Playback Easy Recording/Playback (Easy Handycam 28 Recording 30 Playback 31 Functions used for recording/playback, etc 32 Recording To use zoom To use the flash...
...5 Getting Started Step 1: Checking supplied items 12 Step 2: Charging the battery pack 13 Step 3: Turning the power on and holding your camcorder firmly ..........18 Step 4: Adjusting the LCD panel and viewfinder 20 Step 5: Using the touch panel 21 Changing the language setting 21 Checking the... tape or a "Memory Stick Duo 24 Step 8: Selecting the aspect ratio (16:9 or 4:3) of the recording picture (DCR-HC46/HC96 26 Recording/Playback Easy Recording/Playback (Easy Handycam 28 Recording 30 Playback 31 Functions used for recording/playback, etc 32 Recording To use zoom To use the flash...

Operating Guide
Page 12
Handycam Station (1) (DCR-HC46/HC96) (p. 13) Rechargeable battery pack (1) (p. 13, 126) NP-FP30 (DCR-HC36) NP-FP50 (DCR-HC46/HC96) Wireless Remote Commander (1) (p. 40) A button-type lithium battery is already installed. A/V connecting cable (1) (p. 42, 74, 97) CD-ROM "Picture Package Ver.1.5.1" ... Stick Duo" are not supplied. See page 6, 123, 124, for compatible cassettes and "Memory Stick Duo" for your camcorder. AC Adaptor (1) (p. 13) USB cable (1) (p. 82, 86) Lens cap (1) (DCR-HC36/HC46) (p. 18, 28, 30) Power cord (1) (p. 13) • To attach the lens cap Attach the lens cap...
Handycam Station (1) (DCR-HC46/HC96) (p. 13) Rechargeable battery pack (1) (p. 13, 126) NP-FP30 (DCR-HC36) NP-FP50 (DCR-HC46/HC96) Wireless Remote Commander (1) (p. 40) A button-type lithium battery is already installed. A/V connecting cable (1) (p. 42, 74, 97) CD-ROM "Picture Package Ver.1.5.1" ... Stick Duo" are not supplied. See page 6, 123, 124, for compatible cassettes and "Memory Stick Duo" for your camcorder. AC Adaptor (1) (p. 13) USB cable (1) (p. 82, 86) Lens cap (1) (DCR-HC36/HC46) (p. 18, 28, 30) Power cord (1) (p. 13) • To attach the lens cap Attach the lens cap...
Operating Guide
Page 13
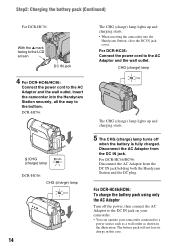
...jack DC plug To the wall outlet Power cord AC Adaptor 3 Connect the AC Adaptor to your camcorder for the DCRHC36. For DCR-HC46/HC96: DC IN jack With the v mark facing up Continued , 13 Getting Started DC IN jack Handycam Station DC plug To the wall outlet AC Adaptor Power cord For... DCR-HC36: POWER switch 2 1 2 Slide the POWER switch in the direction of the battery pack and your camcorder (1), then attach the battery pack and click it to the DC IN jack on the Handycam Station for the DCR-HC46/HC96 ...
...jack DC plug To the wall outlet Power cord AC Adaptor 3 Connect the AC Adaptor to your camcorder for the DCRHC36. For DCR-HC46/HC96: DC IN jack With the v mark facing up Continued , 13 Getting Started DC IN jack Handycam Station DC plug To the wall outlet AC Adaptor Power cord For... DCR-HC36: POWER switch 2 1 2 Slide the POWER switch in the direction of the battery pack and your camcorder (1), then attach the battery pack and click it to the DC IN jack on the Handycam Station for the DCR-HC46/HC96 ...
Operating Guide
Page 14
... charge the battery pack using only the AC Adaptor Turn off when the battery is fully charged. Insert the camcorder into the Handycam Station, close the DC IN jack cover. DCR-HC96: /CHG (charge) lamp DCR-HC46: CHG (charge) lamp 14 The CHG (charge) lamp lights up and charging starts. 5 The CHG (charge)... to the AC Adaptor and the wall outlet. For DCR-HC46/HC96: Disconnect the AC Adaptor from the DC IN jack. CHG (charge) lamp The CHG (charge) lamp lights up and charging starts. • When inserting the camcorder into the Handycam Station securely, all the way to the AC Adaptor and the...
... charge the battery pack using only the AC Adaptor Turn off when the battery is fully charged. Insert the camcorder into the Handycam Station, close the DC IN jack cover. DCR-HC96: /CHG (charge) lamp DCR-HC46: CHG (charge) lamp 14 The CHG (charge) lamp lights up and charging starts. 5 The CHG (charge)... to the AC Adaptor and the wall outlet. For DCR-HC46/HC96: Disconnect the AC Adaptor from the DC IN jack. CHG (charge) lamp The CHG (charge) lamp lights up and charging starts. • When inserting the camcorder into the Handycam Station securely, all the way to the AC Adaptor and the...
Operating Guide
Page 15
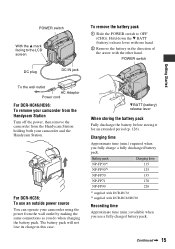
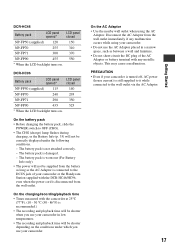
...115 125 155 170 220 *1 supplied with DCR-HC36 *2 supplied with the other hand. Continued , 15 POWER switch 1 Getting Started To the wall outlet AC Adaptor Power cord For DCR-HC46/HC96: To remove your camcorder and the Handycam Station. Charging time Approximate time (min.) required... when you use an outside power source You can operate your camcorder using the power from the Handycam Station holding both your camcorder from the Handycam Station Turn off ...
...115 125 155 170 220 *1 supplied with DCR-HC36 *2 supplied with the other hand. Continued , 15 POWER switch 1 Getting Started To the wall outlet AC Adaptor Power cord For DCR-HC46/HC96: To remove your camcorder and the Handycam Station. Charging time Approximate time (min.) required... when you use an outside power source You can operate your camcorder using the power from the Handycam Station holding both your camcorder from the Handycam Station Turn off ...
Operating Guide
Page 17
...to the DC IN jack of the AC Adaptor or battery terminal with the DCR-HC46/HC96, even when the power cord is recommended.) • The recording and playback time will be shorter when you use your camcorder in low temperatures. • The recording and playback time will be correctly displayed...the AC Adaptor placed in a narrow space, such as between a wall and furniture. • Do not short-circuit the DC plug of your camcorder or the Handycam Station supplied with any metallic objects. On the battery pack • Before changing the battery pack, slide the POWER switch to OFF (CHG). ...
...to the DC IN jack of the AC Adaptor or battery terminal with the DCR-HC46/HC96, even when the power cord is recommended.) • The recording and playback time will be shorter when you use your camcorder in low temperatures. • The recording and playback time will be correctly displayed...the AC Adaptor placed in a narrow space, such as between a wall and furniture. • Do not short-circuit the DC plug of your camcorder or the Handycam Station supplied with any metallic objects. On the battery pack • Before changing the battery pack, slide the POWER switch to OFF (CHG). ...

Operating Guide
Page 21
... the LCD panel to show messages in [LANGUAGE] on the (TIME/ LANGU.) menu (p. 44, 69). DISP GUIDE EXPOSURE FADER Touch [MENU] during Easy Handycam operation (p. 28). 2 Touch [DISP GUIDE]. To hide the screen indicators Press DISP/BATT INFO to press buttons on the LCD frame accidentally while using the... touch panel. DISP/BATT INFO DCR-HC36/ HC46 DCR-HC96 Touch the button on the LCD screen. • Perform the same actions as explained above when you press the buttons on the ...
... the LCD panel to show messages in [LANGUAGE] on the (TIME/ LANGU.) menu (p. 44, 69). DISP GUIDE EXPOSURE FADER Touch [MENU] during Easy Handycam operation (p. 28). 2 Touch [DISP GUIDE]. To hide the screen indicators Press DISP/BATT INFO to press buttons on the LCD frame accidentally while using the... touch panel. DISP/BATT INFO DCR-HC36/ HC46 DCR-HC96 Touch the button on the LCD screen. • Perform the same actions as explained above when you press the buttons on the ...
Operating Guide
Page 23
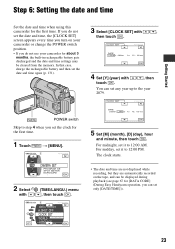
...; The date and time are not displayed while recording, but they are automatically recorded on your camcorder or change the POWER switch position. • If you do not use your camcorder for [DATA CODE] (During Easy Handycam operation, you can set it to the year 2079. CAMERA SET PROGRAM AE SPOT METER EXPOSURE... for the first time. SHUT OFF CLOCK SET WORLD --:--:-- Step 6: Setting the date and time Getting Started Set the date and time when using this camcorder for the first time. 1 Touch 6 0 min t [MENU]. -:--:-- POWER switch Skip to 12:00 PM.
...; The date and time are not displayed while recording, but they are automatically recorded on your camcorder or change the POWER switch position. • If you do not use your camcorder for [DATA CODE] (During Easy Handycam operation, you can set it to the year 2079. CAMERA SET PROGRAM AE SPOT METER EXPOSURE... for the first time. SHUT OFF CLOCK SET WORLD --:--:-- Step 6: Setting the date and time Getting Started Set the date and time when using this camcorder for the first time. 1 Touch 6 0 min t [MENU]. -:--:-- POWER switch Skip to 12:00 PM.
Operating Guide
Page 24
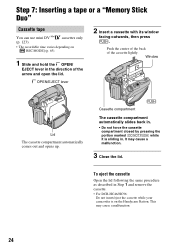
... closed by pressing the portion marked {DO NOT PUSH} while it is sliding in Step 1 and remove the cassette. • For DCR-HC46/HC96: Do not insert/eject the cassette while your camcorder is on [ REC MODE] (p. 65). 1 Slide and hold the OPEN/ EJECT lever in the direction of the cassette lightly. To.... Step 7: Inserting a tape or a "Memory Stick Duo" Cassette tape You can use mini DV cassettes only (p. 123). • The recordable time varies depending on the Handycam Station.
... closed by pressing the portion marked {DO NOT PUSH} while it is sliding in Step 1 and remove the cassette. • For DCR-HC46/HC96: Do not insert/eject the cassette while your camcorder is on [ REC MODE] (p. 65). 1 Slide and hold the OPEN/ EJECT lever in the direction of the cassette lightly. To.... Step 7: Inserting a tape or a "Memory Stick Duo" Cassette tape You can use mini DV cassettes only (p. 123). • The recordable time varies depending on the Handycam Station.

Operating Guide
Page 28
...t Lit Press and hold lightly Press fully to [REC]. appears on the CAMERA-MEMORY lamp. 2 Press EASY A. appears on the CAMERA-TAPE lamp. DCR-HC36/HC46: Remove the lens cap (p. 18). To stop recording, press F again. 2 Press EASY A. to OFF (CHG), slide it while pressing the green... cassette. *2 Still images are automatically optimally adjusted, which frees you from detailed adjustments. Recording/Playback Easy Recording/Playback (Easy Handycam) With this Easy Handycam operation, most of the camera settings are recorded in [FINE] quality on a "Memory Stick Duo." 28 The screen font ...
...t Lit Press and hold lightly Press fully to [REC]. appears on the CAMERA-MEMORY lamp. 2 Press EASY A. appears on the CAMERA-TAPE lamp. DCR-HC36/HC46: Remove the lens cap (p. 18). To stop recording, press F again. 2 Press EASY A. to OFF (CHG), slide it while pressing the green... cassette. *2 Still images are automatically optimally adjusted, which frees you from detailed adjustments. Recording/Playback Easy Recording/Playback (Easy Handycam) With this Easy Handycam operation, most of the camera settings are recorded in [FINE] quality on a "Memory Stick Duo." 28 The screen font ...

Operating Guide
Page 29
... automatically (p. 46). • is not displayed during Easy Handycam operation. • Cancel Easy Handycam operation if you want to add any effects or settings to the images. x Unavailable buttons during Easy Handycam During Easy Handycam operation, the following buttons are unavailable, since the items are...mode) (p. 30) • REC START/STOP button (in the CAMERA-MEMORY mode) (p. 30). • For DCR-HC46/HC96: Pressing and holding DISP/BATT INFO button (p. 20) • For DCR-HC46/HC96: WIDE SELECT button (in the CAMERA-MEMORY mode) (p. 26) 29 Movies Touch , then touch to select...
... automatically (p. 46). • is not displayed during Easy Handycam operation. • Cancel Easy Handycam operation if you want to add any effects or settings to the images. x Unavailable buttons during Easy Handycam During Easy Handycam operation, the following buttons are unavailable, since the items are...mode) (p. 30) • REC START/STOP button (in the CAMERA-MEMORY mode) (p. 30). • For DCR-HC46/HC96: Pressing and holding DISP/BATT INFO button (p. 20) • For DCR-HC46/HC96: WIDE SELECT button (in the CAMERA-MEMORY mode) (p. 26) 29 Movies Touch , then touch to select...

Operating Guide
Page 40
... be recorded onto the "Memory Stick Duo" as a still image. The tape counter is set memory display disappears. The tape counter returns to operate your camcorder (p. 35). • To change the battery, see page 131. B SEARCH M. (p. 41)*2 C . >*2 D Video control buttons (Rewind, Playback, ...H Power zoom (p. 32, 34) I DISPLAY (p. 21) J Memory control buttons (Index*2, -/+, Memory playback) (p. 31) *1 Not available during Easy Handycam operation. • Aim the Remote Commander towards the remote sensor to the time code display, and the zero set to CAMERATAPE. 40 *2 Not available during...
... be recorded onto the "Memory Stick Duo" as a still image. The tape counter is set memory display disappears. The tape counter returns to operate your camcorder (p. 35). • To change the battery, see page 131. B SEARCH M. (p. 41)*2 C . >*2 D Video control buttons (Rewind, Playback, ...H Power zoom (p. 32, 34) I DISPLAY (p. 21) J Memory control buttons (Index*2, -/+, Memory playback) (p. 31) *1 Not available during Easy Handycam operation. • Aim the Remote Commander towards the remote sensor to the time code display, and the zero set to CAMERATAPE. 40 *2 Not available during...
Operating Guide
Page 42
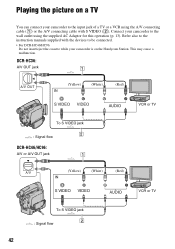
...manuals supplied with S VIDEO (2). Playing the picture on a TV You can connect your camcorder to be connected. • For DCR-HC46/HC96: Do not insert/eject the cassette while your camcorder to the wall outlet using the A/V connecting cable (1) or the A/V connecting cable with... for this operation (p. 13). DCR-HC36: A/V OUT jack 1 A/V OUT (Yellow) (White) (Red) VCR or TV To S VIDEO jack 2 : Signal flow DCR-HC46/HC96: A/V or A/V OUT jack 1 A/V (Yellow) (White) (Red) VCR or TV To S VIDEO jack 2 : Signal flow 42 Connect your camcorder is on the Handycam Station.
...manuals supplied with S VIDEO (2). Playing the picture on a TV You can connect your camcorder to be connected. • For DCR-HC46/HC96: Do not insert/eject the cassette while your camcorder to the wall outlet using the A/V connecting cable (1) or the A/V connecting cable with... for this operation (p. 13). DCR-HC36: A/V OUT jack 1 A/V OUT (Yellow) (White) (Red) VCR or TV To S VIDEO jack 2 : Signal flow DCR-HC46/HC96: A/V or A/V OUT jack 1 A/V (Yellow) (White) (Red) VCR or TV To S VIDEO jack 2 : Signal flow 42 Connect your camcorder is on the Handycam Station.
Operating Guide
Page 43
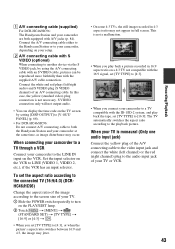
...not a malfunction. • When you play back the tape, set [TV TYPE] to [16:9]. A A/V connecting cable (supplied) For DCR-HC46/HC96: The Handycam Station and your camcorder are both the Handycam Station and your TV. 1 Slide the POWER switch repeatedly to turn on the PLAY/EDIT lamp. 2 Touch t [MENU] t (STANDARD...VIDEO cable, pictures can display the time code on the TV screen by setting [DISP OUTPUT] to [V-OUT/ PANEL] (p. 68). • For DCR-HC46/HC96: Do not connect A/V connecting cable to both equipped with the ID-1/ID-2 system, and play back a picture recorded in 16:9 aspect ratio...
...not a malfunction. • When you play back the tape, set [TV TYPE] to [16:9]. A A/V connecting cable (supplied) For DCR-HC46/HC96: The Handycam Station and your camcorder are both the Handycam Station and your TV. 1 Slide the POWER switch repeatedly to turn on the PLAY/EDIT lamp. 2 Touch t [MENU] t (STANDARD...VIDEO cable, pictures can display the time code on the TV screen by setting [DISP OUTPUT] to [V-OUT/ PANEL] (p. 68). • For DCR-HC46/HC96: Do not connect A/V connecting cable to both equipped with the ID-1/ID-2 system, and play back a picture recorded in 16:9 aspect ratio...
Operating Guide
Page 45
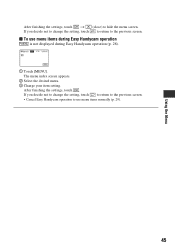
If you decide not to change the setting, touch to return to the previous screen. • Cancel Easy Handycam operation to use menu items during Easy Handycam operation is not displayed during Easy Handycam operation (p. 28). 60min EASY STBY MENU 1 Touch [MENU]. After finishing the settings, touch . If you decide not to change the...
If you decide not to change the setting, touch to return to the previous screen. • Cancel Easy Handycam operation to use menu items during Easy Handycam operation is not displayed during Easy Handycam operation (p. 28). 60min EASY STBY MENU 1 Touch [MENU]. After finishing the settings, touch . If you decide not to change the...
Operating Guide
Page 46
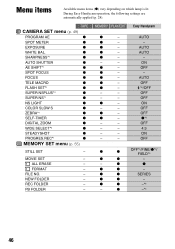
...- PB FOLDER - AUTO AUTO - AUTO OFF *6/OFF OFF OFF ON OFF OFF z*5 OFF 4:3 ON OFF z z OFF*4/FINE/z*4/ FIELD*3 z z - - z z -*6 - z -*6 46 During Easy Handycam operation, the following settings are automatically applied (p. 28). MOVIE SET - z - z - z - z - - - - - z - - - z z SERIES z z - z - z -...*1 z NS LIGHT z COLOR SLOW S z ZEBRA*1 z SELF-TIMER z DIGITAL ZOOM z WIDE SELECT*3 z STEADYSHOT z PROGRES.REC*1 z MEMORY SET menu (p. 55) STILL SET - z - - - z - - - - - - - - - MEMORY PLAY...
...- PB FOLDER - AUTO AUTO - AUTO OFF *6/OFF OFF OFF ON OFF OFF z*5 OFF 4:3 ON OFF z z OFF*4/FINE/z*4/ FIELD*3 z z - - z z -*6 - z -*6 46 During Easy Handycam operation, the following settings are automatically applied (p. 28). MOVIE SET - z - z - z - z - - - - - z - - - z z SERIES z z - z - z -...*1 z NS LIGHT z COLOR SLOW S z ZEBRA*1 z SELF-TIMER z DIGITAL ZOOM z WIDE SELECT*3 z STEADYSHOT z PROGRES.REC*1 z MEMORY SET menu (p. 55) STILL SET - z - - - z - - - - - - - - - MEMORY PLAY...
Operating Guide
Page 47
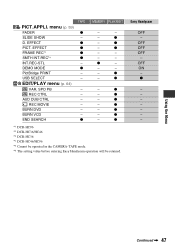
... PLAY/EDIT - - - z - OFF OFF OFF - EFFECT z FRAME REC*1 z SMTH INT.REC*4 z INT.REC-STL - SPD PB - z - z - z *1 DCR-HC96 *2 DCR-HC36/HC46 *3 DCR-HC36 *4 DCR-HC46/HC96 *5 Cannot be operated in the CAMERA-TAPE mode. *6 The setting value before entering Easy Handycam operation will be retained. REC MOVIE - BURN VCD - z - menu (p. 59) FADER z SLIDE SHOW - EDIT/PLAY menu...
... PLAY/EDIT - - - z - OFF OFF OFF - EFFECT z FRAME REC*1 z SMTH INT.REC*4 z INT.REC-STL - SPD PB - z - z - z *1 DCR-HC96 *2 DCR-HC36/HC46 *3 DCR-HC36 *4 DCR-HC46/HC96 *5 Cannot be operated in the CAMERA-TAPE mode. *6 The setting value before entering Easy Handycam operation will be retained. REC MOVIE - BURN VCD - z - menu (p. 59) FADER z SLIDE SHOW - EDIT/PLAY menu...

Operating Guide
Page 48
... DISP GUIDE z z z GUIDEFRAME*1 z z - AUDIO MIX - MEMORY PLAY/EDIT - z - DATA CODE - - z REMOTE CTRL z z z REC LAMP*1 z z - Easy Handycam SP 12BIT z STEREO - - /NORMAL/ - / NORMAL/ -*6 OFF -*6 -*6 OFF z OFF z AUTO ON ON z LCD PANEL - 5 min - z -*6 -*6 48 z -...z A.SHUT OFF z z z CALIBRATION - - menu (p. 69) CLOCK SET z z z WORLD TIME z z z LANGUAGE z z z *1 DCR-HC96 *2 DCR-HC36/HC46 *3 DCR-HC36 *4 DCR-HC46/HC96 *5 Cannot be operated in the CAMERA-TAPE mode. *6 The setting value before entering Easy Handycam operation will be retained.
... DISP GUIDE z z z GUIDEFRAME*1 z z - AUDIO MIX - MEMORY PLAY/EDIT - z - DATA CODE - - z REMOTE CTRL z z z REC LAMP*1 z z - Easy Handycam SP 12BIT z STEREO - - /NORMAL/ - / NORMAL/ -*6 OFF -*6 -*6 OFF z OFF z AUTO ON ON z LCD PANEL - 5 min - z -*6 -*6 48 z -...z A.SHUT OFF z z z CALIBRATION - - menu (p. 69) CLOCK SET z z z WORLD TIME z z z LANGUAGE z z z *1 DCR-HC96 *2 DCR-HC36/HC46 *3 DCR-HC36 *4 DCR-HC46/HC96 *5 Cannot be operated in the CAMERA-TAPE mode. *6 The setting value before entering Easy Handycam operation will be retained.


