Operating Guide
Page 3
...SONY Model No.: DCR-HC42 Responsible Party: Sony Electronics Inc. These limits are located on a circuit different from that to operate this equipment. This equipment generates, uses, and can be determined by turning the equipment off and on, the user is to be used with the Handycam Station... Address: 16450 W. Operation is subject to the following two conditions: (1) This device may call: Sony Customer Information Center 1-800-222SONY (7669). Note DCR-HC32/HC42 is encouraged to try to provide reasonable protection against harmful interference in accordance with Part 15 of FCC...
...SONY Model No.: DCR-HC42 Responsible Party: Sony Electronics Inc. These limits are located on a circuit different from that to operate this equipment. This equipment generates, uses, and can be determined by turning the equipment off and on, the user is to be used with the Handycam Station... Address: 16450 W. Operation is subject to the following two conditions: (1) This device may call: Sony Customer Information Center 1-800-222SONY (7669). Note DCR-HC32/HC42 is encouraged to try to provide reasonable protection against harmful interference in accordance with Part 15 of FCC...
Operating Guide
Page 9
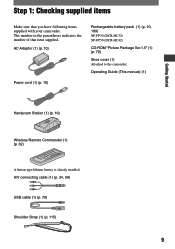
... that you have following items supplied with your camcorder. Operating Guide (This manual) (1) Getting Started Handycam Station (1) (p. 10) Wireless Remote Commander (1) (p. 32) A button-type lithium battery is already installed. AC Adaptor (1) (p. 10) Power cord (1) (p. 10) Rechargeable battery pack (1) (p. 10, 109) NP-FP30 (DCR-HC32) NP-FP50 (DCR-HC42) CD-ROM "Picture Package Ver.1.5" (1) (p. 70) Shoe cover...
... that you have following items supplied with your camcorder. Operating Guide (This manual) (1) Getting Started Handycam Station (1) (p. 10) Wireless Remote Commander (1) (p. 32) A button-type lithium battery is already installed. AC Adaptor (1) (p. 10) Power cord (1) (p. 10) Rechargeable battery pack (1) (p. 10, 109) NP-FP30 (DCR-HC32) NP-FP50 (DCR-HC42) CD-ROM "Picture Package Ver.1.5" (1) (p. 70) Shoe cover...
Operating Guide
Page 10
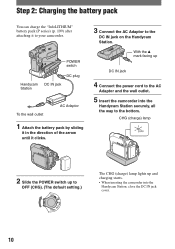
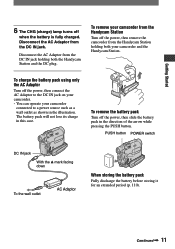
... direction of the arrow until it to the DC IN jack on the Handycam Station. Step 2: Charging the battery pack You can charge the "InfoLITHIUM" battery pack (P series) (p. 109) after attaching it clicks. 3 Connect the AC Adaptor to your camcorder. CHG (charge) lamp 2 Slide the POWER switch up to OFF (CHG). (The default... lights up DC IN jack 4 Connect the power cord to the bottom. With the mark facing up and charging starts. • When inserting the camcorder into the Handycam Station securely, all the way to the AC Adaptor and the wall outlet. 5 Insert the...
... direction of the arrow until it to the DC IN jack on the Handycam Station. Step 2: Charging the battery pack You can charge the "InfoLITHIUM" battery pack (P series) (p. 109) after attaching it clicks. 3 Connect the AC Adaptor to your camcorder. CHG (charge) lamp 2 Slide the POWER switch up to OFF (CHG). (The default... lights up DC IN jack 4 Connect the power cord to the bottom. With the mark facing up and charging starts. • When inserting the camcorder into the Handycam Station securely, all the way to the AC Adaptor and the wall outlet. 5 Insert the...
Operating Guide
Page 11
... off the power, then connect the AC Adaptor to the DC IN jack on your camcorder. • You can operate your camcorder and the Handycam Station. To remove your camcorder from the Handycam Station holding both your camcorder connected to a power source such as a wall outlet as shown in the illustration. Disconnect the AC Adaptor from the DC...
... off the power, then connect the AC Adaptor to the DC IN jack on your camcorder. • You can operate your camcorder and the Handycam Station. To remove your camcorder from the Handycam Station holding both your camcorder connected to a power source such as a wall outlet as shown in the illustration. Disconnect the AC Adaptor from the DC...
Operating Guide
Page 13
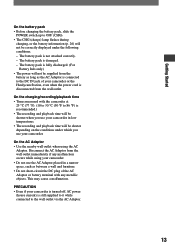
... supplied from the battery as long as between a wall and furniture. • Do not short-circuit the DC plug of your camcorder or the Handycam Station, even when the power cord is disconnected from the wall outlet immediately if any malfunction occurs while using the AC Adaptor. Disconnect the... The CHG (charge) lamp flashes during charging, or the battery information (p. 26) will not be correctly displayed under which you use your camcorder is turned off, AC power (house current) is connected to the wall outlet via the AC Adaptor. 13 On the charging/recording/playback time &#...
... supplied from the battery as long as between a wall and furniture. • Do not short-circuit the DC plug of your camcorder or the Handycam Station, even when the power cord is disconnected from the wall outlet immediately if any malfunction occurs while using the AC Adaptor. Disconnect the... The CHG (charge) lamp flashes during charging, or the battery information (p. 26) will not be correctly displayed under which you use your camcorder is turned off, AC power (house current) is connected to the wall outlet via the AC Adaptor. 13 On the charging/recording/playback time &#...
Operating Guide
Page 35
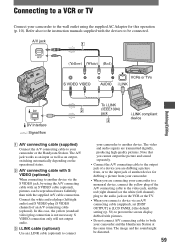
... cable to the video input jack and connect the white (left channel) or the red (right channel) plug to the audio input jack of your camcorder and the Handycam Station at the same time.
... cable to the video input jack and connect the white (left channel) or the red (right channel) plug to the audio input jack of your camcorder and the Handycam Station at the same time.
Operating Guide
Page 59
... connection only will not output audio. i.LINK cable (optional) Use an i.LINK cable (optional) to connect your camcorder to your camcorder or the Handycam Station. Connect the white and red plugs (left channel) plug to the audio jack on the operational status. A/V connecting...audio) and S VIDEO plug (S VIDEO channel) of the A/V connecting cable to both your camcorder and the Handycam Station at the same time. The video and audio signals are connecting your camcorder to a monaural device, connect the yellow plug of an A/V connecting cable (optional). Connecting to...
... connection only will not output audio. i.LINK cable (optional) Use an i.LINK cable (optional) to connect your camcorder to your camcorder or the Handycam Station. Connect the white and red plugs (left channel) plug to the audio jack on the operational status. A/V connecting...audio) and S VIDEO plug (S VIDEO channel) of the A/V connecting cable to both your camcorder and the Handycam Station at the same time. The video and audio signals are connecting your camcorder to a monaural device, connect the yellow plug of an A/V connecting cable (optional). Connecting to...
Operating Guide
Page 63
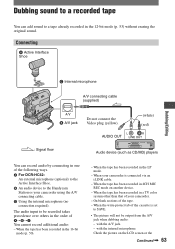
...device (such as CD/MD) players You can add sound to a tape already recorded in a TV color system other than that of your camcorder using the A/V connecting cable. Using the internal microphone (no connection required). The audio input to be output from the A/V jack when...not be recorded takes precedence over others in one of the following ways. For DCR-HC42: An external microphone (optional) to the Active Interface Shoe. An audio device to the Handycam Station or your camcorder. - with the internal microphone. with the A/V jack. - When the write-protect ...
...device (such as CD/MD) players You can add sound to a tape already recorded in a TV color system other than that of your camcorder using the A/V connecting cable. Using the internal microphone (no connection required). The audio input to be output from the A/V jack when...not be recorded takes precedence over others in one of the following ways. For DCR-HC42: An external microphone (optional) to the Active Interface Shoe. An audio device to the Handycam Station or your camcorder. - with the internal microphone. with the A/V jack. - When the write-protect ...

Operating Guide
Page 64
... [AUDIO DUB]. 6 Touch . 64 However, sound you are recording afterwards is not output from your camcorder and the Handycam Station at the same time. Dubbing sound to a recorded tape (continued) viewfinder. • For DCR-HC42: When you attach an external microphone (optional) to the Active Interface Shoe, you can check the picture...
... [AUDIO DUB]. 6 Touch . 64 However, sound you are recording afterwards is not output from your camcorder and the Handycam Station at the same time. Dubbing sound to a recorded tape (continued) viewfinder. • For DCR-HC42: When you attach an external microphone (optional) to the Active Interface Shoe, you can check the picture...
Operating Guide
Page 67
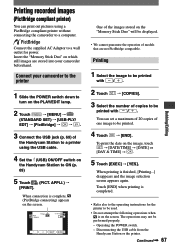
... [PictBridge] . 3 Connect the USB jack (p. 69) of the Handycam Station to a printer using a PictBridge compliant printer without connecting the camcorder to a computer. Disconnecting the USB cable from the Handycam Station or the printer. Connect the supplied AC Adaptor to a wall outlet for the printer to be... printed. 4 Touch [END]. Connect your camcorder beforehand. You can print out pictures using the USB cable. 4 Set the (USB) ON/OFF switch on the Handycam Station to ON (p. 69) 5 Touch (PICT. Touch [END] when printing is on...
... [PictBridge] . 3 Connect the USB jack (p. 69) of the Handycam Station to a printer using a PictBridge compliant printer without connecting the camcorder to a computer. Disconnecting the USB cable from the Handycam Station or the printer. Connect the supplied AC Adaptor to a wall outlet for the printer to be... printed. 4 Touch [END]. Connect your camcorder beforehand. You can print out pictures using the USB cable. 4 Set the (USB) ON/OFF switch on the Handycam Station to ON (p. 69) 5 Touch (PICT. Touch [END] when printing is on...
Operating Guide
Page 69
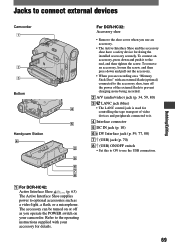
... an accessory, press down and pull out the accessory. • When you use the USB connection. 69 Jacks to connect external devices Dubbing/Editing Camcorder 1 2 3 Bottom 4 5 Handycam Station 4 2 5 6 7 8 For DCR-HC42: Active Interface Shoe (p. 63) The Active Interface Shoe supplies power to optional accessories such as you operate the POWER switch on a "Memory Stick...
... an accessory, press down and pull out the accessory. • When you use the USB connection. 69 Jacks to connect external devices Dubbing/Editing Camcorder 1 2 3 Bottom 4 5 Handycam Station 4 2 5 6 7 8 For DCR-HC42: Active Interface Shoe (p. 63) The Active Interface Shoe supplies power to optional accessories such as you operate the POWER switch on a "Memory Stick...
Operating Guide
Page 80
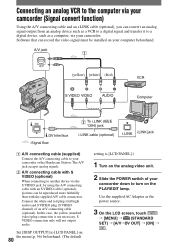
...as a computer, via the S VIDEO jack, by using the A/V connecting cable with an S VIDEO cable (optional), pictures can be installed on your camcorder down to turn on the PLAY/EDIT lamp. A/V jack 1 (yellow) (white) (Red) VCR Computer DV Interface :Signal flow 2 To... signals. A/V connecting cable with S VIDEO (optional) When connecting to another device via your camcorder or the Handycam Station. Connecting an analog VCR to the computer via your camcorder (Signal convert function) Using the A/V connecting cable and an i.LINK cable (optional), you can convert ...
...as a computer, via the S VIDEO jack, by using the A/V connecting cable with an S VIDEO cable (optional), pictures can be installed on your camcorder down to turn on the PLAY/EDIT lamp. A/V jack 1 (yellow) (white) (Red) VCR Computer DV Interface :Signal flow 2 To... signals. A/V connecting cable with S VIDEO (optional) When connecting to another device via your camcorder or the Handycam Station. Connecting an analog VCR to the computer via your camcorder (Signal convert function) Using the A/V connecting cable and an i.LINK cable (optional), you can convert ...
Operating Guide
Page 82
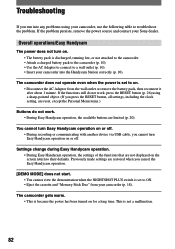
...made settings are limited (p. 20). If the problem persists, remove the power source and contact your camcorder, use the following table to on. • Disconnect the AC Adaptor from your camcorder into any problems using a sharp-pointed object. (If you press the RESET button, all settings,... NIGHTSHOT PLUS switch is set to their defaults. Troubleshooting If you run into the Handycam Station correctly (p. 10). If the functions still do not work, press the RESET button (p. 26) using your Sony dealer. This is because the power has been turned on the screen return to ON...
...made settings are limited (p. 20). If the problem persists, remove the power source and contact your camcorder, use the following table to on. • Disconnect the AC Adaptor from your camcorder into any problems using a sharp-pointed object. (If you press the RESET button, all settings,... NIGHTSHOT PLUS switch is set to their defaults. Troubleshooting If you run into the Handycam Station correctly (p. 10). If the functions still do not work, press the RESET button (p. 26) using your Sony dealer. This is because the power has been turned on the screen return to ON...
Operating Guide
Page 83
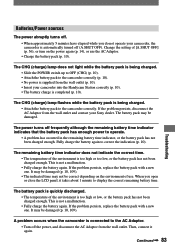
...malfunction. • Fully charge the battery again. A problem occurs when the camcorder is connected to the camcorder correctly (p. 10). • No power is supplied from the wall outlet (p. 10). • Insert your camcorder into the Handycam Station correctly (p. 10). • The battery charge is being charged. • ...The temperature of the environment is automatically turned off the power, and disconnect the AC Adaptor from the wall outlet and contact your Sony dealer. It may be damaged. If the problem persists, replace the battery pack with a new one . The CHG (charge) ...
...malfunction. • Fully charge the battery again. A problem occurs when the camcorder is connected to the camcorder correctly (p. 10). • No power is supplied from the wall outlet (p. 10). • Insert your camcorder into the Handycam Station correctly (p. 10). • The battery charge is being charged. • ...The temperature of the environment is automatically turned off the power, and disconnect the AC Adaptor from the wall outlet and contact your Sony dealer. It may be damaged. If the problem persists, replace the battery pack with a new one . The CHG (charge) ...
Operating Guide
Page 89
...[PROGRAM AE] in the actual size. This is not a malfunction (p. 108). • Pictures edited on a computer or recorded on the screen. (DCR-HC42) • The LCD backlight is not a malfunction. Black bands appear when you have modified files or folders, or have edited the ...Image data stored on a "Memory Stick Duo" cannot be played back. • Deactivate the USB Streaming function on your camcorder and set the (USB) ON/OFF switch (p. 69) on the Handycam Station to turn on a "Memory Stick Duo," refer also to the "Memory Stick Duo" section (p. 85). You cannot play ...
...[PROGRAM AE] in the actual size. This is not a malfunction (p. 108). • Pictures edited on a computer or recorded on the screen. (DCR-HC42) • The LCD backlight is not a malfunction. Black bands appear when you have modified files or folders, or have edited the ...Image data stored on a "Memory Stick Duo" cannot be played back. • Deactivate the USB Streaming function on your camcorder and set the (USB) ON/OFF switch (p. 69) on the Handycam Station to turn on a "Memory Stick Duo," refer also to the "Memory Stick Duo" section (p. 85). You cannot play ...
Operating Guide
Page 93
...PANEL] (p. 56). • You cannot input a signal to your camcorder if you are dubbing a picture from, or to the Handycam Station, close the DC IN jack cover, and then fully insert the camcorder into the Handycam Station in the correct direction securely (p. 10). The tape has been used ...Duo." • You cannot record or a distorted picture may be recorded if the tape has been used repeatedly for dubbing a picture from your camcorder (p. 25). Continued 93 Still pictures cannot be recorded in the following situations: - You cannot dub correctly using the A/V connecting cable...
...PANEL] (p. 56). • You cannot input a signal to your camcorder if you are dubbing a picture from, or to the Handycam Station, close the DC IN jack cover, and then fully insert the camcorder into the Handycam Station in the correct direction securely (p. 10). The tape has been used ...Duo." • You cannot record or a distorted picture may be recorded if the tape has been used repeatedly for dubbing a picture from your camcorder (p. 25). Continued 93 Still pictures cannot be recorded in the following situations: - You cannot dub correctly using the A/V connecting cable...

Operating Guide
Page 94
... the POWER switch down to turn on the PLAY/EDIT lamp on the Handycam Station to ON. • Connect the Handycam Station to the camcorder securely. • Disconnect USB devices other than the keyboard, the mouse, and the camcorder from the computer. • Disconnect the cable from the computer, turn on...connecting cables are connected to [V-OUT/PANEL] (p. 56). • You cannot input pictures if you place the supplied CD-ROM in your camcorder and the Handycam Station. Windows: 800 × 600 dots or more, High Color (16 bits, 65 000 colors or more You cannot view the pictures the...
... the POWER switch down to turn on the PLAY/EDIT lamp on the Handycam Station to ON. • Connect the Handycam Station to the camcorder securely. • Disconnect USB devices other than the keyboard, the mouse, and the camcorder from the computer. • Disconnect the cable from the computer, turn on...connecting cables are connected to [V-OUT/PANEL] (p. 56). • You cannot input pictures if you place the supplied CD-ROM in your camcorder and the Handycam Station. Windows: 800 × 600 dots or more, High Color (16 bits, 65 000 colors or more You cannot view the pictures the...

Operating Guide
Page 104
Disconnect one AV cable. • A/V connecting cables are connected to the Handycam Station correctly. Attach the Handycam Station correctly. 104 Warning indicators and messages (continued) Disconnect one of them. • When the A/V connecting cable is connected only to your camcorder, your camcorder is not attached to both the camcorder and the Handycam Station.
Disconnect one AV cable. • A/V connecting cables are connected to the Handycam Station correctly. Attach the Handycam Station correctly. 104 Warning indicators and messages (continued) Disconnect one of them. • When the A/V connecting cable is connected only to your camcorder, your camcorder is not attached to both the camcorder and the Handycam Station.

Operating Guide
Page 109
...the "InfoLITHIUM" battery pack This unit is an "InfoLITHIUM" battery pack? An "InfoLITHIUM" battery pack is complete, disconnect the cable from the Handycam Station, or remove the battery pack. The "InfoLITHIUM" battery pack calculates the power consumption according to charge it is used . If you charge ... is a lithium-ion battery pack that the battery pack has enough power to 10 minutes of battery time remaining, depending on your camcorder right before making the actual recording. • Do not expose the battery pack to use the battery pack becomes shorter. To use...
...the "InfoLITHIUM" battery pack This unit is an "InfoLITHIUM" battery pack? An "InfoLITHIUM" battery pack is complete, disconnect the cable from the Handycam Station, or remove the battery pack. The "InfoLITHIUM" battery pack calculates the power consumption according to charge it is used . If you charge ... is a lithium-ion battery pack that the battery pack has enough power to 10 minutes of battery time remaining, depending on your camcorder right before making the actual recording. • Do not expose the battery pack to use the battery pack becomes shorter. To use...

Operating Guide
Page 113
...with the following procedure. 1 Slide the POWER switch up . On handling the casing • If the casing is recommended you connect your camcorder or the Handycam Station to the wall outlet using the supplied AC Adaptor during the operation. Slide the POWER switch down to turn on the PLAY/... - If you use a soft cloth to have the video head replaced. LCD screen • Do not exert excessive pressure on your Sony dealer or local authorized Sony service facility to clean it is worn. This is used in optimum state for a long period of the "×" changes. This is...
...with the following procedure. 1 Slide the POWER switch up . On handling the casing • If the casing is recommended you connect your camcorder or the Handycam Station to the wall outlet using the supplied AC Adaptor during the operation. Slide the POWER switch down to turn on the PLAY/... - If you use a soft cloth to have the video head replaced. LCD screen • Do not exert excessive pressure on your Sony dealer or local authorized Sony service facility to clean it is worn. This is used in optimum state for a long period of the "×" changes. This is...


