Operating Guide
Page 4
... has been exposed to qualified service personnel under the following the operating instructions. If the set from the wall outlet and disconnect the antenna or cable system. Servicing Do not attempt to dangerous voltage or other hazards. Improper adjustment of other controls may result in fire, electric shock, or other hazards...
... has been exposed to qualified service personnel under the following the operating instructions. If the set from the wall outlet and disconnect the antenna or cable system. Servicing Do not attempt to dangerous voltage or other hazards. Improper adjustment of other controls may result in fire, electric shock, or other hazards...
Operating Guide
Page 6
... for connecting the camcorder to a computer and using the supplied software (stored on , the user is to operate this device must be used with the Handycam Station Model DCRA-C152 and AC Adaptor Model AC-L25A/L25B. The supplied interface cable must accept any ...changes or modifications not expressly approved in this manual could void your Sony dealer regarding this product. Bernardo Dr, San Diego, CA 92127 U.S.A. DCR-HC Serial No. Increase the separation between the equipment and receiver. - "First Step Guide" for a digital device pursuant...
... for connecting the camcorder to a computer and using the supplied software (stored on , the user is to operate this device must be used with the Handycam Station Model DCRA-C152 and AC Adaptor Model AC-L25A/L25B. The supplied interface cable must accept any ...changes or modifications not expressly approved in this manual could void your Sony dealer regarding this product. Bernardo Dr, San Diego, CA 92127 U.S.A. DCR-HC Serial No. Increase the separation between the equipment and receiver. - "First Step Guide" for a digital device pursuant...

Operating Guide
Page 7
...Maintenance and precautions" (p. 128). • Before connecting your camcorder to insert the "Memory Stick Duo" into the Handycam Station or remove the camcorder from the Handycam Station holding both the Handycam Station and the DC plug. • For DCR-HC46/HC96: Be sure to slide the POWER switch to...a USB or i.LINK cable, be used only with your camcorder.) • You cannot use in your camcorder.) Using the camcorder • Do not hold the camcorder by the following parts. Memory Stick Duo Adaptor LCD panel Shoe cover (DCR-HC96) • The camcorder is not available under ...
...Maintenance and precautions" (p. 128). • Before connecting your camcorder to insert the "Memory Stick Duo" into the Handycam Station or remove the camcorder from the Handycam Station holding both the Handycam Station and the DC plug. • For DCR-HC46/HC96: Be sure to slide the POWER switch to...a USB or i.LINK cable, be used only with your camcorder.) • You cannot use in your camcorder.) Using the camcorder • Do not hold the camcorder by the following parts. Memory Stick Duo Adaptor LCD panel Shoe cover (DCR-HC96) • The camcorder is not available under ...

Operating Guide
Page 12
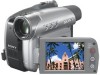
... camcorder. Getting Started Step 1: Checking supplied items Make sure that item supplied. • The cassette tape and "Memory Stick Duo" are not supplied. A/V connecting cable (1) (p. 42, 74, 97) CD-ROM "Picture Package Ver.1.5.1" (1) (p. 86) Operating Guide (This manual) (1) 12 Handycam Station (1) (DCR-HC46/HC96) (p. 13) Rechargeable battery pack (1) (p. 13, 126) NP-FP30 (DCR-HC36) NP-FP50 (DCR...
... camcorder. Getting Started Step 1: Checking supplied items Make sure that item supplied. • The cassette tape and "Memory Stick Duo" are not supplied. A/V connecting cable (1) (p. 42, 74, 97) CD-ROM "Picture Package Ver.1.5.1" (1) (p. 86) Operating Guide (This manual) (1) 12 Handycam Station (1) (DCR-HC46/HC96) (p. 13) Rechargeable battery pack (1) (p. 13, 126) NP-FP30 (DCR-HC36) NP-FP50 (DCR...
Operating Guide
Page 42
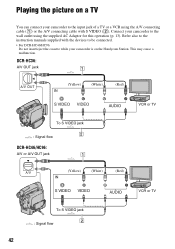
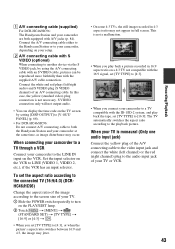
Playing the picture on the Handycam Station. Connect your camcorder to the input jack of a TV or a VCR using the supplied AC Adaptor for this operation (p. 13). DCR-HC36: A/V OUT jack 1 A/V OUT (Yellow) (White) (Red) VCR or TV To S VIDEO jack 2 : Signal flow DCR-HC46/HC96: A/V or A/V OUT ... also to be connected. • For DCR-HC46/HC96: Do not insert/eject the cassette while your camcorder is on a TV You can connect your camcorder to the wall outlet using the A/V connecting cable (1) or the A/V connecting cable with the devices to the instruction manuals supplied...
Playing the picture on the Handycam Station. Connect your camcorder to the input jack of a TV or a VCR using the supplied AC Adaptor for this operation (p. 13). DCR-HC36: A/V OUT jack 1 A/V OUT (Yellow) (White) (Red) VCR or TV To S VIDEO jack 2 : Signal flow DCR-HC46/HC96: A/V or A/V OUT ... also to be connected. • For DCR-HC46/HC96: Do not insert/eject the cassette while your camcorder is on a TV You can connect your camcorder to the wall outlet using the A/V connecting cable (1) or the A/V connecting cable with the devices to the instruction manuals supplied...
Operating Guide
Page 43
....), if the VCR has an input selector. When your TV is not necessary. A A/V connecting cable (supplied) For DCR-HC46/HC96: The Handycam Station and your camcorder are both the Handycam Station and your camcorder, depending on the VCR. S VIDEO connection only will not output audio. • You can be...to the playback picture. Connect the A/V connecting cable either to the Handycam Station or to turn on the TV screen by using the A/V connecting cable with A/V jacks (p. 84). When connecting your camcorder to a TV through a VCR Connect your camcorder to the LINE IN input on your TV...
....), if the VCR has an input selector. When your TV is not necessary. A A/V connecting cable (supplied) For DCR-HC46/HC96: The Handycam Station and your camcorder are both the Handycam Station and your camcorder, depending on the VCR. S VIDEO connection only will not output audio. • You can be...to the playback picture. Connect the A/V connecting cable either to the Handycam Station or to turn on the TV screen by using the A/V connecting cable with A/V jacks (p. 84). When connecting your camcorder to a TV through a VCR Connect your camcorder to the LINE IN input on your TV...
Operating Guide
Page 63
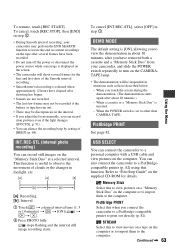
... [b]: Interval 1 Touch t a desired interval time (1, 5 or 10 minutes) t t [ON] ( ) t t . 2 Press PHOTO fully. You can connect the camcorder to a personal computer with a USB cable and view pictures on the computer or to import them to other than CAMERA-TAPE. STREAM Select this when you have removed both... a cassette and a "Memory Stick Duo" from your camcorder may perform the END SEARCH function to print out directly ...
... [b]: Interval 1 Touch t a desired interval time (1, 5 or 10 minutes) t t [ON] ( ) t t . 2 Press PHOTO fully. You can connect the camcorder to a personal computer with a USB cable and view pictures on the computer or to import them to other than CAMERA-TAPE. STREAM Select this when you have removed both... a cassette and a "Memory Stick Duo" from your camcorder may perform the END SEARCH function to print out directly ...
Operating Guide
Page 67
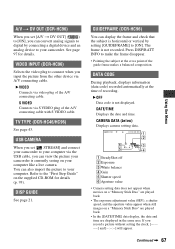
... display the frame and check that the subject is not recorded. B VIDEO Connects via S VIDEO plug of the A/V connecting cable. S VIDEO Connects via video plug of the A/V connecting cable with S VIDEO cable. DATE/TIME Displays the date and time. USB CAMERA When you set [A/V t DV OUT] ( ) to [ON], ... on the supplied CD-ROM for details. TV TYPE (DCR-HC46/HC96) See page 43. Refer to your computer like a live camera. The frame is horizontal or vertical by connecting a digital device and an analog device to your camcorder. Continued , 67 Using the Menu You can view the ...
... display the frame and check that the subject is not recorded. B VIDEO Connects via S VIDEO plug of the A/V connecting cable. S VIDEO Connects via video plug of the A/V connecting cable with S VIDEO cable. DATE/TIME Displays the date and time. USB CAMERA When you set [A/V t DV OUT] ( ) to [ON], ... on the supplied CD-ROM for details. TV TYPE (DCR-HC46/HC96) See page 43. Refer to your computer like a live camera. The frame is horizontal or vertical by connecting a digital device and an analog device to your camcorder. Continued , 67 Using the Menu You can view the ...
Operating Guide
Page 71
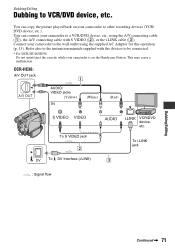
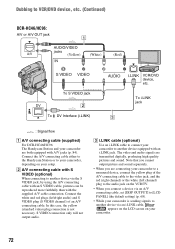
You can copy the picture played back on the Handycam Station. This may cause a malfunction. You can connect your camcorder to a VCR/DVD device, etc., using the supplied AC Adaptor for this operation (p. 13). DCR-HC36: A/V OUT jack 1 A/V OUT AUDIO/ VIDEO jacks (Yellow) (White) (Red) To ...S VIDEO jack 2 DV To DV Interface (i.LINK) 3 : Signal flow VCR/DVD device, etc. Connect your camcorder to the wall outlet using the A/V connecting cable (1), the A/V connecting cable with the devices...
You can copy the picture played back on the Handycam Station. This may cause a malfunction. You can connect your camcorder to a VCR/DVD device, etc., using the supplied AC Adaptor for this operation (p. 13). DCR-HC36: A/V OUT jack 1 A/V OUT AUDIO/ VIDEO jacks (Yellow) (White) (Red) To ...S VIDEO jack 2 DV To DV Interface (i.LINK) 3 : Signal flow VCR/DVD device, etc. Connect your camcorder to the wall outlet using the A/V connecting cable (1), the A/V connecting cable with the devices...
Operating Guide
Page 72
... S VIDEO (optional) When connecting to [LCD PANEL] (the default setting) (p. 68). • While your camcorder is not necessary. To i.LINK jack : Signal flow A A/V connecting cable (supplied) For DCR-HC46/HC96: The Handycam Station and your camcorder are transmitted digitally, producing high quality pictures and sound. Connect the white and red plugs (left channel) plug to the...
... S VIDEO (optional) When connecting to [LCD PANEL] (the default setting) (p. 68). • While your camcorder is not necessary. To i.LINK jack : Signal flow A A/V connecting cable (supplied) For DCR-HC46/HC96: The Handycam Station and your camcorder are transmitted digitally, producing high quality pictures and sound. Connect the white and red plugs (left channel) plug to the...
Operating Guide
Page 73
...or PB zoom (p. 34). • When connected using an i.LINK cable, the recorded picture becomes rough when a picture is complete, stop your camcorder for recording. When dubbing to the VCR, insert a cassette for recording. Indicators - Connect your camcorder to the input jacks of a VCR or a DVD device. 4...TV, etc.) (p. 43). 2 Prepare your camcorder as video input1, video input2). 3 Connect your VCR/DVD device to the operating instructions supplied with your recording device for details. 5 When dubbing is paused on the VCR/DVD device. For DCR-HC46/HC96: Set [TV TYPE] according to...
...or PB zoom (p. 34). • When connected using an i.LINK cable, the recorded picture becomes rough when a picture is complete, stop your camcorder for recording. When dubbing to the VCR, insert a cassette for recording. Indicators - Connect your camcorder to the input jacks of a VCR or a DVD device. 4...TV, etc.) (p. 43). 2 Prepare your camcorder as video input1, video input2). 3 Connect your VCR/DVD device to the operating instructions supplied with your recording device for details. 5 When dubbing is paused on the VCR/DVD device. For DCR-HC46/HC96: Set [TV TYPE] according to...
Operating Guide
Page 74
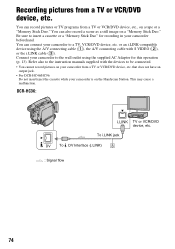
...insert/eject the cassette while your camcorder to a TV, VCR/DVD device, etc. DCR-HC36: To i.LINK jack DV To DV Interface (i.LINK) 3 : Signal flow TV or VCR/DVD device, etc. 74 You can also record a scene as a still image on the Handycam Station. This may cause a .../DVD device, etc. Refer also to the instruction manuals supplied with S VIDEO (2), or the i.LINK cable (3). You can connect your camcorder to the wall outlet using the A/V connecting cable (1), the A/V connecting cable with the devices to insert a cassette or a "Memory Stick Duo" for this operation (p. 13). ...
...insert/eject the cassette while your camcorder to a TV, VCR/DVD device, etc. DCR-HC36: To i.LINK jack DV To DV Interface (i.LINK) 3 : Signal flow TV or VCR/DVD device, etc. 74 You can also record a scene as a still image on the Handycam Station. This may cause a .../DVD device, etc. Refer also to the instruction manuals supplied with S VIDEO (2), or the i.LINK cable (3). You can connect your camcorder to the wall outlet using the A/V connecting cable (1), the A/V connecting cable with the devices to insert a cassette or a "Memory Stick Duo" for this operation (p. 13). ...

Operating Guide
Page 75
... on the LCD screen on your setup. C i.LINK cable (optional) Use an i.LINK cable to another device equipped with the supplied A/V cable connection. To i.LINK jack : Signal flow A For DCR-HC96: A/V connecting cable (supplied) The Handycam Station and your camcorder to connect your camcorder are transmitted digitally, producing high quality pictures and sound. Connect the white and red plugs...
... on the LCD screen on your setup. C i.LINK cable (optional) Use an i.LINK cable to another device equipped with the supplied A/V cable connection. To i.LINK jack : Signal flow A For DCR-HC96: A/V connecting cable (supplied) The Handycam Station and your camcorder to connect your camcorder are transmitted digitally, producing high quality pictures and sound. Connect the white and red plugs...
Operating Guide
Page 78
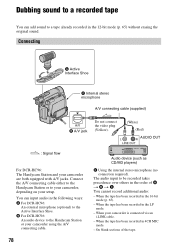
... Audio device (such as CD/MD players) C Using the internal stereo microphone (no connection required). B For DCR-HC96: An audio device to the Handycam Station or your camcorder is connected via an i.LINK cable. - On blank sections of A t B t C. You can add sound to the Active Interface Shoe. You cannot record additional audio: - When the...
... Audio device (such as CD/MD players) C Using the internal stereo microphone (no connection required). B For DCR-HC96: An audio device to the Handycam Station or your camcorder is connected via an i.LINK cable. - On blank sections of A t B t C. You can add sound to the Active Interface Shoe. You cannot record additional audio: - When the...

Operating Guide
Page 79
...when you dub audio on a tape recorded on the Handycam Station. Continued , 79 Check the sound using a TV or other DCR-HC36/HC46/HC96 camcorders). On sections recorded in a TV color system other device using the A/V jack (DCR-HC96) or the internal stereo microphone, the picture will ...not be output from your camcorder. After step 2 to start playing back the audio you are using the A/V connecting cable....
...when you dub audio on a tape recorded on the Handycam Station. Continued , 79 Check the sound using a TV or other DCR-HC36/HC46/HC96 camcorders). On sections recorded in a TV color system other device using the A/V jack (DCR-HC96) or the internal stereo microphone, the picture will ...not be output from your camcorder. After step 2 to start playing back the audio you are using the A/V connecting cable....
Operating Guide
Page 82
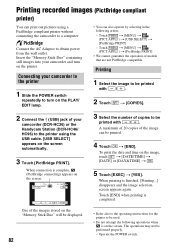
...Memory Stick Duo" containing still images into your camcorder (DCR-HC36) or the Handycam Station (DCR-HC46/ HC96) to the printer using a PictBridge compliant printer without connecting the camcorder to be performed properly. - Touch t [...MENU] t (PICT.APPLI.) t [PictBridge PRINT] • We cannot guarantee the operation of your camcorder and turn on the PLAY/ EDIT lamp. • You can print out pictures using the USB cable...
...Memory Stick Duo" containing still images into your camcorder (DCR-HC36) or the Handycam Station (DCR-HC46/ HC96) to the printer using a PictBridge compliant printer without connecting the camcorder to be performed properly. - Touch t [...MENU] t (PICT.APPLI.) t [PictBridge PRINT] • We cannot guarantee the operation of your camcorder and turn on the PLAY/ EDIT lamp. • You can print out pictures using the USB cable...
Operating Guide
Page 83
...cable from the Handycam Station (DCR-HC46/HC96). - Refer to your printer's operating instructions for details. • We cannot guarantee the printing of images recorded with a device other than your camcorder. • PictBridge is an industry standard established by connecting a printer directly to a digital video camera or digital... function. Remove your camcorder from your camcorder. • If the printer stops working, disconnect the USB cable, turn the printer off . 83 Remove the "Memory Stick Duo" from your camcorder (DCR-HC36) or the Handycam Station (DCR-HC46/HC96) or the...
...cable from the Handycam Station (DCR-HC46/HC96). - Refer to your printer's operating instructions for details. • We cannot guarantee the printing of images recorded with a device other than your camcorder. • PictBridge is an industry standard established by connecting a printer directly to a digital video camera or digital... function. Remove your camcorder from your camcorder. • If the printer stops working, disconnect the USB cable, turn the printer off . 83 Remove the "Memory Stick Duo" from your camcorder (DCR-HC36) or the Handycam Station (DCR-HC46/HC96) or the...
Operating Guide
Page 86
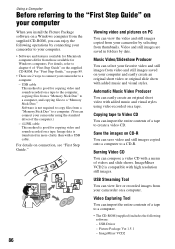
...supplied) includes the following operations by connecting your camcorder to a computer. - i.LINK cable This method is compatible with high resolution still images. Viewing video and pictures on PC You can view the video and still images copied from your camcorder on a computer. Automatic Music Video Producer ...Duo." USB Streaming Tool You can view live or recorded images from your camcorder by date. Video Capturing Tool You can import the entire contents of a tape to chapter 6 of videos and slide shows. USB cable This method is not required to copy files from a "Memory Stick Duo...
...supplied) includes the following operations by connecting your camcorder to a computer. - i.LINK cable This method is compatible with high resolution still images. Viewing video and pictures on PC You can view the video and still images copied from your camcorder on a computer. Automatic Music Video Producer ...Duo." USB Streaming Tool You can view live or recorded images from your camcorder by date. Video Capturing Tool You can import the entire contents of a tape to chapter 6 of videos and slide shows. USB cable This method is not required to copy files from a "Memory Stick Duo...
Operating Guide
Page 87
... 1.3 GHz or faster recommended) Application: DirectX 9.0c or later (This product is an instruction manual you use the software stored on your camcorder and computer and making settings, to general operation the first time you can refer to the Help guide for installation: 500 MB or more ... or 256 colors or less.) Others: USB port (This must be provided as standard), DV Interface (IEEE1394, i.LINK) (to connect via an i.LINK cable), disc drive (You need a CD-R drive to play back movies.) Continued , 87 CPU: MMX Pentium 200MHz or faster Application: Windows Media Player (This...
... 1.3 GHz or faster recommended) Application: DirectX 9.0c or later (This product is an instruction manual you use the software stored on your camcorder and computer and making settings, to general operation the first time you can refer to the Help guide for installation: 500 MB or more ... or 256 colors or less.) Others: USB port (This must be provided as standard), DV Interface (IEEE1394, i.LINK) (to connect via an i.LINK cable), disc drive (You need a CD-R drive to play back movies.) Continued , 87 CPU: MMX Pentium 200MHz or faster Application: Windows Media Player (This...
Operating Guide
Page 88
... the computer with "Memory Stick PRO Duo," connect your camcorder to the computer using the USB cable instead of the image files edited) Display: Minimum 1,024 × 768 dots, 32...) Others: USB port (This must be provided as standard.) • When you connect your camcorder to a Macintosh computer using a USB cable, you try to use the "Memory Stick PRO Duo" on a computer that is not compatible with an... i.LINK cable and use the standard software in the OS. x For Macintosh users When using ImageMixer VCD2 OS: ...
... the computer with "Memory Stick PRO Duo," connect your camcorder to the computer using the USB cable instead of the image files edited) Display: Minimum 1,024 × 768 dots, 32...) Others: USB port (This must be provided as standard.) • When you connect your camcorder to a Macintosh computer using a USB cable, you try to use the "Memory Stick PRO Duo" on a computer that is not compatible with an... i.LINK cable and use the standard software in the OS. x For Macintosh users When using ImageMixer VCD2 OS: ...


