Operating Guide
Page 6
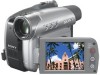
... dealer or an experienced radio/TV technician for a digital device pursuant to Subpart B of Part 15 of FCC Rules. Mini DV cassettes with the Handycam Station Model DCRA-C151 and AC Adaptor Model AC-L25A/L25B. • DCR-HC96 is no guarantee that interference will not occur in... void your Sony dealer regarding this equipment. Connect the equipment into an outlet on a circuit different from that may cause undesired operation. The supplied interface cable must accept any changes or modifications not expressly approved in your camcorder You can use Your camcorder is encouraged ...
... dealer or an experienced radio/TV technician for a digital device pursuant to Subpart B of Part 15 of FCC Rules. Mini DV cassettes with the Handycam Station Model DCRA-C151 and AC Adaptor Model AC-L25A/L25B. • DCR-HC96 is no guarantee that interference will not occur in... void your Sony dealer regarding this equipment. Connect the equipment into an outlet on a circuit different from that may cause undesired operation. The supplied interface cable must accept any changes or modifications not expressly approved in your camcorder You can use Your camcorder is encouraged ...

Operating Guide
Page 7
..., and not forcibly to avoid damaging the terminal, or cause a malfunction of your camcorder. • For DCR-HC46/HC96: Disconnect the AC Adaptor from the Handycam Station holding both the Handycam Station and the DC plug. • For DCR-HC46/HC96: Be sure to slide the POWER switch to OFF (CHG) when you... can use in your camcorder.) • You cannot use any type of memory card except "Memory Stick Duo...
..., and not forcibly to avoid damaging the terminal, or cause a malfunction of your camcorder. • For DCR-HC46/HC96: Disconnect the AC Adaptor from the Handycam Station holding both the Handycam Station and the DC plug. • For DCR-HC46/HC96: Be sure to slide the POWER switch to OFF (CHG) when you... can use in your camcorder.) • You cannot use any type of memory card except "Memory Stick Duo...
Operating Guide
Page 9
...first 5 Getting Started Step 1: Checking supplied items 12 Step 2: Charging the battery pack 13 Step 3: Turning the power on and holding your camcorder firmly ..........18 Step 4: Adjusting the LCD panel and viewfinder 20 Step 5: Using the touch panel 21 Changing the language setting 21 Checking the... Easy Recording/Playback (Easy Handycam 28 Recording 30 Playback 31 Functions used for recording/playback, etc 32 Recording To use zoom To use the flash (DCR-HC96) To record in dark places (NightShot plus) (DCR-HC36/HC46) To record in dark places (NightShot) (DCR-HC96) To adjust the ...
...first 5 Getting Started Step 1: Checking supplied items 12 Step 2: Charging the battery pack 13 Step 3: Turning the power on and holding your camcorder firmly ..........18 Step 4: Adjusting the LCD panel and viewfinder 20 Step 5: Using the touch panel 21 Changing the language setting 21 Checking the... Easy Recording/Playback (Easy Handycam 28 Recording 30 Playback 31 Functions used for recording/playback, etc 32 Recording To use zoom To use the flash (DCR-HC96) To record in dark places (NightShot plus) (DCR-HC36/HC46) To record in dark places (NightShot) (DCR-HC96) To adjust the ...

Operating Guide
Page 12
Handycam Station (1) (DCR-HC46/HC96) (p. 13) Rechargeable battery pack (1) (p. 13, 126) NP-FP30 (DCR-HC36) NP-FP50 (DCR-HC46/HC96) Wireless Remote Commander (1) (p. 40) A button-type lithium battery is already installed. A/V connecting cable (1) (p. 42, 74, 97) CD-ROM "Picture Package ...(p. 13) USB cable (1) (p. 82, 86) Lens cap (1) (DCR-HC36/HC46) (p. 18, 28, 30) Power cord (1) (p. 13) • To attach the lens cap Attach the lens cap to the metal fittings of that you have following items supplied with your camcorder. See page 6, 123, 124, for compatible cassettes and "Memory Stick...
Handycam Station (1) (DCR-HC46/HC96) (p. 13) Rechargeable battery pack (1) (p. 13, 126) NP-FP30 (DCR-HC36) NP-FP50 (DCR-HC46/HC96) Wireless Remote Commander (1) (p. 40) A button-type lithium battery is already installed. A/V connecting cable (1) (p. 42, 74, 97) CD-ROM "Picture Package ...(p. 13) USB cable (1) (p. 82, 86) Lens cap (1) (DCR-HC36/HC46) (p. 18, 28, 30) Power cord (1) (p. 13) • To attach the lens cap Attach the lens cap to the metal fittings of that you have following items supplied with your camcorder. See page 6, 123, 124, for compatible cassettes and "Memory Stick...
Operating Guide
Page 13
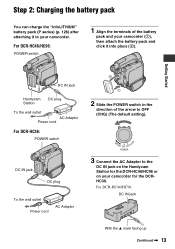
... v mark facing up Continued , 13 Getting Started DC IN jack Handycam Station DC plug To the wall outlet AC Adaptor Power cord For DCR-HC36: POWER switch 2 1 2 Slide the POWER switch in the direction of the battery pack and your camcorder (1), then attach the battery pack and click it to the DC ...IN jack on the Handycam Station for the DCR-HC46/HC96 or on your camcorder. DC IN jack DC plug...
... v mark facing up Continued , 13 Getting Started DC IN jack Handycam Station DC plug To the wall outlet AC Adaptor Power cord For DCR-HC36: POWER switch 2 1 2 Slide the POWER switch in the direction of the battery pack and your camcorder (1), then attach the battery pack and click it to the DC ...IN jack on the Handycam Station for the DCR-HC46/HC96 or on your camcorder. DC IN jack DC plug...
Operating Guide
Page 14
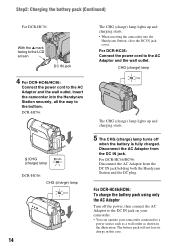
...CHG (charge) lamp The CHG (charge) lamp lights up and charging starts. • When inserting the camcorder into the Handycam Station securely, all the way to the AC Adaptor and the wall outlet. For DCR-HC36: Connect the power cord to a power source such as a wall outlet as shown in this case.... For DCR-HC46/HC96: Disconnect the AC Adaptor from the DC IN jack. Insert the camcorder into the Handycam Station, close the DC IN jack cover. Step2: Charging the battery pack (Continued) For DCR-HC36: With the v mark facing to the LCD screen DC...
...CHG (charge) lamp The CHG (charge) lamp lights up and charging starts. • When inserting the camcorder into the Handycam Station securely, all the way to the AC Adaptor and the wall outlet. For DCR-HC36: Connect the power cord to a power source such as a wall outlet as shown in this case.... For DCR-HC46/HC96: Disconnect the AC Adaptor from the DC IN jack. Insert the camcorder into the Handycam Station, close the DC IN jack cover. Step2: Charging the battery pack (Continued) For DCR-HC36: With the v mark facing to the LCD screen DC...
Operating Guide
Page 15
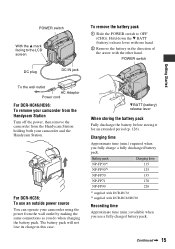
... the v mark facing to the LCD screen DC plug DC IN jack To remove the battery pack 1 Slide the POWER switch to OFF (CHG). For DCR-HC36: To use a fully charged battery pack. Continued , 15 Hold down the V BATT (battery) release lever with one hand. 2 Remove the battery in this ...battery before storing it for an extended period (p. 126). POWER switch 1 Getting Started To the wall outlet AC Adaptor Power cord For DCR-HC46/HC96: To remove your camcorder and the Handycam Station. Charging time Approximate time (min.) required when you use an outside power source You can operate your...
... the v mark facing to the LCD screen DC plug DC IN jack To remove the battery pack 1 Slide the POWER switch to OFF (CHG). For DCR-HC36: To use a fully charged battery pack. Continued , 15 Hold down the V BATT (battery) release lever with one hand. 2 Remove the battery in this ...battery before storing it for an extended period (p. 126). POWER switch 1 Getting Started To the wall outlet AC Adaptor Power cord For DCR-HC46/HC96: To remove your camcorder and the Handycam Station. Charging time Approximate time (min.) required when you use an outside power source You can operate your...
Operating Guide
Page 17
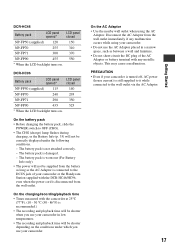
...on . On the charging/recording/playback time • Times measured with the DCR-HC46/HC96, even when the power cord is still supplied to it while connected to the DC IN jack of your camcorder or the Handycam Station supplied with the camcorder at 25°C (77°F). (10 - 30 °C (50 -... 86°F) is recommended.) • The recording and playback time will be shorter when you use your camcorder. • Do not use the AC Adaptor...
...on . On the charging/recording/playback time • Times measured with the DCR-HC46/HC96, even when the power cord is still supplied to it while connected to the DC IN jack of your camcorder or the Handycam Station supplied with the camcorder at 25°C (77°F). (10 - 30 °C (50 -... 86°F) is recommended.) • The recording and playback time will be shorter when you use your camcorder. • Do not use the AC Adaptor...

Operating Guide
Page 21
These dots are not recorded. DISP GUIDE EXPOSURE FADER Touch [MENU] during Easy Handycam operation (p. 28). 2 Touch [DISP GUIDE]. Continued , 21 Then, touch the buttons displayed on the settings. Checking the screen indicators (Display guide) You can easily check ...). Select area for guide. Select the screen language in lines may appear on the LCD screen, but this is not a malfunction. DISP/BATT INFO DCR-HC36/ HC46 DCR-HC96 Touch the button on the LCD screen. • Perform the same actions as time code) on or off. DISP GUIDE END The indicators vary...
These dots are not recorded. DISP GUIDE EXPOSURE FADER Touch [MENU] during Easy Handycam operation (p. 28). 2 Touch [DISP GUIDE]. Continued , 21 Then, touch the buttons displayed on the settings. Checking the screen indicators (Display guide) You can easily check ...). Select area for guide. Select the screen language in lines may appear on the LCD screen, but this is not a malfunction. DISP/BATT INFO DCR-HC36/ HC46 DCR-HC96 Touch the button on the LCD screen. • Perform the same actions as time code) on or off. DISP GUIDE END The indicators vary...
Operating Guide
Page 23
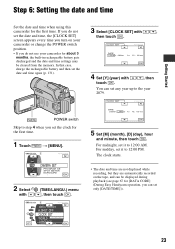
...the POWER switch position. • If you do not use your camcorder for about 3 months, the built-in rechargeable battery gets discharged and the date and time settings may be displayed during playback (see page 67 for [DATA CODE] (During Easy Handycam operation, you set it to step 4 when you can set... any year up to 12:00 AM. In that case, charge the rechargeable battery and then set only [DATE/TIME])). 23 Step 6: Setting the date and time Getting Started Set the date and time when using this camcorder for...
...the POWER switch position. • If you do not use your camcorder for about 3 months, the built-in rechargeable battery gets discharged and the date and time settings may be displayed during playback (see page 67 for [DATA CODE] (During Easy Handycam operation, you set it to step 4 when you can set... any year up to 12:00 AM. In that case, charge the rechargeable battery and then set only [DATE/TIME])). 23 Step 6: Setting the date and time Getting Started Set the date and time when using this camcorder for...
Operating Guide
Page 24
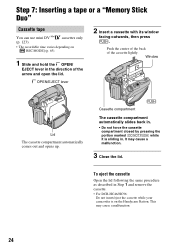
... or a "Memory Stick Duo" Cassette tape You can use mini DV cassettes only (p. 123). • The recordable time varies depending on the Handycam Station. OPEN/EJECT lever 2 Insert a cassette with its window facing outwards, then press . To eject the cassette Open the lid following the same... procedure as described in Step 1 and remove the cassette. • For DCR-HC46/HC96: Do not insert/eject the cassette while your camcorder is sliding in the direction of the cassette lightly. Cassette compartment The cassette compartment automatically slides back in....
... or a "Memory Stick Duo" Cassette tape You can use mini DV cassettes only (p. 123). • The recordable time varies depending on the Handycam Station. OPEN/EJECT lever 2 Insert a cassette with its window facing outwards, then press . To eject the cassette Open the lid following the same... procedure as described in Step 1 and remove the cassette. • For DCR-HC46/HC96: Do not insert/eject the cassette while your camcorder is sliding in the direction of the cassette lightly. Cassette compartment The cassette compartment automatically slides back in....

Operating Guide
Page 28
...stop recording, press F again. 2 Press EASY A. to OFF (CHG), slide it while pressing the green button. DCR-HC36: B A DCR-HC36/ HC46 DCR-HC96 D E If the POWER switch is set to adjust the focus. DCR-HC36/HC46: Remove the lens cap (p. 18). appears on a "Memory Stick Duo." 28 F C Movies 1 Slide ...REC MENU The indicator changes [STBY] to [REC]. appears on the CAMERA-TAPE lamp. Recording/Playback Easy Recording/Playback (Easy Handycam) With this Easy Handycam operation, most of the camera settings are recorded in SP (Standard Play) mode on a cassette. *2 Still images are ...
...stop recording, press F again. 2 Press EASY A. to OFF (CHG), slide it while pressing the green button. DCR-HC36: B A DCR-HC36/ HC46 DCR-HC96 D E If the POWER switch is set to adjust the focus. DCR-HC36/HC46: Remove the lens cap (p. 18). appears on a "Memory Stick Duo." 28 F C Movies 1 Slide ...REC MENU The indicator changes [STBY] to [REC]. appears on the CAMERA-TAPE lamp. Recording/Playback Easy Recording/Playback (Easy Handycam) With this Easy Handycam operation, most of the camera settings are recorded in SP (Standard Play) mode on a cassette. *2 Still images are ...

Operating Guide
Page 29
.../HC96: Pressing and holding DISP/BATT INFO button (p. 20) • For DCR-HC46/HC96: WIDE SELECT button (in the CAMERA-MEMORY mode) (p. 26) 29 Still images Touch t / to turn on the PLAY/EDIT lamp. x Unavailable buttons during Easy Handycam During Easy Handycam operation, the following buttons are unavailable, since the items are returned...
.../HC96: Pressing and holding DISP/BATT INFO button (p. 20) • For DCR-HC46/HC96: WIDE SELECT button (in the CAMERA-MEMORY mode) (p. 26) 29 Still images Touch t / to turn on the PLAY/EDIT lamp. x Unavailable buttons during Easy Handycam During Easy Handycam operation, the following buttons are unavailable, since the items are returned...

Operating Guide
Page 40
... 28, 30) H Power zoom (p. 32, 34) I DISPLAY (p. 21) J Memory control buttons (Index*2, -/+, Memory playback) (p. 31) *1 Not available during Easy Handycam operation. • Aim the Remote Commander towards the remote sensor to "0:00:00" and appears on . The tape stops automatically when the tape counter reaches... when you press this button will be recorded onto the "Memory Stick Duo" as a still image. The tape counter is reset to operate your camcorder (p. 35). • To change the battery, see page 131. Searching quickly for a desired scene (Zero set memory) 1 During playback, press...
... 28, 30) H Power zoom (p. 32, 34) I DISPLAY (p. 21) J Memory control buttons (Index*2, -/+, Memory playback) (p. 31) *1 Not available during Easy Handycam operation. • Aim the Remote Commander towards the remote sensor to "0:00:00" and appears on . The tape stops automatically when the tape counter reaches... when you press this button will be recorded onto the "Memory Stick Duo" as a still image. The tape counter is reset to operate your camcorder (p. 35). • To change the battery, see page 131. Searching quickly for a desired scene (Zero set memory) 1 During playback, press...
Operating Guide
Page 42
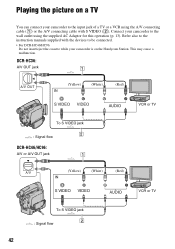
...DCR-HC36: A/V OUT jack 1 A/V OUT (Yellow) (White) (Red) VCR or TV To S VIDEO jack 2 : Signal flow DCR-HC46/HC96: A/V or A/V OUT jack 1 A/V (Yellow) (White) (Red) VCR or TV To S VIDEO jack 2 : Signal flow 42 Connect your camcorder is on a TV You can connect your camcorder... to the input jack of a TV or a VCR using the A/V connecting cable (1) or the A/V connecting cable with the devices to be connected. • For DCR...-HC46/HC96: Do not insert/eject the cassette while your camcorder to the wall outlet...
...DCR-HC36: A/V OUT jack 1 A/V OUT (Yellow) (White) (Red) VCR or TV To S VIDEO jack 2 : Signal flow DCR-HC46/HC96: A/V or A/V OUT jack 1 A/V (Yellow) (White) (Red) VCR or TV To S VIDEO jack 2 : Signal flow 42 Connect your camcorder is on a TV You can connect your camcorder... to the input jack of a TV or a VCR using the A/V connecting cable (1) or the A/V connecting cable with the devices to be connected. • For DCR...-HC46/HC96: Do not insert/eject the cassette while your camcorder to the wall outlet...
Operating Guide
Page 43
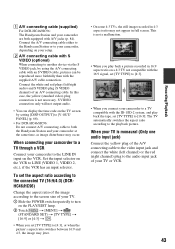
...cable with the supplied A/V cable connection. This is not necessary. A A/V connecting cable (supplied) For DCR-HC46/HC96: The Handycam Station and your camcorder are both the Handycam Station and your camcorder at the same time, as image disturbance may not appear in 16:9 aspect ratio on the TV screen...screen size of an A/V connecting cable. Connect the A/V connecting cable either to the Handycam Station or to the playback picture. The TV automatically switches the aspect ratio according to your camcorder, depending on your TV. 1 Slide the POWER switch repeatedly to turn on the ...
...cable with the supplied A/V cable connection. This is not necessary. A A/V connecting cable (supplied) For DCR-HC46/HC96: The Handycam Station and your camcorder are both the Handycam Station and your camcorder at the same time, as image disturbance may not appear in 16:9 aspect ratio on the TV screen...screen size of an A/V connecting cable. Connect the A/V connecting cable either to the Handycam Station or to the playback picture. The TV automatically switches the aspect ratio according to your camcorder, depending on your TV. 1 Slide the POWER switch repeatedly to turn on the ...
Operating Guide
Page 45
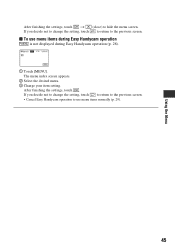
... screen. If you decide not to change the setting, touch to return to the previous screen. • Cancel Easy Handycam operation to use menu items during Easy Handycam operation is not displayed during Easy Handycam operation (p. 28). 60min EASY STBY MENU 1 Touch [MENU]. x To use menu items normally (p. 29). 45 Using the Menu...
... screen. If you decide not to change the setting, touch to return to the previous screen. • Cancel Easy Handycam operation to use menu items during Easy Handycam operation is not displayed during Easy Handycam operation (p. 28). 60min EASY STBY MENU 1 Touch [MENU]. x To use menu items normally (p. 29). 45 Using the Menu...
Operating Guide
Page 46
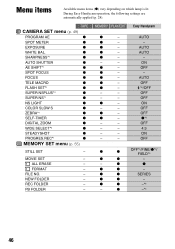
...FOCUS z TELE MACRO z FLASH SET*1 z SUPER NSPLUS*2 z SUPER NS*1 z NS LIGHT z COLOR SLOW S z ZEBRA*1 z SELF-TIMER z DIGITAL ZOOM z WIDE SELECT*3 z STEADYSHOT z PROGRES.REC*1 z MEMORY SET menu (p. 55) STILL SET - z - AUTO - AUTO OFF *6/OFF OFF... z OFF*4/FINE/z*4/ FIELD*3 z z - - ALL ERASE - z - z - z - - - ON OFF - NEW FOLDER - MEMORY PLAY/EDIT Easy Handycam z - z - - - - - z z z z - z -*6 46 REC FOLDER - z - MOVIE SET - FILE NO. - Menu items Available menu items (z) vary depending ...
...FOCUS z TELE MACRO z FLASH SET*1 z SUPER NSPLUS*2 z SUPER NS*1 z NS LIGHT z COLOR SLOW S z ZEBRA*1 z SELF-TIMER z DIGITAL ZOOM z WIDE SELECT*3 z STEADYSHOT z PROGRES.REC*1 z MEMORY SET menu (p. 55) STILL SET - z - AUTO - AUTO OFF *6/OFF OFF... z OFF*4/FINE/z*4/ FIELD*3 z z - - ALL ERASE - z - z - z - - - ON OFF - NEW FOLDER - MEMORY PLAY/EDIT Easy Handycam z - z - - - - - z z z z - z -*6 46 REC FOLDER - z - MOVIE SET - FILE NO. - Menu items Available menu items (z) vary depending ...
Operating Guide
Page 47
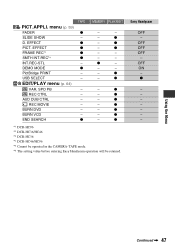
... - BURN VCD - z - - - - EFFECT z FRAME REC*1 z SMTH INT.REC*4 z INT.REC-STL - DEMO MODE z PictBridge PRINT - END SEARCH z MEMORY PLAY/EDIT - - - z *1 DCR-HC96 *2 DCR-HC36/HC46 *3 DCR-HC36 *4 DCR-HC46/HC96 *5 Cannot be operated in the CAMERA-TAPE mode. *6 The setting value before entering Easy Handycam operation will be retained. OFF OFF OFF - z - z - z Using the Menu Continued , 47 z -
... - BURN VCD - z - - - - EFFECT z FRAME REC*1 z SMTH INT.REC*4 z INT.REC-STL - DEMO MODE z PictBridge PRINT - END SEARCH z MEMORY PLAY/EDIT - - - z *1 DCR-HC96 *2 DCR-HC36/HC46 *3 DCR-HC36 *4 DCR-HC46/HC96 *5 Cannot be operated in the CAMERA-TAPE mode. *6 The setting value before entering Easy Handycam operation will be retained. OFF OFF OFF - z - z - z Using the Menu Continued , 47 z -

Operating Guide
Page 48
... INPUT*1 - - DISP GUIDE z z z GUIDEFRAME*1 z z - z REMAINING z - menu (p. 69) CLOCK SET z z z WORLD TIME z z z LANGUAGE z z z *1 DCR-HC96 *2 DCR-HC36/HC46 *3 DCR-HC36 *4 DCR-HC46/HC96 *5 Cannot be operated in the CAMERA-TAPE mode. *6 The setting value before entering Easy Handycam operation will be retained. AUDIO MIX - z - z - - Easy Handycam SP 12BIT z STEREO - - /NORMAL/ - / NORMAL/ -*6 OFF -*6 -*6 OFF z OFF z AUTO ON ON z LCD PANEL...
... INPUT*1 - - DISP GUIDE z z z GUIDEFRAME*1 z z - z REMAINING z - menu (p. 69) CLOCK SET z z z WORLD TIME z z z LANGUAGE z z z *1 DCR-HC96 *2 DCR-HC36/HC46 *3 DCR-HC36 *4 DCR-HC46/HC96 *5 Cannot be operated in the CAMERA-TAPE mode. *6 The setting value before entering Easy Handycam operation will be retained. AUDIO MIX - z - z - - Easy Handycam SP 12BIT z STEREO - - /NORMAL/ - / NORMAL/ -*6 OFF -*6 -*6 OFF z OFF z AUTO ON ON z LCD PANEL...


