
Operating Guide
Page 2
... outlets, extension cords or convenience receptacles beyond their capacity, since this manual for future reference. Use Power Sources This set may be operated only from battery power, or other ). Never spill liquid of power source indicated on the appliance, or the one way. This symbol is intended to alert the user...
... outlets, extension cords or convenience receptacles beyond their capacity, since this manual for future reference. Use Power Sources This set may be operated only from battery power, or other ). Never spill liquid of power source indicated on the appliance, or the one way. This symbol is intended to alert the user...
Operating Guide
Page 4
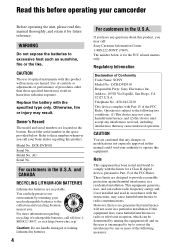
... or leaking Lithium-Ion batteries. 4 For customers in a residential installation. Address: 16530 Via Esprillo, San Diego, CA 92127 U.S.A. Read this before operating your camcorder Before operating the unit...by returning your used in the U.S.A. Model No. Regulatory Information Declaration of optical instruments with the instructions, may result. If you may not cause harmful interference...WARNING Do not expose the batteries to the following measures: CAUTION The use of Conformity Trade Name: SONY Model No.: DCR-DVD910 Responsible Party: Sony Electronics Inc. For customers in...
... or leaking Lithium-Ion batteries. 4 For customers in a residential installation. Address: 16530 Via Esprillo, San Diego, CA 92127 U.S.A. Read this before operating your camcorder Before operating the unit...by returning your used in the U.S.A. Model No. Regulatory Information Declaration of optical instruments with the instructions, may result. If you may not cause harmful interference...WARNING Do not expose the batteries to the following measures: CAUTION The use of Conformity Trade Name: SONY Model No.: DCR-DVD910 Responsible Party: Sony Electronics Inc. For customers in...

Operating Guide
Page 5
...Memory Stick PRO Duo" can use Sony discs or discs with a *(for VIDEO CAMERA) mark for using your camcorder with the equipment in your camcorder. Increase the separation between the equipment...ca.gov/hazardouswaste/perchlorate Perchlorate Material: Lithium battery contains perchlorate. Continued , 5 - Connect the equipment into an outlet on use Your camcorder is recommended that you use a "...- Notes on a circuit different from your camcorder You can use the following discs only. - 8cm DVD-RW - 8cm DVD+RW - 8cm DVD-R - 8cm DVD+R DL Use the discs with : - Types...
...Memory Stick PRO Duo" can use Sony discs or discs with a *(for VIDEO CAMERA) mark for using your camcorder with the equipment in your camcorder. Increase the separation between the equipment...ca.gov/hazardouswaste/perchlorate Perchlorate Material: Lithium battery contains perchlorate. Continued , 5 - Connect the equipment into an outlet on use Your camcorder is recommended that you use a "...- Notes on a circuit different from your camcorder You can use the following discs only. - 8cm DVD-RW - 8cm DVD+RW - 8cm DVD-R - 8cm DVD+R DL Use the discs with : - Types...

Operating Guide
Page 6
These points are on: - See "About handling of your camcorder" (p. 116). • To prevent media from being broken or recorded images from being lost, do not do not affect the recording in any problems. Use a DVD-RW/DVD+RW for trial recording. • Compensation for long periods ...About menu items, LCD panel, viewfinder, and lens • A menu item that appear constantly on the LCD screen and the viewfinder. Battery • The camcorder is not available under the current recording or playback conditions. • The LCD screen and the viewfinder are manufactured using a "Memory Stick...
These points are on: - See "About handling of your camcorder" (p. 116). • To prevent media from being broken or recorded images from being lost, do not do not affect the recording in any problems. Use a DVD-RW/DVD+RW for trial recording. • Compensation for long periods ...About menu items, LCD panel, viewfinder, and lens • A menu item that appear constantly on the LCD screen and the viewfinder. Battery • The camcorder is not available under the current recording or playback conditions. • The LCD screen and the viewfinder are manufactured using a "Memory Stick...
Operating Guide
Page 8
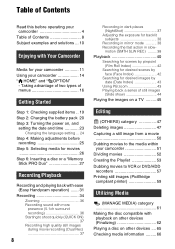
... ......... 66 Table of Contents Read this before operating your camcorder 4 Table of menus 16 Getting Started Step 1: Checking supplied items .. 19 Step 2: Charging the battery pack 20 Step 3: Turning the power on, and setting...Handycam operation) ....... 31 Recording 34 Zooming 36 Recording sound with more presence (5.1ch surround recording 36 Starting to VCR or DVD/HDD recorders 57 Printing still images (PictBridge compliant printer 59 Utilizing Media (MANAGE MEDIA) category 61 Making the disc compatible with Your Camcorder Media for your camcorder 11 Using your camcorder...
... ......... 66 Table of Contents Read this before operating your camcorder 4 Table of menus 16 Getting Started Step 1: Checking supplied items .. 19 Step 2: Charging the battery pack 20 Step 3: Turning the power on, and setting...Handycam operation) ....... 31 Recording 34 Zooming 36 Recording sound with more presence (5.1ch surround recording 36 Starting to VCR or DVD/HDD recorders 57 Printing still images (PictBridge compliant printer 59 Utilizing Media (MANAGE MEDIA) category 61 Making the disc compatible with Your Camcorder Media for your camcorder 11 Using your camcorder...

Operating Guide
Page 9
...Computer What you can do with Windows computer 92 Troubleshooting Troubleshooting 96 Warning indicators and messages 105 Additional Information Using your camcorder abroad ....110 File/folder structure on a "Memory Stick PRO Duo 112 Maintenance and precautions .....113 About the disc... 113 About the "Memory Stick" ......... 114 About the "InfoLITHIUM" battery pack 115 About handling of your camcorder 116 Specifications 120 Quick Reference Identifying parts and controls ......123 Indicators displayed during recording/ playback 127 Glossary 129...
...Computer What you can do with Windows computer 92 Troubleshooting Troubleshooting 96 Warning indicators and messages 105 Additional Information Using your camcorder abroad ....110 File/folder structure on a "Memory Stick PRO Duo 112 Maintenance and precautions .....113 About the disc... 113 About the "Memory Stick" ......... 114 About the "InfoLITHIUM" battery pack 115 About handling of your camcorder 116 Specifications 120 Quick Reference Identifying parts and controls ......123 Indicators displayed during recording/ playback 127 Glossary 129...

Operating Guide
Page 19
...mains lead) (1) (p. 20) CD-ROM "Handycam Application Software" (1) (p. 92) - PMB Guide Operating Guide (This manual) (1) A/V connecting cable (1) (p. 45, 57) USB cable (1) (p. 59) Wireless Remote Commander (1) (p. 126) A button-type lithium battery is already installed. 19 Picture Motion Browser (Software...) - Getting Started Getting Started Step 1: Checking supplied items Make sure that item supplied. The number in the parentheses indicates the number of that you have the following items supplied with your camcorder...
...mains lead) (1) (p. 20) CD-ROM "Handycam Application Software" (1) (p. 92) - PMB Guide Operating Guide (This manual) (1) A/V connecting cable (1) (p. 45, 57) USB cable (1) (p. 59) Wireless Remote Commander (1) (p. 126) A button-type lithium battery is already installed. 19 Picture Motion Browser (Software...) - Getting Started Getting Started Step 1: Checking supplied items Make sure that item supplied. The number in the parentheses indicates the number of that you have the following items supplied with your camcorder...

Operating Guide
Page 20
...(CHG) (the default setting). 2 Align the terminals of the battery pack and your camcorder (1), then attach the battery pack in the direction of the AC Adaptor. Match the v mark on your camcorder. 20 b Notes • Your camcorder operates only with the v mark on the DC plug with "...InfoLITHIUM" battery pack (H series). 1 Turn the POWER switch in the direction of the arrow to your camcorder. Step 2: Charging the battery pack POWER switch Battery DC IN jack CHG (...
...(CHG) (the default setting). 2 Align the terminals of the battery pack and your camcorder (1), then attach the battery pack in the direction of the AC Adaptor. Match the v mark on your camcorder. 20 b Notes • Your camcorder operates only with the v mark on the DC plug with "...InfoLITHIUM" battery pack (H series). 1 Turn the POWER switch in the direction of the arrow to your camcorder. Step 2: Charging the battery pack POWER switch Battery DC IN jack CHG (...

Operating Guide
Page 21
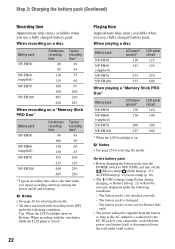
...period (p. 115). You can view the battery information for about 7 seconds. The battery pack will not lose its charge in the direction of the arrow. To use a power source from the DC IN jack holding both the camcorder and the DC plug. Battery pack Charging time NP-FH50 135 NP-FH60... 135 (supplied) NP-FH70 170 NP-FH100 390 Continued , 21 Remaining battery (approx.) b Notes • When you remove the battery pack or the AC Adaptor, make sure that the...
...period (p. 115). You can view the battery information for about 7 seconds. The battery pack will not lose its charge in the direction of the arrow. To use a power source from the DC IN jack holding both the camcorder and the DC plug. Battery pack Charging time NP-FH50 135 NP-FH60... 135 (supplied) NP-FH70 170 NP-FH100 390 Continued , 21 Remaining battery (approx.) b Notes • When you remove the battery pack or the AC Adaptor, make sure that the...
Operating Guide
Page 22
... When the LCD backlight is on. b Notes • See page 26 for Battery Info only). • The power will not be supplied from the battery as long as the AC Adaptor is connected to the DC IN jack of your camcorder, even when the power cord (mains lead) is disconnected from the wall... outlet (wall socket). The battery pack is worn-out (for selecting the media. On the battery pack • Before changing the battery pack, turn the POWER switch to OFF (CHG) and turn off and zooming. The battery pack is ...
... When the LCD backlight is on. b Notes • See page 26 for Battery Info only). • The power will not be supplied from the battery as long as the AC Adaptor is connected to the DC IN jack of your camcorder, even when the power cord (mains lead) is disconnected from the wall... outlet (wall socket). The battery pack is worn-out (for selecting the media. On the battery pack • Before changing the battery pack, turn the POWER switch to OFF (CHG) and turn off and zooming. The battery pack is ...

Operating Guide
Page 23
...50 °F to 86 °F) is recommended that you use an NP-FH70/NPFH100 battery pack. • We do not set the date and time, the [CLOCK SET] screen appears every time you turn on your camcorder is turned off, AC power source (mains) is still supplied to it is recommended)....such as between a wall and furniture. • Do not short-circuit the DC plug of the AC Adaptor or battery terminal with your camcorder. This may cause a malfunction. • Even if your camcorder for the first time. The [CLOCK SET] screen appears. Getting Started • When attaching an optional video light,...
...50 °F to 86 °F) is recommended that you use an NP-FH70/NPFH100 battery pack. • We do not set the date and time, the [CLOCK SET] screen appears every time you turn on your camcorder is turned off, AC power source (mains) is still supplied to it is recommended)....such as between a wall and furniture. • Do not short-circuit the DC plug of the AC Adaptor or battery terminal with your camcorder. This may cause a malfunction. • Even if your camcorder for the first time. The [CLOCK SET] screen appears. Getting Started • When attaching an optional video light,...

Operating Guide
Page 24
...DATA CODE], p. 79). • See page 111 for information concerning "World time difference." • If the buttons on the touch panel do not use your camcorder for about 3 months, the built-in a specified language. Touch (HOME) t (SETTINGS) t[CLOCK/ LANG] t[ LANGUAGE SET], then select the desired language..../ . 6 Select [M] with / , then set the month with / . 7 Set [D] (day), hour and minute in rechargeable battery and then set the date and time again (p. 119). • It takes a few seconds for your camcorder to be ready to shoot after the power is turned on. For midday, set it to 12...
...DATA CODE], p. 79). • See page 111 for information concerning "World time difference." • If the buttons on the touch panel do not use your camcorder for about 3 months, the built-in a specified language. Touch (HOME) t (SETTINGS) t[CLOCK/ LANG] t[ LANGUAGE SET], then select the desired language..../ . 6 Select [M] with / , then set the month with / . 7 Set [D] (day), hour and minute in rechargeable battery and then set the date and time again (p. 119). • It takes a few seconds for your camcorder to be ready to shoot after the power is turned on. For midday, set it to 12...

Operating Guide
Page 25
... when the image seen on the LCD frame accidentally when you open the LCD panel 90 degrees to the camcorder, then rotate it 180 degrees to save battery power. Pull out and look into the viewfinder. z Tips • If you can adjust the brightness of the LCD screen. z Tips • You...Making adjustments before recording Adjusting the LCD panel Open the LCD panel 90 degrees to the camcorder (1), then rotate it to the best angle to record or play (2). 290 degrees (max.) 190 degrees to make the battery last longer Press and hold DISP/BATT INFO for a few seconds until the image becomes...
... when the image seen on the LCD frame accidentally when you open the LCD panel 90 degrees to the camcorder, then rotate it 180 degrees to save battery power. Pull out and look into the viewfinder. z Tips • If you can adjust the brightness of the LCD screen. z Tips • You...Making adjustments before recording Adjusting the LCD panel Open the LCD panel 90 degrees to the camcorder (1), then rotate it to the best angle to record or play (2). 290 degrees (max.) 190 degrees to make the battery last longer Press and hold DISP/BATT INFO for a few seconds until the image becomes...

Operating Guide
Page 29
... once, then slide it on while pressing the green button. to apply mechanical shock or vibration to remove the battery pack or AC Adaptor from being broken or recorded images from the camcorder - If the POWER switch is on: - b Notes • To prevent media from being lost, do not do the following... Memory Stick Duo slot in "Step 5" for movie recording, slide the POWER switch repeatedly until it clicks. 3 Close the Memory Stick Duo cover. to the camcorder Continued , 29 The [Create a new Image Database File.] screen appears on the LCD screen when you can use with your...
... once, then slide it on while pressing the green button. to apply mechanical shock or vibration to remove the battery pack or AC Adaptor from being broken or recorded images from the camcorder - If the POWER switch is on: - b Notes • To prevent media from being lost, do not do the following... Memory Stick Duo slot in "Step 5" for movie recording, slide the POWER switch repeatedly until it clicks. 3 Close the Memory Stick Duo cover. to the camcorder Continued , 29 The [Create a new Image Database File.] screen appears on the LCD screen when you can use with your...

Operating Guide
Page 34
... is still being written onto the media. z Tips • See page 5 for the "Memory Stick PRO Duo" you can use in your camcorder, and do not remove the battery pack or the AC Adaptor. • In the case that [MEMORY STICK] is selected on . Recording The movies are lit or flashing after...), when a movie file exceeds 2 GB, the next movie file is created automatically. PHOTO F START/STOP C POWER switch A If the POWER switch is set to your camcorder. • You can check the free media space for movies by touching (HOME) t t [MEDIA INFO] (p. 66). (MANAGE MEDIA) 34
... is still being written onto the media. z Tips • See page 5 for the "Memory Stick PRO Duo" you can use in your camcorder, and do not remove the battery pack or the AC Adaptor. • In the case that [MEMORY STICK] is selected on . Recording The movies are lit or flashing after...), when a movie file exceeds 2 GB, the next movie file is created automatically. PHOTO F START/STOP C POWER switch A If the POWER switch is set to your camcorder. • You can check the free media space for movies by touching (HOME) t t [MEDIA INFO] (p. 66). (MANAGE MEDIA) 34
Operating Guide
Page 37
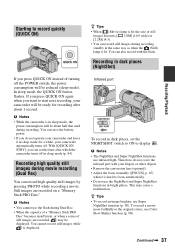
... power consumption will be about 1 second. Continued , 37 Recording/Playback If you press QUICK ON again when you want to start next recording, your camcorder automatically turns off. Recording in dark places (NightShot) Infrared port To record in sleep mode (p. 84). z Tips • To record an image...Shutter function (p. 90). This may be displayed. In sleep mode, the QUICK ON button flashes. With [QUICK ON STBY], you can save the battery power. • If you do not cover the infrared port with the flash. b Notes • You cannot use infrared light. Recording high ...
... power consumption will be about 1 second. Continued , 37 Recording/Playback If you press QUICK ON again when you want to start next recording, your camcorder automatically turns off. Recording in dark places (NightShot) Infrared port To record in sleep mode (p. 84). z Tips • To record an image...Shutter function (p. 90). This may be displayed. In sleep mode, the QUICK ON button flashes. With [QUICK ON STBY], you can save the battery power. • If you do not cover the infrared port with the flash. b Notes • You cannot use infrared light. Recording high ...

Operating Guide
Page 48
...the media, format the media (p. 66). • You can make additional recording. b Notes • Do not remove the battery pack or the AC Adaptor from your camcorder while deleting movies. • Do not remove the "Memory Stick PRO Duo" while deleting movies from the "Memory Stick PRO Duo...the deleted movie is included in a Playlist (p. 53), the movie is deleted also from the Playlist. • You cannot delete movies from your camcorder after recording. - Touch the movie on the screen. To delete all the recordable space of the desired movies, then touch . if you remove ...
...the media, format the media (p. 66). • You can make additional recording. b Notes • Do not remove the battery pack or the AC Adaptor from your camcorder while deleting movies. • Do not remove the "Memory Stick PRO Duo" while deleting movies from the "Memory Stick PRO Duo...the deleted movie is included in a Playlist (p. 53), the movie is deleted also from the Playlist. • You cannot delete movies from your camcorder after recording. - Touch the movie on the screen. To delete all the recordable space of the desired movies, then touch . if you remove ...

Operating Guide
Page 53
... on about half-second increments. z Tips • You can add a maximum of the movies that you have selected. Press and hold the movie on your camcorder are called "original." 1 Touch (HOME) t (OTHERS) t [PLAYLIST EDIT]. 2 Touch [ ADD]. 3 Touch the movie to confirm. The original scenes ... the Playlist b Notes • You cannot restore movies once they are divided. • Do not remove the battery pack or the AC Adaptor from the point where you touch and the actual dividing point, as your camcorder selects the dividing point based on a disc, the movie in the Playlist.
... on about half-second increments. z Tips • You can add a maximum of the movies that you have selected. Press and hold the movie on your camcorder are called "original." 1 Touch (HOME) t (OTHERS) t [PLAYLIST EDIT]. 2 Touch [ ADD]. 3 Touch the movie to confirm. The original scenes ... the Playlist b Notes • You cannot restore movies once they are divided. • Do not remove the battery pack or the AC Adaptor from the point where you touch and the actual dividing point, as your camcorder selects the dividing point based on a disc, the movie in the Playlist.

Operating Guide
Page 54
... the supplied software. Touch to return to select the recording date of the desired movies, then touch . b Notes • Do not remove the battery pack or the AC Adaptor from your camcorder while adding the movies. 2 Touch the movie from the selected movie to the end, then the screen returns to confirm.
... the supplied software. Touch to return to select the recording date of the desired movies, then touch . b Notes • Do not remove the battery pack or the AC Adaptor from your camcorder while adding the movies. 2 Touch the movie from the selected movie to the end, then the screen returns to confirm.

Operating Guide
Page 71
Utilizing Media b Notes • Do not apply mechanical shock or vibration to the camcorder during this operation. • Do not disconnect the AC Adaptor or remove the battery pack. • While the image database file is being repaired, do not remove the "Memory Stick PRO Duo." 71
Utilizing Media b Notes • Do not apply mechanical shock or vibration to the camcorder during this operation. • Do not disconnect the AC Adaptor or remove the battery pack. • While the image database file is being repaired, do not remove the "Memory Stick PRO Duo." 71


