Operating Guide
Page 7
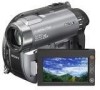
...that is grayed out is equipped with a Carl Zeiss lens, which was developed jointly by Carl Zeiss, in low light conditions, such as at the sun. Continued , 7 Doing so might cause your camcorder if necessary (p. 26). DCR-DVD810 Make trial recording on the internal memory. • ...Germany, and Sony Corporation, and produces superior images. It adopts the MTF measurement system for trial recording. - About menu items, LCD panel, viewfinder, and lens • A menu item that you destroy the actual body of the camcorder. About the Carl Zeiss lens Your camcorder is not available...
...that is grayed out is equipped with a Carl Zeiss lens, which was developed jointly by Carl Zeiss, in low light conditions, such as at the sun. Continued , 7 Doing so might cause your camcorder if necessary (p. 26). DCR-DVD810 Make trial recording on the internal memory. • ...Germany, and Sony Corporation, and produces superior images. It adopts the MTF measurement system for trial recording. - About menu items, LCD panel, viewfinder, and lens • A menu item that you destroy the actual body of the camcorder. About the Carl Zeiss lens Your camcorder is not available...
Operating Guide
Page 8
About the marks used in this before operating your camcorder (Continued) MTF = Modulation Transfer Function. The following marks are used .... media you can use for a particular operation. Read this manual • The operations available depend on DCR-DVD810. • Design and specifications of media and other accessories are subject to indicate the type of light ... • Discs in this manual refers to 8cm DVD discs. • In this manual, the internal memory (DCR-DVD810), a disc and a "Memory Stick PRO Duo" are called the media. • Unless otherwise specifically indicated, ...
About the marks used in this before operating your camcorder (Continued) MTF = Modulation Transfer Function. The following marks are used .... media you can use for a particular operation. Read this manual • The operations available depend on DCR-DVD810. • Design and specifications of media and other accessories are subject to indicate the type of light ... • Discs in this manual refers to 8cm DVD discs. • In this manual, the internal memory (DCR-DVD810), a disc and a "Memory Stick PRO Duo" are called the media. • Unless otherwise specifically indicated, ...
Operating Guide
Page 26
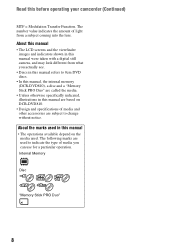
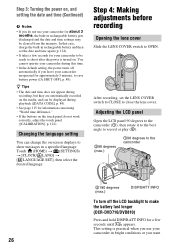
...8226; In the default setting, the power turns off the LCD backlight to make the battery last longer (DCR-DVD710/DVD810) Press and hold DISP/BATT INFO for a few seconds for your camcorder to be displayed during recording, but they are automatically recorded on the media, and can change the on...; See page 115 for information concerning "World time difference." • If the buttons on the touch panel do not use your camcorder in rechargeable battery and then set the LENS COVER switch to CLOSE to OPEN. Step 3: Turning the power on, and setting the date and time (Continued) b Notes &#...
...8226; In the default setting, the power turns off the LCD backlight to make the battery last longer (DCR-DVD710/DVD810) Press and hold DISP/BATT INFO for a few seconds for your camcorder to be displayed during recording, but they are automatically recorded on the media, and can change the on...; See page 115 for information concerning "World time difference." • If the buttons on the touch panel do not use your camcorder in rechargeable battery and then set the LENS COVER switch to CLOSE to OPEN. Step 3: Turning the power on, and setting the date and time (Continued) b Notes &#...

Operating Guide
Page 27
...B.LIGHT] (p. 86). z Tips • If you open or adjust the LCD panel. Pull out and look into the viewfinder. Adjust the viewfinder to your camcorder properly. Fastening the grip belt Adjust and fasten the grip belt as illustrated, and hold DISP/ BATT INFO for a few seconds until the image becomes... clear. 27 Adjusting the viewfinder You can view images using the viewfinder to the lens side, you press DISP BATT/INFO. Viewfinder lens adjustment lever Move it 180 degrees to avoid wearing down the battery, or when the image seen on the LCD ...
...B.LIGHT] (p. 86). z Tips • If you open or adjust the LCD panel. Pull out and look into the viewfinder. Adjust the viewfinder to your camcorder properly. Fastening the grip belt Adjust and fasten the grip belt as illustrated, and hold DISP/ BATT INFO for a few seconds until the image becomes... clear. 27 Adjusting the viewfinder You can view images using the viewfinder to the lens side, you press DISP BATT/INFO. Viewfinder lens adjustment lever Move it 180 degrees to avoid wearing down the battery, or when the image seen on the LCD ...
Operating Guide
Page 30
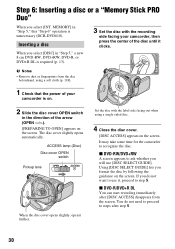
... the guidance on the screen. x DVD-R/DVD+R DL You can start recording immediately after step 5. 30 It may take some time for the camcorder to steps after [DISC ACCESS] disappears from the disc beforehand, using a single-sided disc. 4 Close the disc cover. [DISC ACCESS] appears...TO OPEN] appears on the screen. Set the disc with the recording side facing your camcorder is unnecessary (DCR-DVD810). x DVD-RW/DVD+RW A screen appears to step 5. ACCESS lamp (Disc) Disc cover OPEN switch Pickup lens When the disc cover opens slightly, open it , proceed to ask whether you select...
... the guidance on the screen. x DVD-R/DVD+R DL You can start recording immediately after step 5. 30 It may take some time for the camcorder to steps after [DISC ACCESS] disappears from the disc beforehand, using a single-sided disc. 4 Close the disc cover. [DISC ACCESS] appears...TO OPEN] appears on the screen. Set the disc with the recording side facing your camcorder is unnecessary (DCR-DVD810). x DVD-RW/DVD+RW A screen appears to step 5. ACCESS lamp (Disc) Disc cover OPEN switch Pickup lens When the disc cover opens slightly, open it , proceed to ask whether you select...
Operating Guide
Page 31
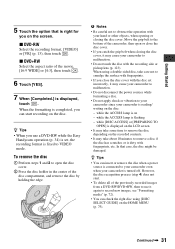
... set , the recording format is fixed to malfunction. • Do not touch the disc with your camcorder is displayed, touch . Move the grip belt to obstruct the operation with the recording side or pickup lens (p. 123). When using [DISC SELECT GUIDE] on the screen. In that is dirty with fingerprints, ... Press the disc holder in the center of the previously recorded images from a DVD-RW/DVD+RW, then to use a DVD-RW while the Easy Handycam operation (p. 34) is set incorrectly, it may take care not to smudge the surface with fingerprints. • If you on the HOME MENU (p. 75).
... set , the recording format is fixed to malfunction. • Do not touch the disc with your camcorder is displayed, touch . Move the grip belt to obstruct the operation with the recording side or pickup lens (p. 123). When using [DISC SELECT GUIDE] on the screen. In that is dirty with fingerprints, ... Press the disc holder in the center of the previously recorded images from a DVD-RW/DVD+RW, then to use a DVD-RW while the Easy Handycam operation (p. 34) is set incorrectly, it may take care not to smudge the surface with fingerprints. • If you on the HOME MENU (p. 75).
Operating Guide
Page 38
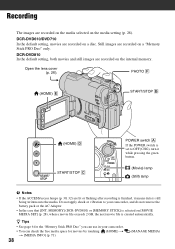
MEMORY] (DCR-DVD810) or [MEMORY STICK] is set to your camcorder. • You can check the free media space for the "Memory Stick PRO Duo" you can use in your camcorder, and do not remove the battery pack or the AC Adaptor. • In the case that [INT. DCR-DVD610/DVD710 In the... default setting, movies are recorded on the internal memory. DCR-DVD810 In the default setting, both movies and still images are recorded on a disc. Open the lens cover ...
MEMORY] (DCR-DVD810) or [MEMORY STICK] is set to your camcorder. • You can check the free media space for the "Memory Stick PRO Duo" you can use in your camcorder, and do not remove the battery pack or the AC Adaptor. • In the case that [INT. DCR-DVD610/DVD710 In the... default setting, movies are recorded on the internal memory. DCR-DVD810 In the default setting, both movies and still images are recorded on a disc. Open the lens cover ...
Operating Guide
Page 41
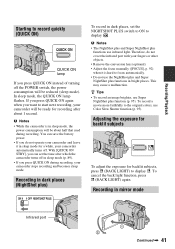
... do not cover the infrared port with your fingers or other objects. • Remove the conversion lens (optional). • Adjust the focus manually ([FOCUS], p. 92) when it in sleep mode for a while, your camcorder will be about 1 second. To cancel the back light function, press . (BACK LIGHT) again...ON lamp If you press QUICK ON instead of turning off the POWER switch, the power consumption will be ready for recording after which the camcorder turns off . This may cause a malfunction. z Tips • To record an image brighter, use Super NightShot plus functions use Color ...
... do not cover the infrared port with your fingers or other objects. • Remove the conversion lens (optional). • Adjust the focus manually ([FOCUS], p. 92) when it in sleep mode for a while, your camcorder will be about 1 second. To cancel the back light function, press . (BACK LIGHT) again...ON lamp If you press QUICK ON instead of turning off the POWER switch, the power consumption will be ready for recording after which the camcorder turns off . This may cause a malfunction. z Tips • To record an image brighter, use Super NightShot plus functions use Color ...

Operating Guide
Page 42
Recording (Continued) Open the LCD panel 90 degrees to the camcorder (1), then rotate it 180 degrees to the lens side (2). z Tips • A mirror-image of the subject appears on the LCD screen, but the image will be normal when recorded. • When recording in mirror mode, the images are not displayed in the viewfinder. 42
Recording (Continued) Open the LCD panel 90 degrees to the camcorder (1), then rotate it 180 degrees to the lens side (2). z Tips • A mirror-image of the subject appears on the LCD screen, but the image will be normal when recorded. • When recording in mirror mode, the images are not displayed in the viewfinder. 42
Operating Guide
Page 80
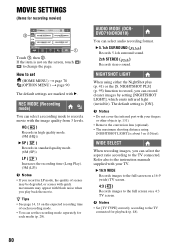
...the movie. NIGHTSHOT PLS] (p. 95) function to record a movie with your fingers or other objects (p. 131). • Remove the conversion lens (optional). • The maximum shooting distance using either the NightShot plus (p. 41) or the [S. The default setting is not on the ... Notes • Set [TV TYPE] correctly according to set the recording mode separately for recording movies) Touch 1, then 2. AUDIO MODE (DCRDVD710/DVD810) You can record clearer images by setting [NIGHTSHOT LIGHT], which emits infrared light (invisible). NIGHTSHOT LIGHT When using [NIGHTSHOT LIGHT] is about ...
...the movie. NIGHTSHOT PLS] (p. 95) function to record a movie with your fingers or other objects (p. 131). • Remove the conversion lens (optional). • The maximum shooting distance using either the NightShot plus (p. 41) or the [S. The default setting is not on the ... Notes • Set [TV TYPE] correctly according to set the recording mode separately for recording movies) Touch 1, then 2. AUDIO MODE (DCRDVD710/DVD810) You can record clearer images by setting [NIGHTSHOT LIGHT], which emits infrared light (invisible). NIGHTSHOT LIGHT When using [NIGHTSHOT LIGHT] is about ...
Operating Guide
Page 92
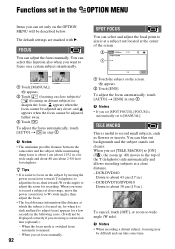
..., touch [OFF], or zoom to wide angle (W side). The default settings are using a conversion lens (optional).) - appears when the focus cannot be adjusted any closer, and appears when the focus cannot... be described below. b Notes • The minimum possible distance between the camcorder and the subject while maintaining sharp focus is about 1 cm (about 13/32 in.) for wide angle...MENU will not be difficult and can blur out backgrounds and the subject stands out clearer. DCR-DVD710/DVD810 Down to about 43 cm (17 in.) - FOCUS You can adjust the focus manually....
..., touch [OFF], or zoom to wide angle (W side). The default settings are using a conversion lens (optional).) - appears when the focus cannot be adjusted any closer, and appears when the focus cannot... be described below. b Notes • The minimum possible distance between the camcorder and the subject while maintaining sharp focus is about 1 cm (about 13/32 in.) for wide angle...MENU will not be difficult and can blur out backgrounds and the subject stands out clearer. DCR-DVD710/DVD810 Down to about 43 cm (17 in.) - FOCUS You can adjust the focus manually....

Operating Guide
Page 95
...to [OFF]. S. NIGHTSHOT PLS (Super NightShot plus) The image will be set. • When [ONE PUSH] was selected, aim your camcorder at a maximum of 16 times the sensitivity of NightShot plus recording if you can record a transition with the following effects adding to the interval ...with your fingers or other objects (p. 131). • Remove the conversion lens (optional). • Adjust the focus manually ([FOCUS], p. 92) when it is hard to focus automatically. • The shutter speed of your camcorder changes depending on the brightness, which may result in a slowdown of ...
...to [OFF]. S. NIGHTSHOT PLS (Super NightShot plus) The image will be set. • When [ONE PUSH] was selected, aim your camcorder at a maximum of 16 times the sensitivity of NightShot plus recording if you can record a transition with the following effects adding to the interval ...with your fingers or other objects (p. 131). • Remove the conversion lens (optional). • Adjust the focus manually ([FOCUS], p. 92) when it is hard to focus automatically. • The shutter speed of your camcorder changes depending on the brightness, which may result in a slowdown of ...
Operating Guide
Page 103
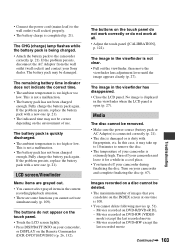
...on your camcorder during finalizing the disc. LCD screen/Viewfinder Menu items are some functions you can delete on the environment of your Sony dealer. The image in the viewfinder has disappeared. • Close the LCD panel. Images recorded on the Remote Commander (DCR-DVD710/DVD810) (p. ...26, 132). The CHG (charge) lamp flashes while the battery pack is not clear. • Pull out the viewfinder, then move the viewfinder lens...
...on your camcorder during finalizing the disc. LCD screen/Viewfinder Menu items are some functions you can delete on the environment of your Sony dealer. The image in the viewfinder has disappeared. • Close the LCD panel. Images recorded on the Remote Commander (DCR-DVD710/DVD810) (p. ...26, 132). The CHG (charge) lamp flashes while the battery pack is not clear. • Pull out the viewfinder, then move the viewfinder lens...

Operating Guide
Page 121
... hot and humid place. Moisture condensation If your camcorder is accidentally swallowed, consult a doctor immediately (DCR-DVD710/DVD810). • If the battery electrolytic liquid has leaked: - x If moisture condensation has occurred Leave your camcorder for example, and operate it. Near strong magnetic ... This damages the inside the casing, unplug your camcorder and have contacted your camcorder gets wet, it may malfunction. Be particularly careful of the lens. • Keep the POWER switch setting to your local authorized Sony service facility. - On a sandy beach or anywhere...
... hot and humid place. Moisture condensation If your camcorder is accidentally swallowed, consult a doctor immediately (DCR-DVD710/DVD810). • If the battery electrolytic liquid has leaked: - x If moisture condensation has occurred Leave your camcorder for example, and operate it. Near strong magnetic ... This damages the inside the casing, unplug your camcorder and have contacted your camcorder gets wet, it may malfunction. Be particularly careful of the lens. • Keep the POWER switch setting to your local authorized Sony service facility. - On a sandy beach or anywhere...

Operating Guide
Page 123
...the inside the disc cover. Continued , 123 Additional Information Do not touch the pickup lens directly during cleaning, because this may cause the camcorder to little dirt or dust. • To prevent mold, periodically clean the lens as at the seaside. • Store in the following the steps below. 1 ...closed except when inserting and removing the disc, to keep dust out. • When your camcorder does not work because the pickup lens is dirty, clean it further. • Do not touch the lens of the lens clean with a fine-tipped object such as a ball point pen, pull the eyecup block...
...the inside the disc cover. Continued , 123 Additional Information Do not touch the pickup lens directly during cleaning, because this may cause the camcorder to little dirt or dust. • To prevent mold, periodically clean the lens as at the seaside. • Store in the following the steps below. 1 ...closed except when inserting and removing the disc, to keep dust out. • When your camcorder does not work because the pickup lens is dirty, clean it further. • Do not touch the lens of the lens clean with a fine-tipped object such as a ball point pen, pull the eyecup block...
Operating Guide
Page 125
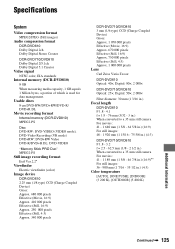
..., a portion of which is used for data management. Usable discs 8 cm DVD-RW/DVD+RW/DVD-R/ DVD+R DL Movie recording format Internal memory (DCR-DVD810) MPEG2-PS Disc DVD-RW: DVD-VIDEO (VIDEO mode), DVD-Video Recording (VR mode) DVD+RW: DVD+RW Video DVD-R/DVD+R DL: DVD-VIDEO...:9) Approx. 670 000 pixels Effective (Still, 16:9) Approx. 750 000 pixels Effective (Still, 4:3) Approx. 1 000 000 pixels Lens Carl Zeiss Vario-Tessar DCR-DVD610 Optical: 40×, Digital: 80×, 2 000× DCR-DVD710/DVD810 Optical: 25×, Digital: 50×, 2 000× Filter diameter: 30 mm (1 3/16 in.) Focal length...
..., a portion of which is used for data management. Usable discs 8 cm DVD-RW/DVD+RW/DVD-R/ DVD+R DL Movie recording format Internal memory (DCR-DVD810) MPEG2-PS Disc DVD-RW: DVD-VIDEO (VIDEO mode), DVD-Video Recording (VR mode) DVD+RW: DVD+RW Video DVD-R/DVD+R DL: DVD-VIDEO...:9) Approx. 670 000 pixels Effective (Still, 16:9) Approx. 750 000 pixels Effective (Still, 4:3) Approx. 1 000 000 pixels Lens Carl Zeiss Vario-Tessar DCR-DVD610 Optical: 40×, Digital: 80×, 2 000× DCR-DVD710/DVD810 Optical: 25×, Digital: 50×, 2 000× Filter diameter: 30 mm (1 3/16 in.) Focal length...

Operating Guide
Page 129
...see page 45. M (USB) jack (64) N (VIEW IMAGES) button (35, 43) O DUBBING button* (55) P DISP/BATT INFO button (22) * DCR-DVD810 Continued , 129 Quick Reference A NIGHTSHOT PLUS switch (41) B Memory Stick Duo slot/cover and access lamp (32) The access lamp lights for both the internal... memory* and a "Memory Stick PRO Duo." H QUICK ON button and lamp (41) I EASY button (34) J Viewfinder lens adjustment lever (27) K . (BACK LIGHT) button (41) L Speaker Playback sounds come out from the speaker. Quick Reference Identifying parts and controls The numbers ...
...see page 45. M (USB) jack (64) N (VIEW IMAGES) button (35, 43) O DUBBING button* (55) P DISP/BATT INFO button (22) * DCR-DVD810 Continued , 129 Quick Reference A NIGHTSHOT PLUS switch (41) B Memory Stick Duo slot/cover and access lamp (32) The access lamp lights for both the internal... memory* and a "Memory Stick PRO Duo." H QUICK ON button and lamp (41) I EASY button (34) J Viewfinder lens adjustment lever (27) K . (BACK LIGHT) button (41) L Speaker Playback sounds come out from the speaker. Quick Reference Identifying parts and controls The numbers ...
Operating Guide
Page 131
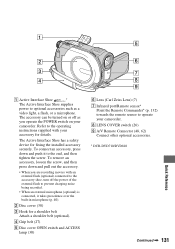
... belt (27) E Disc cover OPEN switch and ACCESS lamp (30) F Lens (Carl Zeiss Lens) (7) G Infrared port/Remote sensor* Point the Remote Commander* (p. 132) towards the remote sensor to operate your camcorder. A Active Interface Shoe * The Active Interface Shoe supplies power to optional accessories... turned on your camcorder. To remove an accessory, loosen the screw, and then press down and push it takes precedence over the built-in microphone (p. 40). H LENS COVER switch (26) I A/V Remote Connector (48, 62) Connect other optional accessories. * DCR-DVD710/DVD810 Continued , 131 ...
... belt (27) E Disc cover OPEN switch and ACCESS lamp (30) F Lens (Carl Zeiss Lens) (7) G Infrared port/Remote sensor* Point the Remote Commander* (p. 132) towards the remote sensor to operate your camcorder. A Active Interface Shoe * The Active Interface Shoe supplies power to optional accessories... turned on your camcorder. To remove an accessory, loosen the screw, and then press down and push it takes precedence over the built-in microphone (p. 40). H LENS COVER switch (26) I A/V Remote Connector (48, 62) Connect other optional accessories. * DCR-DVD710/DVD810 Continued , 131 ...

Operating Guide
Page 137
... SCENE DEL (delete 52 LCD backlight 27 LCD BL LEVEL (LCD back light level 86, 106 LCD BRIGHT 86 LCD COLOR 86 LCD panel 26 Lens cover 26 LP 80 M Maintenance 117 MANAGE MEDIA category 66 "Memory Stick 6, 118 "Memory Stick PRO Duo 6, 32, 118 MICREF LEVEL..........96, 109 Mirror mode...
... SCENE DEL (delete 52 LCD backlight 27 LCD BL LEVEL (LCD back light level 86, 106 LCD BRIGHT 86 LCD COLOR 86 LCD panel 26 Lens cover 26 LP 80 M Maintenance 117 MANAGE MEDIA category 66 "Memory Stick 6, 118 "Memory Stick PRO Duo 6, 32, 118 MICREF LEVEL..........96, 109 Mirror mode...


