Operating Instructions
Page 9
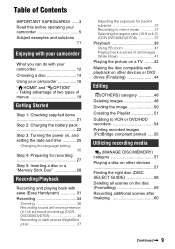
...with your camcorder 12 Choosing a disc 14 Using your camcorder What you can do with playback on other devices or DVD drives (Finalizing...Handycam 31 Recording 34 Zooming 36 Recording sound with more presence (5.1ch surround recording) (DCRDVD308/DVD708 36 Recording in dark places (NightShot plus 37 Adjusting the exposure for backlit subjects 37 Recording in mirror mode 37 Selecting the aspect ratio (16:9 or 4:3) (DCR-DVD308.../DVD708 37 Playback 39 Using PB zoom 41 Playing back a series of Contents IMPORTANT SAFEGUARDS ......3 Read this before operating your camcorder ...
...with your camcorder 12 Choosing a disc 14 Using your camcorder What you can do with playback on other devices or DVD drives (Finalizing...Handycam 31 Recording 34 Zooming 36 Recording sound with more presence (5.1ch surround recording) (DCRDVD308/DVD708 36 Recording in dark places (NightShot plus 37 Adjusting the exposure for backlit subjects 37 Recording in mirror mode 37 Selecting the aspect ratio (16:9 or 4:3) (DCR-DVD308.../DVD708 37 Playback 39 Using PB zoom 41 Playing back a series of Contents IMPORTANT SAFEGUARDS ......3 Read this before operating your camcorder ...
Operating Instructions
Page 29
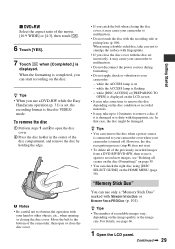
... page 66. 1 Open the LCD panel. When the formatting is completed, you use it again to use a DVD-RW while the Easy Handycam operation (p. 31) is on the image quality or the image size. x DVD+RW Select the aspect ratio of the movie, [16:9 WIDE] or [4:3], then touch . 6 Touch [YES...]. 7 Touch when [Completed.] is flashing - while the ACCESS lamp is set incorrectly, it may cause your camcorder: - In...
... page 66. 1 Open the LCD panel. When the formatting is completed, you use it again to use a DVD-RW while the Easy Handycam operation (p. 31) is on the image quality or the image size. x DVD+RW Select the aspect ratio of the movie, [16:9 WIDE] or [4:3], then touch . 6 Touch [YES...]. 7 Touch when [Completed.] is flashing - while the ACCESS lamp is set incorrectly, it may cause your camcorder: - In...
Operating Instructions
Page 33
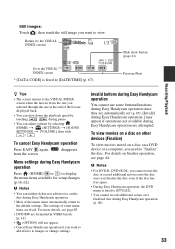
...DATA CODE] is fixed to [STYLE1]. • You cannot record additional scenes on a DVD device or a computer, you finalize the disc even if the disc has free space. • During Easy Handycam operation, the DVD menu is fixed to [DATE/TIME] (p. 67). To view movies on a disc ...You can neither delete nor edit movies on finalize operation, see page 85. • DVD-RW are automatically set (p. 85). [Invalid during Easy Handycam operation.] may appear if operations not available during Easy Handycam operation (p. 60). 33 For more details, see page 44. Invalid buttons during Easy...
...DATA CODE] is fixed to [STYLE1]. • You cannot record additional scenes on a DVD device or a computer, you finalize the disc even if the disc has free space. • During Easy Handycam operation, the DVD menu is fixed to [DATE/TIME] (p. 67). To view movies on a disc ...You can neither delete nor edit movies on finalize operation, see page 85. • DVD-RW are automatically set (p. 85). [Invalid during Easy Handycam operation.] may appear if operations not available during Easy Handycam operation (p. 60). 33 For more details, see page 44. Invalid buttons during Easy...
Operating Instructions
Page 45
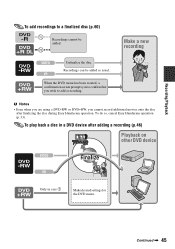
... prompts you to confirm that you cannot record additional movies onto the disc after adding a recording (p.46) Playback on other DVD device Finalize Only in a DVD device after finalizing the disc during Easy Handycam operation. Recording/Playback To add recordings to a finalized disc (p.60) Recordings cannot be added as usual. Continued , 45 Recordings...
... prompts you to confirm that you cannot record additional movies onto the disc after adding a recording (p.46) Playback on other DVD device Finalize Only in a DVD device after finalizing the disc during Easy Handycam operation. Recording/Playback To add recordings to a finalized disc (p.60) Recordings cannot be added as usual. Continued , 45 Recordings...
Operating Instructions
Page 47
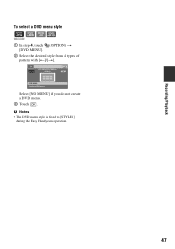
Recording/Playback To select a DVD menu style DVD +RW 1 In step 4, touch (OPTION) t [DVD MENU]. 2 Select the desired style from 4 types of pattern with [T]/[t]. Select [NO MENU] if you do not create a DVD menu. 3 Touch . b Notes • The DVD menu style is fixed to [STYLE1] during the Easy Handycam operation. 47
Recording/Playback To select a DVD menu style DVD +RW 1 In step 4, touch (OPTION) t [DVD MENU]. 2 Select the desired style from 4 types of pattern with [T]/[t]. Select [NO MENU] if you do not create a DVD menu. 3 Touch . b Notes • The DVD menu style is fixed to [STYLE1] during the Easy Handycam operation. 47
Operating Instructions
Page 48
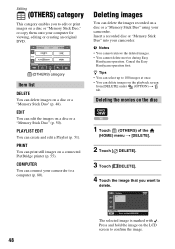
...; You can connect your camcorder. PLAYLIST EDIT You can delete images on a disc or a "Memory Stick Duo" (p. 50). PRINT You can edit the images on a disc or a "Memory Stick Duo" (p. 48). Cancel the Easy Handycam operation first. Press and ...Handycam operation. Editing (OTHERS) category This category enables you want to delete. EDIT You can print still images on the playback screen from [DELETE] under (OPTION) t tab. Deleting images You can delete the images recorded on a disc or a "Memory Stick Duo" using your computer for viewing, editing or creating an original DVD...
...; You can connect your camcorder. PLAYLIST EDIT You can delete images on a disc or a "Memory Stick Duo" (p. 50). PRINT You can edit the images on a disc or a "Memory Stick Duo" (p. 48). Cancel the Easy Handycam operation first. Press and ...Handycam operation. Editing (OTHERS) category This category enables you want to delete. EDIT You can print still images on the playback screen from [DELETE] under (OPTION) t tab. Deleting images You can delete the images recorded on a disc or a "Memory Stick Duo" using your computer for viewing, editing or creating an original DVD...
Operating Instructions
Page 60
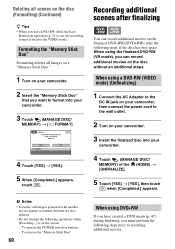
...5 Touch [YES] t [YES], then touch when [Completed.] appears. Deleting all images on a "Memory Stick Duo." 1 Turn on your camcorder. 2 Insert the "Memory Stick Duo" that you want to format into your camcorder. 3 Touch (MANAGE DISC/ MEMORY) t [ FORMAT] 4 Touch [YES] t [YES]. 5 When [Completed.] appears, touch . b ...Memory Stick Duo" Formatting deletes all scenes on the disc (Formatting) (Continued) z Tips • When you use a DVD-RW while the Easy Handycam operation (p. 31) is set, the recording format is on the disc without an additional steps. Recording additional scenes after ...
...5 Touch [YES] t [YES], then touch when [Completed.] appears. Deleting all images on a "Memory Stick Duo." 1 Turn on your camcorder. 2 Insert the "Memory Stick Duo" that you want to format into your camcorder. 3 Touch (MANAGE DISC/ MEMORY) t [ FORMAT] 4 Touch [YES] t [YES]. 5 When [Completed.] appears, touch . b ...Memory Stick Duo" Formatting deletes all scenes on the disc (Formatting) (Continued) z Tips • When you use a DVD-RW while the Easy Handycam operation (p. 31) is set, the recording format is on the disc without an additional steps. Recording additional scenes after ...
Operating Instructions
Page 61
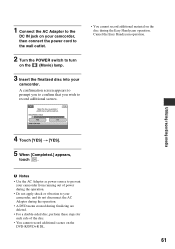
... • Use the AC Adaptor as power source to prevent your camcorder from running out of the disc. • You cannot record additional scenes on the DVD-R/DVD+R DL. 61 1 Connect the AC Adaptor to the DC IN jack on your camcorder, then connect the power cord to the wall outlet. 2 Turn... the POWER switch to your camcorder, and do not disconnect the AC Adaptor during the operation. • A DVD menu created during the Easy Handycam operation. A confirmation screen appears to prompt you to confirm that you wish to record additional scenes. &#...
... • Use the AC Adaptor as power source to prevent your camcorder from running out of the disc. • You cannot record additional scenes on the DVD-R/DVD+R DL. 61 1 Connect the AC Adaptor to the DC IN jack on your camcorder, then connect the power cord to the wall outlet. 2 Turn... the POWER switch to your camcorder, and do not disconnect the AC Adaptor during the operation. • A DVD menu created during the Easy Handycam operation. A confirmation screen appears to prompt you to confirm that you wish to record additional scenes. &#...
Operating Instructions
Page 85
... on. • Attach a charged battery pack to the camcorder (p. 22). • Connect the plug of your camcorder is extremely high. If the problem persists, disconnect the power source and contact your Sony dealer. • Overall operations/Easy Handycam operation/ Remote Commander 85 • Batteries/Power sources 86..., including the clock setting, are reset.) • The temperature of the AC Adaptor to OFF (CHG) for DVD-RW: [VIDEO] • The following menu items return to their default settings during Easy Handycam operation. • The following menu items are fixed during Easy...
... on. • Attach a charged battery pack to the camcorder (p. 22). • Connect the plug of your camcorder is extremely high. If the problem persists, disconnect the power source and contact your Sony dealer. • Overall operations/Easy Handycam operation/ Remote Commander 85 • Batteries/Power sources 86..., including the clock setting, are reset.) • The temperature of the AC Adaptor to OFF (CHG) for DVD-RW: [VIDEO] • The following menu items return to their default settings during Easy Handycam operation. • The following menu items are fixed during Easy...
Operating Instructions
Page 86
... during Easy Handycam operation. - [FILE NO. ] - [VOLUME] - [TV TYPE] - [ DISPLAY] - [BEEP] - [SUB-T DATE] - [CLOCK SET] - [AREA SET] - [DST SET]/[SUMMERTIME] - [WIDE SELECT] * - [DEMO MODE] - [FLASH MODE] ** - [ LANGUAGE SET] * DCR-DVD108/DVD608 ** DCR-DVD308/DVD708 Your camcorder vibrates. &#...8226; Vibration occurs depending on the condition of [A.SHUT OFF] (p. 72), or turn on for your DVD device, or cover the sensor of your camcorder, the camcorder is automatically turned off your hand or a...
... during Easy Handycam operation. - [FILE NO. ] - [VOLUME] - [TV TYPE] - [ DISPLAY] - [BEEP] - [SUB-T DATE] - [CLOCK SET] - [AREA SET] - [DST SET]/[SUMMERTIME] - [WIDE SELECT] * - [DEMO MODE] - [FLASH MODE] ** - [ LANGUAGE SET] * DCR-DVD108/DVD608 ** DCR-DVD308/DVD708 Your camcorder vibrates. &#...8226; Vibration occurs depending on the condition of [A.SHUT OFF] (p. 72), or turn on for your DVD device, or cover the sensor of your camcorder, the camcorder is automatically turned off your hand or a...
Operating Instructions
Page 89
... of your camcorder and leave it for a while in white, red, blue, or green appear on the screen. • The spots appear when you press START/ STOP and the point that recording movie starts/stops. This is DVD+RW. The recording angle looks different (DCR-DVD308/DVD708). &#...(p. 14). This is extremely high. The recording stops. • The temperature of your camcorder, there may not be able to [ON] (p. 65). • [STEADYSHOT] may be used during Easy Handycam operation. Turn off your camcorder is not a malfunction. This is not a malfunction. NIGHTSHOT PLS] or [COLOR SLOW...
... of your camcorder and leave it for a while in white, red, blue, or green appear on the screen. • The spots appear when you press START/ STOP and the point that recording movie starts/stops. This is DVD+RW. The recording angle looks different (DCR-DVD308/DVD708). &#...(p. 14). This is extremely high. The recording stops. • The temperature of your camcorder, there may not be able to [ON] (p. 65). • [STEADYSHOT] may be used during Easy Handycam operation. Turn off your camcorder is not a malfunction. This is not a malfunction. NIGHTSHOT PLS] or [COLOR SLOW...

Operating Instructions
Page 91
... scene. A scene cannot be deleted. • Your disc may not be configured for deleting data (p. 15). • You cannot delete movie during the Easy Handycam operation. • A scene protected on a device that is distorted. • Clean the disc using a soft cloth (p. 101). • Finalize the disc ...image. • You cannot edit an image protected on an image in the instruction manual of additional recording (p. 60), then remake the DVD menu by your camcorder when . Scenes cannot be divided. • A movie that does not support VR mode. Open the LCD screen. • When you...
... scene. A scene cannot be deleted. • Your disc may not be configured for deleting data (p. 15). • You cannot delete movie during the Easy Handycam operation. • A scene protected on a device that is distorted. • Clean the disc using a soft cloth (p. 101). • Finalize the disc ...image. • You cannot edit an image protected on an image in the instruction manual of additional recording (p. 60), then remake the DVD menu by your camcorder when . Scenes cannot be divided. • A movie that does not support VR mode. Open the LCD screen. • When you...
Operating Instructions
Page 110
...-UX1/HDR-SR1. Read "license2.pdf" in the U.S. On trademarks • "Handycam" and are registered trademarks of Sony Corporation. • "Memory Stick," " ," "Memory Stick Duo," " ," "Memory...MagicGate Memory Stick" and "MagicGate Memory Stick Duo" are trademarks of Sony Corporation. • "InfoLITHIUM" is a trademark of Sony Corporation. • DVD-RW, DVD+RW, DVD-R, and DVD+R DL logo are trademarks. • Dolby and the double-D symbol... "Expat," "zlib," and "libjpeg" software are provided in the camcorder. We provide this manual. 110 Notes on requests by the owners ...
...-UX1/HDR-SR1. Read "license2.pdf" in the U.S. On trademarks • "Handycam" and are registered trademarks of Sony Corporation. • "Memory Stick," " ," "Memory Stick Duo," " ," "Memory...MagicGate Memory Stick" and "MagicGate Memory Stick Duo" are trademarks of Sony Corporation. • "InfoLITHIUM" is a trademark of Sony Corporation. • DVD-RW, DVD+RW, DVD-R, and DVD+R DL logo are trademarks. • Dolby and the double-D symbol... "Expat," "zlib," and "libjpeg" software are provided in the camcorder. We provide this manual. 110 Notes on requests by the owners ...
Operating Instructions
Page 119
Index Numeric 16:9 37, 70 16:9 WIDE 64 4:3 37, 64, 70 5.1 ch surround recording .....36 8cm DVD 12 A AC Adaptor 22 Active Interface Shoe .........112 Additional recording 60 AREA SET 71 Aspect ratio 37, 42, 64 AUTO SLW SHUTTR (Auto slow shutter ... 50 Playlist 53 Dolby Digital 5.1 Creator 36, 118 Double-sided disc 100 DST SET 71 Dubbing 54 DVD drive 57 DVD menu 47 DVD-R 15 DVD-RW 15 DVD+R DL 15 DVD+RW 15 D.EFFECT (Digital effect 79, 93 E Easy Handycam 31 EDIT 50 EXPOSURE 76, 93 F FADER 78, 93 FILE NO. (File number).......66 Finalize 44...
Index Numeric 16:9 37, 70 16:9 WIDE 64 4:3 37, 64, 70 5.1 ch surround recording .....36 8cm DVD 12 A AC Adaptor 22 Active Interface Shoe .........112 Additional recording 60 AREA SET 71 Aspect ratio 37, 42, 64 AUTO SLW SHUTTR (Auto slow shutter ... 50 Playlist 53 Dolby Digital 5.1 Creator 36, 118 Double-sided disc 100 DST SET 71 Dubbing 54 DVD drive 57 DVD menu 47 DVD-R 15 DVD-RW 15 DVD+R DL 15 DVD+RW 15 D.EFFECT (Digital effect 79, 93 E Easy Handycam 31 EDIT 50 EXPOSURE 76, 93 F FADER 78, 93 FILE NO. (File number).......66 Finalize 44...

First Step Guide
Page 11
..." to check the box. Tip z You can import the videos recorded with your camcorder. 3 Insert a recorded disc into the DVD drive of videos recorded on the disc are displayed, scene by connecting your camcorder. The window used to select videos to import is not displayed, click [ ] ... on the LCD screen of your camcorder. 5 Select [ COMPUTER] on the screen of your camcorder to import all the scenes, click [Select All]. You can check the contents by connecting your camcorder and a computer. Or, double-click [ ] (Import Media Files (Handycam)) on the desktop. 6 Select the...
..." to check the box. Tip z You can import the videos recorded with your camcorder. 3 Insert a recorded disc into the DVD drive of videos recorded on the disc are displayed, scene by connecting your camcorder. The window used to select videos to import is not displayed, click [ ] ... on the LCD screen of your camcorder. 5 Select [ COMPUTER] on the screen of your camcorder to import all the scenes, click [Select All]. You can check the contents by connecting your camcorder and a computer. Or, double-click [ ] (Import Media Files (Handycam)) on the desktop. 6 Select the...

First Step Guide
Page 13
...Stick Duo" by inserting the disc/"Memory Stick Duo" into the DVD drive/Memory Stick slot of your computer You can be imported is displayed. z To import images from 8 cm discs, the DVD drive of your camcorder are sorted by selecting [Import Media Files] in calendar format. ...On destination folders The images are displayed as thumbnails in the [File] menu. 5 Select [Handycam] or [Digital Still Camera/Memory Stick (DCF format)], and...
...Stick Duo" by inserting the disc/"Memory Stick Duo" into the DVD drive/Memory Stick slot of your computer You can be imported is displayed. z To import images from 8 cm discs, the DVD drive of your camcorder are sorted by selecting [Import Media Files] in calendar format. ...On destination folders The images are displayed as thumbnails in the [File] menu. 5 Select [Handycam] or [Digital Still Camera/Memory Stick (DCF format)], and...


