
Operating Instructions
Page 11
...disc 104 Connecting your camcorder to a TV and a VCR Dubbing a disc to a tape 105 Connecting your camcorder to a VCR ... 107 Connecting your camcorder to a TV or a VCR 107 Dubbing onto a disc 107 Customizing your camcorder Changing the SETUP ...RWs only) Selecting the playing order on your camcorder - Getting Started Table of trouble and corrective ... battery pack 127 Glossary 128 Using your camcorder abroad .......... 129 Maintenance information and precautions ...camcorder to the computer 92 Consulting the on-line help (operating instructions) of ImageMixer Ver.1.5 for Sony DVD Handycam ...
...disc 104 Connecting your camcorder to a TV and a VCR Dubbing a disc to a tape 105 Connecting your camcorder to a VCR ... 107 Connecting your camcorder to a TV or a VCR 107 Dubbing onto a disc 107 Customizing your camcorder Changing the SETUP ...RWs only) Selecting the playing order on your camcorder - Getting Started Table of trouble and corrective ... battery pack 127 Glossary 128 Using your camcorder abroad .......... 129 Maintenance information and precautions ...camcorder to the computer 92 Consulting the on-line help (operating instructions) of ImageMixer Ver.1.5 for Sony DVD Handycam ...
Operating Instructions
Page 14
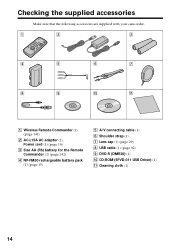
Checking the supplied accessories Make sure that the following accessories are supplied with your camcorder. 1 2 3 4 5 6 7 8 9 0 qa 1 Wireless Remote Commander (1) (page 141) 2 AC-L15A AC adaptor (1), Power cord (1) (page 16) 3 Size AA (R6) battery for the Remote Commander (2) (page 142) 4 NP-FM50 rechargeable battery pack (1) (page 15) 5 A/V connecting cable (1) 6 Shoulder strap (1) 7 Lens cap (1) (page 29) 8 USB cable (1) (page 92) 9 DVD-R (DMR30) (1) q; CD-ROM (SPVD-011 USB Driver) (1) qa Cleaning cloth (1) 14
Checking the supplied accessories Make sure that the following accessories are supplied with your camcorder. 1 2 3 4 5 6 7 8 9 0 qa 1 Wireless Remote Commander (1) (page 141) 2 AC-L15A AC adaptor (1), Power cord (1) (page 16) 3 Size AA (R6) battery for the Remote Commander (2) (page 142) 4 NP-FM50 rechargeable battery pack (1) (page 15) 5 A/V connecting cable (1) 6 Shoulder strap (1) 7 Lens cap (1) (page 29) 8 USB cable (1) (page 92) 9 DVD-R (DMR30) (1) q; CD-ROM (SPVD-011 USB Driver) (1) qa Cleaning cloth (1) 14
Operating Instructions
Page 89
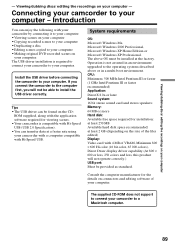
... environment. Tips •The USB driver can enjoy the following with Hi-Speed USB. The above or in an environment upgraded to the operating systems described above OS must be found on your camcorder with a computer compatible with your camcorder by connecting it to your computer:...be able to your computer - The supplied CD-ROM does not support to a Macintosh computer. 89 Install the USB driver before connecting the camcorder to your camcorder to connect your computer. ROM supplied, along with the application software required for installation: at least 250 MB Available ...
... environment. Tips •The USB driver can enjoy the following with Hi-Speed USB. The above or in an environment upgraded to the operating systems described above OS must be found on your camcorder with a computer compatible with your camcorder by connecting it to your computer:...be able to your computer - The supplied CD-ROM does not support to a Macintosh computer. 89 Install the USB driver before connecting the camcorder to your camcorder to connect your computer. ROM supplied, along with the application software required for installation: at least 250 MB Available ...

Operating Instructions
Page 90
Connecting your camcorder to control your camcorder from Sleep status. The menu screen appears after your computer recovers from Suspend/ Resume, or from your computer. Install the USB driver to your computer. If the menu screen does not appear, double-click [My Computer,] then [ImageMixer] (CD-ROM Drive). The installation menu screen appears. Installing...
Connecting your camcorder to control your camcorder from Sleep status. The menu screen appears after your computer recovers from Suspend/ Resume, or from your computer. Install the USB driver to your computer. If the menu screen does not appear, double-click [My Computer,] then [ImageMixer] (CD-ROM Drive). The installation menu screen appears. Installing...
Operating Instructions
Page 91
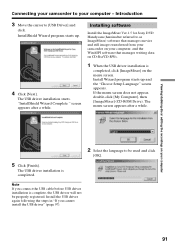
... appears. Installing software Install the ImageMixer Ver.1.5 for Sony DVD Handycam (hereinafter referred to as ImageMixer) software that manages movies and still images transferred from your camcorder on your computer, and the WinASPI software that manages writing data on CD-Rs/CD-RWs. 1 When the USB driver installation is completed, click [ImageMixer] on your...
... appears. Installing software Install the ImageMixer Ver.1.5 for Sony DVD Handycam (hereinafter referred to as ImageMixer) software that manages movies and still images transferred from your camcorder on your computer, and the WinASPI software that manages writing data on CD-Rs/CD-RWs. 1 When the USB driver installation is completed, click [ImageMixer] on your...
Operating Instructions
Page 93
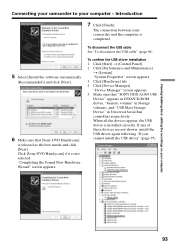
..., install the USB driver again following "If you cannot install the USB driver" (page 97). 93 "Completing the Found New Hardware Wizard" screen appears. Viewing/dubbing discs/ editing the recordings on your computer Connecting your camcorder to your camcorder and the computer is...controllers respectively. The connection between your computer - When all the devices appear, the USB driver is not selected. Introduction 7 Click [Finish]. "Device Manager" screen appears. 5 Make sure that [Sony DVD Handycam] is selected as the best match and click [Next]. To confirm the USB...
..., install the USB driver again following "If you cannot install the USB driver" (page 97). 93 "Completing the Found New Hardware Wizard" screen appears. Viewing/dubbing discs/ editing the recordings on your computer Connecting your camcorder to your camcorder and the computer is...controllers respectively. The connection between your computer - When all the devices appear, the USB driver is not selected. Introduction 7 Click [Finish]. "Device Manager" screen appears. 5 Make sure that [Sony DVD Handycam] is selected as the best match and click [Next]. To confirm the USB...

Operating Instructions
Page 95
...Microsoft Windows Me users 1 Connect the AC adaptor to your camcorder. 2 Set the mode dial to your computer - When all the devices appear, the USB driver is completed. 95 USB port USB jack USB cable Your computer recognizes the camcorder, and the "New Hardware Found" dialog box appears. ...of the computer using the USB cable supplied with your camcorder. Viewing/dubbing discs/ editing the recordings on your computer Connecting your camcorder to (Play/Edit). 3 Turn the power on - "Device Manager" screen appears. 5 Make sure that "SONY DDX-A1000 USB Device" appears in DVD/CD-ROM ...
...Microsoft Windows Me users 1 Connect the AC adaptor to your camcorder. 2 Set the mode dial to your computer - When all the devices appear, the USB driver is completed. 95 USB port USB jack USB cable Your computer recognizes the camcorder, and the "New Hardware Found" dialog box appears. ...of the computer using the USB cable supplied with your camcorder. Viewing/dubbing discs/ editing the recordings on your computer Connecting your camcorder to (Play/Edit). 3 Turn the power on - "Device Manager" screen appears. 5 Make sure that "SONY DDX-A1000 USB Device" appears in DVD/CD-ROM ...

Operating Instructions
Page 96
... appear, the USB driver is lit in Universal Serial Bus controllers respectively. Introduction To disconnect the USB cable See "To disconnect the USB cable" (page 96). "Device Manager" screen appears. 4 Make sure that "SONY DDX-A1000 USB Device" appears in CD-ROM, "Sony DVD Handycam" in Storage device,...cancel the applicable drive. 2 After the "Safe to Remove Hardware" dialog box appears, disconnect the USB cable and turn off your camcorder after disconnecting it from normal disconnection. •Never disconnect the USB cable when the Access/Open lamp is installed correctly. It may ...
... appear, the USB driver is lit in Universal Serial Bus controllers respectively. Introduction To disconnect the USB cable See "To disconnect the USB cable" (page 96). "Device Manager" screen appears. 4 Make sure that "SONY DDX-A1000 USB Device" appears in CD-ROM, "Sony DVD Handycam" in Storage device,...cancel the applicable drive. 2 After the "Safe to Remove Hardware" dialog box appears, disconnect the USB cable and turn off your camcorder after disconnecting it from normal disconnection. •Never disconnect the USB cable when the Access/Open lamp is installed correctly. It may ...
Operating Instructions
Page 97
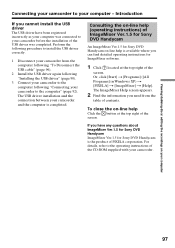
... of PIXELA corporation. To close the on your camcorder. The ImageMixer Help screen appears. 2 Find the information you can find detailed operating instructions for Sony DVD Handycam is completed. If you cannot install the USB driver The USB driver have any questions about ImageMixer Ver.1.5 for Sony DVD Handycam ImageMixer Ver.1.5 for ImageMixer software. 1 Click located at...
... of PIXELA corporation. To close the on your camcorder. The ImageMixer Help screen appears. 2 Find the information you can find detailed operating instructions for Sony DVD Handycam is completed. If you cannot install the USB driver The USB driver have any questions about ImageMixer Ver.1.5 for Sony DVD Handycam ImageMixer Ver.1.5 for ImageMixer software. 1 Click located at...
Operating Instructions
Page 98
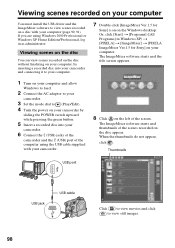
Viewing scenes recorded on your computer You must install the USB driver and the ImageMixer software to view scenes recorded on a disc with your camcorder. 8 Click on the left of the scenes recorded on the disc appear. Viewing scenes on the disc You can view ...Home Edition/Professional, log in Windows XP) t [PIXELA] t [ImageMixer] t [PIXELA ImageMixer Ver.1.5 for Sony] icon on your camcorder by inserting a recorded disc into your camcorder. 6 Connect the (USB) jacks of the camcorder and the (USB) port of the computer using the USB cable supplied with your computer (page 90, 91...
Viewing scenes recorded on your computer You must install the USB driver and the ImageMixer software to view scenes recorded on a disc with your camcorder. 8 Click on the left of the scenes recorded on the disc appear. Viewing scenes on the disc You can view ...Home Edition/Professional, log in Windows XP) t [PIXELA] t [ImageMixer] t [PIXELA ImageMixer Ver.1.5 for Sony] icon on your camcorder by inserting a recorded disc into your camcorder. 6 Connect the (USB) jacks of the camcorder and the (USB) port of the computer using the USB cable supplied with your computer (page 90, 91...
Operating Instructions
Page 99
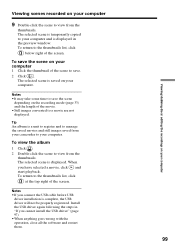
...view from the thumbnails. To view the album 1 Click . 2 Double-click the scene to view from your camcorder to your computer and is saved on your computer. When you cannot install the USB driver" (page 97). •When anything goes wrong with the operation, close all the software and restart them. ... of the screen. To return to manage the saved movies and still images saved from the thumbnails. The selected scene is complete, the USB driver will not be properly registered. The selected scene is displayed in "If you have selected a movie, click and start playback.
...view from the thumbnails. To view the album 1 Click . 2 Double-click the scene to view from your camcorder to your computer and is saved on your computer. When you cannot install the USB driver" (page 97). •When anything goes wrong with the operation, close all the software and restart them. ... of the screen. To return to manage the saved movies and still images saved from the thumbnails. The selected scene is complete, the USB driver will not be properly registered. The selected scene is displayed in "If you have selected a movie, click and start playback.
Operating Instructions
Page 121
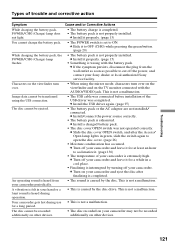
... heard during use for a long period. This is not a malfunction. • The USB cable was connected before installation of the USB driver was not operated correctly. Characters on the viewfinder turn over . A vibration is felt in a cool place. • Finalizing is interrupted ... not a malfunction. • The disc recorded on your Sony dealer or local authorized Sony service facility. • When using the USB connection. Your camcorder gets hot during operation. c If the symptom persists, disconnect the plug from your camcorder and leave it for a while in your hand or ...
... heard during use for a long period. This is not a malfunction. • The USB cable was connected before installation of the USB driver was not operated correctly. Characters on the viewfinder turn over . A vibration is felt in a cool place. • Finalizing is interrupted ... not a malfunction. • The disc recorded on your Sony dealer or local authorized Sony service facility. • When using the USB connection. Your camcorder gets hot during operation. c If the symptom persists, disconnect the plug from your camcorder and leave it for a while in your hand or ...


