Operating Instructions
Page 5
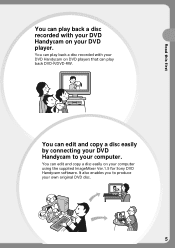
You can edit and copy a disc easily on your DVD player. Read this first You can play back a disc recorded with your own original DVD disc. 5 You can play back a disc recorded with your DVD Handycam on your computer using the supplied ImageMixer Ver.1.5 for Sony DVD Handycam software. It also enables you to your computer. You can edit and copy a disc easily by connecting your DVD Handycam to produce your DVD Handycam on DVD players that can play back DVD-R/DVD-RW.
You can edit and copy a disc easily on your DVD player. Read this first You can play back a disc recorded with your own original DVD disc. 5 You can play back a disc recorded with your DVD Handycam on your computer using the supplied ImageMixer Ver.1.5 for Sony DVD Handycam software. It also enables you to your computer. You can edit and copy a disc easily by connecting your DVD Handycam to produce your DVD Handycam on DVD players that can play back DVD-R/DVD-RW.

Operating Instructions
Page 11
... 108 Selecting the option of each item 109 Troubleshooting Types of contents Using a disc in VR mode (DVD-RWs only) Selecting the playing order on your camcorder - Playlist 74 Registering movies or still images to the Playlist 74 Saving all the still images on a... your camcorder to the computer 92 Consulting the on-line help (operating instructions) of ImageMixer Ver.1.5 for Sony DVD Handycam 97 Viewing scenes recorded on the disc 98 Making a disc copy - Introduction 89 System requirements 89 Installing the USB driver 90 Installing software 91 Connecting your camcorder to ...
... 108 Selecting the option of each item 109 Troubleshooting Types of contents Using a disc in VR mode (DVD-RWs only) Selecting the playing order on your camcorder - Playlist 74 Registering movies or still images to the Playlist 74 Saving all the still images on a... your camcorder to the computer 92 Consulting the on-line help (operating instructions) of ImageMixer Ver.1.5 for Sony DVD Handycam 97 Viewing scenes recorded on the disc 98 Making a disc copy - Introduction 89 System requirements 89 Installing the USB driver 90 Installing software 91 Connecting your camcorder to ...

Operating Instructions
Page 90
...to load. If you open a still image file. If the menu screen does not appear, double-click [My Computer,] then [ImageMixer] (CD-ROM Drive). Introduction Notes on using Windows 2000 Professional or Windows XP Home Edition/Professional, log in as administrator. 1...Turn on your computer and allow Windows to control your camcorder from Sleep status. Communications with your computer Communications between your camcorder and your computer may increase when you are using your computer Software Depending on your application software, the file size may not recover properly even after...
...to load. If you open a still image file. If the menu screen does not appear, double-click [My Computer,] then [ImageMixer] (CD-ROM Drive). Introduction Notes on using Windows 2000 Professional or Windows XP Home Edition/Professional, log in as administrator. 1...Turn on your computer and allow Windows to control your camcorder from Sleep status. Communications with your computer Communications between your camcorder and your computer may increase when you are using your computer Software Depending on your application software, the file size may not recover properly even after...
Operating Instructions
Page 91
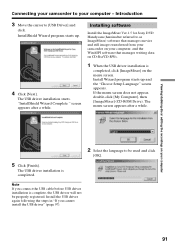
... 3 Move the cursor to as ImageMixer) software that manages movies and still images transferred from your camcorder on your computer, and the WinASPI software that manages writing data on CD-Rs/CD-RWs. 1 When the USB driver installation is completed. The USB driver installation starts. Installing software Install the ImageMixer Ver.1.5 for Sony DVD Handycam (hereinafter referred to [USB...
... 3 Move the cursor to as ImageMixer) software that manages movies and still images transferred from your camcorder on your computer, and the WinASPI software that manages writing data on CD-Rs/CD-RWs. 1 When the USB driver installation is completed. The USB driver installation starts. Installing software Install the ImageMixer Ver.1.5 for Sony DVD Handycam (hereinafter referred to [USB...
Operating Instructions
Page 97
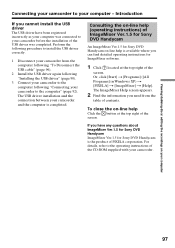
.... 2 Find the information you cannot install the USB driver The USB driver have any questions about ImageMixer Ver.1.5 for Sony DVD Handycam ImageMixer Ver.1.5 for ImageMixer software. 1 Click located at the top right of the CD-ROM supplied with your camcorder and the computer is the product of the screen. Perform the following procedure to install the USB...
.... 2 Find the information you cannot install the USB driver The USB driver have any questions about ImageMixer Ver.1.5 for Sony DVD Handycam ImageMixer Ver.1.5 for ImageMixer software. 1 Click located at the top right of the CD-ROM supplied with your camcorder and the computer is the product of the screen. Perform the following procedure to install the USB...
Operating Instructions
Page 98
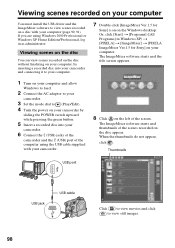
...] in as administrator. The ImageMixer software starts and thumbnails of the screen. The ImageMixer software starts and the title screen appears. 1 Turn on your computer and allow Windows to load. 2 Connect the AC adaptor to your camcorder. 3 Set the mode dial...camcorder by inserting a recorded disc into your camcorder. 6 Connect the (USB) jacks of the camcorder and the (USB) port of the computer using Windows 2000 Professional or Windows XP Home Edition/Professional, log in Windows XP) t [PIXELA] t [ImageMixer] t [PIXELA ImageMixer Ver.1.5 for Sony] icon on a disc with your camcorder...
...] in as administrator. The ImageMixer software starts and thumbnails of the screen. The ImageMixer software starts and the title screen appears. 1 Turn on your computer and allow Windows to load. 2 Connect the AC adaptor to your camcorder. 3 Set the mode dial...camcorder by inserting a recorded disc into your camcorder. 6 Connect the (USB) jacks of the camcorder and the (USB) port of the computer using Windows 2000 Professional or Windows XP Home Edition/Professional, log in Windows XP) t [PIXELA] t [ImageMixer] t [PIXELA ImageMixer Ver.1.5 for Sony] icon on a disc with your camcorder...
Operating Instructions
Page 100
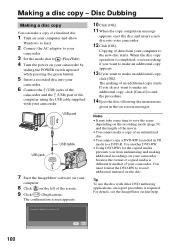
... the procedure. 14 Eject the disc following the instructions given in the on the left of the computer using the USB cable supplied with your camcorder. 12 Click [OK]. The confirmation screen appears. 10 Click [OK]. 11 When the copy completion message appears, eject the disc and insert... you from unfinalizing and making of the movie. •You cannot make an additional copy, click [Cancel] to a DVD-R. You must format the DVD-RW to the new disc starts. USB port USB jack USB cable 7 Start the ImageMixer software on your computer to record additional material on -line help. 100
... the procedure. 14 Eject the disc following the instructions given in the on the left of the computer using the USB cable supplied with your camcorder. 12 Click [OK]. The confirmation screen appears. 10 Click [OK]. 11 When the copy completion message appears, eject the disc and insert... you from unfinalizing and making of the movie. •You cannot make an additional copy, click [Cancel] to a DVD-R. You must format the DVD-RW to the new disc starts. USB port USB jack USB cable 7 Start the ImageMixer software on your computer to record additional material on -line help. 100

Operating Instructions
Page 101
... view the saved file Double-click the saved file (stored in the My Documents folder in the order you want to edit them using the ImageMixer software. Editing and saving scenes You can unite multiple scenes into a single scenes. 1 Click . The screen switches to save them . Saving the movie on your computer...
... view the saved file Double-click the saved file (stored in the My Documents folder in the order you want to edit them using the ImageMixer software. Editing and saving scenes You can unite multiple scenes into a single scenes. 1 Click . The screen switches to save them . Saving the movie on your computer...

DVD Handycam Technology Handbook
Page 17
... DVD Handycam camcorders adopt USB 2.0 as a connection interface. B Duplicating a DVD Connecting a DVD Handycam camcorder to a PC allows you must also support USB 2.0 (high-speed USB) in order to transfer at a rate of a PC for Sony). DVD Handycam (When USB 2.0 is used 10 20 22.16Mbps 7~8Mbps 22.16Mbps 17 DVD Handycam TECHNOLOGY HANDBOOK DVD HANDYCAM EDITING Transferring Recordings to a PC There are using supplied ImageMixer software...
... DVD Handycam camcorders adopt USB 2.0 as a connection interface. B Duplicating a DVD Connecting a DVD Handycam camcorder to a PC allows you must also support USB 2.0 (high-speed USB) in order to transfer at a rate of a PC for Sony). DVD Handycam (When USB 2.0 is used 10 20 22.16Mbps 7~8Mbps 22.16Mbps 17 DVD Handycam TECHNOLOGY HANDBOOK DVD HANDYCAM EDITING Transferring Recordings to a PC There are using supplied ImageMixer software...

DVD Handycam Technology Handbook
Page 18
... finalized by ImageMixer software? DVD Handycam can be played back on a DVD Handycam camcorder be used to two hours on a PC using DVD ImageMixer software, is finalizing? A Up to play back Dolby AC-3 (2-channel) sound. Q What recording modes can be unfinalized and recorded again. A Sony 3-1/8" (8cm) DVD-R discs (DMR30, DMR60) or Sony 3-1/8" DVD-RW (DMW30, DMW60) discs are loaded directly into your DVD Handycam is not...
... finalized by ImageMixer software? DVD Handycam can be played back on a DVD Handycam camcorder be used to two hours on a PC using DVD ImageMixer software, is finalizing? A Up to play back Dolby AC-3 (2-channel) sound. Q What recording modes can be unfinalized and recorded again. A Sony 3-1/8" (8cm) DVD-R discs (DMR30, DMR60) or Sony 3-1/8" DVD-RW (DMW30, DMW60) discs are loaded directly into your DVD Handycam is not...

DVD Handycam Technology Handbook
Page 19
... changed. Q How are thumbnails created? A Yes, via USB using supplied Sony DVD ImageMixer software (vers. 1.5 for Sony) software is fixed, it cannot be viewed on your DVD Handycam screen before you can connect your DVD Handycam camcorder to your PC using USB 2.0 and record your recordings on your DVD Handycam camcorder screen before your DVD Handycam camcorder when you 've recorded. 2 More complex editing can still images...
... changed. Q How are thumbnails created? A Yes, via USB using supplied Sony DVD ImageMixer software (vers. 1.5 for Sony) software is fixed, it cannot be viewed on your DVD Handycam screen before you can connect your DVD Handycam camcorder to your PC using USB 2.0 and record your recordings on your DVD Handycam camcorder screen before your DVD Handycam camcorder when you 've recorded. 2 More complex editing can still images...

Marketing Specifications
Page 2
...permission is a trademark of DVD-R/RW discs and/or due to encoding incompatibilities. Sony, AccuPower, Advanced HAD, Handycam, i.LINK, InfoLithium, NightShot, PlayStation, Remote Commander, SteadyShot, SwivelScreen and Worry Free are trademarks of Microsoft Corporation. DCR-DVD200 ADDITIONAL FEATURES Date/Time ... A/V Cable, Lens Cap, Cleaning Cloth, Blank DVD-R Media, USB Cable, CD-ROM with USB Driver SPVD-0011 (Pixela ImageMixer™ Software Ver. 1.5 for Sony) Sony Electronics Inc. 16765 West Bernardo Drive San Diego, CA 92127 www.sony.com/di TM BATTERY LIFE Battery 2 (Fully...
...permission is a trademark of DVD-R/RW discs and/or due to encoding incompatibilities. Sony, AccuPower, Advanced HAD, Handycam, i.LINK, InfoLithium, NightShot, PlayStation, Remote Commander, SteadyShot, SwivelScreen and Worry Free are trademarks of Microsoft Corporation. DCR-DVD200 ADDITIONAL FEATURES Date/Time ... A/V Cable, Lens Cap, Cleaning Cloth, Blank DVD-R Media, USB Cable, CD-ROM with USB Driver SPVD-0011 (Pixela ImageMixer™ Software Ver. 1.5 for Sony) Sony Electronics Inc. 16765 West Bernardo Drive San Diego, CA 92127 www.sony.com/di TM BATTERY LIFE Battery 2 (Fully...


