Operating Instructions
Page 10
... (VIDEO mode DVD-RWs only) ... 70 Recording again on the power 20 Step 4 Setting the date and time ........ 21 Simple setting of the clock using a time difference 23 Step 5 Adjusting the LCD screen and the viewfinder 24 Adjusting the brightness of movies and still images 69 Recording on a finalized disc - BATTERY INFO 18 Connecting to a wall outlet 18 Step 2 Opening the LCD screen ......... 19 Step 3 Turning on a used disc - Picture effect/Digital effect 51 Other functions 53 Checking the last scene - Review...
... (VIDEO mode DVD-RWs only) ... 70 Recording again on the power 20 Step 4 Setting the date and time ........ 21 Simple setting of the clock using a time difference 23 Step 5 Adjusting the LCD screen and the viewfinder 24 Adjusting the brightness of movies and still images 69 Recording on a finalized disc - BATTERY INFO 18 Connecting to a wall outlet 18 Step 2 Opening the LCD screen ......... 19 Step 3 Turning on a used disc - Picture effect/Digital effect 51 Other functions 53 Checking the last scene - Review...

Operating Instructions
Page 11
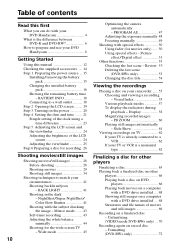
... Playlist 82 Playing the Playlist 84 Editing the original data 85 Dividing a movie 85 Deleting movies/still images ....... 87 Viewing/dubbing discs/ editing the recordings on your computer Connecting your camcorder to the computer 92 Consulting the on-line help (operating instructions) of ImageMixer Ver.1.5 for Sony DVD Handycam 97 Viewing scenes recorded on your camcorder abroad .......... 129 Maintenance information and precautions 130 Specifications 134 Parts and controls/Index Identifying parts and controls 136 Index...
... Playlist 82 Playing the Playlist 84 Editing the original data 85 Dividing a movie 85 Deleting movies/still images ....... 87 Viewing/dubbing discs/ editing the recordings on your computer Connecting your camcorder to the computer 92 Consulting the on-line help (operating instructions) of ImageMixer Ver.1.5 for Sony DVD Handycam 97 Viewing scenes recorded on your camcorder abroad .......... 129 Maintenance information and precautions 130 Specifications 134 Parts and controls/Index Identifying parts and controls 136 Index...
Operating Instructions
Page 35
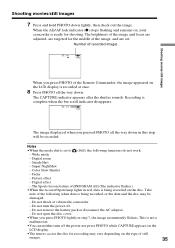
... focus are adjusted, are targeted for the middle of the following functions do not work. - Fader - Digital effect - Take note of the image, and are set to access the disc for shooting. This is not a malfunction. •You can neither turn the power off the power nor press PHOTO while CAPTURE appears on the LCD display. •The time to (Still), the following when data is being recorded on the type...
... focus are adjusted, are targeted for the middle of the following functions do not work. - Fader - Digital effect - Take note of the image, and are set to access the disc for shooting. This is not a malfunction. •You can neither turn the power off the power nor press PHOTO while CAPTURE appears on the LCD display. •The time to (Still), the following when data is being recorded on the type...
Operating Instructions
Page 46
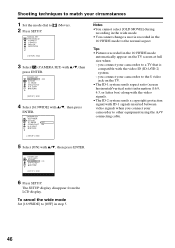
... ID-1 signals inserted between video signals when you connect your circumstances 1 Set the mode dial to 2 Press SETUP. you connect your camcorder to a TV that is compatible with v/V, then press ENTER. you connect your camcorder to the S video jack on the TV screen at full size when: - The SETUP display disappear from the LCD display. MANUAL SET PROGRAM AE P EFFECT D EFFECT WHT BAL AUTO SHTR (Movie). [ SETUP ] : END 3 Select (CAMERA SET) with v/V, then press...
... ID-1 signals inserted between video signals when you connect your circumstances 1 Set the mode dial to 2 Press SETUP. you connect your camcorder to a TV that is compatible with v/V, then press ENTER. you connect your camcorder to the S video jack on the TV screen at full size when: - The SETUP display disappear from the LCD display. MANUAL SET PROGRAM AE P EFFECT D EFFECT WHT BAL AUTO SHTR (Movie). [ SETUP ] : END 3 Select (CAMERA SET) with v/V, then press...
Operating Instructions
Page 62
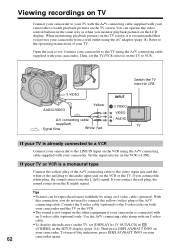
... screen, it is already connected to a VCR Connect your camcorder to the LINE IN input on the VCR or the TV. S VIDEO AUDIO/VIDEO Yellow A/V connecting cable (supplied) : Signal flow White Red Switch the TV input to the operating instructions of your TV. Tips • Pictures can operate the video control buttons in the SETUP display (page 114). Connect the S video cable (optional) to the S video jacks on both your camcorder and the TV or the VCR. • The sound is not output...
... screen, it is already connected to a VCR Connect your camcorder to the LINE IN input on the VCR or the TV. S VIDEO AUDIO/VIDEO Yellow A/V connecting cable (supplied) : Signal flow White Red Switch the TV input to the operating instructions of your TV. Tips • Pictures can operate the video control buttons in the SETUP display (page 114). Connect the S video cable (optional) to the S video jacks on both your camcorder and the TV or the VCR. • The sound is not output...
Operating Instructions
Page 89
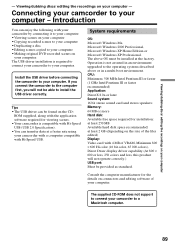
... stereo sound card and stereo speakers Memory: 64 MB or more Hard disk: Available free space required for viewing scenes. •Your camcorder is not assured in a multi-boot environment. Viewing/dubbing discs/ editing the recordings on connectors and editing software of the files edited) Display: Video card with Hi-Speed USB (USB 2.0 Specification). •You can enjoy the following with Hi-Speed USB. Introduction You can transfer data at the factory. Install the USB driver before connecting the camcorder...
... stereo sound card and stereo speakers Memory: 64 MB or more Hard disk: Available free space required for viewing scenes. •Your camcorder is not assured in a multi-boot environment. Viewing/dubbing discs/ editing the recordings on connectors and editing software of the files edited) Display: Video card with Hi-Speed USB (USB 2.0 Specification). •You can enjoy the following with Hi-Speed USB. Introduction You can transfer data at the factory. Install the USB driver before connecting the camcorder...
Operating Instructions
Page 91
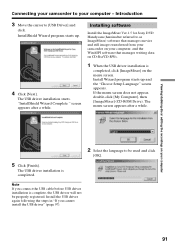
... the "Choose Setup Language" screen appears. The USB driver installation starts. Viewing/dubbing discs/ editing the recordings on the menu screen. Connecting your camcorder to [USB Driver] and click. Install the USB driver again following the steps in "If you connect the USB cable before USB driver installation is complete, the USB driver will not be used and click [OK]. 5 Click [Finish]. Installing software Install the ImageMixer Ver.1.5 for Sony DVD Handycam (hereinafter referred to as ImageMixer) software that manages movies and still images transferred from your...
... the "Choose Setup Language" screen appears. The USB driver installation starts. Viewing/dubbing discs/ editing the recordings on the menu screen. Connecting your camcorder to [USB Driver] and click. Install the USB driver again following the steps in "If you connect the USB cable before USB driver installation is complete, the USB driver will not be used and click [OK]. 5 Click [Finish]. Installing software Install the ImageMixer Ver.1.5 for Sony DVD Handycam (hereinafter referred to as ImageMixer) software that manages movies and still images transferred from your...
Operating Instructions
Page 92
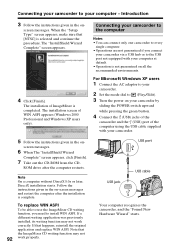
... not work properly. When the "Setup Type" screen appears, make sure that happens, reinstall the original application and replace WIN ASPI. For Microsoft Windows XP users 1 Connect the AC adaptor to your camcorder. 2 Set the mode dial to (Play/Edit). 3 Turn the power on your camcorder by sliding the POWER switch upward while pressing the green button. 4 Connect the (USB) jacks of the camcorder and the (USB) port of the computer using the USB cable...
... not work properly. When the "Setup Type" screen appears, make sure that happens, reinstall the original application and replace WIN ASPI. For Microsoft Windows XP users 1 Connect the AC adaptor to your camcorder. 2 Set the mode dial to (Play/Edit). 3 Turn the power on your camcorder by sliding the POWER switch upward while pressing the green button. 4 Connect the (USB) jacks of the camcorder and the (USB) port of the computer using the USB cable...

Operating Instructions
Page 95
... users 1 Connect the AC adaptor to your camcorder. 2 Set the mode dial to your computer - If any of the computer using the USB cable supplied with your camcorder. USB port USB jack USB cable Your computer recognizes the camcorder, and the "New Hardware Found" dialog box appears. 5 Follow the instructions given in Universal Serial Bus controllers respectively. Viewing/dubbing discs/ editing the recordings on your computer Connecting your camcorder to (Play/Edit). 3 Turn the power...
... users 1 Connect the AC adaptor to your camcorder. 2 Set the mode dial to your computer - If any of the computer using the USB cable supplied with your camcorder. USB port USB jack USB cable Your computer recognizes the camcorder, and the "New Hardware Found" dialog box appears. 5 Follow the instructions given in Universal Serial Bus controllers respectively. Viewing/dubbing discs/ editing the recordings on your computer Connecting your camcorder to (Play/Edit). 3 Turn the power...
Operating Instructions
Page 98
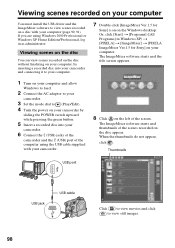
.... 2 Connect the AC adaptor to your camcorder. 3 Set the mode dial to (Play/Edit). 4 Turn the power on your camcorder by inserting a recorded disc into your camcorder. 6 Connect the (USB) jacks of the camcorder and the (USB) port of the screen. Thumbnails USB port USB jack USB cable 98 Click to view movies and click to view still images. Viewing scenes recorded on your computer You must install the USB driver and the ImageMixer software to view scenes recorded on the Windows desktop.
.... 2 Connect the AC adaptor to your camcorder. 3 Set the mode dial to (Play/Edit). 4 Turn the power on your camcorder by inserting a recorded disc into your camcorder. 6 Connect the (USB) jacks of the camcorder and the (USB) port of the screen. Thumbnails USB port USB jack USB cable 98 Click to view movies and click to view still images. Viewing scenes recorded on your computer You must install the USB driver and the ImageMixer software to view scenes recorded on the Windows desktop.
Operating Instructions
Page 116
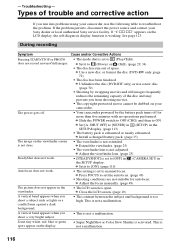
... tiny white, red, blue or green spots appear on the LCD display, the self-diagnosis display function is exhausted or nearly exhausted. c Set it to manual focus. c Slide the POWER switch to OFF (CHG) and then to troubleshoot the problem. c Press FOCUS to set to [NEVER] in (SETUP) in the SETUP display. If "C:ss:ss" appears on the display. • Super NightShot or Color Slow Shutter is not a malfunction. SteadyShot does not work...
... tiny white, red, blue or green spots appear on the LCD display, the self-diagnosis display function is exhausted or nearly exhausted. c Set it to manual focus. c Slide the POWER switch to OFF (CHG) and then to troubleshoot the problem. c Press FOCUS to set to [NEVER] in (SETUP) in the SETUP display. If "C:ss:ss" appears on the display. • Super NightShot or Color Slow Shutter is not a malfunction. SteadyShot does not work...
Operating Instructions
Page 121
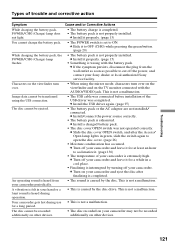
... devices. 121 Image data cannot be ejected. Your camcorder gets hot during operation. While charging the battery pack, the POWER/CHG (Charge) lamp flashes. An operating sound is not properly installed. c Install it to open the disc cover. (page 26) • Moisture condensation has occurred. This is wrong with the AUDIO/VIDEO jack. c Turn on your Sony dealer or local authorized Sony service facility. • When using the USB connection. The disc cannot be transferred using the mirror mode, characters turn...
... devices. 121 Image data cannot be ejected. Your camcorder gets hot during operation. While charging the battery pack, the POWER/CHG (Charge) lamp flashes. An operating sound is not properly installed. c Install it to open the disc cover. (page 26) • Moisture condensation has occurred. This is wrong with the AUDIO/VIDEO jack. c Turn on your Sony dealer or local authorized Sony service facility. • When using the USB connection. The disc cannot be transferred using the mirror mode, characters turn...
Operating Instructions
Page 134
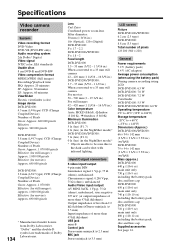
... oz) including the battery pack, disc and lens cap Supplied accessories See page 14. Specifications Video camera recorder System Video recording format DVD-Video DVD-VR (DVD-RW only) Audio recording system 2ch Dolby* Digital Video signal NTSC color, EIA standards Usable discs 8 cm DVD-R and DVD-RW Video compression format MPEG2/JPEG (Still images) Recording/playback time HQ: Approx. 20 minutes SP: Approx. 30 minutes LP: Approx. 60 minutes Viewfinder Electric viewfinder (color) Image device DCR-DVD100: 4.5 mm (1/4 type) CCD (Charge Coupled Device) Number of Pixels Gross...
... oz) including the battery pack, disc and lens cap Supplied accessories See page 14. Specifications Video camera recorder System Video recording format DVD-Video DVD-VR (DVD-RW only) Audio recording system 2ch Dolby* Digital Video signal NTSC color, EIA standards Usable discs 8 cm DVD-R and DVD-RW Video compression format MPEG2/JPEG (Still images) Recording/playback time HQ: Approx. 20 minutes SP: Approx. 30 minutes LP: Approx. 60 minutes Viewfinder Electric viewfinder (color) Image device DCR-DVD100: 4.5 mm (1/4 type) CCD (Charge Coupled Device) Number of Pixels Gross...
Operating Instructions
Page 144
... rechargeable battery .......... 132 Clock set 21 Color slow shutter 42 Continuous still images shooting 39 Counter 31 Data code 58 Date/time display 31, 58 Daylight saving time ...... 21, 114 DEMO 113 Digital effect 51 Digital zoom 32 Disc dubbing 100 Disc title 54 Disc type 6 DISPLAY 58 Divide 82, 85 DVD-R 6 DVD-RW 6 E EXP BRKTG 39 EXPOSURE 48 F, G, H FADER 50 Fade in/out 50 Finalize 63 FINE 37 Flash 109 Folder 69 FOCUS 49 Format 72 Full charge...
... rechargeable battery .......... 132 Clock set 21 Color slow shutter 42 Continuous still images shooting 39 Counter 31 Data code 58 Date/time display 31, 58 Daylight saving time ...... 21, 114 DEMO 113 Digital effect 51 Digital zoom 32 Disc dubbing 100 Disc title 54 Disc type 6 DISPLAY 58 Divide 82, 85 DVD-R 6 DVD-RW 6 E EXP BRKTG 39 EXPOSURE 48 F, G, H FADER 50 Fade in/out 50 Finalize 63 FINE 37 Flash 109 Folder 69 FOCUS 49 Format 72 Full charge...
DVD Handycam Technology Handbook
Page 11
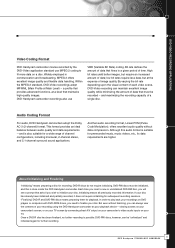
... recording using the DVD Handycam camcorder as your disc. and maximizing the recording capacity of data; Although this is also suitable for subsequent recording sessions. DVD-RW discs must be recorded -- If your TV. low bit rates require less data, but require an increased amount of a single disc. DVD VIDEO RECORDING APPLICATIONS Video Coding Format DVD Handycam camcorder movies recorded by connecting direct A/V output on your camcorder to video audio inputs on DVD players or computers with DVD-ROM drives, you need to play back your recordings on your disc...
... recording using the DVD Handycam camcorder as your disc. and maximizing the recording capacity of data; Although this is also suitable for subsequent recording sessions. DVD-RW discs must be recorded -- If your TV. low bit rates require less data, but require an increased amount of a single disc. DVD VIDEO RECORDING APPLICATIONS Video Coding Format DVD Handycam camcorder movies recorded by connecting direct A/V output on your camcorder to video audio inputs on DVD players or computers with DVD-ROM drives, you need to play back your recordings on your disc...

DVD Handycam Technology Handbook
Page 18
... using DVD ImageMixer software, is the copy also finalized? This process is a record-once format; A No. Q If a finalized disc is turned on DVD players anywhere in the world. A A DVD-RW disc recorded by the DVD Handycam camcorder. DVD-RW discs recorded in DVD-VR (Video Recording) mode cannot be unfinalized, although additional data can be unfinalized and recorded again. Q What happens if battery power runs out during operation. When power is restored and your DVD Handycam is copied on a DVD Handycam camcorder? Sony DVD Handycam models are loaded directly...
... using DVD ImageMixer software, is the copy also finalized? This process is a record-once format; A No. Q If a finalized disc is turned on DVD players anywhere in the world. A A DVD-RW disc recorded by the DVD Handycam camcorder. DVD-RW discs recorded in DVD-VR (Video Recording) mode cannot be unfinalized, although additional data can be unfinalized and recorded again. Q What happens if battery power runs out during operation. When power is restored and your DVD Handycam is copied on a DVD Handycam camcorder? Sony DVD Handycam models are loaded directly...

DVD Handycam Technology Handbook
Page 19
... you can connect your DVD Handycam camcorder to view images on your DVD Handycam screen before finalizing your disc. A Still images can be viewed on a TV screen using supplied Sony DVD ImageMixer software (vers. 1.5 for DVD-RW discs can still images be copied by ImageMixer software). Using ImageMixer software and USB connector, you finalize your PC hard drive -- If you want and change the display time of your PC using a DVD Player, you must finalize data by using ImageMixer (vers. 1.5 for Sony) software. Once setup time is a "scene...
... you can connect your DVD Handycam camcorder to view images on your DVD Handycam screen before finalizing your disc. A Still images can be viewed on a TV screen using supplied Sony DVD ImageMixer software (vers. 1.5 for DVD-RW discs can still images be copied by ImageMixer software). Using ImageMixer software and USB connector, you finalize your PC hard drive -- If you want and change the display time of your PC using a DVD Player, you must finalize data by using ImageMixer (vers. 1.5 for Sony) software. Once setup time is a "scene...

DVD Handycam Technology Handbook
Page 20
... DVD Handycam TECHNOLOGY HANDBOOK for DVD discs, including high-capacity storage of computer software and data. There are read as though they were commercial recorded DVD movies -- DVD-RAM, DVD+R and DVD+RW are alternate recordable formats not compatible with two recording layers can be recorded and stored on . DVD-VR (or DVD Video Recording) provides added in-camera capabilities such as multiple screen ratios, captions, language options, and simultaneous multi-angle viewing of a scene. ❏ DVD...
... DVD Handycam TECHNOLOGY HANDBOOK for DVD discs, including high-capacity storage of computer software and data. There are read as though they were commercial recorded DVD movies -- DVD-RAM, DVD+R and DVD+RW are alternate recordable formats not compatible with two recording layers can be recorded and stored on . DVD-VR (or DVD Video Recording) provides added in-camera capabilities such as multiple screen ratios, captions, language options, and simultaneous multi-angle viewing of a scene. ❏ DVD...

Marketing Specifications
Page 1
...". Images are designed to DVD-R or DVD-RW media. Playback of subjects and makes spotting and/or following subjects easier. ➤Digital Still Memory Mode Digital Still Memory Mode captures high quality still images at any analog NTSC source to 10 feet away. Sony's exclusive AccuPower™ meter displays the battery time remaining in minutes, in low light situations with and may be compatible with full color detail by slowing down the shutter speed...
...". Images are designed to DVD-R or DVD-RW media. Playback of subjects and makes spotting and/or following subjects easier. ➤Digital Still Memory Mode Digital Still Memory Mode captures high quality still images at any analog NTSC source to 10 feet away. Sony's exclusive AccuPower™ meter displays the battery time remaining in minutes, in low light situations with and may be compatible with full color detail by slowing down the shutter speed...

Marketing Specifications
Page 2
... are approximate. DCR-DVD200 ADDITIONAL FEATURES Date/Time Display Digital Picture Effects Disc Titling Dolby Digital® AC-3 (2 Channel) Stereo Audio Recording Exposure Control EXIF 2.2 Fader Modes Manual Focus Microphone Jack Picture Effect Modes Playback Zoom Program AE (Auto Exposure) Modes White Balance Adjustment World Clock S P E C I F I C AT I O N S Imaging Device: 1/4.7", 1070K Gross Pixels, Advanced HAD™ CCD Video Actual: 690K Pixels Still Actual: 1000K Pixels F: 1.8-2.0 Focal Distance: 3.7-37mm 35mm Conversion: 50-500mm (Camera Mode) 42-420mm (Memory Mode) Filter...
... are approximate. DCR-DVD200 ADDITIONAL FEATURES Date/Time Display Digital Picture Effects Disc Titling Dolby Digital® AC-3 (2 Channel) Stereo Audio Recording Exposure Control EXIF 2.2 Fader Modes Manual Focus Microphone Jack Picture Effect Modes Playback Zoom Program AE (Auto Exposure) Modes White Balance Adjustment World Clock S P E C I F I C AT I O N S Imaging Device: 1/4.7", 1070K Gross Pixels, Advanced HAD™ CCD Video Actual: 690K Pixels Still Actual: 1000K Pixels F: 1.8-2.0 Focal Distance: 3.7-37mm 35mm Conversion: 50-500mm (Camera Mode) 42-420mm (Memory Mode) Filter...


