Operating Guide
Page 2
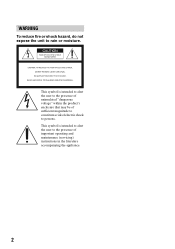
WARNING power cord To reduce fire or shock hazard, do not expose the unit to persons. This symbol is intended to alert the user to the presence of electric shock to rain or moisture. This symbol is intended to alert the user to the presence of uninsulated "dangerous voltage" within the product's enclosure that may be of sufficient magnitude to constitute a risk of important operating and maintenance (servicing) instructions in the literature accompanying the appliance. 2
WARNING power cord To reduce fire or shock hazard, do not expose the unit to persons. This symbol is intended to alert the user to the presence of electric shock to rain or moisture. This symbol is intended to alert the user to the presence of uninsulated "dangerous voltage" within the product's enclosure that may be of sufficient magnitude to constitute a risk of important operating and maintenance (servicing) instructions in the literature accompanying the appliance. 2

Operating Guide
Page 3
...cause hazards. Never block the slots and openings by forcing it is a safety feature. If the plug should be equipped with a polarized ac power cord plug (a plug having one blade wider than the other sources, refer to insert the plug fully into the set may be operated only from... the appliance. Power-Cord Protection Route the power cord so that could result in . Use only a cart, stand, tripod, bracket, or table recommended by the manufacturer, as they may...
...cause hazards. Never block the slots and openings by forcing it is a safety feature. If the plug should be equipped with a polarized ac power cord plug (a plug having one blade wider than the other sources, refer to insert the plug fully into the set may be operated only from... the appliance. Power-Cord Protection Route the power cord so that could result in . Use only a cart, stand, tripod, bracket, or table recommended by the manufacturer, as they may...
Operating Guide
Page 4
If the set exhibits a distinct change in the operating instructions. this set to rain or water. - When the power cord or plug is left unattended and unused for service. When the set does not operate normally when following conditions: - Replacement parts When replacement ...technician has used replacement parts specified by being dropped, or the cabinet has been damaged. - If the set has been subject to lightning and power-line surges. Improper adjustment of any service or repairs to the set, as the service technician to perform routine safety checks (as the original ...
If the set exhibits a distinct change in the operating instructions. this set to rain or water. - When the power cord or plug is left unattended and unused for service. When the set does not operate normally when following conditions: - Replacement parts When replacement ...technician has used replacement parts specified by being dropped, or the cabinet has been damaged. - If the set has been subject to lightning and power-line surges. Improper adjustment of any service or repairs to the set, as the service technician to perform routine safety checks (as the original ...
Operating Guide
Page 20
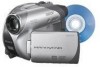
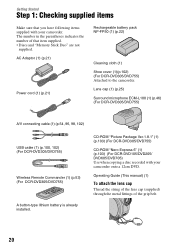
... fittings of that you have following items supplied with your camcorder. CD-ROM "Picture Package Ver.1.8.1" (1) (p.103) (For DCR-DVD305/DVD755) CD-ROM "Nero Express 6" (1) (p.103) (For DCR-DVD105/DVD205/ DVD605/DVD705) Use when copying a disc recorded with your camcorder onto a 12cm DVD. AC Adaptor (1) (p.21) Power cord (1) (p.21) Rechargeable battery pack NP-FP50 (1) (p.22) Cleaning cloth...
... fittings of that you have following items supplied with your camcorder. CD-ROM "Picture Package Ver.1.8.1" (1) (p.103) (For DCR-DVD305/DVD755) CD-ROM "Nero Express 6" (1) (p.103) (For DCR-DVD105/DVD205/ DVD605/DVD705) Use when copying a disc recorded with your camcorder onto a 12cm DVD. AC Adaptor (1) (p.21) Power cord (1) (p.21) Rechargeable battery pack NP-FP50 (1) (p.22) Cleaning cloth...
Operating Guide
Page 21
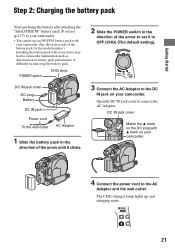
... cover Match the v mark on the DC plug with v mark on your camcorder. 4 Connect the power cord to the AC Adaptor and the wall outlet. POWER switch CHG lamp DC IN jack cover DC plug Battery DC IN jack Power cord To the wall outlet AC Adaptor 1 Slide the battery pack in the direction ...of the arrow until it clicks. 2 Slide the POWER switch in the direction of the battery pack for the model number.) Installing the battery pack with excess force may lead to camcorder malfunction such as...
... cover Match the v mark on the DC plug with v mark on your camcorder. 4 Connect the power cord to the AC Adaptor and the wall outlet. POWER switch CHG lamp DC IN jack cover DC plug Battery DC IN jack Power cord To the wall outlet AC Adaptor 1 Slide the battery pack in the direction ...of the arrow until it clicks. 2 Slide the POWER switch in the direction of the battery pack for the model number.) Installing the battery pack with excess force may lead to camcorder malfunction such as...
Operating Guide
Page 23
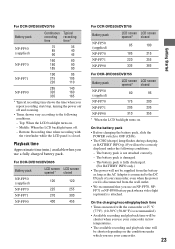
... correctly. - Playback time Approximate time (min.) available when you use your camcorder in low temperatures. • The available recording and playback time will not be shorter depending on the conditions under the following conditions. - For DCR-DVD105/DVD605 Battery pack LCD screen LCD screen opened* closed NP-FP50 (supplied) ...conditions. - Middle: When the LCD backlight turns off and zooming. • Times shown vary according to the DC IN jack of your camcorder, even when the power cord is disconnected from the battery as long as the AC Adaptor is attached.
... correctly. - Playback time Approximate time (min.) available when you use your camcorder in low temperatures. • The available recording and playback time will not be shorter depending on the conditions under the following conditions. - For DCR-DVD105/DVD605 Battery pack LCD screen LCD screen opened* closed NP-FP50 (supplied) ...conditions. - Middle: When the LCD backlight turns off and zooming. • Times shown vary according to the DC IN jack of your camcorder, even when the power cord is disconnected from the battery as long as the AC Adaptor is attached.
Operating Guide
Page 63
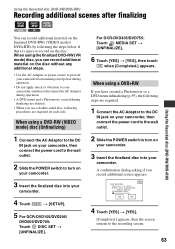
... mode) disc (Unfinalizing) 1 Connect the AC Adaptor to the DC IN jack on your camcorder, then connect the power cord to the wall outlet. 2 Slide the POWER switch to turn on your camcorder. 3 Insert the finalized disc into your camcorder. 4 Touch t [SETUP]. 5 For DCR-DVD105/DVD205/ DVD605/DVD705: Touch DISC SET t [UNFINALIZE]. Using the Recorded disc (DVD-RW...
... mode) disc (Unfinalizing) 1 Connect the AC Adaptor to the DC IN jack on your camcorder, then connect the power cord to the wall outlet. 2 Slide the POWER switch to turn on your camcorder. 3 Insert the finalized disc into your camcorder. 4 Touch t [SETUP]. 5 For DCR-DVD105/DVD205/ DVD605/DVD705: Touch DISC SET t [UNFINALIZE]. Using the Recorded disc (DVD-RW...
Operating Guide
Page 64
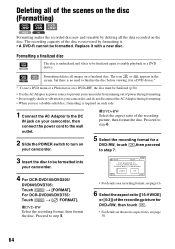
... AC Adaptor to the DC IN jack on your camcorder. Replace it . • A DVD-R cannot be finalized again to turn on your camcorder, then connect the power cord to the wall outlet. 2 Slide the POWER switch to enable playback in Camcorder VIDEO VR OK • For details on a... step 7. 3 Insert the disc to step 5. Proceed to be finalized (p.56). • Use the AC Adaptor as power source to prevent your camcorder from running out of power during formatting. • Do not apply shock or vibration to your camcorder. 4 For DCR-DVD105/DVD205/ DVD605/DVD705: Touch t [FORMAT].
... AC Adaptor to the DC IN jack on your camcorder. Replace it . • A DVD-R cannot be finalized again to turn on your camcorder, then connect the power cord to the wall outlet. 2 Slide the POWER switch to enable playback in Camcorder VIDEO VR OK • For details on a... step 7. 3 Insert the disc to step 5. Proceed to be finalized (p.56). • Use the AC Adaptor as power source to prevent your camcorder from running out of power during formatting. • Do not apply shock or vibration to your camcorder. 4 For DCR-DVD105/DVD205/ DVD605/DVD705: Touch t [FORMAT].
Operating Guide
Page 110
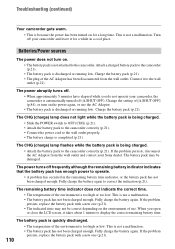
... from the wall outlet and contact your camcorder, the camcorder is not attached to the camcorder. Troubleshooting (continued) Your camcorder gets warm. • This is being charged. • Slide the POWER switch to OFF (CHG) (p.21). • Attach the battery pack to the camcorder correctly (p.21). • Connect the power cord to the wall outlet properly. • The...
... from the wall outlet and contact your camcorder, the camcorder is not attached to the camcorder. Troubleshooting (continued) Your camcorder gets warm. • This is being charged. • Slide the POWER switch to OFF (CHG) (p.21). • Attach the battery pack to the camcorder correctly (p.21). • Connect the power cord to the wall outlet properly. • The...
Operating Guide
Page 139
...a warm place (or vice versa) or when you are not using your camcorder and have contacted your local authorized Sony service facility. - x When not using your camcorder. • Do not wrap your camcorder, and leave it for 1H.] or [% Condensation. Turn off any solid object... the lens. • Keep the POWER switch setting to a warm place, moisture may condense inside . • When disconnecting the power cord, pull it may condense when you bring your camcorder from your camcorder is accidentally swallowed, consult a doctor immediately (For DCR-DVD305/DVD755). • If the...
...a warm place (or vice versa) or when you are not using your camcorder and have contacted your local authorized Sony service facility. - x When not using your camcorder. • Do not wrap your camcorder, and leave it for 1H.] or [% Condensation. Turn off any solid object... the lens. • Keep the POWER switch setting to a warm place, moisture may condense inside . • When disconnecting the power cord, pull it may condense when you bring your camcorder from your camcorder is accidentally swallowed, consult a doctor immediately (For DCR-DVD305/DVD755). • If the...
Operating Guide
Page 144
...) General Power requirements 7.2 V (battery pack) 8.4 V (AC Adaptor) Average power consumption During camera recording using LCD DCR-DVD105/DVD605: 2.7W DCR-DVD205/DVD705: 3.4W DCR-DVD305/DVD755: 3.6W Viewfinder DCR-DVD105/DVD605: 2.4W DCR-DVD205/DVD705: 3.0W 144 DCR-DVD305/DVD755...(Approx.) 190 g (6.7 oz) excluding the power cord * See at Load impedance 47 kΩ (kilohms)), Input impedance more than 47 kΩ (kilohms), Output impedance less than 2.2 kΩ (kilohms) DCR-DVD305/DVD755 Audio/Video input/output 10 pin... wh (680 mAh) Dimensions (Approx.) 31.8 × 18.5 × 45.0 mm
...) General Power requirements 7.2 V (battery pack) 8.4 V (AC Adaptor) Average power consumption During camera recording using LCD DCR-DVD105/DVD605: 2.7W DCR-DVD205/DVD705: 3.4W DCR-DVD305/DVD755: 3.6W Viewfinder DCR-DVD105/DVD605: 2.4W DCR-DVD205/DVD705: 3.0W 144 DCR-DVD305/DVD755...(Approx.) 190 g (6.7 oz) excluding the power cord * See at Load impedance 47 kΩ (kilohms)), Input impedance more than 47 kΩ (kilohms), Output impedance less than 2.2 kΩ (kilohms) DCR-DVD305/DVD755 Audio/Video input/output 10 pin... wh (680 mAh) Dimensions (Approx.) 31.8 × 18.5 × 45.0 mm
Operating Guide
Page 149
... LP (Long Play 80 LUMI. G Grip belt 25 H Help 103 High-speed transfer.......15, 104 Holding the camcorder .........25 HQ 80 I Icon ...... EFFECT (Picture effect 78 Pixela User Support Center 108 Playback 38, 44 Playlist ADD 91 DIVIDE 93 ERASE 92 MOVE 92 PORTRAIT (Soft portrait) ... 70 Power cord 21 149 Glossary, Index
... LP (Long Play 80 LUMI. G Grip belt 25 H Help 103 High-speed transfer.......15, 104 Holding the camcorder .........25 HQ 80 I Icon ...... EFFECT (Picture effect 78 Pixela User Support Center 108 Playback 38, 44 Playlist ADD 91 DIVIDE 93 ERASE 92 MOVE 92 PORTRAIT (Soft portrait) ... 70 Power cord 21 149 Glossary, Index


