Operating Instructions
Page 2
.... Reorient or relocate the receiving antenna (aerial). - Increase the separation between the equipment and receiver. - Connect the equipment into your Sony dealer regarding this product. DAV-IS10 Serial No 2US WARNING This equipment has been tested and found to operate this equipment. Consult the dealer or an experienced radio/TV...digital device, pursuant to them whenever you call upon your outlet, consult an electrician for replacement of the obsolete outlet. 10) Protect the power cord from the apparatus. If this equipment does cause harmful interference to rain or moisture.
.... Reorient or relocate the receiving antenna (aerial). - Increase the separation between the equipment and receiver. - Connect the equipment into your Sony dealer regarding this product. DAV-IS10 Serial No 2US WARNING This equipment has been tested and found to operate this equipment. Consult the dealer or an experienced radio/TV...digital device, pursuant to them whenever you call upon your outlet, consult an electrician for replacement of the obsolete outlet. 10) Protect the power cord from the apparatus. If this equipment does cause harmful interference to rain or moisture.
Operating Instructions
Page 3
...CATV system installer's attention to Article 820-40 of the NEC that the AC power cord (mains lead) can be connected to the grounding system of... not operate normally, or has been dropped. Welcome! Note to CATV system installer: This reminder is connected to the wall outlet (mains), even ...you for proper grounding and, in the event of the building, as power-supply cord or plug is used, use attachments/accessories specified by the... moving the cart/apparatus combination to qualified service personnel. Precautions On power sources • The unit is not disconnected from the wall socket...
...CATV system installer's attention to Article 820-40 of the NEC that the AC power cord (mains lead) can be connected to the grounding system of... not operate normally, or has been dropped. Welcome! Note to CATV system installer: This reminder is connected to the wall outlet (mains), even ...you for proper grounding and, in the event of the building, as power-supply cord or plug is used, use attachments/accessories specified by the... moving the cart/apparatus combination to qualified service personnel. Precautions On power sources • The unit is not disconnected from the wall socket...
Operating Instructions
Page 4
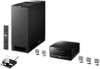
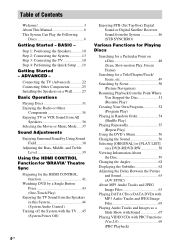
...) Enjoying the TV Sound from the Speakers in this System 44 (System Audio Control) Turning off the System with the TV ..... 45 (System Power Off) Enjoying STB (Set Top Box) Digital Sound or Digital Satellite Receiver Sound from the System 46 (STB SYNCHRO) Various Functions for Playing Discs Searching...CDs with PBC Functions (Ver.2.0 69 (PBC Playback) 4US ADVANCED - Step 1: Positioning the Speakers........... 10 Step 2: Connecting the System 13 Step 3: Connecting the TV 18 Step 4: Performing the Quick Setup ..... 19 Getting Started - Table of Contents Welcome 3 About This Manual ...
...) Enjoying the TV Sound from the Speakers in this System 44 (System Audio Control) Turning off the System with the TV ..... 45 (System Power Off) Enjoying STB (Set Top Box) Digital Sound or Digital Satellite Receiver Sound from the System 46 (STB SYNCHRO) Various Functions for Playing Discs Searching...CDs with PBC Functions (Ver.2.0 69 (PBC Playback) 4US ADVANCED - Step 1: Positioning the Speakers........... 10 Step 2: Connecting the System 13 Step 3: Connecting the TV 18 Step 4: Performing the Quick Setup ..... 19 Getting Started - Table of Contents Welcome 3 About This Manual ...
Operating Instructions
Page 13
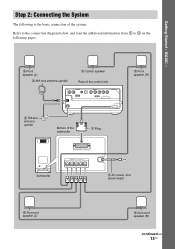
... following pages. 2 Front speaker (L) 3 AM loop antenna (aerial) 2 Center speaker Rear of the control unit DMPORT 2 Front speaker (R) 3 FM wire antenna (aerial) Bottom of the system. Refer to the connection diagram below, and read the additional information from 1 to 4 on the following is the basic connection of the subwoofer 1 Plug Subwoofer...
... following pages. 2 Front speaker (L) 3 AM loop antenna (aerial) 2 Center speaker Rear of the control unit DMPORT 2 Front speaker (R) 3 FM wire antenna (aerial) Bottom of the system. Refer to the connection diagram below, and read the additional information from 1 to 4 on the following is the basic connection of the subwoofer 1 Plug Subwoofer...

Operating Instructions
Page 17
Getting Started - BASIC - 4 Connecting the AC power cord (mains lead) Before connecting the AC power cord (mains lead) of the subwoofer to a wall outlet (mains), connect all the speakers to the subwoofer (page 15). Subwoofer To a wall outlet (mains) AC power cord (mains lead) Note • After connecting the AC power cord (mains lead), wait about 20 seconds before turning on the power by pressing "/1. 17US
Getting Started - BASIC - 4 Connecting the AC power cord (mains lead) Before connecting the AC power cord (mains lead) of the subwoofer to a wall outlet (mains), connect all the speakers to the subwoofer (page 15). Subwoofer To a wall outlet (mains) AC power cord (mains lead) Note • After connecting the AC power cord (mains lead), wait about 20 seconds before turning on the power by pressing "/1. 17US

Operating Instructions
Page 33
... back to the preceding chapter, track, or scene . (except for JPEG) Turn off , do not push a disc into the control unit. Note • When the system is turned off the sound temporarily MUTING. Note • You may not be able to adjust the sound volume. Briefly fast forward the current scene... VOLUME + to use the instant replay or instant advance function with some scenes. 33US To cancel standby mode, press "/1 once. Basic Operations To save the power in standby mode Press "/1 while the system turns on the control unit.
... back to the preceding chapter, track, or scene . (except for JPEG) Turn off , do not push a disc into the control unit. Note • When the system is turned off the sound temporarily MUTING. Note • You may not be able to adjust the sound volume. Briefly fast forward the current scene... VOLUME + to use the instant replay or instant advance function with some scenes. 33US To cancel standby mode, press "/1 once. Basic Operations To save the power in standby mode Press "/1 while the system turns on the control unit.
Operating Instructions
Page 38
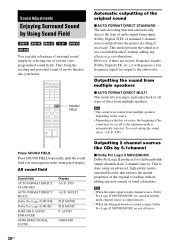
...effects (e.g. STD." AUDIO OMNI-DIR Outputting 2 channel sources like CDs by selecting one of system's preprogrammed sound fields. This mode presents the sound as the optimum mode is input, ...x AUTO FORMAT DIRECT STANDARD The auto decoding function automatically detects the type of movie theaters into your home. STD A.F.D. MULTI PLII MOVIE PLII MUSIC P. Sound Adjustments Enjoying Surround Sound by ..., Dolby Pro Logic II MOVIE/MUSIC are not effective. 38US They bring the exciting and powerful sound of audio signal being input (Dolby Digital, DTS, or standard 2 channel stereo)...
...effects (e.g. STD." AUDIO OMNI-DIR Outputting 2 channel sources like CDs by selecting one of system's preprogrammed sound fields. This mode presents the sound as the optimum mode is input, ...x AUTO FORMAT DIRECT STANDARD The auto decoding function automatically detects the type of movie theaters into your home. STD A.F.D. MULTI PLII MOVIE PLII MUSIC P. Sound Adjustments Enjoying Surround Sound by ..., Dolby Pro Logic II MOVIE/MUSIC are not effective. 38US They bring the exciting and powerful sound of audio signal being input (Dolby Digital, DTS, or standard 2 channel stereo)...
Operating Instructions
Page 40
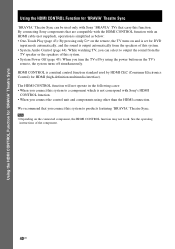
...automatically, and the sound is a mutual control function standard used only with Sony's HDMI CONTROL function. • When you connect the control unit and components using the power button on the TV's remote, the system turns off by HDMI CEC (Consumer Electronics Control) for 'BRAVIA' Theatre ...can be used by using other than the HDMI connection. By connecting Sony components that carry this function. HDMI CONTROL is output automatically from the TV speaker or the speakers of this system. • System Power Off (page 45): When you turn the TV off simultaneously. See ...
...automatically, and the sound is a mutual control function standard used only with Sony's HDMI CONTROL function. • When you connect the control unit and components using the power button on the TV's remote, the system turns off by HDMI CEC (Consumer Electronics Control) for 'BRAVIA' Theatre ...can be used by using other than the HDMI connection. By connecting Sony components that carry this function. HDMI CONTROL is output automatically from the TV speaker or the speakers of this system. • System Power Off (page 45): When you turn the TV off simultaneously. See ...

Operating Instructions
Page 45
...HDMI CONTROL Function for 'BRAVIA' Theatre Sync Turning off the System with an HDMI cable (not supplied). When you turn off. To use System Power Off, connect the control unit and the TV with the TV (System Power Off) When you turn off the system by pressing "/1 on the remote of the TV. •... Depending on the status, the system may not be turned off the TV using the System Power Off function, the TV function to link a power supply should be on. For details...
...HDMI CONTROL Function for 'BRAVIA' Theatre Sync Turning off the System with an HDMI cable (not supplied). When you turn off. To use System Power Off, connect the control unit and the TV with the TV (System Power Off) When you turn off the system by pressing "/1 on the remote of the TV. •... Depending on the status, the system may not be turned off the TV using the System Power Off function, the TV function to link a power supply should be on. For details...

Operating Instructions
Page 52
.... The Control Menu display appears on the Setup Display. - you disconnect the AC power cord (mains lead). - the system enters standby mode (DATA CD/ DATA DVD only). - X/x/c, H DISPLAY 1 Press DISPLAY. Tip • This system can store at least 10 resume playback points. • To play the contents of...Press X/x to [ON]. Note • If [MULTI-DISC RESUME] in VR mode, VIDEO CDs, CDs, DATA CDs, and DATA DVDs, the system remembers the resume playback point for the current disc. • Resume Play does not work during Program Play and Shuffle Play. • This function may...
.... The Control Menu display appears on the Setup Display. - you disconnect the AC power cord (mains lead). - the system enters standby mode (DATA CD/ DATA DVD only). - X/x/c, H DISPLAY 1 Press DISPLAY. Tip • This system can store at least 10 resume playback points. • To play the contents of...Press X/x to [ON]. Note • If [MULTI-DISC RESUME] in VR mode, VIDEO CDs, CDs, DATA CDs, and DATA DVDs, the system remembers the resume playback point for the current disc. • Resume Play does not work during Program Play and Shuffle Play. • This function may...
Operating Instructions
Page 85
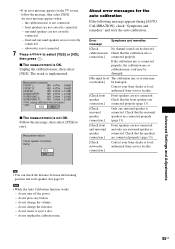
... or local authorized Sony service facility. [Check front speaker connection.] Front speakers are not correctly connected. - Note • While the Auto Calibration function works: - do not insert or eject a disc. - do not turn off the power. - • If an error message appears on ...the calibration mic or calibration mic cord may be damaged. [Mic input level The calibration mic or system may overloaded.] be detected. Contact your Sony dealer or local authorized Sony service facility. Check that the calibration mic is implemented. If the calibration mic is not connected. ...
... or local authorized Sony service facility. [Check front speaker connection.] Front speakers are not correctly connected. - Note • While the Auto Calibration function works: - do not insert or eject a disc. - do not turn off the power. - • If an error message appears on ...the calibration mic or calibration mic cord may be damaged. [Mic input level The calibration mic or system may overloaded.] be detected. Contact your Sony dealer or local authorized Sony service facility. Check that the calibration mic is implemented. If the calibration mic is not connected. ...

Operating Instructions
Page 95
..., wait about 20 seconds before turning on after returning to the default settings. Note • When you turn the system on the power by selecting [NO] here. 6 Press . The setting is turned off the power. 2 Press and hold "/1 on the TV screen. 3 Press X/x to select press . [SETUP], then The options for [SETUP] appear...
..., wait about 20 seconds before turning on after returning to the default settings. Note • When you turn the system on the power by selecting [NO] here. 6 Press . The setting is turned off the power. 2 Press and hold "/1 on the TV screen. 3 Press X/x to select press . [SETUP], then The options for [SETUP] appear...
Operating Instructions
Page 96
... putting anything on the system. If you carry the system, use it on your television screen indefinitely. On moving the system When you have any questions or problems concerning your system, please consult your nearest Sony dealer. On placement • Place the system in a confined space ...8226; Clean the cabinet, panel, and controls with a soft cloth slightly moistened with a mild detergent solution. Additional Information Precautions On power sources • Unplug the subwoofer from the wall outlet if you risk permanent damage to your television screen. To disconnect the cord,...
... putting anything on the system. If you carry the system, use it on your television screen indefinitely. On moving the system When you have any questions or problems concerning your system, please consult your nearest Sony dealer. On placement • Place the system in a confined space ...8226; Clean the cabinet, panel, and controls with a soft cloth slightly moistened with a mild detergent solution. Additional Information Precautions On power sources • Unplug the subwoofer from the wall outlet if you risk permanent damage to your television screen. To disconnect the cord,...
Operating Instructions
Page 97
...short-circuited? • Are you experience any of the system? Power The power is not turned on the power by pressing "/1. In this case, return the setting to turn off the system, and check the following difficulties while using the system, use solvents such as the temperature may rise considerably ...cause of the problem cannot be found even after all the above items and fix any problem persist, consult your nearest Sony dealer. If "PROTECTOR" and "PUSH POWER" appear alternately in its edge. On cleaning • Before playing, clean the disc with progressive format (525p) ...
...short-circuited? • Are you experience any of the system? Power The power is not turned on the power by pressing "/1. In this case, return the setting to turn off the system, and check the following difficulties while using the system, use solvents such as the temperature may rise considerably ...cause of the problem cannot be found even after all the above items and fix any problem persist, consult your nearest Sony dealer. If "PROTECTOR" and "PUSH POWER" appear alternately in its edge. On cleaning • Before playing, clean the disc with progressive format (525p) ...

Operating Instructions
Page 100
...cannot be ejected and "LOCKED" appears in the front panel display. • Contact your Sony dealer or local authorized Sony service facility. Other characters are not displayed correctly. • The system can only display numbers and letters of the connected component is connected securely. • ...DVD being played. • The DVD prohibits changing the subtitles. The HDMI CONTROL function does not work normally. • Disconnect the AC power cord (mains lead) from the beginning. • Program Play, Shuffle Play, or Repeat Play has been selected. The subtitle language cannot ...
...cannot be ejected and "LOCKED" appears in the front panel display. • Contact your Sony dealer or local authorized Sony service facility. Other characters are not displayed correctly. • The system can only display numbers and letters of the connected component is connected securely. • ...DVD being played. • The DVD prohibits changing the subtitles. The HDMI CONTROL function does not work normally. • Disconnect the AC power cord (mains lead) from the beginning. • Program Play, Shuffle Play, or Repeat Play has been selected. The subtitle language cannot ...
Operating Instructions
Page 101
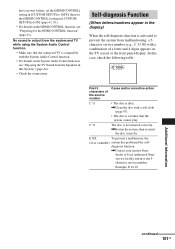
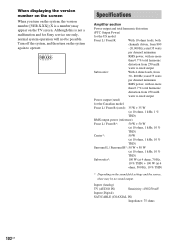
...4 digits appears on the TV screen or the front panel display. have a power failure, set the [HDMI CONTROL] setting in [CUSTOM SETUP] to [OFF], then set the [HDMI CONTROL] setting in [CUSTOM SETUP] to prevent the system from malfunctioning, a 5character service number (e.g., C 13 50) with a combination ... letters/numbers appear in this case, check the following table. E XX To prevent a malfunction, the (xx is a number) system has performed the selfdiagnosis function. ,Contact your nearest Sony dealer or local authorized Sony service facility and give the 5- character service number.
...4 digits appears on the TV screen or the front panel display. have a power failure, set the [HDMI CONTROL] setting in [CUSTOM SETUP] to [OFF], then set the [HDMI CONTROL] setting in [CUSTOM SETUP] to prevent the system from malfunctioning, a 5character service number (e.g., C 13 50) with a combination ... letters/numbers appear in this case, check the following table. E XX To prevent a malfunction, the (xx is a number) system has performed the selfdiagnosis function. ,Contact your nearest Sony dealer or local authorized Sony service facility and give the 5- character service number.
Operating Instructions
Page 102
... Front L / Front R: With 10 ohms loads, both channels driven, from 800 - 20,000 Hz; VER.X.XX Specifications Amplifier section Power output and total harmonic distortion (FTC Output Power) for Sony service use only, normal system operation will not be no more than 0.7 % total harmonic distortion from 250 milli watts to rated output Subwoofer: With...
... Front L / Front R: With 10 ohms loads, both channels driven, from 800 - 20,000 Hz; VER.X.XX Specifications Amplifier section Power output and total harmonic distortion (FTC Output Power) for Sony service use only, normal system operation will not be no more than 0.7 % total harmonic distortion from 250 milli watts to rated output Subwoofer: With...
Operating Instructions
Page 103
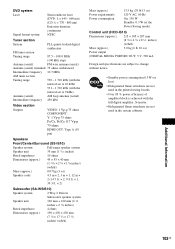
...PR/CR: 0.7 Vp-p 75 ohms HDMI OUT: Type A (19 pin) Speakers Front/Center/Surround (SS-IS10) Speaker system Full range speaker system Speaker unit 35 mm (1 7/16 inches) Rated impedance 10 ohms Dimensions (approx.) 45 × 55 ...system Speaker unit 120 mm + 160 mm (4 3/4 inches + 6 3/8 inches) Rated impedance 4 ohms Dimensions (approx.) 190 × 450 × 450 mm (7 1/2 × 17 3/4 × 17 3/4 inches) (w/h/d) Mass (approx.) Power requirements Power consumption 13.5 kg (29 lb 13 oz) 120 V AC, 60 Hz On: 130 W Standby: 0.3 W (at the Power Saving mode) Control unit (HCD-IS10...
...PR/CR: 0.7 Vp-p 75 ohms HDMI OUT: Type A (19 pin) Speakers Front/Center/Surround (SS-IS10) Speaker system Full range speaker system Speaker unit 35 mm (1 7/16 inches) Rated impedance 10 ohms Dimensions (approx.) 45 × 55 ...system Speaker unit 120 mm + 160 mm (4 3/4 inches + 6 3/8 inches) Rated impedance 4 ohms Dimensions (approx.) 190 × 450 × 450 mm (7 1/2 × 17 3/4 × 17 3/4 inches) (w/h/d) Mass (approx.) Power requirements Power consumption 13.5 kg (29 lb 13 oz) 120 V AC, 60 Hz On: 130 W Standby: 0.3 W (at the Power Saving mode) Control unit (HCD-IS10...
Operating Instructions
Page 106
...only moving pictures. VIDEO CD A compact disc that contains moving pictures and still pictures are divided into sections called "scenes." This system conforms to 74 minutes of moving pictures and sounds. • Version 2.0: You can hold six times the audio information of ...several tracks (MP3 only). S-master S-master is an all-digital amplifier technology developed by Sony, which effectively minimizes the occurrence of sound fragmentation and jitter, delivering superb dialog clarity and faithful reproduction of a picture or a music...
...only moving pictures. VIDEO CD A compact disc that contains moving pictures and still pictures are divided into sections called "scenes." This system conforms to 74 minutes of moving pictures and sounds. • Version 2.0: You can hold six times the audio information of ...several tracks (MP3 only). S-master S-master is an all-digital amplifier technology developed by Sony, which effectively minimizes the occurrence of sound fragmentation and jitter, delivering superb dialog clarity and faithful reproduction of a picture or a music...

