
Operating Instructions
Page 1
3-283-033-12(1) DVD Home Theatre System Operating Instructions DAV-HDX575WC / HDX578W / HDX678WF / HDX975WF ©2008 Sony Corporation
3-283-033-12(1) DVD Home Theatre System Operating Instructions DAV-HDX575WC / HDX578W / HDX678WF / HDX975WF ©2008 Sony Corporation

Operating Instructions
Page 2
... installed apparatus shall not be exposed to correct the interference by turning the equipment off and on the apparatus. Model No. DAV-HDX575WC/DAV-HDX578W/ DAV-HDX678WF Serial No Date of Manufacture Marking is intended to alert the user to persons. CAUTION THIS CLASS B DIGITAL DEVICE COMPLIES WITH...the presence of optical instruments with liquids, such as sunshine, fire or the like. Install in this manual could void your Sony dealer regarding this equipment does cause harmful interference to radio or television reception, which the receiver is intended to alert the ...
... installed apparatus shall not be exposed to correct the interference by turning the equipment off and on the apparatus. Model No. DAV-HDX575WC/DAV-HDX578W/ DAV-HDX678WF Serial No Date of Manufacture Marking is intended to alert the user to persons. CAUTION THIS CLASS B DIGITAL DEVICE COMPLIES WITH...the presence of optical instruments with liquids, such as sunshine, fire or the like. Install in this manual could void your Sony dealer regarding this equipment does cause harmful interference to radio or television reception, which the receiver is intended to alert the ...
Operating Instructions
Page 3
... the apparatus. For the wireless transceiver (EZW-RT10) This transmitter must accept any interference, including interference that may cause undesired operation of this system so that produce heat. 9) Do not defeat the safety purpose of the IC radio frequency (RF) Exposure rules. This equipment complies with...with IC radiation exposure limits set forth for uncontrolled equipment and meets RSS-102 of the polarized or grounding-type plug. Note to CATV system installer: This reminder is damaged, liquid has been spilled or objects have fallen into your safety. 8) Do not install near any ...
... the apparatus. For the wireless transceiver (EZW-RT10) This transmitter must accept any interference, including interference that may cause undesired operation of this system so that produce heat. 9) Do not defeat the safety purpose of the IC radio frequency (RF) Exposure rules. This equipment complies with...with IC radiation exposure limits set forth for uncontrolled equipment and meets RSS-102 of the polarized or grounding-type plug. Note to CATV system installer: This reminder is damaged, liquid has been spilled or objects have fallen into your safety. 8) Do not install near any ...

Operating Instructions
Page 4
...Instructions describe the controls on the area. • "DVD" may vary depending on the remote. Any difference in operation is as a general term for a DVD VIDEO, DVD+RW/DVD+R, and DVDRW/DVD-R. • Measurements are for illustration purposes. The ... DAV-HDX575WC: Surround amplifier (optional) S-AIR receiver (supplied) • DAV-HDX578W: Surround amplifier (supplied) S-AIR receiver (optional) • DAV-HDX678WF: Surround amplifier (supplied) S-AIR receiver (supplied) • DAV-HDX975WF: Surround amplifier (supplied) S-AIR receiver (supplied) The S-AIR product can enjoy system ...
...Instructions describe the controls on the area. • "DVD" may vary depending on the remote. Any difference in operation is as a general term for a DVD VIDEO, DVD+RW/DVD+R, and DVDRW/DVD-R. • Measurements are for illustration purposes. The ... DAV-HDX575WC: Surround amplifier (optional) S-AIR receiver (supplied) • DAV-HDX578W: Surround amplifier (supplied) S-AIR receiver (optional) • DAV-HDX678WF: Surround amplifier (supplied) S-AIR receiver (supplied) • DAV-HDX975WF: Surround amplifier (supplied) S-AIR receiver (supplied) The S-AIR product can enjoy system ...

Operating Instructions
Page 5
... the S-AIR function 4 Playable Discs 6 Getting Started Step 1: Assembling the Speakers 15 Step 2: Positioning the System... 21 Step 3: Connecting the System... 25 Step 4: Setting up the Wireless System 42 Step 5: Performing the Quick Setup 44 Step 6: Enjoying Sound from all the Speakers 47 Sound Adjustment Enjoying... Presetting Radio Stations 77 Listening to the Radio 78 Control for HDMI/External Audio Device Using the Control for HDMI Function for "BRAVIA" Sync 80 Using the DIGITAL MEDIA PORT Adapter 83 Using an S-AIR Product 84 Other Operations Getting Optimal Surround Sound for a...
... the S-AIR function 4 Playable Discs 6 Getting Started Step 1: Assembling the Speakers 15 Step 2: Positioning the System... 21 Step 3: Connecting the System... 25 Step 4: Setting up the Wireless System 42 Step 5: Performing the Quick Setup 44 Step 6: Enjoying Sound from all the Speakers 47 Sound Adjustment Enjoying... Presetting Radio Stations 77 Listening to the Radio 78 Control for HDMI/External Audio Device Using the Control for HDMI Function for "BRAVIA" Sync 80 Using the DIGITAL MEDIA PORT Adapter 83 Using an S-AIR Product 84 Other Operations Getting Optimal Surround Sound for a...

Operating Instructions
Page 6
... DATA CD format, containing MP3 files1) and JPEG image files2), and conforming to ISO 96603) Level 1/ Level 2, or Joliet (extended format) • DVD-ROM/DVD-R/DVD-RW/ DVD+R/DVD+RW in DATA DVD format, containing MP3 files1) and JPEG image files2), and conforming to UDF (Universal Disk Format) 1)MP3 (MPEG1 Audio Layer 3) is a standard format defined...
... DATA CD format, containing MP3 files1) and JPEG image files2), and conforming to ISO 96603) Level 1/ Level 2, or Joliet (extended format) • DVD-ROM/DVD-R/DVD-RW/ DVD+R/DVD+RW in DATA DVD format, containing MP3 files1) and JPEG image files2), and conforming to UDF (Universal Disk Format) 1)MP3 (MPEG1 Audio Layer 3) is a standard format defined...

Operating Instructions
Page 7
...one side with paper or stickers on it • A disc that does not contain MP3 files or JPEG image files • DVD-RAM Also, the system cannot play the following discs: • A DVD VIDEO with a different region code (page 8) • A disc that has a non-standard shape (e.g., card, heart) •... aware that among those discs, there are trademarks. Example of discs that the system cannot play The system cannot play the following discs: • CD-ROM/CD-R/CD-RW other side. "DVD-RW," "DVD+RW," "DVD+R,""DVD VIDEO," and the "CD" logos are some that some playback functions may not...
...one side with paper or stickers on it • A disc that does not contain MP3 files or JPEG image files • DVD-RAM Also, the system cannot play the following discs: • A DVD VIDEO with a different region code (page 8) • A disc that has a non-standard shape (e.g., card, heart) •... aware that among those discs, there are trademarks. Example of discs that the system cannot play The system cannot play the following discs: • CD-ROM/CD-R/CD-RW other side. "DVD-RW," "DVD+RW," "DVD+R,""DVD VIDEO," and the "CD" logos are some that some playback functions may not...

Operating Instructions
Page 8
... to play any other DVD VIDEO, the message [Playback prohibited by area restrictions. This system incorporates High-Definition Multimedia Interface (HDMITM) technology. "BRAVIA" and are registered trademarks of the unit and will also play on this system. Depending on the DVD VIDEO, no region code... for home and other intellectual property rights. About Multi Session CD • This system can play a Multi Session CD when an MP3 file is contained in the first session. "S-AIR" and its logo are trademarks of Sony Corporation. 8US This system incorporates with the DVD or...
... to play any other DVD VIDEO, the message [Playback prohibited by area restrictions. This system incorporates High-Definition Multimedia Interface (HDMITM) technology. "BRAVIA" and are registered trademarks of the unit and will also play on this system. Depending on the DVD VIDEO, no region code... for home and other intellectual property rights. About Multi Session CD • This system can play a Multi Session CD when an MP3 file is contained in the first session. "S-AIR" and its logo are trademarks of Sony Corporation. 8US This system incorporates with the DVD or...

Operating Instructions
Page 9
Getting Started Getting Started Unpacking DAV-HDX575WC • Front speakers (2) • Speaker cords (6, red/white/ • Post covers (2) green/gray/blue/purple) • Video cord (1) • Screws (large, with washer) (4) • ...
Getting Started Getting Started Unpacking DAV-HDX575WC • Front speakers (2) • Speaker cords (6, red/white/ • Post covers (2) green/gray/blue/purple) • Video cord (1) • Screws (large, with washer) (4) • ...
Operating Instructions
Page 10
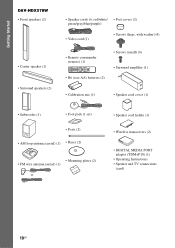
Getting Started DAV-HDX578W • Front speakers (2) • Center speaker (1) • Surround speakers (2) • Speaker cords (6, red/white/ • Post covers (2) green/gray/blue/purple) • Video cord (1) &#...
Getting Started DAV-HDX578W • Front speakers (2) • Center speaker (1) • Surround speakers (2) • Speaker cords (6, red/white/ • Post covers (2) green/gray/blue/purple) • Video cord (1) &#...

Operating Instructions
Page 11
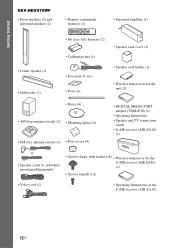
Getting Started DAV-HDX678WF • Front speakers (2) • Video cord (1) • Surround amplifier (1) • Remote commander (remote) (1) • Speaker cord cover (1) • Center speaker (1) • Surround speakers (2) • R6 (...
Getting Started DAV-HDX678WF • Front speakers (2) • Video cord (1) • Surround amplifier (1) • Remote commander (remote) (1) • Speaker cord cover (1) • Center speaker (1) • Surround speakers (2) • R6 (...
Operating Instructions
Page 12
Getting Started DAV-HDX975WF • Front speakers (2) and surround speakers (2) • Remote commander (remote) (1) • Surround amplifier (1) • Center speaker (1) • Subwoofer (1) • R6 (size AA) batteries (2) • ...
Getting Started DAV-HDX975WF • Front speakers (2) and surround speakers (2) • Remote commander (remote) (1) • Surround amplifier (1) • Center speaker (1) • Subwoofer (1) • R6 (size AA) batteries (2) • ...

Operating Instructions
Page 13
...remote at the remote sensor on the batteries to use a new battery with the Supplied Remote" (page 92). 13US When operating the system, point the remote at the TV. About operation of the subwoofer to stabilize the subwoofer and prevent it from slipping. , Remove the... foot pads from battery leakage and corrosion. The remote enters system operation mode. The remote enters the TV mode. Using the remote Inserting batteries into the remote casing, particularly when replacing the batteries. •...
...remote at the remote sensor on the batteries to use a new battery with the Supplied Remote" (page 92). 13US When operating the system, point the remote at the TV. About operation of the subwoofer to stabilize the subwoofer and prevent it from slipping. , Remove the... foot pads from battery leakage and corrosion. The remote enters system operation mode. The remote enters the TV mode. Using the remote Inserting batteries into the remote casing, particularly when replacing the batteries. •...

Operating Instructions
Page 14
Getting Started TV Note • Do not expose the remote sensor to direct sunlight or lighting apparatus. Doing so may cause a malfunction. 14US
Getting Started TV Note • Do not expose the remote sensor to direct sunlight or lighting apparatus. Doing so may cause a malfunction. 14US

Operating Instructions
Page 15
... the Speakers Before connecting the speakers, attach the speaker stand to the speaker. (For the front speakers of DAV-HDX575WC/DAV-HDX578W/DAV-HDX678WF, front and surround speakers of DAV-HDX975WF) Use the parts as follows: DAV-HDX575WC/DAV-HDX578W/DAV-HDX678WF • Front speakers (2) • Speaker cords (2, red/white) • Posts (2) • Bases (2) • Mounting plates (2) • Post...
... the Speakers Before connecting the speakers, attach the speaker stand to the speaker. (For the front speakers of DAV-HDX575WC/DAV-HDX578W/DAV-HDX678WF, front and surround speakers of DAV-HDX975WF) Use the parts as follows: DAV-HDX575WC/DAV-HDX578W/DAV-HDX678WF • Front speakers (2) • Speaker cords (2, red/white) • Posts (2) • Bases (2) • Mounting plates (2) • Post...

Operating Instructions
Page 16
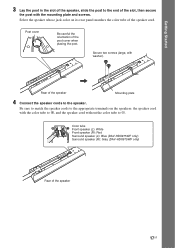
Thread the speaker cord (and the speaker system cord) into the end of the post that the slot of the post engages with the tab of the post cover, then secure with the ... of the speaker cords are the same color as follows: • Front speaker (L): White • Front speaker (R): Red • Surround speaker (L): Blue (DAV-HDX975WF only) • Surround speaker (R): Gray (DAV-HDX975WF only) Be careful with the screw. Use the speaker cords as the label of the jacks to the other end of...
Thread the speaker cord (and the speaker system cord) into the end of the post that the slot of the post engages with the tab of the post cover, then secure with the ... of the speaker cords are the same color as follows: • Front speaker (L): White • Front speaker (R): Red • Surround speaker (L): Blue (DAV-HDX975WF only) • Surround speaker (R): Gray (DAV-HDX975WF only) Be careful with the screw. Use the speaker cords as the label of the jacks to the other end of...
Operating Instructions
Page 17
... color tube to 3, and the speaker cord without the color tube to the speaker. Color tube Front speaker (L): White Front speaker (R): Red Surround speaker (L): Blue (DAV-HDX975WF only) Surround speaker (R): Gray (DAV-HDX975WF only) Rear of the speaker 17US
... color tube to 3, and the speaker cord without the color tube to the speaker. Color tube Front speaker (L): White Front speaker (R): Red Surround speaker (L): Blue (DAV-HDX975WF only) Surround speaker (R): Gray (DAV-HDX975WF only) Rear of the speaker 17US

Operating Instructions
Page 18
Loosen (but do not remove) the screws, adjust the height of the speaker, grasp the speaker so that the speaker does not fall. Lines Post Loosen two screws. , Secure two screws. 18US Adjust the speaker of one side, then adjust another speaker by rotating the post slightly. 6 Adjust the height of the speaker. Post Slit , Projection Base Screws (small) Note • Make sure that the slit on the post aligns with the projection of the base, then secure the post with the projection of the base by checking lines as a guide. Getting Started 5 Attach the post to the base....
Loosen (but do not remove) the screws, adjust the height of the speaker, grasp the speaker so that the speaker does not fall. Lines Post Loosen two screws. , Secure two screws. 18US Adjust the speaker of one side, then adjust another speaker by rotating the post slightly. 6 Adjust the height of the speaker. Post Slit , Projection Base Screws (small) Note • Make sure that the slit on the post aligns with the projection of the base, then secure the post with the projection of the base by checking lines as a guide. Getting Started 5 Attach the post to the base....

Operating Instructions
Page 19
Fully-assembled illustration DAV-HDX575WC/DAV-HDX578W/DAV-HDX678WF Front speaker (L): White label Front speaker (R): Red label White Red 19US Take up any speaker cord slack. Secure the speaker cord by pulling from the bottom of the cord. Adjust the length of the base. Getting Started 7 Take up slack in the speaker cord by running it through the slot.
Fully-assembled illustration DAV-HDX575WC/DAV-HDX578W/DAV-HDX678WF Front speaker (L): White label Front speaker (R): Red label White Red 19US Take up any speaker cord slack. Secure the speaker cord by pulling from the bottom of the cord. Adjust the length of the base. Getting Started 7 Take up slack in the speaker cord by running it through the slot.
Operating Instructions
Page 20
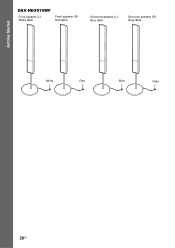
Getting Started DAV-HDX975WF Front speaker (L): White label Front speaker (R): Red label Surround speaker (L): Blue label Surround speaker (R): Gray label White Red Blue Gray 20US
Getting Started DAV-HDX975WF Front speaker (L): White label Front speaker (R): Red label Surround speaker (L): Blue label Surround speaker (R): Gray label White Red Blue Gray 20US