Operating Instructions
Page 2
... sale in accordance with the installation instructions. However, there is connected to radio communications. To prevent injury, this product. Precautions On power sources • The unit is not disconnected from the mains as long as lighted candles on the bottom exterior. For the customers in the space provided below. Owner's Record The model and serial numbers are designed to disconnect...
... sale in accordance with the installation instructions. However, there is connected to radio communications. To prevent injury, this product. Precautions On power sources • The unit is not disconnected from the mains as long as lighted candles on the bottom exterior. For the customers in the space provided below. Owner's Record The model and serial numbers are designed to disconnect...
Operating Instructions
Page 6
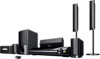
... the Quick Setup 29 Step 4: Selecting the Source .......32 Step 5: Enjoying Surround Sound 33 Disc Playing a Disc 36 Using Play Mode 41 Searching/Selecting Disc Contents ....... 44 Playing MP3 Files/JPEG Image Files... 46 Adjusting the Delay Between the Picture and Sound 50 Restricting Playback of the Disc........... 50 Changing the System Settings by Using the Setup Display 52 Tuner Presetting Radio Stations 60 Listening to the Radio 61 Control for HDMI/External Audio Device Using the Control for HDMI Function for "BRAVIA" Sync 63 Using the DIGITAL MEDIA PORT Adapter 65 Using an...
... the Quick Setup 29 Step 4: Selecting the Source .......32 Step 5: Enjoying Surround Sound 33 Disc Playing a Disc 36 Using Play Mode 41 Searching/Selecting Disc Contents ....... 44 Playing MP3 Files/JPEG Image Files... 46 Adjusting the Delay Between the Picture and Sound 50 Restricting Playback of the Disc........... 50 Changing the System Settings by Using the Setup Display 52 Tuner Presetting Radio Stations 60 Listening to the Radio 61 Control for HDMI/External Audio Device Using the Control for HDMI Function for "BRAVIA" Sync 63 Using the DIGITAL MEDIA PORT Adapter 65 Using an...
Operating Instructions
Page 22
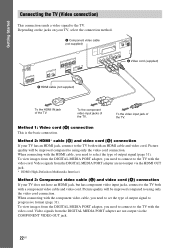
...with the component video cable, you need to using only the video cord connection. Method 1: Video cord (A) connection This is the basic connection. Video signals from the DIGITAL MEDIA PORT adapter are not output via the COMPONENT VIDEO OUT jack. 22US Picture quality will be improved compared to the TV. To the component video input jacks of output signal (page 31). Depending on the jacks on your TV, select the connection method. Getting Started Connecting the TV (Video connection) This connection sends a video signal to using only the video cord connection.
...with the component video cable, you need to using only the video cord connection. Method 1: Video cord (A) connection This is the basic connection. Video signals from the DIGITAL MEDIA PORT adapter are not output via the COMPONENT VIDEO OUT jack. 22US Picture quality will be improved compared to the TV. To the component video input jacks of output signal (page 31). Depending on the jacks on your TV, select the connection method. Getting Started Connecting the TV (Video connection) This connection sends a video signal to using only the video cord connection.
Operating Instructions
Page 30
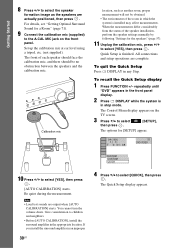
... system is in any Step. The Control Menu display appears on the front panel. To recall the Quick Setup display 1 Press FUNCTION +/- Set up the calibration mic at ear level using a tripod, etc. (not supplied). All connections and setup operations are output when [AUTO CALIBRATION] starts. Give consideration to select [QUICK], then press . The Quick Setup display appears. For details, see "Getting Optimal Surround Sound for a Room" (page 71). 9 Connect the calibration mic (supplied) to the A.CAL MIC jack on the TV screen...
... system is in any Step. The Control Menu display appears on the front panel. To recall the Quick Setup display 1 Press FUNCTION +/- Set up the calibration mic at ear level using a tripod, etc. (not supplied). All connections and setup operations are output when [AUTO CALIBRATION] starts. Give consideration to select [QUICK], then press . The Quick Setup display appears. For details, see "Getting Optimal Surround Sound for a Room" (page 71). 9 Connect the calibration mic (supplied) to the A.CAL MIC jack on the TV screen...
Operating Instructions
Page 31
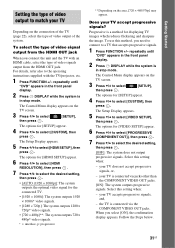
... COMPONENT VIDEO OUT jacks. [ON]: The system outputs progressive signals. Getting Started Setting the type of video output to match your TV Depending on the TV screen. 3 Press X/x to select [SETUP], then press . The Control Menu display appears on the connection of the TV (page 22), select the type of video output of the system. For details, refer also to the operating instructions supplied with an HDMI cable, select the type of video signal output from the HDMI OUT jack...
... COMPONENT VIDEO OUT jacks. [ON]: The system outputs progressive signals. Getting Started Setting the type of video output to match your TV Depending on the TV screen. 3 Press X/x to select [SETUP], then press . The Control Menu display appears on the connection of the TV (page 22), select the type of video output of the system. For details, refer also to the operating instructions supplied with an HDMI cable, select the type of video signal output from the HDMI OUT jack...
Operating Instructions
Page 36
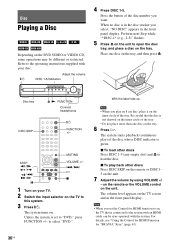
... the VOLUME control on the TV screen and in the front panel display. The volume level appears on the unit. With the label side up. For details, see "Using the Control for HDMI Function for HDMI function to on, the TV that the disc is in the disc stocker you set to the operating instructions supplied with your TV. 2 Switch the input selector on the TV to the system with an HDMI cable...
... the VOLUME control on the TV screen and in the front panel display. The volume level appears on the unit. With the label side up. For details, see "Using the Control for HDMI Function for HDMI function to on, the TV that the disc is in the disc stocker you set to the operating instructions supplied with your TV. 2 Switch the input selector on the TV to the system with an HDMI cable...

Operating Instructions
Page 37
... press . To return to adjust the sound volume. The system enters standby mode. The sound of the system is on the the disc unit. twice in the disc stocker but not selected. - Turn off Press "/1 while the system is muted.) Other operations To Press Stop x Pause X Resume play and remove DISC 1-5 and Z on . To Press Change a disc while playing another disc DISC SKIP Play the desired disc directly DISC 1-5 on the unit. Stop play after pause X or...
... press . To return to adjust the sound volume. The system enters standby mode. The sound of the system is on the the disc unit. twice in the disc stocker but not selected. - Turn off Press "/1 while the system is muted.) Other operations To Press Stop x Pause X Resume play and remove DISC 1-5 and Z on . To Press Change a disc while playing another disc DISC SKIP Play the desired disc directly DISC 1-5 on the unit. Stop play after pause X or...

Operating Instructions
Page 53
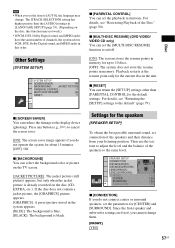
... disc's menu. Note • When you select [AUDIO FOLLOW], the language for the on the disc, the language may not be connected. Example: [4:3 LETTER BOX] VIDEO SETUP TV TYPE: 4:3 LETTER BOX PROGRESSIVE (COMPONENT OUT): OFF 4:3 OUTPUT: FULL BLACK LEVEL: ON BLACK LEVEL (COMPONENT OUT): OFF PAUSE MODE: AUTO Selected setting To reset all of the [SETUP] settings To reset all of the recorded languages will be automatically selected (depending on -screen display or sound track. Setting the display or sound...
... disc's menu. Note • When you select [AUDIO FOLLOW], the language for the on the disc, the language may not be connected. Example: [4:3 LETTER BOX] VIDEO SETUP TV TYPE: 4:3 LETTER BOX PROGRESSIVE (COMPONENT OUT): OFF 4:3 OUTPUT: FULL BLACK LEVEL: ON BLACK LEVEL (COMPONENT OUT): OFF PAUSE MODE: AUTO Selected setting To reset all of the [SETUP] settings To reset all of the recorded languages will be automatically selected (depending on -screen display or sound track. Setting the display or sound...
Operating Instructions
Page 55
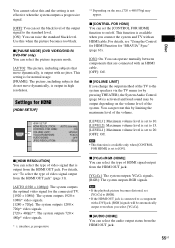
... maximum level of the system. Disc You cannot select this and the setting is activated and loud sound may appear. x [AUDIO (HDMI)] You can select the type of video signal output from the HDMI OUT jack. For details, see "To select the type of HDMI signal output from the HDMI OUT jack. 55US x [VOLUME LIMIT] If you select [YCBCR]. Note • If the playback picture becomes distorted, set the [CONTROL FOR HDMI] function to a component with an HDMI cable. [OFF...
... maximum level of the system. Disc You cannot select this and the setting is activated and loud sound may appear. x [AUDIO (HDMI)] You can select the type of video signal output from the HDMI OUT jack. For details, see "To select the type of HDMI signal output from the HDMI OUT jack. 55US x [VOLUME LIMIT] If you select [YCBCR]. Note • If the playback picture becomes distorted, set the [CONTROL FOR HDMI] function to a component with an HDMI cable. [OFF...
Operating Instructions
Page 57
... system selects PCM, DTS, Dolby Digital sound, and MPEG audio in this function may change them. [FRONT] [YES] 57US x [RESET] You can set connection of the speakers to adjust the level and the balance of the speakers and their distance from your listening position. Then use the test tone to the same level. Since the front speaker and subwoofer settings are fixed, you do not operate the system for the speakers [SPEAKER SETUP] To obtain the best possible surround sound, set the [MULTI-DISC RESUME] function...
... system selects PCM, DTS, Dolby Digital sound, and MPEG audio in this function may change them. [FRONT] [YES] 57US x [RESET] You can set connection of the speakers to adjust the level and the balance of the speakers and their distance from your listening position. Then use the test tone to the same level. Since the front speaker and subwoofer settings are fixed, you do not operate the system for the speakers [SPEAKER SETUP] To obtain the best possible surround sound, set the [MULTI-DISC RESUME] function...
Operating Instructions
Page 63
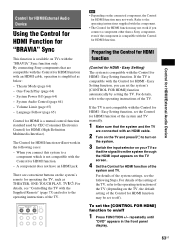
... Control for HDMI function may not work . Refer to off 1 Press FUNCTION +/- By connecting Sony components that the signal from the system through the HDMI input appears on TVs with the "BRAVIA" Sync function only. Theater Mode (page 64) - System Audio Control (page 64) - Easy Setting) The system is simplified as THEATER, ONE-TOUCH PLAY, TV [/1. To set to the operating instructions supplied with the component. • The Control for HDMI function may not work if you connect this system to on the system's remote for operating...
... Control for HDMI function may not work . Refer to off 1 Press FUNCTION +/- By connecting Sony components that the signal from the system through the HDMI input appears on TVs with the "BRAVIA" Sync function only. Theater Mode (page 64) - System Audio Control (page 64) - Easy Setting) The system is simplified as THEATER, ONE-TOUCH PLAY, TV [/1. To set to the operating instructions supplied with the component. • The Control for HDMI function may not work if you connect this system to on the system's remote for operating...
Operating Instructions
Page 64
.... Enjoying TV sound from the system speakers, and the volume of the system is minimized automatically. The Control Menu display appears on , the TV is in sync with the TV (System Power Off) When you are watching the TV and the function of the TV speakers is switched to select [SETUP], then press . r r Minimizes sound level. Watching a DVD by pressing THEATER. 2 Press DISPLAY while the system is set for DVD input mode, and the system starts playing a disc automatically.
.... Enjoying TV sound from the system speakers, and the volume of the system is minimized automatically. The Control Menu display appears on , the TV is in sync with the TV (System Power Off) When you are watching the TV and the function of the TV speakers is switched to select [SETUP], then press . r r Minimizes sound level. Watching a DVD by pressing THEATER. 2 Press DISPLAY while the system is set for DVD input mode, and the system starts playing a disc automatically.
Operating Instructions
Page 72
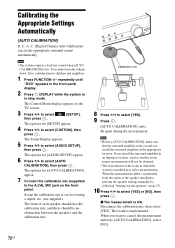
... select [AUTO CALIBRATION], then press . When you install the surround amplifier in the appropriate location. C. (Digital Cinema Auto Calibration) can set the appropriate surround sound automatically. repeatedly until "DVD" appears in which the system is implemented. Calibration mic 8 Press C/c to select [AUDIO SETUP], then press . When the measurements differ considerably from the status of the room in the front panel display. 2 Press DISPLAY while the system is OK. Note • The system outputs a loud test sound when [AUTO CALIBRATION] starts...
... select [AUTO CALIBRATION], then press . When you install the surround amplifier in the appropriate location. C. (Digital Cinema Auto Calibration) can set the appropriate surround sound automatically. repeatedly until "DVD" appears in which the system is implemented. Calibration mic 8 Press C/c to select [AUDIO SETUP], then press . When the measurements differ considerably from the status of the room in the front panel display. 2 Press DISPLAY while the system is OK. Note • The system outputs a loud test sound when [AUTO CALIBRATION] starts...
Operating Instructions
Page 75
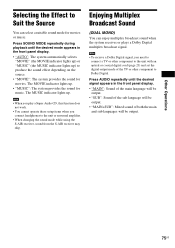
... select a suitable sound mode for music. Note • To receive a Dolby Digital signal, you connect headphones to the unit or surround amplifier. • When changing the sound mode while using the S-AIR receiver, sound from the S-AIR receiver may skip. Selecting the Effect to Suit the Source You can enjoy multiplex broadcast sound when the system receives or plays a Dolby Digital multiplex broadcast signal. Note • When you play a Super Audio CD, this function does not work. • You cannot operate these setup...
... select a suitable sound mode for music. Note • To receive a Dolby Digital signal, you connect headphones to the unit or surround amplifier. • When changing the sound mode while using the S-AIR receiver, sound from the S-AIR receiver may skip. Selecting the Effect to Suit the Source You can enjoy multiplex broadcast sound when the system receives or plays a Dolby Digital multiplex broadcast signal. Note • When you play a Super Audio CD, this function does not work. • You cannot operate these setup...
Operating Instructions
Page 85
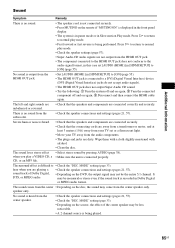
... or stereo even if the sound track is connected properly. MODE" setting (page 33). • Depending on the source, the effect of Dolby Digital, DTS, or MPEG audio. • Depending on the DVD, the output signal may come from the subwoofer. • Check the speaker connections and settings (pages 21, 57). Press H to return to normal play a VIDEO CD, a • Make sure the unit is recorded in Dolby Digital or MPEG audio format...
... or stereo even if the sound track is connected properly. MODE" setting (page 33). • Depending on the source, the effect of Dolby Digital, DTS, or MPEG audio. • Depending on the DVD, the output signal may come from the subwoofer. • Check the speaker connections and settings (pages 21, 57). Press H to return to normal play a VIDEO CD, a • Make sure the unit is recorded in Dolby Digital or MPEG audio format...
Operating Instructions
Page 87
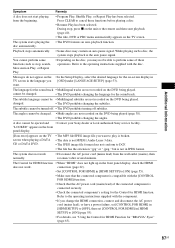
... operating instructions supplied with the component. • If you may contain an auto pause signal. The system does not work . During stop , search, Slow-motion Play, or Repeat Play. • Depending on the disc, you change the HDMI connection, connect and disconnect the AC power cord (mains lead), or have a power failure, set [CONTROL FOR HDMI] in JPEG format. The language for "BRAVIA" Sync" (page 63). 87US changed . • The DVD prohibits changing the language for HDMI function. A disc...
... operating instructions supplied with the component. • If you may contain an auto pause signal. The system does not work . During stop , search, Slow-motion Play, or Repeat Play. • Depending on the disc, you change the HDMI connection, connect and disconnect the AC power cord (mains lead), or have a power failure, set [CONTROL FOR HDMI] in JPEG format. The language for "BRAVIA" Sync" (page 63). 87US changed . • The DVD prohibits changing the language for HDMI function. A disc...
Operating Instructions
Page 92
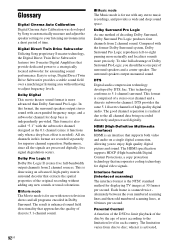
... Digital Cinema Auto Calibration Digital Cinema Auto Calibration was developed by Sony to automatically measure and adjust the speaker settings to the limitation level in each country. The result is enhanced sound field directionality that approaches the quality of discrete 5.1-channel sound. 92US x Music mode The Music mode is an interface that incorporates coding technology for use with an expanded frequency range, and a subwoofer channel for astounding sound performance. The good channel separation is comprised of decoding Dolby Surround, Dolby Surround...
... Digital Cinema Auto Calibration Digital Cinema Auto Calibration was developed by Sony to automatically measure and adjust the speaker settings to the limitation level in each country. The result is enhanced sound field directionality that approaches the quality of discrete 5.1-channel sound. 92US x Music mode The Music mode is an interface that incorporates coding technology for use with an expanded frequency range, and a subwoofer channel for astounding sound performance. The good channel separation is comprised of decoding Dolby Surround, Dolby Surround...
Operating Instructions
Page 103
... BLACK LEVEL (COMPONENT OUT) 54 C COLD RESET 79 CONTROL FOR HDMI 55 Control for HDMI 63 Control Menu Display 100 CUSTOM 52, 79 D D. A. C. (Digital Cinema Auto Calibration) 72, 92 DEMO 28 Digital Direct Twin Drive Subwoofer 92 DIGITAL MEDIA PORT 65 DIMMER 77 DISPLAY 62 Dolby Digital 38, 92 Dolby Pro Logic II 92 Dolby Surround Pro Logic 92 DTS 38, 92 DUAL MONO 75 DVD's menu 44 DYNAMIC BASS 74 E EFFECT 49 F FM MODE 61 Front panel 96 Front panel display...
... BLACK LEVEL (COMPONENT OUT) 54 C COLD RESET 79 CONTROL FOR HDMI 55 Control for HDMI 63 Control Menu Display 100 CUSTOM 52, 79 D D. A. C. (Digital Cinema Auto Calibration) 72, 92 DEMO 28 Digital Direct Twin Drive Subwoofer 92 DIGITAL MEDIA PORT 65 DIMMER 77 DISPLAY 62 Dolby Digital 38, 92 Dolby Pro Logic II 92 Dolby Surround Pro Logic 92 DTS 38, 92 DUAL MONO 75 DVD's menu 44 DYNAMIC BASS 74 E EFFECT 49 F FM MODE 61 Front panel 96 Front panel display...
Quick Setup Guide
Page 2
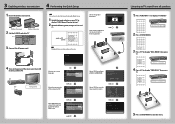
... the Quick Setup Note Do not insert a disc before performing the Quick Setup. 1 Switch the input selector on -screen language. Select the speaker formation. AUTO CALIBRATION Connect calibration mic. 3 Enabling wireless transmission 1 Insert the wireless transceiver. ANTENNA AM FM COAXIAL 75 EZW-RT10 COMPONENT VIDEO OUT VOIDUETO PR/CR PB/CB Y TV/VIDEO R AUDIO IN L S-AIR BC ID PAIRING WIRELESS SPEAKER SYSTEM AIR-SA10 EZW-RT10 Wireless transceiver Wireless transceiver 2 Set the S-AIR ID switch to display "SONY Home Theatre System." 2 Set each following item, using and...
... the Quick Setup Note Do not insert a disc before performing the Quick Setup. 1 Switch the input selector on -screen language. Select the speaker formation. AUTO CALIBRATION Connect calibration mic. 3 Enabling wireless transmission 1 Insert the wireless transceiver. ANTENNA AM FM COAXIAL 75 EZW-RT10 COMPONENT VIDEO OUT VOIDUETO PR/CR PB/CB Y TV/VIDEO R AUDIO IN L S-AIR BC ID PAIRING WIRELESS SPEAKER SYSTEM AIR-SA10 EZW-RT10 Wireless transceiver Wireless transceiver 2 Set the S-AIR ID switch to display "SONY Home Theatre System." 2 Set each following item, using and...
Marketing Specifications
Page 2
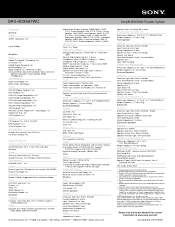
... universally compatible 4. AM: 530- 1710 kHz (10k step)531-1710 kHz (9k step) Inputs and Outputs Antenna Terminal (AM Loop): Yes Antenna Terminal (FM 75 Ohm): Yes Wireless S-Air A/V SYNC (Lip Sync): Yes Dimmer: Yes VACS: Yes DEMO Mode: Yes Illumination Mode: Yes Amplifier General Function: Tuner (FM, AM), DVD, TV/VIDEO, Audio In, DIGITAL MEDIA PORT Audio Equalizer: Bass Boost function (Dynamic Bass on recording conditions 2. Input Terminal: Push Type Speaker System: 1 Way (Full Range) Woofer...
... universally compatible 4. AM: 530- 1710 kHz (10k step)531-1710 kHz (9k step) Inputs and Outputs Antenna Terminal (AM Loop): Yes Antenna Terminal (FM 75 Ohm): Yes Wireless S-Air A/V SYNC (Lip Sync): Yes Dimmer: Yes VACS: Yes DEMO Mode: Yes Illumination Mode: Yes Amplifier General Function: Tuner (FM, AM), DVD, TV/VIDEO, Audio In, DIGITAL MEDIA PORT Audio Equalizer: Bass Boost function (Dynamic Bass on recording conditions 2. Input Terminal: Push Type Speaker System: 1 Way (Full Range) Woofer...


