Operating Instructions
Page 1
2-895-962-13(1) DVD Home Theatre System Operating Instructions DAV-HDX500/HDX501W ©2007 Sony Corporation
2-895-962-13(1) DVD Home Theatre System Operating Instructions DAV-HDX500/HDX501W ©2007 Sony Corporation
Operating Instructions
Page 2
... customers in accordance with the limits for your outlet, consult an electrician for help. Record the serial number in a residential installation. DAV-HDX500/DAV-HDX501W Serial No 2US WARNING This equipment has been tested and found to comply with the instructions, may be determined by turning the ...increase eye hazard. Do not expose the battery to excessive heat such as a bookcase or built-in this manual could void your Sony dealer regarding this apparatus to operate this product will not occur in the literature accompanying the appliance. Refer to them whenever you ...
... customers in accordance with the limits for your outlet, consult an electrician for help. Record the serial number in a residential installation. DAV-HDX500/DAV-HDX501W Serial No 2US WARNING This equipment has been tested and found to comply with the instructions, may be determined by turning the ...increase eye hazard. Do not expose the battery to excessive heat such as a bookcase or built-in this manual could void your Sony dealer regarding this apparatus to operate this product will not occur in the literature accompanying the appliance. Refer to them whenever you ...
Operating Instructions
Page 3
... immediately in any way, such as power-supply cord or plug is a registered trademark of cable entry as it for purchasing Sony DVD Home Theatre System. Sony Corporation hereby grants the user a nonexclusive, non-transferable, limited license right to the point of XM Satellite Radio Inc. Servicing ...of trouble. 13) Unplug this apparatus during lightning storms or when unused for long periods of Neural Audio Corporation. Before operating this system, please read this product under license from the AC power source (mains) as long as practical. Welcome! XM is damaged, liquid...
... immediately in any way, such as power-supply cord or plug is a registered trademark of cable entry as it for purchasing Sony DVD Home Theatre System. Sony Corporation hereby grants the user a nonexclusive, non-transferable, limited license right to the point of XM Satellite Radio Inc. Servicing ...of trouble. 13) Unplug this apparatus during lightning storms or when unused for long periods of Neural Audio Corporation. Before operating this system, please read this product under license from the AC power source (mains) as long as practical. Welcome! XM is damaged, liquid...
Operating Instructions
Page 4
...Adjusting the Delay Between the Picture and Sound 57 (A/V SYNC) About MP3 Audio Tracks and JPEG Image Files 58 Playing DATA CDs or DATA DVDs with MP3 Audio Tracks and JPEG Image Files 60 Playing Audio Tracks and Images as a Slide Show with Sound 62 Playing VIDEO CDs with PBC... Radio 66 Listening to the XM Radio 67 Presetting XM Radio Channels 70 4US BASIC - Step 1: Assembling the Speakers 10 Step 2: Connecting the System and TV 19 Step 3: Positioning the System ...24 Step 4: Performing the Quick Setup 24 Getting Started - Table of Contents Welcome 3 About This Manual 6 This...
...Adjusting the Delay Between the Picture and Sound 57 (A/V SYNC) About MP3 Audio Tracks and JPEG Image Files 58 Playing DATA CDs or DATA DVDs with MP3 Audio Tracks and JPEG Image Files 60 Playing Audio Tracks and Images as a Slide Show with Sound 62 Playing VIDEO CDs with PBC... Radio 66 Listening to the XM Radio 67 Presetting XM Radio Channels 70 4US BASIC - Step 1: Assembling the Speakers 10 Step 2: Connecting the System and TV 19 Step 3: Positioning the System ...24 Step 4: Performing the Quick Setup 24 Getting Started - Table of Contents Welcome 3 About This Manual 6 This...
Operating Instructions
Page 5
... appear in the display) Specifications 101 Glossary 103 Language Code List 107 Index to Parts and Controls 108 Guide to the Control Menu Display ... 111 DVD Setup Display List 114 System Menu List 115 Index 116 5US
... appear in the display) Specifications 101 Glossary 103 Language Code List 107 Index to Parts and Controls 108 Guide to the Control Menu Display ... 111 DVD Setup Display List 114 System Menu List 115 Index 116 5US
Operating Instructions
Page 6
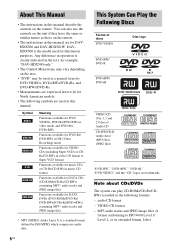
...6US This System Can Play the Following Discs Format of format conforming to ISO 9660 Level 1/ Level 2, or its extended format, Joliet Any difference in operation is clearly indicated in the text, for example, "DAV-HDX500 only." • The Control Menu items may vary depending on the area. • "DVD" may be... used as those on the remote. Note about CDs/DVDs The system can also use the controls on the unit if they have the...
...6US This System Can Play the Following Discs Format of format conforming to ISO 9660 Level 1/ Level 2, or its extended format, Joliet Any difference in operation is clearly indicated in the text, for example, "DAV-HDX500 only." • The Control Menu items may vary depending on the area. • "DVD" may be... used as those on the remote. Note about CDs/DVDs The system can also use the controls on the unit if they have the...
Operating Instructions
Page 7
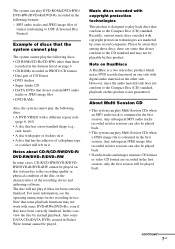
... are some cases, CD-R/CD-RW/DVD-R/DVDRW/DVD+R/DVD+RW cannot be played. The system can play Multi Session CDs when an MP3 audio track is contained in the first session. About Multi Session CD • This system can play DVD-ROMs/DVD+RWs/ DVD-RWs/DVD+Rs/DVD-Rs recorded in the following discs:... • A DVD VIDEO with a different region code (page 8, 105) • A disc that some playback functions may ...
... are some cases, CD-R/CD-RW/DVD-R/DVDRW/DVD+R/DVD+RW cannot be played. The system can play Multi Session CDs when an MP3 audio track is contained in the first session. About Multi Session CD • This system can play DVD-ROMs/DVD+RWs/ DVD-RWs/DVD+Rs/DVD-Rs recorded in the following discs:... • A DVD VIDEO with a different region code (page 8, 105) • A disc that some playback functions may ...
Operating Instructions
Page 8
... CDs may be given even though playing the DVD VIDEO is intended for home and other limited viewing uses only unless otherwise authorized by Macrovision. patents and other intellectual property rights. If you try to play DVDs labeled with the same region code. Copyrights This... [Playback prohibited by area limitations.] will also play on this copyright protection technology must be available. DVD VIDEOs labeled ALL will appear on the TV screen. This system incorporates with the DVDs or VIDEO CDs. "Dolby", "Pro Logic", and the double-D symbol are registered trademarks of DTS...
... CDs may be given even though playing the DVD VIDEO is intended for home and other limited viewing uses only unless otherwise authorized by Macrovision. patents and other intellectual property rights. If you try to play DVDs labeled with the same region code. Copyrights This... [Playback prohibited by area limitations.] will also play on this copyright protection technology must be available. DVD VIDEOs labeled ALL will appear on the TV screen. This system incorporates with the DVDs or VIDEO CDs. "Dolby", "Pro Logic", and the double-D symbol are registered trademarks of DTS...

Operating Instructions
Page 9
... do not intend to use a new battery with an old one. • Do not drop any foreign object into the remote You can control the system using the supplied remote. Insert two R6 (size AA) batteries by matching the 3 and # ends on the batteries to stabilize the subwoofer and prevent it...
... do not intend to use a new battery with an old one. • Do not drop any foreign object into the remote You can control the system using the supplied remote. Insert two R6 (size AA) batteries by matching the 3 and # ends on the batteries to stabilize the subwoofer and prevent it...

Operating Instructions
Page 10
BASIC - Getting Started - Step 1: Assembling the Speakers Before connecting the speakers, attach the speaker stand to the speaker. (For the front speakers.) About how to connect the speaker cords to avoid damaging the floor. Tip • You can use the speaker without the speaker stand by installing it on the floor to the SPEAKER jacks, see page 21. Screw (small, black) Screw (small, silver) Screw (large, with the orientation of the post. Use the speaker cords as the label of the post that has 2 holes. Be careful with washer) 1 Thread the speaker cord through the hole on the...
BASIC - Getting Started - Step 1: Assembling the Speakers Before connecting the speakers, attach the speaker stand to the speaker. (For the front speakers.) About how to connect the speaker cords to avoid damaging the floor. Tip • You can use the speaker without the speaker stand by installing it on the floor to the SPEAKER jacks, see page 21. Screw (small, black) Screw (small, silver) Screw (large, with the orientation of the post. Use the speaker cords as the label of the post that has 2 holes. Be careful with washer) 1 Thread the speaker cord through the hole on the...
Operating Instructions
Page 11
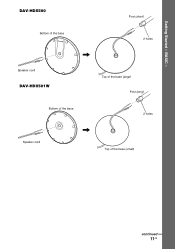
Getting Started - BASIC - DAV-HDX500 Post (short) Bottom of the base 2 holes Speaker cord DAV-HDX501W , Top of the base (large) Post (long) Bottom of the base 2 holes Speaker cord , Top of the base (small) continued 11US
Getting Started - BASIC - DAV-HDX500 Post (short) Bottom of the base 2 holes Speaker cord DAV-HDX501W , Top of the base (large) Post (long) Bottom of the base 2 holes Speaker cord , Top of the base (small) continued 11US
Operating Instructions
Page 12
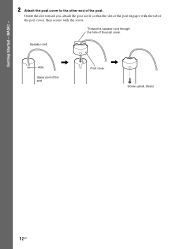
Orient the slot toward you, attach the post cover so that the slot of the post engages with the tab of the post Post cover , Screw (small, black) 12US Speaker cord , Hole Upper part of the post cover, then secure with the screw. Getting Started - Thread the speaker cord through the hole of the post. BASIC - 2 Attach the post cover to the other end of the post cover.
Orient the slot toward you, attach the post cover so that the slot of the post engages with the tab of the post Post cover , Screw (small, black) 12US Speaker cord , Hole Upper part of the post cover, then secure with the screw. Getting Started - Thread the speaker cord through the hole of the post. BASIC - 2 Attach the post cover to the other end of the post cover.

Operating Instructions
Page 13
...in the slot of the speaker, slide the post to the end of the slot, then secure the post with washer) in criss-cross pattern. DAV-HDX500 Post cover Be careful the orientation of the post cover when placing the post. Secure 2 screws (large, with the mounting plate and screws. ...Rear of the speaker , DAV-HDX501W Post cover Be careful the orientation of the post cover when placing the post. Mounting plate Secure 2 screws (large, with washer) in criss-...
...in the slot of the speaker, slide the post to the end of the slot, then secure the post with washer) in criss-cross pattern. DAV-HDX500 Post cover Be careful the orientation of the post cover when placing the post. Secure 2 screws (large, with the mounting plate and screws. ...Rear of the speaker , DAV-HDX501W Post cover Be careful the orientation of the post cover when placing the post. Mounting plate Secure 2 screws (large, with washer) in criss-...
Operating Instructions
Page 14
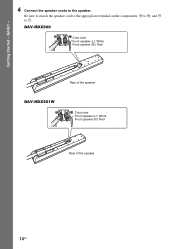
BASIC - 4 Connect the speaker cords to #. DAV-HDX500 Color tube Front speaker (L): White Front speaker (R): Red Rear of the speaker DAV-HDX501W Color tube Front speaker (L): White Front speaker (R): Red Rear of the speaker 14US Be sure to match the speaker cord to the appropriate terminal on the components: 3 to 3, and # to the speaker. Getting Started -
BASIC - 4 Connect the speaker cords to #. DAV-HDX500 Color tube Front speaker (L): White Front speaker (R): Red Rear of the speaker DAV-HDX501W Color tube Front speaker (L): White Front speaker (R): Red Rear of the speaker 14US Be sure to match the speaker cord to the appropriate terminal on the components: 3 to 3, and # to the speaker. Getting Started -

Operating Instructions
Page 15
Insert the post so that the slot on the lower part of the post aligns with the projection of the base, then secure the post with the projection of the base by rotating the post slightly. Post Slit Projection Base DAV-HDX501W , Screws (small, silver) Post Slit Projection Base , Screws (small, silver) Note • Make sure that the slit on the post aligns with the 2 screws. DAV-HDX500 Getting Started - BASIC - continued 15US 5 Attach the post to the base.
Insert the post so that the slot on the lower part of the post aligns with the projection of the base, then secure the post with the projection of the base by rotating the post slightly. Post Slit Projection Base DAV-HDX501W , Screws (small, silver) Post Slit Projection Base , Screws (small, silver) Note • Make sure that the slit on the post aligns with the 2 screws. DAV-HDX500 Getting Started - BASIC - continued 15US 5 Attach the post to the base.
Operating Instructions
Page 16
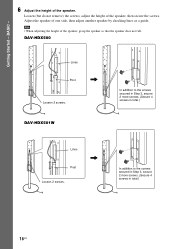
... the screws. Loosen (but do not remove) the screws, adjust the height of one side, then adjust another speaker by checking lines as a guide. DAV-HDX500 Lines Post , Loosen 2 screws. BASIC - 6 Adjust the height of the speaker, grasp the speaker so that the speaker does not fall. Note &#...8226; When adjusting the height of the speaker. DAV-HDX501W In addition to the screws secured in Step 3, secure 2 more screws. (Secure 4 screws in total.) Lines Post Loosen 2 screws. , In addition...
... the screws. Loosen (but do not remove) the screws, adjust the height of one side, then adjust another speaker by checking lines as a guide. DAV-HDX500 Lines Post , Loosen 2 screws. BASIC - 6 Adjust the height of the speaker, grasp the speaker so that the speaker does not fall. Note &#...8226; When adjusting the height of the speaker. DAV-HDX501W In addition to the screws secured in Step 3, secure 2 more screws. (Secure 4 screws in total.) Lines Post Loosen 2 screws. , In addition...

Operating Instructions
Page 17
DAV-HDX500 Take up slack in the cord clamp. Bottom of the base Adjust the length of the cord. DAV-HDX501W Take up any speaker cord slack. continued 17US Getting Started - Cord clamp , Secure the speaker cord by running it through the slot. Adjust the length of the cord. BASIC - 7 Take up slack in the speaker cord by pulling from the bottom of the base and hook the speaker cord in the speaker cord by pulling from the bottom of the base. Secure the speaker cord by running it through the slot.
DAV-HDX500 Take up slack in the cord clamp. Bottom of the base Adjust the length of the cord. DAV-HDX501W Take up any speaker cord slack. continued 17US Getting Started - Cord clamp , Secure the speaker cord by running it through the slot. Adjust the length of the cord. BASIC - 7 Take up slack in the speaker cord by pulling from the bottom of the base and hook the speaker cord in the speaker cord by pulling from the bottom of the base. Secure the speaker cord by running it through the slot.

Operating Instructions
Page 18
White Red DAV-HDX501W Front speaker (L): White label Front speaker (R): Red label White Red 18US Fully-assembled illustration DAV-HDX500 Front speaker (L): White label Front speaker (R): Red label Getting Started - BASIC -
White Red DAV-HDX501W Front speaker (L): White label Front speaker (R): Red label White Red 18US Fully-assembled illustration DAV-HDX500 Front speaker (L): White label Front speaker (R): Red label Getting Started - BASIC -
Operating Instructions
Page 19
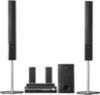
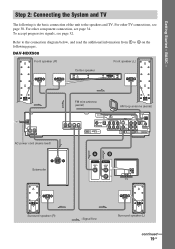
...see page 32. Refer to the connection diagram below, and read the additional information from 1 to the speakers and TV. Getting Started - DAV-HDX500 Front speaker (R) Front speaker (L) Center speaker CENTER WOOFER SPEAKER AC power cord (mains lead) Subwoofer FM wire antenna (aerial) AM loop ...S VIDEO (DVD ONLY) Y PB/CB PR/CR COMPONENT VIDEO OUT VIDEO MONITOR OUT R AUDIO IN L TV XM DMPORT1 FM 75 COAXIAL ANTENNA DMPORT2 AB VIDEO IN AUDIO OUT L R TV Surround speaker (R) :Signal flow Surround speaker (L) continued 19US BASIC - Step 2: Connecting the System and TV ...
...see page 32. Refer to the connection diagram below, and read the additional information from 1 to the speakers and TV. Getting Started - DAV-HDX500 Front speaker (R) Front speaker (L) Center speaker CENTER WOOFER SPEAKER AC power cord (mains lead) Subwoofer FM wire antenna (aerial) AM loop ...S VIDEO (DVD ONLY) Y PB/CB PR/CR COMPONENT VIDEO OUT VIDEO MONITOR OUT R AUDIO IN L TV XM DMPORT1 FM 75 COAXIAL ANTENNA DMPORT2 AB VIDEO IN AUDIO OUT L R TV Surround speaker (R) :Signal flow Surround speaker (L) continued 19US BASIC - Step 2: Connecting the System and TV ...
Operating Instructions
Page 20
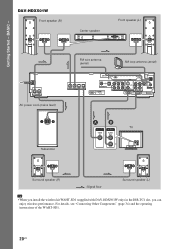
BASIC - DAV-HDX501W Front speaker (R) Center speaker Front speaker (L) CENTER WOOFER SPEAKER AC power cord (mains lead) FM wire antenna (aerial) AM loop antenna (aerial) FRONT R FRONT L SUR R SPEAKER SUR L DIR-TC1 COAXIAL OPTICAL DIGITAL IN SAT/CABLE OUT (DVD ONLY) COMPONENT ...DVD ONLY) Y PB/CB PR/CR COMPONENT VIDEO OUT VIDEO MONITOR OUT R AUDIO IN L TV XM DMPORT1 FM 75 COAXIAL ANTENNA DMPORT2 Subwoofer AB TV VIDEO IN AUDIO OUT L R Surround speaker (R) :Signal flow Surround speaker (L) Tip • When you install the wireless kit WAHT-SD1 (supplied with DAV...
BASIC - DAV-HDX501W Front speaker (R) Center speaker Front speaker (L) CENTER WOOFER SPEAKER AC power cord (mains lead) FM wire antenna (aerial) AM loop antenna (aerial) FRONT R FRONT L SUR R SPEAKER SUR L DIR-TC1 COAXIAL OPTICAL DIGITAL IN SAT/CABLE OUT (DVD ONLY) COMPONENT ...DVD ONLY) Y PB/CB PR/CR COMPONENT VIDEO OUT VIDEO MONITOR OUT R AUDIO IN L TV XM DMPORT1 FM 75 COAXIAL ANTENNA DMPORT2 Subwoofer AB TV VIDEO IN AUDIO OUT L R Surround speaker (R) :Signal flow Surround speaker (L) Tip • When you install the wireless kit WAHT-SD1 (supplied with DAV...