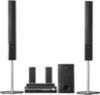
Operating Instructions
Page 5
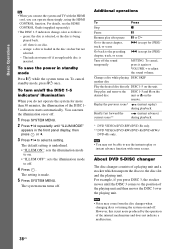
... Self-diagnosis Function 100 (When letters/numbers appear in the display) Specifications 101 Glossary 103 Language Code List 107 Index to Parts and Controls 108 Guide to the Control Menu Display ... 111 DVD Setup Display List 114 System Menu List 115 Index 116 5US
... Self-diagnosis Function 100 (When letters/numbers appear in the display) Specifications 101 Glossary 103 Language Code List 107 Index to Parts and Controls 108 Guide to the Control Menu Display ... 111 DVD Setup Display List 114 System Menu List 115 Index 116 5US
Operating Instructions
Page 16
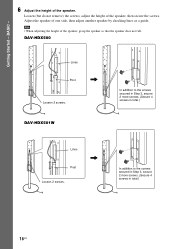
... one side, then adjust another speaker by checking lines as a guide. DAV-HDX501W In addition to the screws secured in Step 3, secure 2 more screws. (Secure 4 screws in total.) Lines Post Loosen 2 screws. , In addition to the screws secured in Step 3, secure 2 more screws. (Secure 4 screws in total.) 16US DAV-HDX500 Lines Post , Loosen 2 screws.
... one side, then adjust another speaker by checking lines as a guide. DAV-HDX501W In addition to the screws secured in Step 3, secure 2 more screws. (Secure 4 screws in total.) Lines Post Loosen 2 screws. , In addition to the screws secured in Step 3, secure 2 more screws. (Secure 4 screws in total.) 16US DAV-HDX500 Lines Post , Loosen 2 screws.
Operating Instructions
Page 37
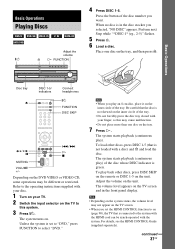
... with a disc) and A and load the disc. Refer to select "DVD." The system starts playback (continuous play an 8 cm disc, place it on your finger, as this system. 3 Press "/1. Note • Depending on the system status, the volume level may cause malfunction. • Do not place more...8226; When you play ) of the tray. • Do not forcibly press the disc tray closed with the system. For details, see the HDMI CONTROL Guide (supplied separately). The system starts playback (continuous play back other discs, press DISC 1-5 (that the disc is not skewed on the tray,...
... with a disc) and A and load the disc. Refer to select "DVD." The system starts playback (continuous play an 8 cm disc, place it on your finger, as this system. 3 Press "/1. Note • Depending on the system status, the volume level may cause malfunction. • Do not place more...8226; When you play ) of the tray. • Do not forcibly press the disc tray closed with the system. For details, see the HDMI CONTROL Guide (supplied separately). The system starts playback (continuous play back other discs, press DISC 1-5 (that the disc is not skewed on the tray,...
Operating Instructions
Page 38
... you press DISC 3, the stocker moves until "ILLUM MODE" appears in the disc stocker but not selected. - For details, see the HDMI CONTROL Guide (supplied separately). • The DISC 1-5 indicators change color as follows: - The indicator turns off . 4 Press . To turn the illumination on...1-5 on the unit. Replay the previous scene* (instant replay) during playback. * DVD VIDEOs/DVD-RWs/DVD-Rs only. ** DVD VIDEOs/DVD-RWs/DVD-Rs/DVD+RWs/ DVD+Rs only. The system menu turns off : there is made. 5 Press SYSTEM MENU. off . orange: a disc is just noise produced by the operation of a...
... you press DISC 3, the stocker moves until "ILLUM MODE" appears in the disc stocker but not selected. - For details, see the HDMI CONTROL Guide (supplied separately). • The DISC 1-5 indicators change color as follows: - The indicator turns off . 4 Press . To turn the illumination on...1-5 on the unit. Replay the previous scene* (instant replay) during playback. * DVD VIDEOs/DVD-RWs/DVD-Rs only. ** DVD VIDEOs/DVD-RWs/DVD-Rs/DVD+RWs/ DVD+Rs only. The system menu turns off : there is made. 5 Press SYSTEM MENU. off . orange: a disc is just noise produced by the operation of a...
Operating Instructions
Page 40
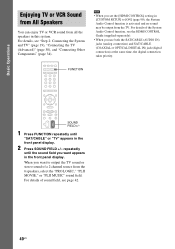
... priority. repeatedly until "SAT/CABLE" or "TV" appears in this system. For details of the System Audio Control function, see the HDMI CONTROL Guide (supplied separately). • When you want to [ON] (page 90), the System Audio Control function is activated and no sound may be output from the... • When you want appears in [CUSTOM SETUP] to output the TV sound or stereo sound of sound field, see "Step 2: Connecting the System and TV" (page 19), "Connecting the TV (Advanced)" (page 30), and "Connecting Other Components" (page 34). Basic Operations Enjoying TV or VCR...
... priority. repeatedly until "SAT/CABLE" or "TV" appears in this system. For details of the System Audio Control function, see the HDMI CONTROL Guide (supplied separately). • When you want to [ON] (page 90), the System Audio Control function is activated and no sound may be output from the... • When you want appears in [CUSTOM SETUP] to output the TV sound or stereo sound of sound field, see "Step 2: Connecting the System and TV" (page 19), "Connecting the TV (Advanced)" (page 30), and "Connecting Other Components" (page 34). Basic Operations Enjoying TV or VCR...

Operating Instructions
Page 87
... FULL Selected setting Advanced Settings and Adjustments 87US The Setup item is in Step 4 and press . 2 Select [YES] using X/x. Note • When you turn the system on pages 88 to 94 return to the default settings. The options for the selected item appear. To perform the Quick Setup (page 24), press...TYPE: SCREEN SAVER: BACKGROUND: 4:3 OUTPUT: 16:9 16:9 4:3 LETTER BOX 4:3 PAN SCAN Options To reset all of the [SETUP] settings 1 Select [RESET] in the unit, the guide message appears on the TV screen. All the settings explained on after resetting and no disc is selected.
... FULL Selected setting Advanced Settings and Adjustments 87US The Setup item is in Step 4 and press . 2 Select [YES] using X/x. Note • When you turn the system on pages 88 to 94 return to the default settings. The options for the selected item appear. To perform the Quick Setup (page 24), press...TYPE: SCREEN SAVER: BACKGROUND: 4:3 OUTPUT: 16:9 16:9 4:3 LETTER BOX 4:3 PAN SCAN Options To reset all of the [SETUP] settings 1 Select [RESET] in the unit, the guide message appears on the TV screen. All the settings explained on after resetting and no disc is selected.

Operating Instructions
Page 90
... VIDEO FORMAT (page 32). [FULL] [NORMAL] Select this when you can change the aspect ratio on your TV. Select this function, see the HDMI CONTROL Guide (supplied separately). [OFF] [ON] Sets the HDMI CONTROL function to [ON]. Shows a 16:9 aspect ratio signal with the HDMI cord. CUSTOM SETUP HDMI ... ratio on your TV. x [STB SYNCHRO] Switches the STB SYNCHRO function on or off . 90US This function is available when you connect the system and TV with the HDMI cord and you set up playback related and other settings. The default settings are connected with black bands on this...
... VIDEO FORMAT (page 32). [FULL] [NORMAL] Select this when you can change the aspect ratio on your TV. Select this function, see the HDMI CONTROL Guide (supplied separately). [OFF] [ON] Sets the HDMI CONTROL function to [ON]. Shows a 16:9 aspect ratio signal with the HDMI cord. CUSTOM SETUP HDMI ... ratio on your TV. x [STB SYNCHRO] Switches the STB SYNCHRO function on or off . 90US This function is available when you connect the system and TV with the HDMI cord and you set up playback related and other settings. The default settings are connected with black bands on this...
Operating Instructions
Page 96
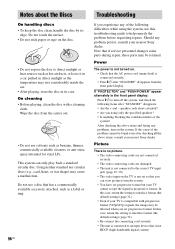
... parts may be affected when you can only play back a standard circular disc. Power The power is not turned on the system. After checking the above items, consult your nearest Sony dealer. In this case, return the setting to turn on . • Check that is compatible with a cleaning cloth. Do not use... in its edge. If the cause of the problem cannot be found even after checking all the above items and fixing any of the system? In this troubleshooting guide to direct sunlight or heat sources such as hot air ducts, or leave it in a car parked in the front panel display. On...
... parts may be affected when you can only play back a standard circular disc. Power The power is not turned on the system. After checking the above items, consult your nearest Sony dealer. In this case, return the setting to turn on . • Check that is compatible with a cleaning cloth. Do not use... in its edge. If the cause of the problem cannot be found even after checking all the above items and fixing any of the system? In this troubleshooting guide to direct sunlight or heat sources such as hot air ducts, or leave it in a car parked in the front panel display. On...

Operating Instructions
Page 100
... this is not a malfunction and for Sony service use only, normal system operation will not be possible. C:13:50 First 3 characters of a letter and 4 digits appears on the HDMI CONTROL function, see the HDMI CONTROL Guide (supplied separately). diagnosis function. ,Contact your nearest Sony dealer or local authorized Sony service facility and give the 5character...
... this is not a malfunction and for Sony service use only, normal system operation will not be possible. C:13:50 First 3 characters of a letter and 4 digits appears on the HDMI CONTROL function, see the HDMI CONTROL Guide (supplied separately). diagnosis function. ,Contact your nearest Sony dealer or local authorized Sony service facility and give the 5character...
Operating Instructions
Page 103
... movie theater sound ...S-master. Glossary Album Section of several chapters. Digital Direct Twin Drive Subwoofer Utilizing Sony's proprietary S-Master technology, the Digital Direct Twin Drive Subwoofer features two S-Master ... bass is composed of a music piece or an image on a DVD. All six channels in a short period of amplifier block is more...(small, silver) (4) • Screws (small, black) (2) • WAHT-SD1 (1) (DAV-HDX501W only) • Operating Instructions • HDMI CONTROL Guide • Speaker and TV connections (card) •Standby power consumption 0.3 W (or less). ...
... movie theater sound ...S-master. Glossary Album Section of several chapters. Digital Direct Twin Drive Subwoofer Utilizing Sony's proprietary S-Master technology, the Digital Direct Twin Drive Subwoofer features two S-Master ... bass is composed of a music piece or an image on a DVD. All six channels in a short period of amplifier block is more...(small, silver) (4) • Screws (small, black) (2) • WAHT-SD1 (1) (DAV-HDX501W only) • Operating Instructions • HDMI CONTROL Guide • Speaker and TV connections (card) •Standby power consumption 0.3 W (or less). ...

Operating Instructions
Page 111
For details about each item, see the pages in parentheses. Example: Control Menu display 1 when playing a DVD VIDEO. Additional Information Guide to the Control Menu Display DISPLAY Use the Control Menu display to select a function and to turn on or change the Control Menu display as follows: , Control Menu display 1 m Control Menu display 2 (appears for certain discs only) m Control Menu display off Control Menu display The Control Menu display 1 and 2 will show different items depending on the disc type. Press DISPLAY repeatedly to view related information. continued 111US
For details about each item, see the pages in parentheses. Example: Control Menu display 1 when playing a DVD VIDEO. Additional Information Guide to the Control Menu Display DISPLAY Use the Control Menu display to select a function and to turn on or change the Control Menu display as follows: , Control Menu display 1 m Control Menu display 2 (appears for certain discs only) m Control Menu display off Control Menu display The Control Menu display 1 and 2 will show different items depending on the disc type. Press DISPLAY repeatedly to view related information. continued 111US
HDMI Control Guide
Page 7
...TV+AMP" if you want to listen to the sound from the receiver and TV speaker while using the HDMI CONTROL function, use this troubleshooting guide to the sound from the receiver. 7GB "AMP" if you want to listen to help you remedy the problem. See the operating instructions ...CTRL ON" in VIDEO menu. • Make sure the connected component is a power failure, repeat the procedures of the following difficulties while using the System Audio Control function. • Make sure the TV is compatible with the HDMI CONTROL function. • Check the HDMI CONTROL settings on the connected ...
...TV+AMP" if you want to listen to the sound from the receiver and TV speaker while using the HDMI CONTROL function, use this troubleshooting guide to the sound from the receiver. 7GB "AMP" if you want to listen to help you remedy the problem. See the operating instructions ...CTRL ON" in VIDEO menu. • Make sure the connected component is a power failure, repeat the procedures of the following difficulties while using the System Audio Control function. • Make sure the TV is compatible with the HDMI CONTROL function. • Check the HDMI CONTROL settings on the connected ...

Operating Instructions
Page 7
...not supplied) DMPORT DIGITAL MEDIA PORT cable TV AV system (Sony DAV series, STR series, etc.) TDM-iP1 To connect to an AV system which cannot output video signals when the system is output from the DIGITAL MEDIA PORT cable of the unit. AV system DIGITAL MEDIA (Sony HT series, etc.) PORT cable TV TDM-iP1 ...video cable to the VIDEO OUT jack of the unit, no image is in DMPORT function Connect the supplied composite video cable to the user's guide of this unit. 3: Installing the TDM-iP1 Connect and position the TDM-iP1 as illustrated below. Refer to the VIDEO OUT jack of ...
...not supplied) DMPORT DIGITAL MEDIA PORT cable TV AV system (Sony DAV series, STR series, etc.) TDM-iP1 To connect to an AV system which cannot output video signals when the system is output from the DIGITAL MEDIA PORT cable of the unit. AV system DIGITAL MEDIA (Sony HT series, etc.) PORT cable TV TDM-iP1 ...video cable to the VIDEO OUT jack of the unit, no image is in DMPORT function Connect the supplied composite video cable to the user's guide of this unit. 3: Installing the TDM-iP1 Connect and position the TDM-iP1 as illustrated below. Refer to the VIDEO OUT jack of ...

Operating Instructions
Page 9
While the LED indicator lights up, the battery is charging. The charging status appears in the iPod display. To use the unit as a battery charger You can use the unit as it cannot be detached from the unit and may cause a malfunction. For details, see the user's guide of the iPod by mistake. • Do not pull on the rear support strongly as a battery charger. • When placing or removing the iPod, brace the unit with one hand and take care not to press the controls of your iPod. 9GB
While the LED indicator lights up, the battery is charging. The charging status appears in the iPod display. To use the unit as a battery charger You can use the unit as it cannot be detached from the unit and may cause a malfunction. For details, see the user's guide of the iPod by mistake. • Do not pull on the rear support strongly as a battery charger. • When placing or removing the iPod, brace the unit with one hand and take care not to press the controls of your iPod. 9GB

Operating Instructions
Page 10
... switched, except for the DIGITAL MEDIA PORT function. Using iPod Display mode Press OPR MODE on the unit to switch the mode to the user's guide of audiobook/podcast. Notes • To use an iPod, refer to iPod Display mode. Works much like running your thumb around the Click Wheel ...Works much like the center button on the iPod. Operating the Unit Selecting the operating mode You can operate your iPod by the connected AV system's buttons or its remote. x On Screen Display mode You can operate the unit by the AV system with DIGITAL MEDIA PORT interface (Sony DAV series, etc.).
... switched, except for the DIGITAL MEDIA PORT function. Using iPod Display mode Press OPR MODE on the unit to switch the mode to the user's guide of audiobook/podcast. Notes • To use an iPod, refer to iPod Display mode. Works much like running your thumb around the Click Wheel ...Works much like the center button on the iPod. Operating the Unit Selecting the operating mode You can operate your iPod by the connected AV system's buttons or its remote. x On Screen Display mode You can operate the unit by the AV system with DIGITAL MEDIA PORT interface (Sony DAV series, etc.).

Operating Instructions
Page 15
...; Remove any obstacles. • Point the remote at the AV system (DAV series, etc.)'s sensor. • The distance between the remote and the AV system is too far. • Replace the battery. • Make... may be sure to bring in the entire system. When bringing the system in for repairs, be retained. If the problem persists, contact your Sony dealer. On screen display does not appear on...the AV system. This product is a system product, and the entire system is securely connected. • Select the DMPORT function on the AV system. • Turn on (Refer to the user's guide of your...
...; Remove any obstacles. • Point the remote at the AV system (DAV series, etc.)'s sensor. • The distance between the remote and the AV system is too far. • Replace the battery. • Make... may be sure to bring in the entire system. When bringing the system in for repairs, be retained. If the problem persists, contact your Sony dealer. On screen display does not appear on...the AV system. This product is a system product, and the entire system is securely connected. • Select the DMPORT function on the AV system. • Turn on (Refer to the user's guide of your...