
Operating Instructions
Page 10
.... Be careful with washer) 1 Thread the speaker cord through the hole on the base and post. About the speaker cord The connector and color tube of the jacks to be connected. Use the speaker cords as the label of the speaker cords are the same color as follows: • Front speaker (L): White • Front speaker (R): Red 10US Screw (small, black...
.... Be careful with washer) 1 Thread the speaker cord through the hole on the base and post. About the speaker cord The connector and color tube of the jacks to be connected. Use the speaker cords as the label of the speaker cords are the same color as follows: • Front speaker (L): White • Front speaker (R): Red 10US Screw (small, black...
Operating Instructions
Page 11
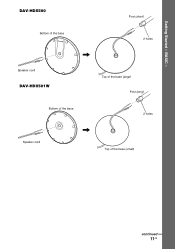
DAV-HDX500 Post (short) Bottom of the base 2 holes Speaker cord DAV-HDX501W , Top of the base (large) Post (long) Bottom of the base 2 holes Speaker cord , Top of the base (small) continued 11US BASIC - Getting Started -
DAV-HDX500 Post (short) Bottom of the base 2 holes Speaker cord DAV-HDX501W , Top of the base (large) Post (long) Bottom of the base 2 holes Speaker cord , Top of the base (small) continued 11US BASIC - Getting Started -
Operating Instructions
Page 12
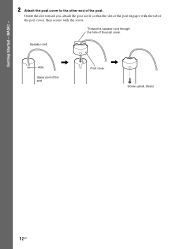
Orient the slot toward you, attach the post cover so that the slot of the post engages with the tab of the post. Getting Started - BASIC - 2 Attach the post cover to the other end of the post cover, then secure with the screw. Thread the speaker cord through the hole of the post Post cover , Screw (small, black) 12US Speaker cord , Hole Upper part of the post cover.
Orient the slot toward you, attach the post cover so that the slot of the post engages with the tab of the post. Getting Started - BASIC - 2 Attach the post cover to the other end of the post cover, then secure with the screw. Thread the speaker cord through the hole of the post Post cover , Screw (small, black) 12US Speaker cord , Hole Upper part of the post cover.

Operating Instructions
Page 13
Rear of the speaker , DAV-HDX501W Post cover Be careful the orientation of the speaker , Mounting plate continued 13US Mounting plate Secure 2 screws (large, with the mounting plate and screws. BASIC - 3 Lay the post in the slot of the speaker, slide the post to the end of the ...in criss-cross pattern. Rear of the post cover when placing the post. DAV-HDX500 Post cover Be careful the orientation of the speaker cord. Select the speaker whose color of the jack on the rear panel of speaker matches the color tube of the post cover when placing the post. Getting ...
Rear of the speaker , DAV-HDX501W Post cover Be careful the orientation of the speaker , Mounting plate continued 13US Mounting plate Secure 2 screws (large, with the mounting plate and screws. BASIC - 3 Lay the post in the slot of the speaker, slide the post to the end of the ...in criss-cross pattern. Rear of the post cover when placing the post. DAV-HDX500 Post cover Be careful the orientation of the speaker cord. Select the speaker whose color of the jack on the rear panel of speaker matches the color tube of the post cover when placing the post. Getting ...
Operating Instructions
Page 14
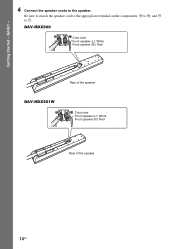
BASIC - 4 Connect the speaker cords to #. Getting Started - DAV-HDX500 Color tube Front speaker (L): White Front speaker (R): Red Rear of the speaker DAV-HDX501W Color tube Front speaker (L): White Front speaker (R): Red Rear of the speaker 14US Be sure to match the speaker cord to the appropriate terminal on the components: 3 to 3, and # to the speaker.
BASIC - 4 Connect the speaker cords to #. Getting Started - DAV-HDX500 Color tube Front speaker (L): White Front speaker (R): Red Rear of the speaker DAV-HDX501W Color tube Front speaker (L): White Front speaker (R): Red Rear of the speaker 14US Be sure to match the speaker cord to the appropriate terminal on the components: 3 to 3, and # to the speaker.

Operating Instructions
Page 17
DAV-HDX501W Take up slack in the speaker cord by running it through the slot. Secure the speaker cord by pulling from the bottom of the base and hook the speaker cord in the speaker cord by running it through the slot. continued 17US Adjust the length of the cord. DAV-HDX500 Take up slack in the cord clamp. Bottom of the base Adjust the length of the cord. Getting Started - BASIC - 7 Take up any speaker cord slack. Cord clamp , Secure the speaker cord by pulling from the bottom of the base.
DAV-HDX501W Take up slack in the speaker cord by running it through the slot. Secure the speaker cord by pulling from the bottom of the base and hook the speaker cord in the speaker cord by running it through the slot. continued 17US Adjust the length of the cord. DAV-HDX500 Take up slack in the cord clamp. Bottom of the base Adjust the length of the cord. Getting Started - BASIC - 7 Take up any speaker cord slack. Cord clamp , Secure the speaker cord by pulling from the bottom of the base.
Operating Instructions
Page 19
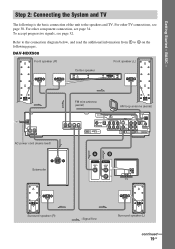
...see page 32. DAV-HDX500 Front speaker (R) Front speaker (L) Center speaker CENTER WOOFER SPEAKER AC power cord (mains lead) Subwoofer FM wire antenna (aerial) AM loop antenna (aerial) FRONT R FRONT L SUR R SPEAKER SUR L DIR-TC1 COAXIAL OPTICAL DIGITAL IN SAT/CABLE OUT (DVD ONLY) COMPONENT VIDEO... TV Surround speaker (R) :Signal flow Surround speaker (L) continued 19US BASIC - To accept progressive signals, see page 30. Refer to the connection diagram below, and read the additional information from 1 to the speakers and TV. Step 2: Connecting the System and TV...
...see page 32. DAV-HDX500 Front speaker (R) Front speaker (L) Center speaker CENTER WOOFER SPEAKER AC power cord (mains lead) Subwoofer FM wire antenna (aerial) AM loop antenna (aerial) FRONT R FRONT L SUR R SPEAKER SUR L DIR-TC1 COAXIAL OPTICAL DIGITAL IN SAT/CABLE OUT (DVD ONLY) COMPONENT VIDEO... TV Surround speaker (R) :Signal flow Surround speaker (L) continued 19US BASIC - To accept progressive signals, see page 30. Refer to the connection diagram below, and read the additional information from 1 to the speakers and TV. Step 2: Connecting the System and TV...
Operating Instructions
Page 20
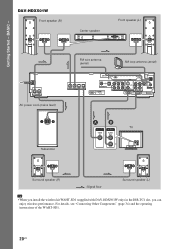
... 34) and the operating instructions of the WAHT-SD1. 20US DAV-HDX501W Front speaker (R) Center speaker Front speaker (L) CENTER WOOFER SPEAKER AC power cord (mains lead) FM wire antenna (aerial) AM loop antenna (aerial) FRONT R FRONT L SUR R SPEAKER SUR L DIR-TC1 COAXIAL OPTICAL DIGITAL IN SAT/CABLE OUT (DVD ONLY) COMPONENT VIDEO IN Y PB/CB PR/CR AM...
... 34) and the operating instructions of the WAHT-SD1. 20US DAV-HDX501W Front speaker (R) Center speaker Front speaker (L) CENTER WOOFER SPEAKER AC power cord (mains lead) FM wire antenna (aerial) AM loop antenna (aerial) FRONT R FRONT L SUR R SPEAKER SUR L DIR-TC1 COAXIAL OPTICAL DIGITAL IN SAT/CABLE OUT (DVD ONLY) COMPONENT VIDEO IN Y PB/CB PR/CR AM...
Operating Instructions
Page 21
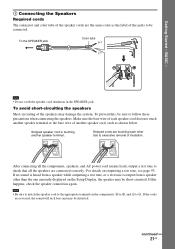
... reversed, the sound will lack bass and may damage the system. To prevent this happens, check the speaker connection again. If this , be connected. To the SPEAKER jack Color tube (+) (-) Note • Do not catch the speaker cord insulation in the SPEAKER jack. Stripped speaker cord is output from a speaker other due to follow these precautions when connecting the...
... reversed, the sound will lack bass and may damage the system. To prevent this happens, check the speaker connection again. If this , be connected. To the SPEAKER jack Color tube (+) (-) Note • Do not catch the speaker cord insulation in the SPEAKER jack. Stripped speaker cord is output from a speaker other due to follow these precautions when connecting the...

Operating Instructions
Page 22
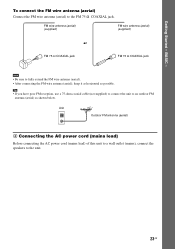
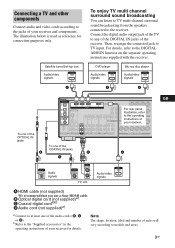
B Audio cord (not supplied) Yellow White (L/audio) Red (R/audio) Tip • When you want to output the TV sound or stereo sound of a 2 channel source from the plastic stand. 2 Set up the antenna (aerial). 1 Remove only the loop part from the 6 speakers, select the "Dolby...22US BASIC - 2 Connecting the TV Required cords A Video cord . Do not dismantle or roll up the AM loop antenna (aerial). 3 Connect the cords to the AM antenna (aerial) terminals. Getting Started - A Insert the cord pushing down the terminal clamp. Cord (A) or cord (B) can be connected to receive AM ...
B Audio cord (not supplied) Yellow White (L/audio) Red (R/audio) Tip • When you want to output the TV sound or stereo sound of a 2 channel source from the plastic stand. 2 Set up the antenna (aerial). 1 Remove only the loop part from the 6 speakers, select the "Dolby...22US BASIC - 2 Connecting the TV Required cords A Video cord . Do not dismantle or roll up the AM loop antenna (aerial). 3 Connect the cords to the AM antenna (aerial) terminals. Getting Started - A Insert the cord pushing down the terminal clamp. Cord (A) or cord (B) can be connected to receive AM ...
Operating Instructions
Page 23
... wire antenna (aerial) to the unit. 23US Unit Outdoor FM antenna (aerial) 4 Connecting the AC power cord (mains lead) Before connecting the AC power cord (mains lead) of this unit to a wall outlet (mains), connect the speakers to the FM 75 Ω COAXIAL jack. Tip • If you have poor FM reception, use...
... wire antenna (aerial) to the unit. 23US Unit Outdoor FM antenna (aerial) 4 Connecting the AC power cord (mains lead) Before connecting the AC power cord (mains lead) of this unit to a wall outlet (mains), connect the speakers to the FM 75 Ω COAXIAL jack. Tip • If you have poor FM reception, use...
Operating Instructions
Page 36
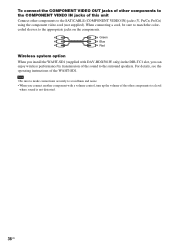
... instructions of the WAHT-SD1. Green Blue Red Wireless system option When you can enjoy wireless performance by transmission of the sound to a level where sound is not distorted. 36US When connecting a cord, be sure to match the colorcoded sleeves to the ... (Y, PB/CB, PR/CR) using the component video cord (not supplied). Note • Be sure to make connections securely to avoid hum and noise. • When you connect another component with DAV-HDX501W only) in the DIR-TC1 slot, you install ...the COMPONENT VIDEO IN jacks of this unit Connect other components to the surround speakers.
... instructions of the WAHT-SD1. Green Blue Red Wireless system option When you can enjoy wireless performance by transmission of the sound to a level where sound is not distorted. 36US When connecting a cord, be sure to match the colorcoded sleeves to the ... (Y, PB/CB, PR/CR) using the component video cord (not supplied). Note • Be sure to make connections securely to avoid hum and noise. • When you connect another component with DAV-HDX501W only) in the DIR-TC1 slot, you install ...the COMPONENT VIDEO IN jacks of this unit Connect other components to the surround speakers.
Operating Instructions
Page 44
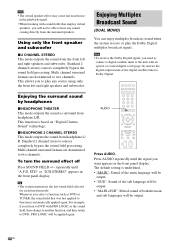
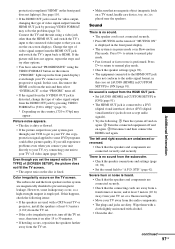
...For example, if you listen to DVD with PRO LOGIC as DVD or TUNER, the sound field that employ virtual speakers, you want appears in the front... digital satellite tuner to the unit with an optical or coaxial digital cord (page 34) and set the digital output mode of both the ...) sources completely bypass the sound field processing. Tip • The system memorizes the last sound field selected for each function mode. Multi channel...surround sound by headphones x HEADPHONE THEATER This mode outputs the sound as surround from the front left and right speakers and subwoofer. x HEADPHONE 2 ...
...For example, if you listen to DVD with PRO LOGIC as DVD or TUNER, the sound field that employ virtual speakers, you want appears in the front... digital satellite tuner to the unit with an optical or coaxial digital cord (page 34) and set the digital output mode of both the ...) sources completely bypass the sound field processing. Tip • The system memorizes the last sound field selected for each function mode. Multi channel...surround sound by headphones x HEADPHONE THEATER This mode outputs the sound as surround from the front left and right speakers and subwoofer. x HEADPHONE 2 ...
Operating Instructions
Page 95
...consult your nearest Sony dealer. These may cause the apparatus to use cleaning discs or disc/lens cleaners (including wet or spray types). On moving the system 1 Press FUNCTION repeatedly to select "DVD." 2 Make sure... Precautions On power sources • Unplug the unit from the wall outlet if you do , the speakers may be damaged when a peak level section is placed in a horizontal position only. • Keep... the unit and discs away from the TV set. To disconnect the cord, pull it any disc. It is poor as radiators, or air ducts, or in the front ...
...consult your nearest Sony dealer. These may cause the apparatus to use cleaning discs or disc/lens cleaners (including wet or spray types). On moving the system 1 Press FUNCTION repeatedly to select "DVD." 2 Make sure... Precautions On power sources • Unplug the unit from the wall outlet if you do , the speakers may be damaged when a peak level section is placed in a horizontal position only. • Keep... the unit and discs away from the TV set. To disconnect the cord, pull it any disc. It is poor as radiators, or air ducts, or in the front ...
Operating Instructions
Page 96
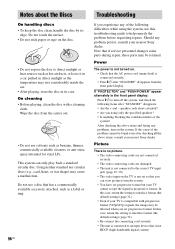
...you set progressive format. Should any problems, turn off the system, and check the following difficulties while using only the specified speakers? • Is anything blocking the ventilation holes of the problem cannot be retained. speaker cords short-circuited? • Are you can only play back a...+ and - Wipe the disc from the front panel display. After checking the above items and fixing any problem persist, consult your nearest Sony dealer. Using neither standard nor circular discs (e.g., card, heart, or star shape) may rise considerably inside the car. • After ...
...you set progressive format. Should any problems, turn off the system, and check the following difficulties while using only the specified speakers? • Is anything blocking the ventilation holes of the problem cannot be retained. speaker cords short-circuited? • Are you can only play back a...+ and - Wipe the disc from the front panel display. After checking the above items and fixing any problem persist, consult your nearest Sony dealer. Using neither standard nor circular discs (e.g., card, heart, or star shape) may rise considerably inside the car. • After ...
Operating Instructions
Page 97
...HDMI. Color irregularity occurs on again. 3 Disconnect and then connect the HDMI cord again. However, some DVD programs could affect picture quality. Press H to return to [ON] (page 91). There is no sound. • The speaker cord is in pause mode or in the front panel display) even though your TV... of video signal output from the HDMI OUT jack by pressing VIDEO FORMAT may occur, as a high-strength magnet is output from your system goes through your VCR to get to your unit to prevent magnetic leakage. Picture noise appears. • The disc is performed. The ...
...HDMI. Color irregularity occurs on again. 3 Disconnect and then connect the HDMI cord again. However, some DVD programs could affect picture quality. Press H to return to [ON] (page 91). There is no sound. • The speaker cord is in pause mode or in the front panel display) even though your TV... of video signal output from the HDMI OUT jack by pressing VIDEO FORMAT may occur, as a high-strength magnet is output from your system goes through your VCR to get to your unit to prevent magnetic leakage. Picture noise appears. • The disc is performed. The ...
Operating Instructions
Page 103
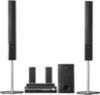
...Speaker cords (6, red/white/green/gray/blue/purple) • Video Cord (1) • Remote Commander (remote) (1) • R6 (size AA) batteries (2) • Calibration mic (1) • Foot pads (1 set up, Digital Direct Twin Drive Subwoofer provides a stable sound field over a much larger listening area without notice. Digital Direct Twin Drive Subwoofer Utilizing Sony... • Screws (small, black) (2) • WAHT-SD1 (1) (DAV-HDX501W only) • Operating Instructions • HDMI CONTROL Guide • Speaker and TV connections (card) •Standby power consumption 0.3 W (or less...
...Speaker cords (6, red/white/green/gray/blue/purple) • Video Cord (1) • Remote Commander (remote) (1) • R6 (size AA) batteries (2) • Calibration mic (1) • Foot pads (1 set up, Digital Direct Twin Drive Subwoofer provides a stable sound field over a much larger listening area without notice. Digital Direct Twin Drive Subwoofer Utilizing Sony... • Screws (small, black) (2) • WAHT-SD1 (1) (DAV-HDX501W only) • Operating Instructions • HDMI CONTROL Guide • Speaker and TV connections (card) •Standby power consumption 0.3 W (or less...
HDMI Control Guide
Page 2
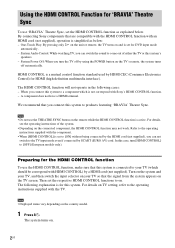
...DVD input mode automatically. - System Power Off: When you connect this system to products featuring 'BRAVIA' Theatre Sync. We recommend that you turn [HDMI CONTROL] to your TV so that the signal from the system appears on your TV (which should be correspond with HDMI CONTROL) by the HDMI cord (not supplied), you connect this system's speakers... HDMI CONTROL function may not work. For details on . 2US By connecting Sony components that this system is connected to [OFF] (European models only). The system turns on TV setting, refer to the TV input mode even if connected...
...DVD input mode automatically. - System Power Off: When you connect this system to products featuring 'BRAVIA' Theatre Sync. We recommend that you turn [HDMI CONTROL] to your TV so that the signal from the system appears on your TV (which should be correspond with HDMI CONTROL) by the HDMI cord (not supplied), you connect this system's speakers... HDMI CONTROL function may not work. For details on . 2US By connecting Sony components that this system is connected to [OFF] (European models only). The system turns on TV setting, refer to the TV input mode even if connected...
HDMI Control Guide
Page 5
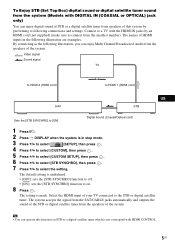
... . 7 Press X/x to select the setting. Video signal Sound signal TV to HDMI 2 (HDMI cord) to HDMI 1 (HDMI cord) GUSB DAV STB Sets the [STB SYNCHRO] to connect from the speakers of the system. The default setting is in the following illustration are examples. The names of this function on . ...8 Press . The system accepts the signal from the SAT/CABLE jacks automatically...
... . 7 Press X/x to select the setting. Video signal Sound signal TV to HDMI 2 (HDMI cord) to HDMI 1 (HDMI cord) GUSB DAV STB Sets the [STB SYNCHRO] to connect from the speakers of the system. The default setting is in the following illustration are examples. The names of this function on . ...8 Press . The system accepts the signal from the SAT/CABLE jacks automatically...
HDMI Control Guide
Page 3
... R R R AUDIO IN AUDIO IN AUDIO OUT AUDIO IN AUDIO OUT AUDIO IN AUDIO OUT SAT DVD VIDEO 2/BD VIDEO 1 SUB WOOFER CENTER R SURROUND BACK SPEAKERS R SURROUND To one of the audio cords (B, C or D). C Coaxial digital corda)b) D Audio cord (not supplied)a) a)Connect to at least one of your receiver. The illustration below is used as...
... R R R AUDIO IN AUDIO IN AUDIO OUT AUDIO IN AUDIO OUT AUDIO IN AUDIO OUT SAT DVD VIDEO 2/BD VIDEO 1 SUB WOOFER CENTER R SURROUND BACK SPEAKERS R SURROUND To one of the audio cords (B, C or D). C Coaxial digital corda)b) D Audio cord (not supplied)a) a)Connect to at least one of your receiver. The illustration below is used as...


