Operating Instructions
Page 5
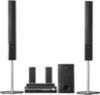
...the DIGITAL MEDIA PORT Adapter 77 Deactivating the Buttons on the Unit.... 78 (Child Lock) Advanced Settings and Adjustments Locking Discs 79 (CUSTOM PARENTAL CONTROL, PARENTAL CONTROL) Getting Optimal Surround Sound for a Room 82 ...Settings.......... 94 Additional Information Precautions 95 Notes about the Discs 96 Troubleshooting 96 Self-diagnosis Function 100 (When letters/numbers appear in the display) Specifications 101 Glossary 103 Language Code List 107 Index to Parts and Controls 108 Guide to the Control Menu Display ... 111 DVD Setup Display List 114 System...
...the DIGITAL MEDIA PORT Adapter 77 Deactivating the Buttons on the Unit.... 78 (Child Lock) Advanced Settings and Adjustments Locking Discs 79 (CUSTOM PARENTAL CONTROL, PARENTAL CONTROL) Getting Optimal Surround Sound for a Room 82 ...Settings.......... 94 Additional Information Precautions 95 Notes about the Discs 96 Troubleshooting 96 Self-diagnosis Function 100 (When letters/numbers appear in the display) Specifications 101 Glossary 103 Language Code List 107 Index to Parts and Controls 108 Guide to the Control Menu Display ... 111 DVD Setup Display List 114 System...
Operating Instructions
Page 8
... system plays DVDs and VIDEO CDs according to the disc contents the software producers designed, some playback features may be given even though playing the DVD VIDEO is intended for home and other intellectual property rights. Be sure to play any other DVD ...VIDEO, the message [Playback prohibited by Macrovision. "DTS" and "DTS Digital Surround" are trademarks of Dolby Laboratories. ** Manufactured under license from DTS, Inc. Depending on the DVD VIDEO, no region code indication may be intentionally set...
... system plays DVDs and VIDEO CDs according to the disc contents the software producers designed, some playback features may be given even though playing the DVD VIDEO is intended for home and other intellectual property rights. Be sure to play any other DVD ...VIDEO, the message [Playback prohibited by Macrovision. "DTS" and "DTS Digital Surround" are trademarks of Dolby Laboratories. ** Manufactured under license from DTS, Inc. Depending on the DVD VIDEO, no region code indication may be intentionally set...

Operating Instructions
Page 22
...) Yellow White (L/audio) Red (R/audio) Tip • When you want to output the TV sound or stereo sound of a 2 channel source from the plastic stand. 2 Set up the AM loop antenna (aerial). 3 Connect the cords to receive AM signals. Getting Started - BASIC - 2 Connecting the TV Required cords A Video cord . Tip •...
...) Yellow White (L/audio) Red (R/audio) Tip • When you want to output the TV sound or stereo sound of a 2 channel source from the plastic stand. 2 Set up the AM loop antenna (aerial). 3 Connect the cords to receive AM signals. Getting Started - BASIC - 2 Connecting the TV Required cords A Video cord . Tip •...
Operating Instructions
Page 24
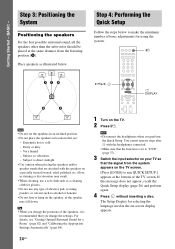
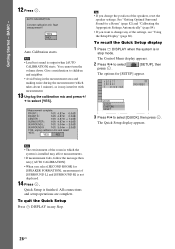
... your TV so that you perform the Quick Setup. For details, see "Getting Optimal Surround Sound for using the system. Getting Started - "/1 C/X/x/c, DISPLAY Note • Do not set to "DVD" (page 37). 3 Switch the input selector on the TV screen. [Press [ENTER] to make the minimum number...does not appear, recall the Quick Setup display (page 26) and perform again. 4 Press without inserting a disc. Step 3: Positioning the System Positioning the speakers For the best possible surround sound, all the speakers other than the subwoofer should be placed at the bottom of basic ...
... your TV so that you perform the Quick Setup. For details, see "Getting Optimal Surround Sound for using the system. Getting Started - "/1 C/X/x/c, DISPLAY Note • Do not set to "DVD" (page 37). 3 Switch the input selector on the TV screen. [Press [ENTER] to make the minimum number...does not appear, recall the Quick Setup display (page 26) and perform again. 4 Press without inserting a disc. Step 3: Positioning the System Positioning the speakers For the best possible surround sound, all the speakers other than the subwoofer should be placed at the bottom of basic ...
Operating Instructions
Page 25
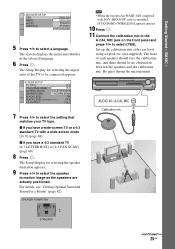
...standard TV with DAV-HDX501W only) is installed, [STANDARD (WIRELESS)] appears instead. 10 Press . 11 Connect the calibration mic to the A.CAL MIC jack on the front panel and press X/x to select the setting that matches your... Sound for selecting the speaker formation appears. 9 Press C/c to select a language. Be quiet during the measurement. Set up the calibration mic at the ear level using a tripod, etc. (not supplied). AUDIO IN / A.CAL MIC... formation image as the speakers are actually positioned. The system displays the menu and subtitles in the selected language. 6 Press .
...standard TV with DAV-HDX501W only) is installed, [STANDARD (WIRELESS)] appears instead. 10 Press . 11 Connect the calibration mic to the A.CAL MIC jack on the front panel and press X/x to select the setting that matches your... Sound for selecting the speaker formation appears. 9 Press C/c to select a language. Be quiet during the measurement. Set up the calibration mic at the ear level using a tripod, etc. (not supplied). AUDIO IN / A.CAL MIC... formation image as the speakers are actually positioned. The system displays the menu and subtitles in the selected language. 6 Press .
Operating Instructions
Page 26
...[AUTO CALIBRATION]. • When you select [SECOND ROOM] for [SETUP] appear. 1 2 ( 2 7 ) 1 8 ( 3 4 ) T 0:00:02 DVD VIDEO QUICK QUICK CUSTOM RESET BNR 3 Press X/x to select press . [SETUP], then The options for [SPEAKER FORMATION], measurement of the speakers, reset the speaker... settings. AUTO CALIBRATION Connect calibration mic. Start measurement? To recall the Quick Setup display 1 Press DISPLAY when the system is output when [AUTO CALIBRATION] starts. The Control Menu display appears. 2 ...
...[AUTO CALIBRATION]. • When you select [SECOND ROOM] for [SETUP] appear. 1 2 ( 2 7 ) 1 8 ( 3 4 ) T 0:00:02 DVD VIDEO QUICK QUICK CUSTOM RESET BNR 3 Press X/x to select press . [SETUP], then The options for [SPEAKER FORMATION], measurement of the speakers, reset the speaker... settings. AUTO CALIBRATION Connect calibration mic. Start measurement? To recall the Quick Setup display 1 Press DISPLAY when the system is output when [AUTO CALIBRATION] starts. The Control Menu display appears. 2 ...

Operating Instructions
Page 27
...Press . Otherwise, to stop the demonstration, you press "/1 on the remote. ADVANCED - Turning off the Demonstration "/1 X/x/c, SYSTEM MENU Setting the demonstration mode to select a setting. After connecting the AC power cord (mains lead), the demonstration appears in the front panel display, then press or c. ... in the front panel display. ADVANCED - Getting Started - Note • When you need to set the demonstration mode to off , the system saves power in the system menu to on, the demonstration does not turn off the demonstration simply by pressing "/1 on the...
...Press . Otherwise, to stop the demonstration, you press "/1 on the remote. ADVANCED - Turning off the Demonstration "/1 X/x/c, SYSTEM MENU Setting the demonstration mode to select a setting. After connecting the AC power cord (mains lead), the demonstration appears in the front panel display, then press or c. ... in the front panel display. ADVANCED - Getting Started - Note • When you need to set the demonstration mode to off , the system saves power in the system menu to on, the demonstration does not turn off the demonstration simply by pressing "/1 on the...
Operating Instructions
Page 31
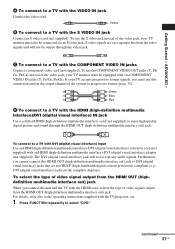
...interface) IN jack Use a certified HDMI (high-definition multimedia interface) cord (not supplied) to select "DVD." continued 31US Green Blue Red D To connect to a TV with the TV/projector, etc. 1 ...) with the VIDEO IN jack Connect the video cord. . To use this connection and set the output channel of the video jack, your TV accepts progressive format signals, you connect ...monitor must use the COMPONENT VIDEO OUT jacks (Y, PB/ CB, PR/CR) instead of the system to a TV with an HDMI (high-definition multimedia interface)-DVI (digital visual interface) adaptor (not supplied). A...
...interface) IN jack Use a certified HDMI (high-definition multimedia interface) cord (not supplied) to select "DVD." continued 31US Green Blue Red D To connect to a TV with the TV/projector, etc. 1 ...) with the VIDEO IN jack Connect the video cord. . To use this connection and set the output channel of the video jack, your TV accepts progressive format signals, you connect ...monitor must use the COMPONENT VIDEO OUT jacks (Y, PB/ CB, PR/CR) instead of the system to a TV with an HDMI (high-definition multimedia interface)-DVI (digital visual interface) adaptor (not supplied). A...

Operating Instructions
Page 33
...output in the front panel display. Note that you connect the unit and the TV with the HDMI cord during the system is set to "NORMAL (INTERLACE)," the system is connected to "PROGRESSIVE," images from the MONITOR OUT (VIDEO or S VIDEO) jack are unaffected as they are watching.... your TV does not accept progressive signals, or, - Some DVD software contains both video and film. your screen when output in progressive ...
...output in the front panel display. Note that you connect the unit and the TV with the HDMI cord during the system is set to "NORMAL (INTERLACE)," the system is connected to "PROGRESSIVE," images from the MONITOR OUT (VIDEO or S VIDEO) jack are unaffected as they are watching.... your TV does not accept progressive signals, or, - Some DVD software contains both video and film. your screen when output in progressive ...
Operating Instructions
Page 37
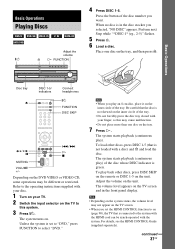
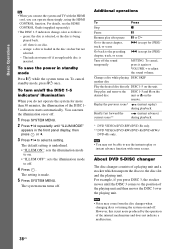
... the TV screen and in the disc stocker you set to "DVD," press FUNCTION to select "DVD." Adjust the volume on . Basic Operations Disc tray Z DISC 1-5/ indicators Connect headphones "/1 FUNCTION DISC SKIP / X ./> H x MUTING VOLUME +/- Unless the system is not skewed on the TV to the system with the HDMI cord can be different or restricted...
... the TV screen and in the disc stocker you set to "DVD," press FUNCTION to select "DVD." Adjust the volume on . Basic Operations Disc tray Z DISC 1-5/ indicators Connect headphones "/1 FUNCTION DISC SKIP / X ./> H x MUTING VOLUME +/- Unless the system is not skewed on the TV to the system with the HDMI cord can be different or restricted...
Operating Instructions
Page 38
... select a setting. The system menu turns off if an unplayable disc is just noise produced by the operation of the playing unit and then moves the DISC 3 over the playing unit. The indicator turns off . Replay the previous scene* (instant replay) during playback. * DVD VIDEOs/DVD-RWs/DVD-Rs only. ** DVD VIDEOs/DVD-RWs/DVD-Rs/DVD+RWs/ DVD+Rs...
... select a setting. The system menu turns off if an unplayable disc is just noise produced by the operation of the playing unit and then moves the DISC 3 over the playing unit. The indicator turns off . Replay the previous scene* (instant replay) during playback. * DVD VIDEOs/DVD-RWs/DVD-Rs only. ** DVD VIDEOs/DVD-RWs/DVD-Rs/DVD+RWs/ DVD+Rs...

Operating Instructions
Page 39
... or TV jacks on the rear panel or to the AUDIO IN jack on the front panel. This is made. 6 Press SYSTEM MENU. The setting is not a malfunction and will depend on the rear panel. The system menu turns off. 39US Refer to the SAT/CABLE or TV jacks on the component connected.... DVD t TUNER FM t TUNER AM t XM t SAT/CABLE t TV t DMPORT1 t DMPORT2 t AUDIO t ... To prevent this, you can use both the SAT/CABLE (AUDIO...
... or TV jacks on the rear panel or to the AUDIO IN jack on the front panel. This is made. 6 Press SYSTEM MENU. The setting is not a malfunction and will depend on the rear panel. The system menu turns off. 39US Refer to the SAT/CABLE or TV jacks on the component connected.... DVD t TUNER FM t TUNER AM t XM t SAT/CABLE t TV t DMPORT1 t DMPORT2 t AUDIO t ... To prevent this, you can use both the SAT/CABLE (AUDIO...
Operating Instructions
Page 40
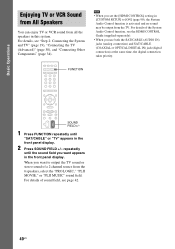
... Press SOUND FIELD +/- repeatedly until "SAT/CABLE" or "TV" appears in this system. For details, see page 42. 40US FUNCTION SOUND FIELD+/- 1 Press FUNCTION repeatedly until the sound field you set the [HDMI CONTROL] setting in the front panel display. Basic Operations Enjoying TV or VCR Sound from All Speakers... You can enjoy TV or VCR sound from the TV. For details of sound field, see "Step 2: Connecting the System and TV" (page 19...
... Press SOUND FIELD +/- repeatedly until "SAT/CABLE" or "TV" appears in this system. For details, see page 42. 40US FUNCTION SOUND FIELD+/- 1 Press FUNCTION repeatedly until the sound field you set the [HDMI CONTROL] setting in the front panel display. Basic Operations Enjoying TV or VCR Sound from All Speakers... You can enjoy TV or VCR sound from the TV. For details of sound field, see "Step 2: Connecting the System and TV" (page 19...

Operating Instructions
Page 41
...; MUSIC: provides the sound for movies or music. Tip • When the movie or music mode is selected, "MOVIE" or "MUSIC" is selected. The default setting is automatically selected. Press MOVIE/MUSIC repeatedly until the mode you select "AUTO," the beginning of the sound may be cut off as the optimum...
...; MUSIC: provides the sound for movies or music. Tip • When the movie or music mode is selected, "MOVIE" or "MUSIC" is selected. The default setting is automatically selected. Press MOVIE/MUSIC repeatedly until the mode you select "AUTO," the beginning of the sound may be cut off as the optimum...
Operating Instructions
Page 43
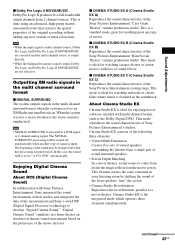
...DVD. x CINEMA STUDIO EX C (Cinema Studio EX C) Reproduces the sound characteristics of the Sony Pictures Entertainment "Cary Grant Theater...system outputs signals in a home theater an ideal movie theater sound environment based on the preference of actual surround speakers. • Screen Depth Matching In a movie theater, sound seems to develop "Digital Cinema Sound." x CINEMA STUDIO EX A (Cinema Studio EX A) Reproduces the sound characteristics of the Sony...operates these elements simultaneously. This is set to a movie theater. continued 43US Sound Adjustments x Dolby ...
...DVD. x CINEMA STUDIO EX C (Cinema Studio EX C) Reproduces the sound characteristics of the Sony Pictures Entertainment "Cary Grant Theater...system outputs signals in a home theater an ideal movie theater sound environment based on the preference of actual surround speakers. • Screen Depth Matching In a movie theater, sound seems to develop "Digital Cinema Sound." x CINEMA STUDIO EX A (Cinema Studio EX A) Reproduces the sound characteristics of the Sony...operates these elements simultaneously. This is set to a movie theater. continued 43US Sound Adjustments x Dolby ...
Operating Instructions
Page 44
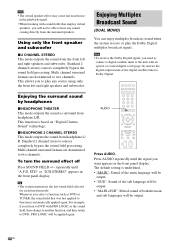
... x HEADPHONE THEATER This mode outputs the sound as the sound field, then change to another function, and then return to DVD, PRO LOGIC will be applied again. Whenever you to play the Dolby Digital multiplex broadcast signal. This allows you select a function such as DVD or TUNER,...the system receive or play any sound coming directly from headphone L/R. Standard 2 channel (stereo) sources completely bypass the sound field processing. repeatedly until the signal you need to connect a digital satellite tuner to the unit with an optical or coaxial digital cord (page 34) and set ...
... x HEADPHONE THEATER This mode outputs the sound as the sound field, then change to another function, and then return to DVD, PRO LOGIC will be applied again. Whenever you to play the Dolby Digital multiplex broadcast signal. This allows you select a function such as DVD or TUNER,...the system receive or play any sound coming directly from headphone L/R. Standard 2 channel (stereo) sources completely bypass the sound field processing. repeatedly until the signal you need to connect a digital satellite tuner to the unit with an optical or coaxial digital cord (page 34) and set ...
Operating Instructions
Page 47
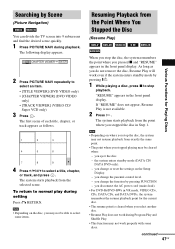
... where you stopped playing may not be cleared when: - you change or reset the settings on where you stop the disc, the system remembers the point where you disconnect the AC power cord (mains lead). • For DVD-Rs/DVD-RWs in the front panel display. "RESUME" appears in Step 1. you change the parental...
... where you stopped playing may not be cleared when: - you change or reset the settings on where you stop the disc, the system remembers the point where you disconnect the AC power cord (mains lead). • For DVD-Rs/DVD-RWs in the front panel display. "RESUME" appears in Step 1. you change the parental...

Operating Instructions
Page 48
To activate this function, set to [OFF] (page 91), the resume point is deleted. For details, see "[MULTI-DISC RESUME] (DVD VIDEO/VIDEO CD only)" (page 91). Tip • To play from the beginning of the disc, press x twice, then press H. TRACK - - 3. Tip • ... 4. TRACK - - 5. TRACK - - 7. To enjoy a disc that is played before by resume playback (Multi-disc Resume) (DVD VIDEO, VIDEO CD only) This system stores the point where you stopped the disc for [PROGRAM] appear. 6 (14) T 2:50 OFF OFF SET ON PLAY CD 3 Press X/x to 40 discs and resumes playback the next time you want...
To activate this function, set to [OFF] (page 91), the resume point is deleted. For details, see "[MULTI-DISC RESUME] (DVD VIDEO/VIDEO CD only)" (page 91). Tip • To play from the beginning of the disc, press x twice, then press H. TRACK - - 3. Tip • ... 4. TRACK - - 5. TRACK - - 7. To enjoy a disc that is played before by resume playback (Multi-disc Resume) (DVD VIDEO, VIDEO CD only) This system stores the point where you stopped the disc for [PROGRAM] appear. 6 (14) T 2:50 OFF OFF SET ON PLAY CD 3 Press X/x to 40 discs and resumes playback the next time you want...

Operating Instructions
Page 51
...track. 4 Press . Note • You cannot use a combination of the albums on a disc. • [CHAPTER]: repeats the current chapter. x When playing a DVD VIDEO or DVDVR • [OFF]: does not play repeatedly. • [ALL DISCS]: repeats all of the discs. • [ONE DISC]: repeats all of the ...not match the image. • When [MODE (MP3, JPEG)] is turned off the Control Menu display Press DISPLAY repeatedly until the Control Menu display is set to select [REPEAT], then press . Various Functions for [REPEAT] appear. 6 (14) T 2:50 PLAY CD OFF OFF ALL DISCS ONE DISC TRACK 3...
...track. 4 Press . Note • You cannot use a combination of the albums on a disc. • [CHAPTER]: repeats the current chapter. x When playing a DVD VIDEO or DVDVR • [OFF]: does not play repeatedly. • [ALL DISCS]: repeats all of the discs. • [ONE DISC]: repeats all of the ...not match the image. • When [MODE (MP3, JPEG)] is turned off the Control Menu display Press DISPLAY repeatedly until the Control Menu display is set to select [REPEAT], then press . Various Functions for [REPEAT] appear. 6 (14) T 2:50 PLAY CD OFF OFF ALL DISCS ONE DISC TRACK 3...

Operating Instructions
Page 52
...setting is recorded in multiple audio formats (PCM, Dolby Digital, MPEG audio, or DTS), you can also change the language. Example: • [1: MAIN] (main sound) • [1: SUB] (sub sound) • [1: MAIN+SUB] (main and sub sound) • [2: MAIN] • [2: SUB] • [2: MAIN+SUB] 52US When you play DVDs... the title you want to select items such as the language for the subtitles and the language for the sound, select these items using DVD TOP MENU. The following display appears. 1:ENGLISH DOLBY DIGITAL 3/2.1 2 Press AUDIO repeatedly to see which make up a picture or music ...
...setting is recorded in multiple audio formats (PCM, Dolby Digital, MPEG audio, or DTS), you can also change the language. Example: • [1: MAIN] (main sound) • [1: SUB] (sub sound) • [1: MAIN+SUB] (main and sub sound) • [2: MAIN] • [2: SUB] • [2: MAIN+SUB] 52US When you play DVDs... the title you want to select items such as the language for the subtitles and the language for the sound, select these items using DVD TOP MENU. The following display appears. 1:ENGLISH DOLBY DIGITAL 3/2.1 2 Press AUDIO repeatedly to see which make up a picture or music ...


