Operating Instructions
Page 2
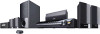
... radiate radio frequency energy and, if not installed and used to the presence of important operating and maintenance (servicing) instructions in cabinet. Do not place the naked flame sources such as a bookcase or built-in the literature accompanying the appliance. This marking is intended to alert the user to disconnect the unit from the AC outlet immediately. Model No. DAV-HDX287WC Serial...
... radiate radio frequency energy and, if not installed and used to the presence of important operating and maintenance (servicing) instructions in cabinet. Do not place the naked flame sources such as a bookcase or built-in the literature accompanying the appliance. This marking is intended to alert the user to disconnect the unit from the AC outlet immediately. Model No. DAV-HDX287WC Serial...
Operating Instructions
Page 6
... the Quick Setup 24 Step 4: Selecting the Source .......27 Step 5: Enjoying Surround Sound 28 Disc Playing a Disc 31 Using Play Mode 36 Searching/Selecting Disc Contents ....... 39 Playing MP3 Files/JPEG Image Files... 41 Adjusting the Delay Between the Picture and Sound 45 Restricting Playback of the Disc........... 45 Changing the System Settings by Using the Setup Display 47 Tuner Presetting Radio Stations 55 Listening to the Radio 56 Control for HDMI/External Audio Device Using the Control for HDMI Function for "BRAVIA" Sync 58 Using the DIGITAL MEDIA PORT Adapter 60 Using an...
... the Quick Setup 24 Step 4: Selecting the Source .......27 Step 5: Enjoying Surround Sound 28 Disc Playing a Disc 31 Using Play Mode 36 Searching/Selecting Disc Contents ....... 39 Playing MP3 Files/JPEG Image Files... 41 Adjusting the Delay Between the Picture and Sound 45 Restricting Playback of the Disc........... 45 Changing the System Settings by Using the Setup Display 47 Tuner Presetting Radio Stations 55 Listening to the Radio 56 Control for HDMI/External Audio Device Using the Control for HDMI Function for "BRAVIA" Sync 58 Using the DIGITAL MEDIA PORT Adapter 60 Using an...
Operating Instructions
Page 17
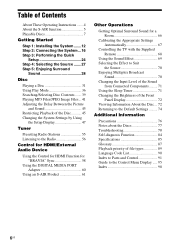
.../VIDEO R AUDIO IN L A Video cord (supplied) B HDMI cable (not supplied) To the HDMI IN jack of the TV. To view images from the DIGITAL MEDIA PORT adapter are not output via the HDMI OUT jack. * HDMI (High-Definition Multimedia Interface) Method 3: Component video cable (C) and video cord (A) connection If your TV does not have an HDMI jack, but has component video input jacks, connect to select the type of output signal (page 26). To the component video input jacks of output signal to progressive format (page 26). Method 1: Video cord (A) connection This...
.../VIDEO R AUDIO IN L A Video cord (supplied) B HDMI cable (not supplied) To the HDMI IN jack of the TV. To view images from the DIGITAL MEDIA PORT adapter are not output via the HDMI OUT jack. * HDMI (High-Definition Multimedia Interface) Method 3: Component video cable (C) and video cord (A) connection If your TV does not have an HDMI jack, but has component video input jacks, connect to select the type of output signal (page 26). To the component video input jacks of output signal to progressive format (page 26). Method 1: Video cord (A) connection This...
Operating Instructions
Page 25
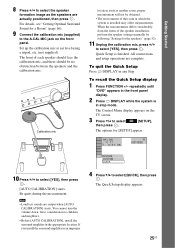
... Quick Setup display 1 Press FUNCTION +/- Note • Loud test sounds are actually positioned, then press . If you install the surround amplifier in stop mode. Getting Started 8 Press C/c to select the speaker formation image as another room, proper measurement will not be no obstruction between the speakers and the calibration mic. repeatedly until "DVD" appears in the front panel display. 2 Press DISPLAY while the system is finished. The Control Menu display appears on the TV screen...
... Quick Setup display 1 Press FUNCTION +/- Note • Loud test sounds are actually positioned, then press . If you install the surround amplifier in stop mode. Getting Started 8 Press C/c to select the speaker formation image as another room, proper measurement will not be no obstruction between the speakers and the calibration mic. repeatedly until "DVD" appears in the front panel display. 2 Press DISPLAY while the system is finished. The Control Menu display appears on the TV screen...
Operating Instructions
Page 26
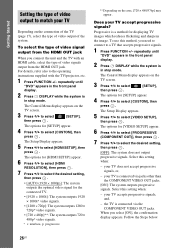
... panel display. 2 Press DISPLAY while the system is in stop mode. Does your TV accepts progressive signals, and, - Select this setting when: - The options for [HDMI SETUP] appear. 6 Press X/x to select [HDMI RESOLUTION], then press . 7 Press X/x to select the desired setting, then press . • [AUTO (1920 × 1080p)]: The system outputs the optimal video signal for [VIDEO SETUP] appear. 6 Press X/x to select [PROGRESSIVE (COMPONENT OUT)], then press . 7 Press X/x to the operating instructions supplied with an HDMI cable, select...
... panel display. 2 Press DISPLAY while the system is in stop mode. Does your TV accepts progressive signals, and, - Select this setting when: - The options for [HDMI SETUP] appear. 6 Press X/x to select [HDMI RESOLUTION], then press . 7 Press X/x to select the desired setting, then press . • [AUTO (1920 × 1080p)]: The system outputs the optimal video signal for [VIDEO SETUP] appear. 6 Press X/x to select [PROGRESSIVE (COMPONENT OUT)], then press . 7 Press X/x to the operating instructions supplied with an HDMI cable, select...
Operating Instructions
Page 31
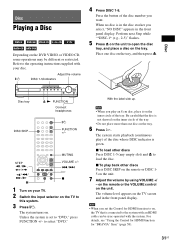
... "DVD," press FUNCTION +/- Disc Playing a Disc Depending on , the TV that the disc is not skewed on the inner circle of the disc number you select, "NO DISC" appears in the front panel display. Be careful that is connected to the operating instructions supplied with your TV. 2 Switch the input selector on the unit. 7 Adjust the volume by using VOLUME +/ - Refer to the system with an HDMI cable can be different or restricted. Disc Disc tray DISC...
... "DVD," press FUNCTION +/- Disc Playing a Disc Depending on , the TV that the disc is not skewed on the inner circle of the disc number you select, "NO DISC" appears in the front panel display. Be careful that is connected to the operating instructions supplied with your TV. 2 Switch the input selector on the unit. 7 Adjust the volume by using VOLUME +/ - Refer to the system with an HDMI cable can be different or restricted. Disc Disc tray DISC...
Operating Instructions
Page 32
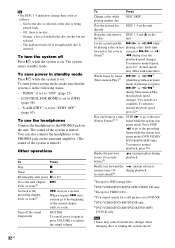
.... 2)DVD VIDEO/DVD-R/DVD-RW/VIDEO CD only. 3)Except for VIDEO CDs. 4)You cannot search for a still picture on /off if an unplayable disc is in standby mode Press "/1 while the system is no disc. - The sound of the system is in pause mode. Watch frame by playing a disc in a second. Each time you can also connect the headphones to "OFF" (page 23). - [CONTROL FOR HDMI] is in the disc stocker...
.... 2)DVD VIDEO/DVD-R/DVD-RW/VIDEO CD only. 3)Except for VIDEO CDs. 4)You cannot search for a still picture on /off if an unplayable disc is in standby mode Press "/1 while the system is no disc. - The sound of the system is in pause mode. Watch frame by playing a disc in a second. Each time you can also connect the headphones to "OFF" (page 23). - [CONTROL FOR HDMI] is in the disc stocker...
Operating Instructions
Page 48
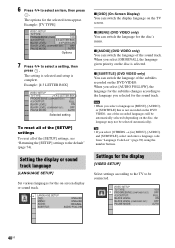
... you select a language in [MENU], [AUDIO], and [SUBTITLE], select and enter a language code from "Language Code List" (page 90) using the number buttons. Setting the display or sound track language [LANGUAGE SETUP] Set various languages for the sound track. Example: [4:3 LETTER BOX] VIDEO SETUP TV TYPE: 4:3 LETTER BOX PROGRESSIVE (COMPONENT OUT): OFF 4:3 OUTPUT: FULL BLACK LEVEL: ON BLACK LEVEL (COMPONENT OUT): OFF PAUSE MODE: AUTO Selected setting To reset all of the [SETUP] settings To reset all of the sound track. LANGUAGE SETUP OSD: MENU: AUDIO...
... you select a language in [MENU], [AUDIO], and [SUBTITLE], select and enter a language code from "Language Code List" (page 90) using the number buttons. Setting the display or sound track language [LANGUAGE SETUP] Set various languages for the sound track. Example: [4:3 LETTER BOX] VIDEO SETUP TV TYPE: 4:3 LETTER BOX PROGRESSIVE (COMPONENT OUT): OFF 4:3 OUTPUT: FULL BLACK LEVEL: ON BLACK LEVEL (COMPONENT OUT): OFF PAUSE MODE: AUTO Selected setting To reset all of the [SETUP] settings To reset all of the sound track. LANGUAGE SETUP OSD: MENU: AUDIO...
Operating Instructions
Page 50
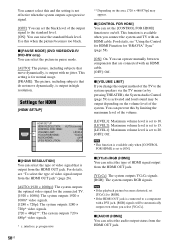
... of video signal output from the HDMI OUT jack" (page 26). [AUTO (1920 × 1080p)]: The system outputs the optimal video signal for "BRAVIA" Sync" (page 58). [ON]: On. You can set the [CONTROL FOR HDMI] function to on the area, [720 × 480/576p] may be automatically output even when you select [YCBCR]. Use this by pressing THEATER), the System Audio Control (page 59) is output with an HDMI cable. [OFF]: Off. You can select the picture...
... of video signal output from the HDMI OUT jack" (page 26). [AUTO (1920 × 1080p)]: The system outputs the optimal video signal for "BRAVIA" Sync" (page 58). [ON]: On. You can set the [CONTROL FOR HDMI] function to on the area, [720 × 480/576p] may be automatically output even when you select [YCBCR]. Use this by pressing THEATER), the System Audio Control (page 59) is output with an HDMI cable. [OFF]: Off. You can select the picture...
Operating Instructions
Page 52
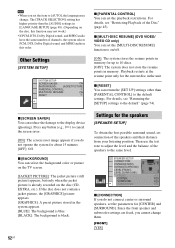
.... Then use the test tone to the same level. x [SCREEN SAVER] You can select the background color or picture on the disc (CDEXTRA, etc.). x [BACKGROUND] You can reduce the damage to [AUTO], the language may not work.) • If PCM, DTS, Dolby Digital sound, and MPEG audio have the same number of the speakers to adjust the level and the balance of channels, the system selects PCM, DTS, Dolby Digital sound, and MPEG audio in the system appears. [BLUE...
.... Then use the test tone to the same level. x [SCREEN SAVER] You can select the background color or picture on the disc (CDEXTRA, etc.). x [BACKGROUND] You can reduce the damage to [AUTO], the language may not work.) • If PCM, DTS, Dolby Digital sound, and MPEG audio have the same number of the speakers to adjust the level and the balance of channels, the system selects PCM, DTS, Dolby Digital sound, and MPEG audio in the system appears. [BLUE...
Operating Instructions
Page 58
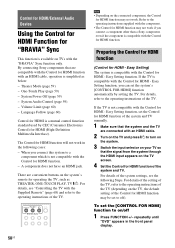
... not work. System Power Off (page 59) - System Audio Control (page 59) - The Control for HDMI function may be set the [CONTROL FOR HDMI] function to the operating instructions of the Control for HDMI function. ONE-TOUCH TV THEATER PLAY BRAVIA Sync Note • Depending on the TV, the default setting of the TV. Refer to the operating instructions of the TV, refer to the operating instructions supplied with the component. • The Control for HDMI function may not work in the front panel display...
... not work. System Power Off (page 59) - System Audio Control (page 59) - The Control for HDMI function may be set the [CONTROL FOR HDMI] function to the operating instructions of the Control for HDMI function. ONE-TOUCH TV THEATER PLAY BRAVIA Sync Note • Depending on the TV, the default setting of the TV. Refer to the operating instructions of the TV, refer to the operating instructions supplied with the component. • The Control for HDMI function may not work in the front panel display...
Operating Instructions
Page 59
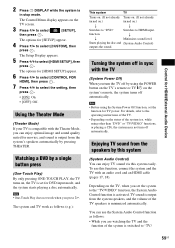
... sound is output from the system speakers, and the volume of the TV speakers is activated. The options for [HDMI SETUP] appear. 6 Press X/x to select [CONTROL FOR HDMI], then press . 7 Press X/x to HDMI input. Using the Theater Mode (Theater Mode) If your TV is compatible with the Theater Mode, you set the function for TV power. The system and TV work when you turn off automatically. r r Minimizes sound level. Starts playing the disc and (System Audio Control) outputs the sound. while using other than "DVD" or "TV/VIDEO" functions, or playing...
... sound is output from the system speakers, and the volume of the TV speakers is activated. The options for [HDMI SETUP] appear. 6 Press X/x to select [CONTROL FOR HDMI], then press . 7 Press X/x to HDMI input. Using the Theater Mode (Theater Mode) If your TV is compatible with the Theater Mode, you set the function for TV power. The system and TV work when you turn off automatically. r r Minimizes sound level. Starts playing the disc and (System Audio Control) outputs the sound. while using other than "DVD" or "TV/VIDEO" functions, or playing...

Operating Instructions
Page 67
... The system outputs a loud test sound when [AUTO CALIBRATION] starts. Set up the calibration mic at ear level using a tripod, etc. (not supplied). The result is OK. Other Operations Calibrating the Appropriate Settings Automatically [AUTO CALIBRATION] D. A. The options for the speakers" (page 52). 10 Press C/c to select [YES]. 9 Press . [AUTO CALIBRATION] starts. Note • Before [AUTO CALIBRATION], make sure that the surround amplifier turns on and you want to select [SETUP], then press . C. (Digital Cinema Auto Calibration) can set the appropriate surround sound...
... The system outputs a loud test sound when [AUTO CALIBRATION] starts. Set up the calibration mic at ear level using a tripod, etc. (not supplied). The result is OK. Other Operations Calibrating the Appropriate Settings Automatically [AUTO CALIBRATION] D. A. The options for the speakers" (page 52). 10 Press C/c to select [YES]. 9 Press . [AUTO CALIBRATION] starts. Note • Before [AUTO CALIBRATION], make sure that the surround amplifier turns on and you want to select [SETUP], then press . C. (Digital Cinema Auto Calibration) can set the appropriate surround sound...
Operating Instructions
Page 70
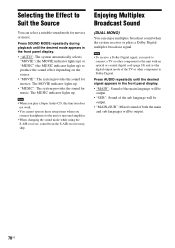
... system provides the sound for movies or music. Press SOUND MODE repeatedly during playback until the desired signal appears in the front panel display. • "AUTO": The system automatically selects "MOVIE" (the MOVIE indicator lights up) or "MUSIC" (the MUSIC indicator lights up) to Dolby Digital. Note • When you play a Super Audio CD, this function does not work. • You cannot operate these setup items when you need to connect a TV or other component to...
... system provides the sound for movies or music. Press SOUND MODE repeatedly during playback until the desired signal appears in the front panel display. • "AUTO": The system automatically selects "MOVIE" (the MOVIE indicator lights up) or "MUSIC" (the MUSIC indicator lights up) to Dolby Digital. Note • When you play a Super Audio CD, this function does not work. • You cannot operate these setup items when you need to connect a TV or other component to...
Operating Instructions
Page 80
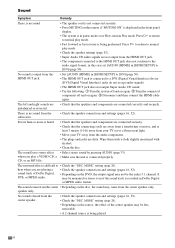
.... MODE" setting (page 28). • Depending on the source, the effect of Dolby Digital, DTS, or MPEG audio. • Depending on the remote if "MUTING ON" is displayed in the front panel display. • The system is in pause mode or in Slow-motion Play mode. There is no sound. • The speaker cord is not connected securely. • Press MUTING on the DVD, the output signal may be the entire 5.1 channel...
.... MODE" setting (page 28). • Depending on the source, the effect of Dolby Digital, DTS, or MPEG audio. • Depending on the remote if "MUTING ON" is displayed in the front panel display. • The system is in pause mode or in Slow-motion Play mode. There is no sound. • The speaker cord is not connected securely. • Press MUTING on the DVD, the output signal may be the entire 5.1 channel...
Operating Instructions
Page 82
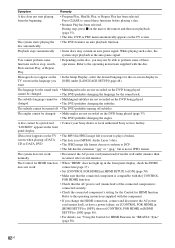
... the AC power cord (mains lead), or have a power failure, set [CONTROL FOR HDMI] in [HDMI SETUP] to [OFF], then set [CONTROL FOR HDMI] in [HDMI SETUP] to the operating instructions supplied with the [CONTROL FOR HDMI] function. • Check that the connected component is compatible with the disc. The Control for the on the TV screen. You cannot perform some of the connected component is not in the front panel display. [Data error] appears on the DVD being played. The...
... the AC power cord (mains lead), or have a power failure, set [CONTROL FOR HDMI] in [HDMI SETUP] to [OFF], then set [CONTROL FOR HDMI] in [HDMI SETUP] to the operating instructions supplied with the [CONTROL FOR HDMI] function. • Check that the connected component is compatible with the disc. The Control for the on the TV screen. You cannot perform some of the connected component is not in the front panel display. [Data error] appears on the DVD being played. The...
Operating Instructions
Page 87
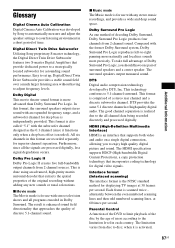
... in Dolby Surround. x Music mode The Music mode is for use with any new sounds or tonal colorations. HDMI (High-Definition Multimedia Interface) HDMI is enhanced sound field directionality that supports both video and audio on a single digital connection, allowing you should have one method of decoding Dolby Surround, Dolby Surround Pro Logic produces four channels from 2 channel sources. Parental Control A function of the DVD to limit playback of the disc by Sony to automatically measure and adjust the speaker settings...
... in Dolby Surround. x Music mode The Music mode is for use with any new sounds or tonal colorations. HDMI (High-Definition Multimedia Interface) HDMI is enhanced sound field directionality that supports both video and audio on a single digital connection, allowing you should have one method of decoding Dolby Surround, Dolby Surround Pro Logic produces four channels from 2 channel sources. Parental Control A function of the DVD to limit playback of the disc by Sony to automatically measure and adjust the speaker settings...

Operating Instructions
Page 98
..., 64, 65, 71, 72 SYSTEM SETUP 52 T TEST TONE 54 TIME 40 TRACK SELECTION 51 TV TYPE 49 V VIDEO SETUP 48 VOLUME LIMIT 50 A. Index Numerics 4:3 OUTPUT 49 5.1 Channel Surround 34 A A/V SYNC 45 ANGLE 33 ATTENUATE 71 AUDIO 48 AUDIO (HDMI) 50 AUDIO DRC 51 AUDIO SETUP 51 AUTO CALIBRATION 51, 67, 87 B BACKGROUND 52 BLACK LEVEL 49 BLACK LEVEL (COMPONENT OUT) 49 C COLD RESET 74 CONTROL FOR HDMI 50 Control for HDMI 58 Control Menu Display 95 CUSTOM 47, 74...
..., 64, 65, 71, 72 SYSTEM SETUP 52 T TEST TONE 54 TIME 40 TRACK SELECTION 51 TV TYPE 49 V VIDEO SETUP 48 VOLUME LIMIT 50 A. Index Numerics 4:3 OUTPUT 49 5.1 Channel Surround 34 A A/V SYNC 45 ANGLE 33 ATTENUATE 71 AUDIO 48 AUDIO (HDMI) 50 AUDIO DRC 51 AUDIO SETUP 51 AUTO CALIBRATION 51, 67, 87 B BACKGROUND 52 BLACK LEVEL 49 BLACK LEVEL (COMPONENT OUT) 49 C COLD RESET 74 CONTROL FOR HDMI 50 Control for HDMI 58 Control Menu Display 95 CUSTOM 47, 74...
Quick Setup Guide
Page 2
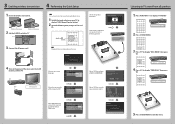
... TV to TV sound from all speakers 1 Press FUNCTION +/- MODE," then press . 4 Press / to display "PRO LOGIC," then press . 5 Press SYSTEM MENU to display "DEC. ENTER) Note Displayed items vary depending on -screen language. Start measurement? to display "TV/VIDEO." 2 Press SYSTEM MENU. 3 Press / to exit the menu. AUTO CALIBRATION Connect calibration mic. YES NO /, QUICK SETUP is complete. Home Theatre System Listening to display "SONY Home Theatre System." 2 Set each following item, using and . A S-AIR...
... TV to TV sound from all speakers 1 Press FUNCTION +/- MODE," then press . 4 Press / to display "PRO LOGIC," then press . 5 Press SYSTEM MENU to display "DEC. ENTER) Note Displayed items vary depending on -screen language. Start measurement? to display "TV/VIDEO." 2 Press SYSTEM MENU. 3 Press / to exit the menu. AUTO CALIBRATION Connect calibration mic. YES NO /, QUICK SETUP is complete. Home Theatre System Listening to display "SONY Home Theatre System." 2 Set each following item, using and . A S-AIR...
Marketing Specifications
Page 2
... Speaker General Enclosure Type: Bass Reflex (Ported) Front Grille/Material: Fixed - Requires DIGITAL MEDIA PORT accessory compatible with each other trademarks are not universally compatible 4. iPod® support is limited based upon which optional Digital Media Port is being used. HDMI and the HDMI logo are subject to owner's manual for compatibility. 6. Features and specifications are trademarks or registered trademarks of Sony. Sleep Inputs and Outputs Analog Audio Input(s): 1 (Rear-RCA) & 1 (Front-Mini Jack) Coaxial Audio Digital Input(s): 1 (Rear) Component Video...
... Speaker General Enclosure Type: Bass Reflex (Ported) Front Grille/Material: Fixed - Requires DIGITAL MEDIA PORT accessory compatible with each other trademarks are not universally compatible 4. iPod® support is limited based upon which optional Digital Media Port is being used. HDMI and the HDMI logo are subject to owner's manual for compatibility. 6. Features and specifications are trademarks or registered trademarks of Sony. Sleep Inputs and Outputs Analog Audio Input(s): 1 (Rear-RCA) & 1 (Front-Mini Jack) Coaxial Audio Digital Input(s): 1 (Rear) Component Video...


