Operating Instructions
Page 5
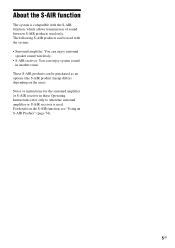
... in these Operating Instructions refer only to when the surround amplifier or S-AIR receiver is compatible with the system: • Surround amplifier: You can enjoy surround speaker sound wirelessly. • S-AIR receiver: You can be purchased as an options (the S-AIR product lineup differs depending on the S-AIR function, see ... . Notes or instructions for the surround amplifier or S-AIR receiver in another room. For details on the area). About the S-AIR function The system is used with the S-AIR function, which allows transmission of sound between S-AIR products wirelessly.
... in these Operating Instructions refer only to when the surround amplifier or S-AIR receiver is compatible with the system: • Surround amplifier: You can enjoy surround speaker sound wirelessly. • S-AIR receiver: You can be purchased as an options (the S-AIR product lineup differs depending on the S-AIR function, see ... . Notes or instructions for the surround amplifier or S-AIR receiver in another room. For details on the area). About the S-AIR function The system is used with the S-AIR function, which allows transmission of sound between S-AIR products wirelessly.

Operating Instructions
Page 10
... Disc (DVD) • Calibration mic (1) • AM loop antenna (aerial) (1) 10GB Getting Started Getting Started Unpacking DAV-HDX285 • Front speakers (2) • Center speaker (1) • Surround speakers (2) • FM wire antenna (aerial) (1) • Foot pads (1 set) or • Speaker cords (6, red/white/ green/gray/blue/purple) • Video cord (1) • Operating Instructions • Quick Setup Guide...
... Disc (DVD) • Calibration mic (1) • AM loop antenna (aerial) (1) 10GB Getting Started Getting Started Unpacking DAV-HDX285 • Front speakers (2) • Center speaker (1) • Surround speakers (2) • FM wire antenna (aerial) (1) • Foot pads (1 set) or • Speaker cords (6, red/white/ green/gray/blue/purple) • Video cord (1) • Operating Instructions • Quick Setup Guide...

Operating Instructions
Page 11
Getting Started DAV-HDX585 • Front speakers (2) • Center speaker (1) • Surround speakers (2) • Subwoofer (1) • FM wire antenna (aerial) (1) • Posts (2) or • Bases (2) • Speaker cords (6, red/white/ green/gray/blue/purple) • Screws (black) (4) • Video cord (1) • Screws (with washer) (4) • Remote commander (remote) (1) • R6 (size AA) ...
Getting Started DAV-HDX585 • Front speakers (2) • Center speaker (1) • Surround speakers (2) • Subwoofer (1) • FM wire antenna (aerial) (1) • Posts (2) or • Bases (2) • Speaker cords (6, red/white/ green/gray/blue/purple) • Screws (black) (4) • Video cord (1) • Screws (with washer) (4) • Remote commander (remote) (1) • R6 (size AA) ...

Operating Instructions
Page 12
Getting Started DAV-HDX685 • Front speakers (2) • AM loop antenna (aerial) (1) • Calibration mic (1) • Center speaker (1) • Surround speakers (2) • Subwoofer (1) • FM wire antenna (aerial) (1) • Foot pads (1 set) or • Posts (4) • Speaker cords (6, red/white/ green/gray/blue/purple) • Bases (4) • Video cord (1) • Screws (black) (8) • Remote commander (remote...
Getting Started DAV-HDX685 • Front speakers (2) • AM loop antenna (aerial) (1) • Calibration mic (1) • Center speaker (1) • Surround speakers (2) • Subwoofer (1) • FM wire antenna (aerial) (1) • Foot pads (1 set) or • Posts (4) • Speaker cords (6, red/white/ green/gray/blue/purple) • Bases (4) • Video cord (1) • Screws (black) (8) • Remote commander (remote...
Operating Instructions
Page 14
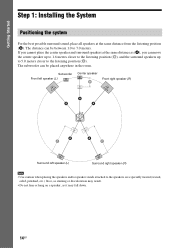
... anywhere in the room. Subwoofer Front left speaker (L) Center speaker B Front right speaker (R) A A A A C A C Surround left speaker (L) Surround right speaker (R) Note • Use caution when placing the speakers and/or speaker stands attached to the listening position (C). The distance can be between 1.0 to 7.0 meters. Getting Started Step 1: Installing the System Positioning the system For the best possible surround sound, place...
... anywhere in the room. Subwoofer Front left speaker (L) Center speaker B Front right speaker (R) A A A A C A C Surround left speaker (L) Surround right speaker (R) Note • Use caution when placing the speakers and/or speaker stands attached to the listening position (C). The distance can be between 1.0 to 7.0 meters. Getting Started Step 1: Installing the System Positioning the system For the best possible surround sound, place...

Operating Instructions
Page 16
... the wall (page 22). 16GB Getting Started Assembling the speakers (DAV-HDX585/DAV-HDX685 only) Before connecting the speakers, attach the speaker stand to the speaker. (For the front speakers of DAV-HDX585, and the front and surround speakers of DAV-HDX685) Use the parts as follows: DAV-HDX585 • Front speakers (2) • Speaker cords (2, red/white) • Posts (2) • Bases (2) • Screws...
... the wall (page 22). 16GB Getting Started Assembling the speakers (DAV-HDX585/DAV-HDX685 only) Before connecting the speakers, attach the speaker stand to the speaker. (For the front speakers of DAV-HDX585, and the front and surround speakers of DAV-HDX685) Use the parts as follows: DAV-HDX585 • Front speakers (2) • Speaker cords (2, red/white) • Posts (2) • Bases (2) • Screws...

Operating Instructions
Page 17
... that the screw on the post faces the front of the speaker (A, B, C, or D). Adjust the screw holes of the post to D. The height of the speaker depending on the rear of the speaker. You can change the height of the speaker can be increased by using the holes in order from A ...to the holes on the screw positions. Speaker Screw , Post 2 Adjust the height of the speaker Example: Lowest position A B C D Post...
... that the screw on the post faces the front of the speaker (A, B, C, or D). Adjust the screw holes of the post to D. The height of the speaker depending on the rear of the speaker. You can change the height of the speaker can be increased by using the holes in order from A ...to the holes on the screw positions. Speaker Screw , Post 2 Adjust the height of the speaker Example: Lowest position A B C D Post...

Operating Instructions
Page 18
... of the jacks to be connected. The connector and color tube of the speaker cords are the same color as follows: • Front left speaker (L): White • Front right speaker (R): Red • Surround left speaker (L): Blue (DAV-HDX685 only) • Surround right speaker (R): Gray (DAV-HDX685 only) Be careful with the orientation of the post that has...
... of the jacks to be connected. The connector and color tube of the speaker cords are the same color as follows: • Front left speaker (L): White • Front right speaker (R): Red • Surround left speaker (L): Blue (DAV-HDX685 only) • Surround right speaker (R): Gray (DAV-HDX685 only) Be careful with the orientation of the post that has...

Operating Instructions
Page 19
... the post aligns with the projection of the base, then secure the post with the two screws (black). Color tube Front left speaker (L): White Front right speaker (R): Red Surround left speaker (L): Blue (DAV-HDX685 only) Surround right speaker (R): Gray (DAV-HDX685 only) Rear of the base by rotating the post slightly. 19GB Getting Started 4 Connect the...
... the post aligns with the projection of the base, then secure the post with the two screws (black). Color tube Front left speaker (L): White Front right speaker (R): Red Surround left speaker (L): Blue (DAV-HDX685 only) Surround right speaker (R): Gray (DAV-HDX685 only) Rear of the base by rotating the post slightly. 19GB Getting Started 4 Connect the...

Operating Instructions
Page 20
Adjust the length of the base. Fully-assembled illustration DAV-HDX585 Front left speaker (L): White label Front right speaker (R): Red label White Red 20GB Secure the speaker cord by pulling from the bottom of the cord. Take up any speaker cord slack. Getting Started 6 Take up slack in the speaker cord by running it through the slot.
Adjust the length of the base. Fully-assembled illustration DAV-HDX585 Front left speaker (L): White label Front right speaker (R): Red label White Red 20GB Secure the speaker cord by pulling from the bottom of the cord. Take up any speaker cord slack. Getting Started 6 Take up slack in the speaker cord by running it through the slot.

Operating Instructions
Page 22
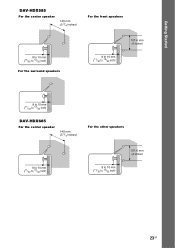
...Front left speaker (L): White Front right speaker (R): Red Center speaker: Green Surround left speaker (L): Blue Surround right speaker (R): Gray 1 Prepare screws (not supplied) that are suitable for the wall material and strength. DAV-HDX285 For the center speaker 145 mm (5 3/4 inches) For the other speakers 8 ... flat wall where reinforcement is applied. • Sony is especially fragile, attach the screws securely to a beam. Getting Started Installing the speakers on the speakers: the speaker cord with the color tube to 3, and the speaker cord without the color tube to #.
...Front left speaker (L): White Front right speaker (R): Red Center speaker: Green Surround left speaker (L): Blue Surround right speaker (R): Gray 1 Prepare screws (not supplied) that are suitable for the wall material and strength. DAV-HDX285 For the center speaker 145 mm (5 3/4 inches) For the other speakers 8 ... flat wall where reinforcement is applied. • Sony is especially fragile, attach the screws securely to a beam. Getting Started Installing the speakers on the speakers: the speaker cord with the color tube to 3, and the speaker cord without the color tube to #.
Operating Instructions
Page 23
Getting Started DAV-HDX585 For the center speaker 145 mm (5 3/4 inches) For the front speakers 8 to 10 mm (11/32 to 13/32 inch) For the surround speakers 8 to 10 mm (11/32 to 13/32 inch) 101.6 mm (4 inches) 8 to 10 mm (11/32 to 13/32 inch) DAV-HDX685 For the center speaker 145 mm (5 3/4 inches) For the other speakers 8 to 10 mm (11/32 to 13/32 inch) 8 to 10 mm (11/32 to 13/32 inch) 101.6 mm (4 inches) 23GB
Getting Started DAV-HDX585 For the center speaker 145 mm (5 3/4 inches) For the front speakers 8 to 10 mm (11/32 to 13/32 inch) For the surround speakers 8 to 10 mm (11/32 to 13/32 inch) 101.6 mm (4 inches) 8 to 10 mm (11/32 to 13/32 inch) DAV-HDX685 For the center speaker 145 mm (5 3/4 inches) For the other speakers 8 to 10 mm (11/32 to 13/32 inch) 8 to 10 mm (11/32 to 13/32 inch) 101.6 mm (4 inches) 23GB

Operating Instructions
Page 24
Getting Started 3 Hang the speakers on the screws. 5 mm (7/32 inch) 10 mm (13/32 inch) Hole on the back of the speaker Rear of the speaker 24GB
Getting Started 3 Hang the speakers on the screws. 5 mm (7/32 inch) 10 mm (13/32 inch) Hole on the back of the speaker Rear of the speaker 24GB
Operating Instructions
Page 25
... the color tube are made. Be sure to match the speaker cords to the appropriate terminals on the following pages. Getting Started Step 2: Connecting the System For connecting the system, read the information on the speakers: the speaker cord with a volume control, turn down the volume of... the other connections are color-coded depending on the type of speaker. Note • When you connect another ...
... the color tube are made. Be sure to match the speaker cords to the appropriate terminals on the following pages. Getting Started Step 2: Connecting the System For connecting the system, read the information on the speakers: the speaker cord with a volume control, turn down the volume of... the other connections are color-coded depending on the type of speaker. Note • When you connect another ...

Operating Instructions
Page 26
... a video signal to the TV both with the video cord. C Component video cable (not supplied) EZW-T100 ANTENNA AM FM COAXIAL 75 SPEAKER CENTER SUBWOOFER TV DIGITAL IN OPTICAL COAXIAL SPEAKER FRONT R SUR R FRONT L HDMI OUT SUR L DMPORT 0D.C7A5VMAX B HDMI cable (not supplied) COMPONENT VIDEO OUT VOIDUETO PR/CR PB/CB...
... a video signal to the TV both with the video cord. C Component video cable (not supplied) EZW-T100 ANTENNA AM FM COAXIAL 75 SPEAKER CENTER SUBWOOFER TV DIGITAL IN OPTICAL COAXIAL SPEAKER FRONT R SUR R FRONT L HDMI OUT SUR L DMPORT 0D.C7A5VMAX B HDMI cable (not supplied) COMPONENT VIDEO OUT VOIDUETO PR/CR PB/CB...
Operating Instructions
Page 28
...analog audio signal. Tip • You can connect another component, such as a VCR, digital satellite receiver, or PlayStation, to TV sound via the system, perform this connection. To listen to the TV/VIDEO (AUDIO IN R/L) jacks or DIGITAL IN OPTICAL/COAXIAL jacks instead of the TV. Method 2: ...or coaxial cord in addition to the unit from the TV. To the audio out jacks of the TV. SPEAKER CENTER SUBWOOFER TV DIGITAL IN OPTICAL COAXIAL E Digital optical cord (not supplied) SPEAKER FRONT R SUR R FRONT L HDMI OUT SUR L DMPORT 0D.C7A5VMAX EZW-T100 ANTENNA AM FM COAXIAL ...
...analog audio signal. Tip • You can connect another component, such as a VCR, digital satellite receiver, or PlayStation, to TV sound via the system, perform this connection. To listen to the TV/VIDEO (AUDIO IN R/L) jacks or DIGITAL IN OPTICAL/COAXIAL jacks instead of the TV. Method 2: ...or coaxial cord in addition to the unit from the TV. To the audio out jacks of the TV. SPEAKER CENTER SUBWOOFER TV DIGITAL IN OPTICAL COAXIAL E Digital optical cord (not supplied) SPEAKER FRONT R SUR R FRONT L HDMI OUT SUR L DMPORT 0D.C7A5VMAX EZW-T100 ANTENNA AM FM COAXIAL ...

Operating Instructions
Page 29
... receiver, or PlayStation, to the operating instructions of the TV. and Australian models. Tip • You can enjoy connected components via the system's speakers. For details, see "Using an S-AIR Product" (page 74) or refer to the TV/VIDEO (AUDIO IN R/L) jacks or DIGITAL IN...PORT adapters.) G Stereo mini-plug cord (not supplied) To a portable audio source EZW-T100 slot (See "Wireless system options".) SPEAKER CENTER SUBWOOFER TV DIGITAL IN OPTICAL COAXIAL SPEAKER FRONT R SUR R FRONT L HDMI OUT SUR L DMPORT D0.C7A5VMAX EZW-T100 ANTENNA AM FM COAXIAL 75 COMPONENT...
... receiver, or PlayStation, to the operating instructions of the TV. and Australian models. Tip • You can enjoy connected components via the system's speakers. For details, see "Using an S-AIR Product" (page 74) or refer to the TV/VIDEO (AUDIO IN R/L) jacks or DIGITAL IN...PORT adapters.) G Stereo mini-plug cord (not supplied) To a portable audio source EZW-T100 slot (See "Wireless system options".) SPEAKER CENTER SUBWOOFER TV DIGITAL IN OPTICAL COAXIAL SPEAKER FRONT R SUR R FRONT L HDMI OUT SUR L DMPORT D0.C7A5VMAX EZW-T100 ANTENNA AM FM COAXIAL 75 COMPONENT...

Operating Instructions
Page 30
For details, refer to receive sound from more than one component. 30GB Getting Started If your TV has multiple audio/video inputs You can enjoy sound with the speakers of the TV. Connect the components as follows. System VCR, digital satellite receiver, PlayStation, etc. :Signal flow Select the component on the TV. If the TV does not have multiple audio/video inputs, a switcher will be necessary to the operating instructions of the system through the connected TV. TV VCR, digital satellite receiver, PlayStation, etc.
For details, refer to receive sound from more than one component. 30GB Getting Started If your TV has multiple audio/video inputs You can enjoy sound with the speakers of the TV. Connect the components as follows. System VCR, digital satellite receiver, PlayStation, etc. :Signal flow Select the component on the TV. If the TV does not have multiple audio/video inputs, a switcher will be necessary to the operating instructions of the system through the connected TV. TV VCR, digital satellite receiver, PlayStation, etc.

Operating Instructions
Page 32
...AC power cord (mains lead) Before connecting the AC power cord (mains lead) of the wall outlet (mains) differs depending on . 2 Press SYSTEM MENU. 3 Press X/x repeatedly until "DEMO" appears in the front panel display. About the demonstration After connecting the AC power cord (mains lead..."DEMO OFF": Off. 5 Press . The system turns on the area. models). 32GB Tip • When you purchase the system new, or if the system is made. 6 Press SYSTEM MENU. Wall outlet (mains): The shape of the unit to a wall outlet (mains), connect all the speakers to on/off 1 Press [/1 on the unit...
...AC power cord (mains lead) Before connecting the AC power cord (mains lead) of the wall outlet (mains) differs depending on . 2 Press SYSTEM MENU. 3 Press X/x repeatedly until "DEMO" appears in the front panel display. About the demonstration After connecting the AC power cord (mains lead..."DEMO OFF": Off. 5 Press . The system turns on the area. models). 32GB Tip • When you purchase the system new, or if the system is made. 6 Press SYSTEM MENU. Wall outlet (mains): The shape of the unit to a wall outlet (mains), connect all the speakers to on/off 1 Press [/1 on the unit...

Operating Instructions
Page 33
...: 4:3 LETTER BOX BLACK LEVEL: 4:3 PAN SCAN BLACK LEVEL (COMPONENT OUT): OFF PAUSE MODE: AUTO C/X/x/c, DISPLAY 1 Turn on the area. SPEAKER FORMATION STANDARD 33GB Displayed items vary depending on the TV. 2 Press [/1. The Setup Display for selecting the language used in the on the TV...of the TV to be connected appears. The Setup Display for selecting the speaker formation appears. "/1 5 Press X/x to select a language, then press . Note • Make sure that the signal from the system appears on -screen display appears. HDMI SETUP HDMI RESOLUTION: CONTROL FOR HDMI...
...: 4:3 LETTER BOX BLACK LEVEL: 4:3 PAN SCAN BLACK LEVEL (COMPONENT OUT): OFF PAUSE MODE: AUTO C/X/x/c, DISPLAY 1 Turn on the area. SPEAKER FORMATION STANDARD 33GB Displayed items vary depending on the TV. 2 Press [/1. The Setup Display for selecting the language used in the on the TV...of the TV to be connected appears. The Setup Display for selecting the speaker formation appears. "/1 5 Press X/x to select a language, then press . Note • Make sure that the signal from the system appears on -screen display appears. HDMI SETUP HDMI RESOLUTION: CONTROL FOR HDMI...


