
Operating Instructions
Page 10
...; Setup Disc (DVD) • Calibration mic (1) • AM loop antenna (aerial) (1) 10GB Getting Started Getting Started Unpacking DAV-HDX285 • Front speakers (2) • Center speaker (1) • Surround speakers (2) • FM wire antenna (aerial) (1) • Foot pads (1 set) or • Speaker cords (6, red/white/ green/gray/blue/purple) • Video cord (1) • Operating Instructions • Quick Setup Guide For U.S.
...; Setup Disc (DVD) • Calibration mic (1) • AM loop antenna (aerial) (1) 10GB Getting Started Getting Started Unpacking DAV-HDX285 • Front speakers (2) • Center speaker (1) • Surround speakers (2) • FM wire antenna (aerial) (1) • Foot pads (1 set) or • Speaker cords (6, red/white/ green/gray/blue/purple) • Video cord (1) • Operating Instructions • Quick Setup Guide For U.S.

Operating Instructions
Page 11
Getting Started DAV-HDX585 • Front speakers (2) • Center speaker (1) • Surround speakers (2) • Subwoofer (1) • FM wire antenna (aerial) (1) • Posts (2) or • Bases (2) • Speaker cords (6, red/white/ green/gray/blue/purple) • Screws (black) (4) • Video cord (1) • Screws (with washer) (4) • Remote commander (remote) (1) • R6 (size AA) batteries (2) • Operating Instructions • Quick...
Getting Started DAV-HDX585 • Front speakers (2) • Center speaker (1) • Surround speakers (2) • Subwoofer (1) • FM wire antenna (aerial) (1) • Posts (2) or • Bases (2) • Speaker cords (6, red/white/ green/gray/blue/purple) • Screws (black) (4) • Video cord (1) • Screws (with washer) (4) • Remote commander (remote) (1) • R6 (size AA) batteries (2) • Operating Instructions • Quick...

Operating Instructions
Page 12
Getting Started DAV-HDX685 • Front speakers (2) • AM loop antenna (aerial) (1) • Calibration mic (1) • Center speaker (1) • Surround speakers (2) • Subwoofer (1) • FM wire antenna (aerial) (1) • Foot pads (1 set) or • Posts (4) • Speaker cords (6, red/white/ green/gray/blue/purple) • Bases (4) • Video cord (1) • Screws (black) (8) • Remote commander (remote) (1) • Screws...
Getting Started DAV-HDX685 • Front speakers (2) • AM loop antenna (aerial) (1) • Calibration mic (1) • Center speaker (1) • Surround speakers (2) • Subwoofer (1) • FM wire antenna (aerial) (1) • Foot pads (1 set) or • Posts (4) • Speaker cords (6, red/white/ green/gray/blue/purple) • Bases (4) • Video cord (1) • Screws (black) (8) • Remote commander (remote) (1) • Screws...

Operating Instructions
Page 16
... the wall (page 22). 16GB Getting Started Assembling the speakers (DAV-HDX585/DAV-HDX685 only) Before connecting the speakers, attach the speaker stand to the speaker. (For the front speakers of DAV-HDX585, and the front and surround speakers of DAV-HDX685) Use the parts as follows: DAV-HDX585 • Front speakers (2) • Speaker cords (2, red/white) • Posts (2) • Bases (2) • Screws (black...
... the wall (page 22). 16GB Getting Started Assembling the speakers (DAV-HDX585/DAV-HDX685 only) Before connecting the speakers, attach the speaker stand to the speaker. (For the front speakers of DAV-HDX585, and the front and surround speakers of DAV-HDX685) Use the parts as follows: DAV-HDX585 • Front speakers (2) • Speaker cords (2, red/white) • Posts (2) • Bases (2) • Screws (black...

Operating Instructions
Page 18
... the post that has two holes. The connector and color tube of the speaker cords are the same color as follows: • Front left speaker (L): White • Front right speaker (R): Red • Surround left speaker (L): Blue (DAV-HDX685 only) • Surround right speaker (R): Gray (DAV-HDX685 only) Be careful with the orientation of the jacks to be connected...
... the post that has two holes. The connector and color tube of the speaker cords are the same color as follows: • Front left speaker (L): White • Front right speaker (R): Red • Surround left speaker (L): Blue (DAV-HDX685 only) • Surround right speaker (R): Gray (DAV-HDX685 only) Be careful with the orientation of the jacks to be connected...

Operating Instructions
Page 19
... (black) Note • Make sure that the slot on the speakers: the speaker cord with the two screws (black). Getting Started 4 Connect the speaker cords to the base. Color tube Front left speaker (L): White Front right speaker (R): Red Surround left speaker (L): Blue (DAV-HDX685 only) Surround right speaker (R): Gray (DAV-HDX685 only) Rear of the base, then secure the post with...
... (black) Note • Make sure that the slot on the speakers: the speaker cord with the two screws (black). Getting Started 4 Connect the speaker cords to the base. Color tube Front left speaker (L): White Front right speaker (R): Red Surround left speaker (L): Blue (DAV-HDX685 only) Surround right speaker (R): Gray (DAV-HDX685 only) Rear of the base, then secure the post with...

Operating Instructions
Page 20
Take up any speaker cord slack. Fully-assembled illustration DAV-HDX585 Front left speaker (L): White label Front right speaker (R): Red label White Red 20GB Secure the speaker cord by pulling from the bottom of the cord. Getting Started 6 Take up slack in the speaker cord by running it through the slot. Adjust the length of the base.
Take up any speaker cord slack. Fully-assembled illustration DAV-HDX585 Front left speaker (L): White label Front right speaker (R): Red label White Red 20GB Secure the speaker cord by pulling from the bottom of the cord. Getting Started 6 Take up slack in the speaker cord by running it through the slot. Adjust the length of the base.

Operating Instructions
Page 22
...of each speaker. DAV-HDX285 For the center speaker 145 mm (5 3/4 inches) For the other speakers 8 to 10 mm (11/32 to 13/32 inch) 8 to 10 mm (11/32 to #. Be sure to match the speaker cords to the appropriate terminals on the speakers: the speaker cord with the ... and flat wall where reinforcement is applied. • Sony is especially fragile, attach the screws securely to a beam. Color tube Front left speaker (L): White Front right speaker (R): Red Center speaker: Green Surround left speaker (L): Blue Surround right speaker (R): Gray 1 Prepare screws (not supplied) that are...
...of each speaker. DAV-HDX285 For the center speaker 145 mm (5 3/4 inches) For the other speakers 8 to 10 mm (11/32 to 13/32 inch) 8 to 10 mm (11/32 to #. Be sure to match the speaker cords to the appropriate terminals on the speakers: the speaker cord with the ... and flat wall where reinforcement is applied. • Sony is especially fragile, attach the screws securely to a beam. Color tube Front left speaker (L): White Front right speaker (R): Red Center speaker: Green Surround left speaker (L): Blue Surround right speaker (R): Gray 1 Prepare screws (not supplied) that are...
Operating Instructions
Page 25
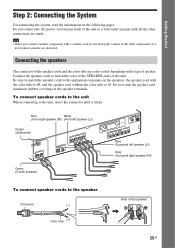
... are color-coded depending on the following pages. Getting Started Step 2: Connecting the System For connecting the system, read the information on the type of speaker. Note • When you connect another component with the color tube to 3, and the speaker cord without the color tube to a level where sound is not distorted. Connecting the...
... are color-coded depending on the following pages. Getting Started Step 2: Connecting the System For connecting the system, read the information on the type of speaker. Note • When you connect another component with the color tube to 3, and the speaker cord without the color tube to a level where sound is not distorted. Connecting the...

Operating Instructions
Page 26
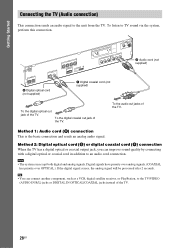
... (not supplied) EZW-T100 ANTENNA AM FM COAXIAL 75 SPEAKER CENTER SUBWOOFER TV DIGITAL IN OPTICAL COAXIAL SPEAKER FRONT R SUR R FRONT L HDMI OUT SUR L DMPORT 0D.C7A5VMAX B HDMI cable (not supplied) COMPONENT VIDEO OUT VOIDUETO PR/CR PB/CB Y TV/VIDEO R AUDIO IN L A Video cord (supplied) To the HDMI IN jack of the...
... (not supplied) EZW-T100 ANTENNA AM FM COAXIAL 75 SPEAKER CENTER SUBWOOFER TV DIGITAL IN OPTICAL COAXIAL SPEAKER FRONT R SUR R FRONT L HDMI OUT SUR L DMPORT 0D.C7A5VMAX B HDMI cable (not supplied) COMPONENT VIDEO OUT VOIDUETO PR/CR PB/CB Y TV/VIDEO R AUDIO IN L A Video cord (supplied) To the HDMI IN jack of the...
Operating Instructions
Page 28
...Note • The system can improve sound quality by connecting with a digital optical or coaxial cord in addition to the TV/VIDEO (AUDIO IN R/L) jacks or DIGITAL IN OPTICAL/COAXIAL jacks instead of the TV. Method 2: Digital optical cord (E) or digital coaxial cord (F) connection When the ... such as a VCR, digital satellite receiver, or PlayStation, to an audio cord connection. To listen to the unit from the TV. SPEAKER CENTER SUBWOOFER TV DIGITAL IN OPTICAL COAXIAL E Digital optical cord (not supplied) SPEAKER FRONT R SUR R FRONT L HDMI OUT SUR L DMPORT 0D.C7A5VMAX EZW...
...Note • The system can improve sound quality by connecting with a digital optical or coaxial cord in addition to the TV/VIDEO (AUDIO IN R/L) jacks or DIGITAL IN OPTICAL/COAXIAL jacks instead of the TV. Method 2: Digital optical cord (E) or digital coaxial cord (F) connection When the ... such as a VCR, digital satellite receiver, or PlayStation, to an audio cord connection. To listen to the unit from the TV. SPEAKER CENTER SUBWOOFER TV DIGITAL IN OPTICAL COAXIAL E Digital optical cord (not supplied) SPEAKER FRONT R SUR R FRONT L HDMI OUT SUR L DMPORT 0D.C7A5VMAX EZW...

Operating Instructions
Page 29
...digital satellite receiver, or PlayStation, to the operating instructions of the TV. You can enjoy wireless performance by transmission from the system. When disconnecting, pull out while pressing . For details, see "Using an S-AIR Product" (page 74) or refer...enjoy connected components via the system's speakers. Getting Started Connecting the other DIGITAL MEDIA PORT adapters.) G Stereo mini-plug cord (not supplied) To a portable audio source EZW-T100 slot (See "Wireless system options".) SPEAKER CENTER SUBWOOFER TV DIGITAL IN OPTICAL COAXIAL SPEAKER FRONT R SUR R ...
...digital satellite receiver, or PlayStation, to the operating instructions of the TV. You can enjoy wireless performance by transmission from the system. When disconnecting, pull out while pressing . For details, see "Using an S-AIR Product" (page 74) or refer...enjoy connected components via the system's speakers. Getting Started Connecting the other DIGITAL MEDIA PORT adapters.) G Stereo mini-plug cord (not supplied) To a portable audio source EZW-T100 slot (See "Wireless system options".) SPEAKER CENTER SUBWOOFER TV DIGITAL IN OPTICAL COAXIAL SPEAKER FRONT R SUR R ...

Operating Instructions
Page 32
... (except for U.S. Wall outlet (mains): The shape of the unit to a wall outlet (mains), connect all the speakers to the unit. models). 32GB The system turns on. 2 Press SYSTEM MENU. 3 Press X/x repeatedly until "DEMO" appears in the front panel display. Tip • When you purchase the...demonstration After connecting the AC power cord (mains lead), the demonstration appears in the front panel display, then press or c. 4 Press X/x to on/off 1 Press [/1 on the unit. Getting Started Connecting the AC power cord (mains lead) Before connecting the AC power cord (mains lead) of the ...
... (except for U.S. Wall outlet (mains): The shape of the unit to a wall outlet (mains), connect all the speakers to the unit. models). 32GB The system turns on. 2 Press SYSTEM MENU. 3 Press X/x repeatedly until "DEMO" appears in the front panel display. Tip • When you purchase the...demonstration After connecting the AC power cord (mains lead), the demonstration appears in the front panel display, then press or c. 4 Press X/x to on/off 1 Press [/1 on the unit. Getting Started Connecting the AC power cord (mains lead) Before connecting the AC power cord (mains lead) of the ...

Operating Instructions
Page 71
... the speakers by pressing THEATER/THEATRE*. * The button name differs depending on the TV screen. 3 Press X/x to select [HDMI SETUP], then press . TV sound is output from the system speakers, and the volume of the TV speakers is switched to the "TV/VIDEO" function, the System Audio Control function is in sync with an audio cord and...
... the speakers by pressing THEATER/THEATRE*. * The button name differs depending on the TV screen. 3 Press X/x to select [HDMI SETUP], then press . TV sound is output from the system speakers, and the volume of the TV speakers is switched to the "TV/VIDEO" function, the System Audio Control function is in sync with an audio cord and...

Operating Instructions
Page 74
...however, keep it after detaching. 2 Insert the wireless transmitter. Surround amplifier: You can enjoy system sound in another room. To insert the wireless transmitter into the S-AIR sub unit. 74GB Note...sound. - You can use up . • Insert the wireless transmitter so that the AC power cord (mains lead) is not connected to a wall outlet (mains). • Do not touch the terminals... of the wireless transmitter/ transceiver. S-AIR receiver: You can enjoy surround speaker sound wirelessly. - When you purchase the S-AIR product, you need to insert the wireless...
...however, keep it after detaching. 2 Insert the wireless transmitter. Surround amplifier: You can enjoy system sound in another room. To insert the wireless transmitter into the S-AIR sub unit. 74GB Note...sound. - You can use up . • Insert the wireless transmitter so that the AC power cord (mains lead) is not connected to a wall outlet (mains). • Do not touch the terminals... of the wireless transmitter/ transceiver. S-AIR receiver: You can enjoy surround speaker sound wirelessly. - When you purchase the S-AIR product, you need to insert the wireless...

Operating Instructions
Page 90
...an hour until the moisture evaporates. • When you do , the speakers may cause the apparatus to your nearest Sony dealer. If color irregularity should cause the TV screen to have any questions or problems concerning your system, please consult your television screen. repeatedly to a section with a mild ... • Do not install the system near heat sources such as radiators, or air ducts, or in the front panel display. 4 Remove the AC power cord (mains lead) from components with strong magnets, such as alcohol or benzine. To disconnect the cord, pull it out by the plug,...
...an hour until the moisture evaporates. • When you do , the speakers may cause the apparatus to your nearest Sony dealer. If color irregularity should cause the TV screen to have any questions or problems concerning your system, please consult your television screen. repeatedly to a section with a mild ... • Do not install the system near heat sources such as radiators, or air ducts, or in the front panel display. 4 Remove the AC power cord (mains lead) from components with strong magnets, such as alcohol or benzine. To disconnect the cord, pull it out by the plug,...

Operating Instructions
Page 92
...may be found even after "STANDBY" disappears from the front panel display. Press "/1 to turn on . speaker cords short-circuited? • Are you using the system, use this troubleshooting guide to help remedy the problem before requesting repairs. Power Symptom The power is connected ...your nearest Sony dealer. 92GB Should any problems, turn off the system, and check the following difficulties while using only the specified speakers? • Is anything blocking the ventilation holes of the system? • After checking the above items, consult your nearest Sony dealer....
...may be found even after "STANDBY" disappears from the front panel display. Press "/1 to turn on . speaker cords short-circuited? • Are you using the system, use this troubleshooting guide to help remedy the problem before requesting repairs. Power Symptom The power is connected ...your nearest Sony dealer. 92GB Should any problems, turn off the system, and check the following difficulties while using only the specified speakers? • Is anything blocking the ventilation holes of the system? • After checking the above items, consult your nearest Sony dealer....

Operating Instructions
Page 93
...case, return the setting to your TV is compatible with a CRT-based TV or projector, install the speakers at least 0.3 meters (1.0 ft) from the HDMI OUT jack. The system's speakers contain magnet parts, so magnetic distortion may solve the problem (page 35). Change the type of video signal... the TV screen. Even though you set . • Make sure that no picture. • The video connecting cords are not connected securely. • The video connecting cords are damaged. • The unit is not connected to an input device that you set progressive format. Color irregularity...
...case, return the setting to your TV is compatible with a CRT-based TV or projector, install the speakers at least 0.3 meters (1.0 ft) from the HDMI OUT jack. The system's speakers contain magnet parts, so magnetic distortion may solve the problem (page 35). Change the type of video signal... the TV screen. Even though you set . • Make sure that no picture. • The video connecting cords are not connected securely. • The video connecting cords are damaged. • The unit is not connected to an input device that you set progressive format. Color irregularity...

Operating Instructions
Page 94
... jacks do not accept audio signals). • The HDMI OUT jack does not output Super Audio CD sound. • Try the following: 1 Turn the system off and on again. 2 Turn the connected component off and on the DVD, the output signal may not be less noticeable. • A 2 channel source... be monaural or stereo even if the sound track is recorded in Dolby Digital or MPEG audio format. speaker only. There is no sound. • The speaker cord is not connected securely. • Press MUTING on the source, the effect of Dolby Digital, DTS, or MPEG audio. • Depending on again. 3...
... jacks do not accept audio signals). • The HDMI OUT jack does not output Super Audio CD sound. • Try the following: 1 Turn the system off and on again. 2 Turn the connected component off and on the DVD, the output signal may not be less noticeable. • A 2 channel source... be monaural or stereo even if the sound track is recorded in Dolby Digital or MPEG audio format. speaker only. There is no sound. • The speaker cord is not connected securely. • Press MUTING on the source, the effect of Dolby Digital, DTS, or MPEG audio. • Depending on again. 3...
Operating Instructions
Page 95
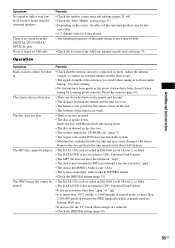
... half an hour. The disc does not play. • There is no sound from the surround speakers. Insert the disc with automatic tuning). Additional Information Symptom No sound or only a very lowlevel sound ... kHz. • Check the location of the AM loop antenna (aerial) and cord (page 31). Adjust the antenna (aerial) or connect an external antenna (aerial) if necessary. • The signal... in. • Check that the antenna (aerial) is not MPEG1 Audio Layer 3 data. • The system cannot play CD-ROMs, etc. (page 7). • The region code on the source, the effect of the...
... half an hour. The disc does not play. • There is no sound from the surround speakers. Insert the disc with automatic tuning). Additional Information Symptom No sound or only a very lowlevel sound ... kHz. • Check the location of the AM loop antenna (aerial) and cord (page 31). Adjust the antenna (aerial) or connect an external antenna (aerial) if necessary. • The signal... in. • Check that the antenna (aerial) is not MPEG1 Audio Layer 3 data. • The system cannot play CD-ROMs, etc. (page 7). • The region code on the source, the effect of the...


