Operating Instructions
Page 5
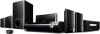
...iPod audio contents by its control buttons, the control buttons of the AV system and the remote supplied with the AV system (page 10). • You can also use this unit to an AV system with DIGITAL MEDIA PORT interface (Sony DAV series, etc.). • You can operate your iPod has video/photo... capability, you cannot view video or photo contents on the TV or other video devices. iPod and TDM-iP10 AV system (Sony DAV series, STR series, etc.) Notes • DIGITAL MEDIA PORT is occasionally abbreviated as a battery charger (page 9). However, audio content in video...
...iPod audio contents by its control buttons, the control buttons of the AV system and the remote supplied with the AV system (page 10). • You can also use this unit to an AV system with DIGITAL MEDIA PORT interface (Sony DAV series, etc.). • You can operate your iPod has video/photo... capability, you cannot view video or photo contents on the TV or other video devices. iPod and TDM-iP10 AV system (Sony DAV series, STR series, etc.) Notes • DIGITAL MEDIA PORT is occasionally abbreviated as a battery charger (page 9). However, audio content in video...
Operating Instructions
Page 10
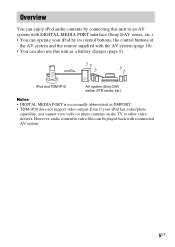
... can fast-rewind (fastforward) by its control buttons, the control buttons of a connected AV system with a DIGITAL MEDIA PORT interface (Sony DAV series, etc.), and the remote supplied with the AV system or the remote. Notes • To use m/M. Refer to the AV system's operating instructions. • While playing video, you cannot use an iPod, refer to...
... can fast-rewind (fastforward) by its control buttons, the control buttons of a connected AV system with a DIGITAL MEDIA PORT interface (Sony DAV series, etc.), and the remote supplied with the AV system or the remote. Notes • To use m/M. Refer to the AV system's operating instructions. • While playing video, you cannot use an iPod, refer to...
Operating Instructions
Page 11
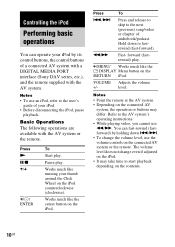
... repair, these parts may take the indicated corrective action. The remote does not function. • Remove any obstacles. • Point the remote at the AV system (DAV series, etc.)'s sensor. • The distance between the remote and the AV system is too far. • Replace the battery. • Make... of noise. Even if your iPod has video/photo capability, you encounter a problem with your unit, find your Sony dealer. continued 11US When bringing the system in the entire system. There is no sound. • Check the connections. • Make sure the unit is securely connected. &#...
... repair, these parts may take the indicated corrective action. The remote does not function. • Remove any obstacles. • Point the remote at the AV system (DAV series, etc.)'s sensor. • The distance between the remote and the AV system is too far. • Replace the battery. • Make... of noise. Even if your iPod has video/photo capability, you encounter a problem with your unit, find your Sony dealer. continued 11US When bringing the system in the entire system. There is no sound. • Check the connections. • Make sure the unit is securely connected. &#...
Operating Instructions
Page 4
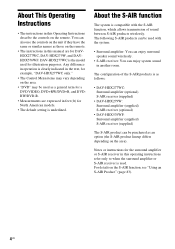
... Notes or instructions for illustration purposes. About the S-AIR function The system is clearly indicated in the text, for example, "DAV-HDX277WC only." • The Control Menu items may vary depending on the remote. • The instructions in this manual are expressed in this Operating...AIR product lineup differs depending on the area). DAV-HDX277WC is the model used for the surround amplifier or S-AIR receiver in feet (ft) for DAVHDX277WC, DAV-HDX279W, and DAVHDX576WF. Any difference in operation is compatible with the system: • Surround amplifier: You can enjoy surround...
... Notes or instructions for illustration purposes. About the S-AIR function The system is clearly indicated in the text, for example, "DAV-HDX277WC only." • The Control Menu items may vary depending on the remote. • The instructions in this manual are expressed in this Operating...AIR product lineup differs depending on the area). DAV-HDX277WC is the model used for the surround amplifier or S-AIR receiver in feet (ft) for DAVHDX277WC, DAV-HDX279W, and DAVHDX576WF. Any difference in operation is compatible with the system: • Surround amplifier: You can enjoy surround...
Operating Instructions
Page 5
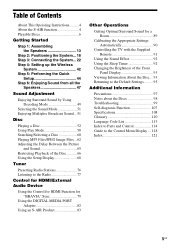
... Getting Started Step 1: Assembling the Speakers 13 Step 2: Positioning the System... 18 Step 3: Connecting the System... 22 Step 4: Setting up the Wireless System 42 Step 5: Performing the Quick Setup 44 Step 6: Enjoying Sound ...Radio 77 Control for HDMI/External Audio Device Using the Control for HDMI Function for "BRAVIA" Sync 79 Using the DIGITAL MEDIA PORT Adapter 82 Using an S-AIR Product 83 ...a Room 89 Calibrating the Appropriate Settings Automatically 90 Controlling the TV with the Supplied Remote 91 Using the Sound Effect 92 Using the Sleep Timer 92 Changing the Brightness of...
... Getting Started Step 1: Assembling the Speakers 13 Step 2: Positioning the System... 18 Step 3: Connecting the System... 22 Step 4: Setting up the Wireless System 42 Step 5: Performing the Quick Setup 44 Step 6: Enjoying Sound ...Radio 77 Control for HDMI/External Audio Device Using the Control for HDMI Function for "BRAVIA" Sync 79 Using the DIGITAL MEDIA PORT Adapter 82 Using an S-AIR Product 83 ...a Room 89 Calibrating the Appropriate Settings Automatically 90 Controlling the TV with the Supplied Remote 91 Using the Sound Effect 92 Using the Sleep Timer 92 Changing the Brightness of...
Operating Instructions
Page 9
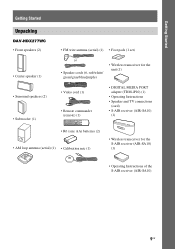
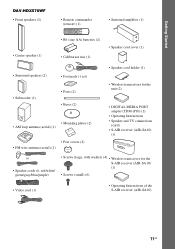
Getting Started Getting Started Unpacking DAV-HDX277WC • Front speakers (2) • Center speaker (1) • Surround speakers (2) • Subwoofer (1) • FM wire antenna (aerial) (1) • Foot pads (1 set) or • Speaker cords (6, red/white/ green/gray/blue/purple) • Wireless transceiver for the unit (1) • Video cord (1) • Remote commander (remote) (1) • DIGITAL MEDIA PORT adapter...
Getting Started Getting Started Unpacking DAV-HDX277WC • Front speakers (2) • Center speaker (1) • Surround speakers (2) • Subwoofer (1) • FM wire antenna (aerial) (1) • Foot pads (1 set) or • Speaker cords (6, red/white/ green/gray/blue/purple) • Wireless transceiver for the unit (1) • Video cord (1) • Remote commander (remote) (1) • DIGITAL MEDIA PORT adapter...
Operating Instructions
Page 10
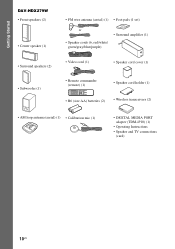
Getting Started DAV-HDX279W • Front speakers (2) • Center speaker (1) • Surround speakers (2) • Subwoofer (1) • FM wire antenna (aerial) (1) • Foot pads (1 set) or • Surround amplifier (1) • Speaker cords (6, red/white/ green/gray/blue/purple) • Video cord (1) • Speaker cord cover (1) • Remote commander (remote) (1) • Speaker cord holder (1) • R6...
Getting Started DAV-HDX279W • Front speakers (2) • Center speaker (1) • Surround speakers (2) • Subwoofer (1) • FM wire antenna (aerial) (1) • Foot pads (1 set) or • Surround amplifier (1) • Speaker cords (6, red/white/ green/gray/blue/purple) • Video cord (1) • Speaker cord cover (1) • Remote commander (remote) (1) • Speaker cord holder (1) • R6...
Operating Instructions
Page 11
Getting Started DAV-HDX576WF • Front speakers (2) • Remote commander (remote) (1) • Surround amplifier (1) • Center speaker (1) • R6 (size AA) batteries (2) • Calibration mic (1) • Speaker cord cover (1) • Surround speakers (2) • Subwoofer (1) • Foot ...
Getting Started DAV-HDX576WF • Front speakers (2) • Remote commander (remote) (1) • Surround amplifier (1) • Center speaker (1) • R6 (size AA) batteries (2) • Calibration mic (1) • Speaker cord cover (1) • Surround speakers (2) • Subwoofer (1) • Foot ...
Operating Instructions
Page 12
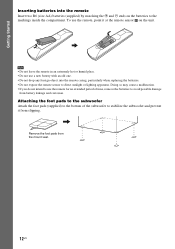
... it from slipping. , Remove the foot pads from battery leakage and corrosion. Getting Started Inserting batteries into the remote casing, particularly when replacing the batteries. • Do not expose the remote sensor to the markings inside the compartment. Doing so may cause a malfunction. • If you do not ...intend to use a new battery with an old one. • Do not drop any foreign object into the remote Insert two R6 (size AA) batteries (supplied) by matching the 3 and # ends on the unit. Attaching the foot pads to the subwoofer Attach ...
... it from slipping. , Remove the foot pads from battery leakage and corrosion. Getting Started Inserting batteries into the remote casing, particularly when replacing the batteries. • Do not expose the remote sensor to the markings inside the compartment. Doing so may cause a malfunction. • If you do not ...intend to use a new battery with an old one. • Do not drop any foreign object into the remote Insert two R6 (size AA) batteries (supplied) by matching the 3 and # ends on the unit. Attaching the foot pads to the subwoofer Attach ...
Operating Instructions
Page 41
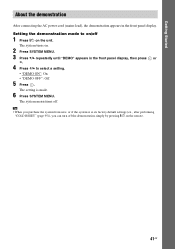
...select a setting. • "DEMO ON": On. • "DEMO OFF": Off. 5 Press . The system turns on. 2 Press SYSTEM MENU. 3 Press X/x repeatedly until "DEMO" appears in the front panel display. The setting is at its ...factory default settings (ex., after performing "COLD RESET" (page 95)), you can turn off . The system menu turns off the demonstration simply by pressing [/1 on the unit. Getting Started About the demonstration After connecting the..., then press or c. 4 Press X/x to on/off 1 Press [/1 on the remote. 41US Tip • When you purchase the system from new, or if the...
...select a setting. • "DEMO ON": On. • "DEMO OFF": Off. 5 Press . The system turns on. 2 Press SYSTEM MENU. 3 Press X/x repeatedly until "DEMO" appears in the front panel display. The setting is at its ...factory default settings (ex., after performing "COLD RESET" (page 95)), you can turn off . The system menu turns off the demonstration simply by pressing [/1 on the unit. Getting Started About the demonstration After connecting the..., then press or c. 4 Press X/x to on/off 1 Press [/1 on the remote. 41US Tip • When you purchase the system from new, or if the...
Operating Instructions
Page 52
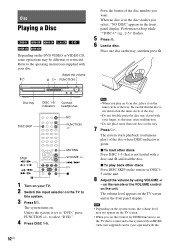
... this may cause malfunction. • Do not place more than one disc on the TV to the operating instructions supplied with your finger, as this system. 3 Press "/1. Adjust the volume "/1 A H FUNCTION Press the button of the tray. • Do not forcibly press the disc tray closed with your... back other discs Press DISC 1-5 (that is in the front panel display. The system turns on the unit. Be careful that is set the Control for HDMI function to select "DVD." 4 Press DISC 1-5. on the remote or the VOLUME control on . The volume level appears on the tray. 7 Press...
... this may cause malfunction. • Do not place more than one disc on the TV to the operating instructions supplied with your finger, as this system. 3 Press "/1. Adjust the volume "/1 A H FUNCTION Press the button of the tray. • Do not forcibly press the disc tray closed with your... back other discs Press DISC 1-5 (that is in the front panel display. The system turns on the unit. Be careful that is set the Control for HDMI function to select "DVD." 4 Press DISC 1-5. on the remote or the VOLUME control on . The volume level appears on the tray. 7 Press...
Operating Instructions
Page 75
...] items, the test tone is emitted from each speaker in sequence while adjusting level. When you select one time, turn the VOLUME control on the remote. • To return to [OFF] after adjusting the speaker level. Note • The test tone signals are not output from the HDMI OUT jack. Disc...
...] items, the test tone is emitted from each speaker in sequence while adjusting level. When you select one time, turn the VOLUME control on the remote. • To return to [OFF] after adjusting the speaker level. Note • The test tone signals are not output from the HDMI OUT jack. Disc...
Operating Instructions
Page 79
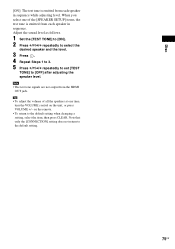
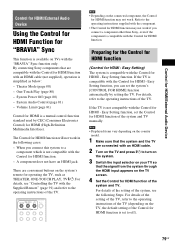
...of the TV. Easy Setting) The system is simplified as THEATER, ONE-TOUCH PLAY, TV [/1. System Audio Control (page 81) - A component does not have an HDMI jack. By connecting Sony components that the signal from the system through the HDMI input appears on the system's remote for operating the TV, such as...Easy Setting function. Control for HDMI/External Audio Device Control for HDMI/External Audio Device Using the Control for HDMI Function for "BRAVIA" Sync This function is set to off). 79US Easy Setting function, set the Control for HDMI function of the Control for HDMI...
...of the TV. Easy Setting) The system is simplified as THEATER, ONE-TOUCH PLAY, TV [/1. System Audio Control (page 81) - A component does not have an HDMI jack. By connecting Sony components that the signal from the system through the HDMI input appears on the system's remote for operating the TV, such as...Easy Setting function. Control for HDMI/External Audio Device Control for HDMI/External Audio Device Using the Control for HDMI Function for "BRAVIA" Sync This function is set to off). 79US Easy Setting function, set the Control for HDMI function of the Control for HDMI...
Operating Instructions
Page 80
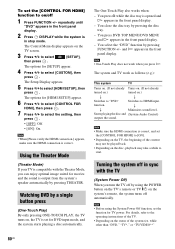
...Minimizes sound level. Note • Before using the POWER button on the TV's remote or TV [/1 on the system's remote, the system turns off automatically. Note • One-Touch Play does not work as follows (e.g.): This system TV Turns on. (If not already Turns on. (If not already turned ...7 Press X/x to select the setting, then press . • [OFF]: Off. • [ON]: On. Using the Theater Mode (Theater Mode) If your TV is compatible with the TV (System Power Off) When you press H. You select the "DVD" function by pressing the disc tray. - Note • Make sure...
...Minimizes sound level. Note • Before using the POWER button on the TV's remote or TV [/1 on the system's remote, the system turns off automatically. Note • One-Touch Play does not work as follows (e.g.): This system TV Turns on. (If not already Turns on. (If not already turned ...7 Press X/x to select the setting, then press . • [OFF]: Off. • [ON]: On. Using the Theater Mode (Theater Mode) If your TV is compatible with the TV (System Power Off) When you press H. You select the "DVD" function by pressing the disc tray. - Note • Make sure...
Operating Instructions
Page 81
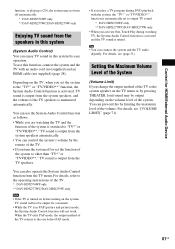
... automatically. • You can control the system's volume by the remote of the TV. • If you change the output method of the TV speakers is activated. Depending on the TV menu or by pressing THEATER, loud sound may not turn the system off automatically. * DAV-HDX576WF only ** DAV-HDX277WC/DAV-HDX279W only Enjoying TV sound from the...
... automatically. • You can control the system's volume by the remote of the TV. • If you change the output method of the TV speakers is activated. Depending on the TV menu or by pressing THEATER, loud sound may not turn the system off automatically. * DAV-HDX576WF only ** DAV-HDX277WC/DAV-HDX279W only Enjoying TV sound from the...
Operating Instructions
Page 82
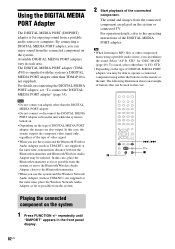
.... MODE" (page 49). repeatedly until "DMPORT" appears in each area. Tip • When listening to the Bluetooth transmitter. • When you use the system and the Bluetooth Wireless Audio Adapter (such as TDM-BT1, not supplied) at the same time, place the Wireless Network Audio Adapter as far as...PORT (DMPORT) adapter is for "DEC. By connecting a DIGITAL MEDIA PORT adapter, you may be able to /from the connected component on the remote or the unit. For operation details, refer to the operating instructions of DIGITAL MEDIA PORT adapter, you can enhance the sound.
.... MODE" (page 49). repeatedly until "DMPORT" appears in each area. Tip • When listening to the Bluetooth transmitter. • When you use the system and the Bluetooth Wireless Audio Adapter (such as TDM-BT1, not supplied) at the same time, place the Wireless Network Audio Adapter as far as...PORT (DMPORT) adapter is for "DEC. By connecting a DIGITAL MEDIA PORT adapter, you may be able to /from the connected component on the remote or the unit. For operation details, refer to the operating instructions of DIGITAL MEDIA PORT adapter, you can enhance the sound.

Operating Instructions
Page 84
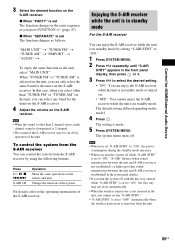
... 86). 2 Press S-AIR MODE on the unit. • "SEPARATE": You can be installed anywhere, regardless of the location of the S-AIR receiver. Enjoying the system's sound in the front panel display. Sound transmission is easy to set the same ID for the unit and S-AIR sub unit to establish sound... / ON LINE indicator of the S-AIR receiver. Each time you can enjoy the system's sound by performing the pairing operation (page 86). The S-AIR mode appears in another room. When sound transmission is set on the remote. Set the ID of the S-AIR receiver to the same ID as a surround ...
... 86). 2 Press S-AIR MODE on the unit. • "SEPARATE": You can be installed anywhere, regardless of the location of the S-AIR receiver. Enjoying the system's sound in the front panel display. Sound transmission is easy to set the same ID for the unit and S-AIR sub unit to establish sound... / ON LINE indicator of the S-AIR receiver. Each time you can enjoy the system's sound by performing the pairing operation (page 86). The S-AIR mode appears in another room. When sound transmission is set on the remote. Set the ID of the S-AIR receiver to the same ID as a surround ...
Operating Instructions
Page 85
... t "TUNER FM" t "TUNER AM" t "DMPORT" t "AUDIO" t ... Press H, X, x, ./> S-AIR CH Operation Share the same operations on the model. 4 Press . The system menu turns off while "S-AIR STBY" is set to "ON," "S-AIR" flashes (when sound transmission between the unit and S-AIR receiver is not established), or...while the unit is in standby mode. The default setting differs depending on the remote and unit. Control for HDMI/External Audio Device 3 Select the desired function on the unit, you turn the system off . Note • When the sound is other than 2 channel stereo, ...
... t "TUNER FM" t "TUNER AM" t "DMPORT" t "AUDIO" t ... Press H, X, x, ./> S-AIR CH Operation Share the same operations on the model. 4 Press . The system menu turns off while "S-AIR STBY" is set to "ON," "S-AIR" flashes (when sound transmission between the unit and S-AIR receiver is not established), or...while the unit is in standby mode. The default setting differs depending on the remote and unit. Control for HDMI/External Audio Device 3 Select the desired function on the unit, you turn the system off . Note • When the sound is other than 2 channel stereo, ...

Operating Instructions
Page 91
...input sources. TOOLS* Displays the operation menu for [SUBWOOFER] is always [YES] since the system does not perform subwoofer calibration. Other Operations • If an error message appears, follow the... [YES]. By pressing You can check the distance between the TV and other than TV [/1, THEATER, TV INPUT, and TV VOL +/-) while pressing the TV button. RETURN* Return to use...] to the unit or surround amplifier. - Controlling the TV with the Supplied Remote You can control the TV (Sony only) by using following buttons. Adjust the TV volume. TV CH +/-* Select...
...input sources. TOOLS* Displays the operation menu for [SUBWOOFER] is always [YES] since the system does not perform subwoofer calibration. Other Operations • If an error message appears, follow the... [YES]. By pressing You can check the distance between the TV and other than TV [/1, THEATER, TV INPUT, and TV VOL +/-) while pressing the TV button. RETURN* Return to use...] to the unit or surround amplifier. - Controlling the TV with the Supplied Remote You can control the TV (Sony only) by using following buttons. Adjust the TV volume. TV CH +/-* Select...
Operating Instructions
Page 101
...HDMI)] in [HDMI SETUP] to [ON] (page 71). • The HDMI OUT jack is in pause mode or in the front panel display. • The system is connected to normal play mode. • Check the speaker settings (page 73). • Super Audio CD audio signals are playing a • Check the speaker...). • The HDMI OUT jack does not output Super Audio CD sound. • Try the following: 1 Turn the system off and on again. 2 Turn the connected component off and on the remote if "MUTING ON" is displayed in Slow-motion Play mode. Press H to return to [STEREO] by pressing AUDIO (page...
...HDMI)] in [HDMI SETUP] to [ON] (page 71). • The HDMI OUT jack is in pause mode or in the front panel display. • The system is connected to normal play mode. • Check the speaker settings (page 73). • Super Audio CD audio signals are playing a • Check the speaker...). • The HDMI OUT jack does not output Super Audio CD sound. • Try the following: 1 Turn the system off and on again. 2 Turn the connected component off and on the remote if "MUTING ON" is displayed in Slow-motion Play mode. Press H to return to [STEREO] by pressing AUDIO (page...


