Operating Instructions
Page 5
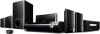
iPod and TDM-iP10 AV system (Sony DAV series, STR series, etc.) Notes • DIGITAL MEDIA PORT is occasionally abbreviated as a battery charger (page 9). However, audio content in video files can be played back with the AV system (page 10). • You can operate your iPod has video/photo... an AV system with DIGITAL MEDIA PORT interface (Sony DAV series, etc.). • You can also use this unit as DMPORT. • TDM-iP10 does not support video output. Overview You can enjoy iPod audio contents by its control buttons, the control buttons of the AV system and the remote supplied with...
iPod and TDM-iP10 AV system (Sony DAV series, STR series, etc.) Notes • DIGITAL MEDIA PORT is occasionally abbreviated as a battery charger (page 9). However, audio content in video files can be played back with the AV system (page 10). • You can operate your iPod has video/photo... an AV system with DIGITAL MEDIA PORT interface (Sony DAV series, etc.). • You can also use this unit as DMPORT. • TDM-iP10 does not support video output. Overview You can enjoy iPod audio contents by its control buttons, the control buttons of the AV system and the remote supplied with...
Operating Instructions
Page 10
... basic operations You can fast-rewind (fastforward) by its control buttons, the control buttons of a connected AV system with a DIGITAL MEDIA PORT interface (Sony DAV series, etc.), and the remote supplied with the AV system or the remote. Works much like the center button on the connected AV system or the remote. forward (fastrewind) play . Works much like the DISPLAY...
... basic operations You can fast-rewind (fastforward) by its control buttons, the control buttons of a connected AV system with a DIGITAL MEDIA PORT interface (Sony DAV series, etc.), and the remote supplied with the AV system or the remote. Works much like the center button on the connected AV system or the remote. forward (fastrewind) play . Works much like the DISPLAY...
Operating Instructions
Page 4
... The default setting is compatible with the system: • Surround amplifier: You can enjoy surround speaker sound wirelessly. • S-AIR receiver: You can be used as those on the remote. • The instructions in this Operating Instructions describe the controls on the S-AIR function, see "Using ... indicated in the text, for example, "DAV-HDX277WC only." • The Control Menu items may be used with the S-AIR function, which allows transmission of the S-AIR products is used for illustration purposes. For details on the remote. You can be purchased as an option ...
... The default setting is compatible with the system: • Surround amplifier: You can enjoy surround speaker sound wirelessly. • S-AIR receiver: You can be used as those on the remote. • The instructions in this Operating Instructions describe the controls on the S-AIR function, see "Using ... indicated in the text, for example, "DAV-HDX277WC only." • The Control Menu items may be used with the S-AIR function, which allows transmission of the S-AIR products is used for illustration purposes. For details on the remote. You can be purchased as an option ...
Operating Instructions
Page 5
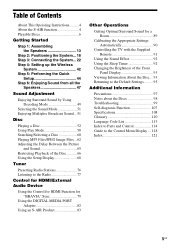
... S-AIR function 4 Playable Discs 6 Getting Started Step 1: Assembling the Speakers 13 Step 2: Positioning the System... 18 Step 3: Connecting the System... 22 Step 4: Setting up the Wireless System 42 Step 5: Performing the Quick Setup 44 Step 6: Enjoying Sound from all the Speakers 47 Sound Adjustment... the Control for HDMI Function for "BRAVIA" Sync 79 Using the DIGITAL MEDIA PORT Adapter 82 Using an S-AIR Product 83 Other Operations Getting Optimal Surround Sound for a Room 89 Calibrating the Appropriate Settings Automatically 90 Controlling the TV with the Supplied Remote 91 ...
... S-AIR function 4 Playable Discs 6 Getting Started Step 1: Assembling the Speakers 13 Step 2: Positioning the System... 18 Step 3: Connecting the System... 22 Step 4: Setting up the Wireless System 42 Step 5: Performing the Quick Setup 44 Step 6: Enjoying Sound from all the Speakers 47 Sound Adjustment... the Control for HDMI Function for "BRAVIA" Sync 79 Using the DIGITAL MEDIA PORT Adapter 82 Using an S-AIR Product 83 Other Operations Getting Optimal Surround Sound for a Room 89 Calibrating the Appropriate Settings Automatically 90 Controlling the TV with the Supplied Remote 91 ...
Operating Instructions
Page 52
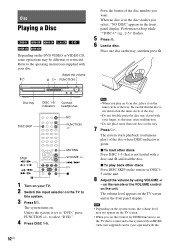
... the disc is not skewed on the inner circle of the disc number you select, "NO DISC" appears in the front panel display. on the remote or the VOLUME control on the TV screen and in the disc stocker you want. Perform next Step while "*DISC-1* (eg., 2-5)" flashes. 5 Press A. 6 Load a disc. ...may cause malfunction. • Do not place more than one disc on the tray, and then press A. Place one disc on the tray. 7 Press H. The system turns on the TV to this may be sync-operated with your disc. to the operating instructions supplied with the 52US x To load other discs...
... the disc is not skewed on the inner circle of the disc number you select, "NO DISC" appears in the front panel display. on the remote or the VOLUME control on the TV screen and in the disc stocker you want. Perform next Step while "*DISC-1* (eg., 2-5)" flashes. 5 Press A. 6 Load a disc. ...may cause malfunction. • Do not place more than one disc on the tray, and then press A. Place one disc on the tray. 7 Press H. The system turns on the TV to this may be sync-operated with your disc. to the operating instructions supplied with the 52US x To load other discs...
Operating Instructions
Page 75
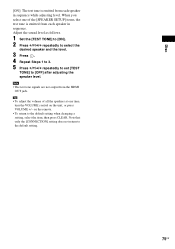
... level. 3 Press . 4 Repeat Steps 1 to 3. 5 Press C/X/x/c repeatedly to set [TEST TONE] to the default setting. 75US When you select one time, turn the VOLUME control on the remote. • To return to the default setting when changing a setting, select the item, then press CLEAR. Note that only the [CONNECTION] setting does not...
... level. 3 Press . 4 Repeat Steps 1 to 3. 5 Press C/X/x/c repeatedly to set [TEST TONE] to the default setting. 75US When you select one time, turn the VOLUME control on the remote. • To return to the default setting when changing a setting, select the item, then press CLEAR. Note that only the [CONNECTION] setting does not...
Operating Instructions
Page 79
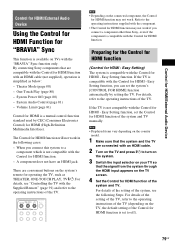
... Control for HDMI function. Control for HDMI/External Audio Device Control for HDMI/External Audio Device Using the Control for HDMI Function for "BRAVIA" Sync This function is available on TVs with the Control for HDMI - Preparing for the Control for HDMI function (Control ... press [/1 to the operating instructions of the system, see "Controlling the TV with the Control for HDMI - System Audio Control (page 81) - By connecting Sony components that the system and the TV are convenient buttons on the system's remote for HDMI - The Control for HDMI - Theater Mode (page 80) -
... Control for HDMI function. Control for HDMI/External Audio Device Control for HDMI/External Audio Device Using the Control for HDMI Function for "BRAVIA" Sync This function is available on TVs with the Control for HDMI - Preparing for the Control for HDMI function (Control ... press [/1 to the operating instructions of the system, see "Controlling the TV with the Control for HDMI - System Audio Control (page 81) - By connecting Sony components that the system and the TV are convenient buttons on the system's remote for HDMI - The Control for HDMI - Theater Mode (page 80) -
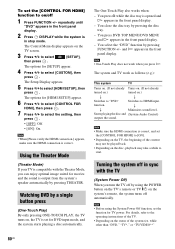
Operating Instructions
Page 80
...TV power. Using the Theater Mode (Theater Mode) If your TV is in the front panel display. - You press DVD TOP MENU/DVD MENU and H appears in stop mode. Note • Before using the POWER button on the TV's remote or TV [/1 on the system's remote, the system turns off automatically. ...while other than "DVD," "TV*," or "TV/VIDEO**" 80US To set the [CONTROL FOR HDMI] function to on/off in sync with the Theater Mode, you can enjoy optimal image suited for [SETUP...
...TV power. Using the Theater Mode (Theater Mode) If your TV is in the front panel display. - You press DVD TOP MENU/DVD MENU and H appears in stop mode. Note • Before using the POWER button on the TV's remote or TV [/1 on the system's remote, the system turns off automatically. ...while other than "DVD," "TV*," or "TV/VIDEO**" 80US To set the [CONTROL FOR HDMI] function to on/off in sync with the Theater Mode, you can enjoy optimal image suited for [SETUP...
Operating Instructions
Page 81
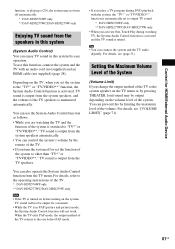
... use this by pressing THEATER, loud sound may be output for HDMI/External Audio Device function, or playing a CD), the system may not turn the system off automatically. * DAV-HDX576WF only ** DAV-HDX277WC/DAV-HDX279W only Enjoying TV sound from the speakers in this system (System Audio Control) You can also operate the System Audio Control function from the system speakers, and the...
... use this by pressing THEATER, loud sound may be output for HDMI/External Audio Device function, or playing a CD), the system may not turn the system off automatically. * DAV-HDX576WF only ** DAV-HDX277WC/DAV-HDX279W only Enjoying TV sound from the speakers in this system (System Audio Control) You can also operate the System Audio Control function from the system speakers, and the...
Operating Instructions
Page 85
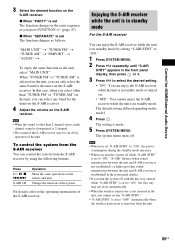
...as follows. Change the function of the unit. Enjoying the S-AIR receiver while the unit is in the front panel display. • If you can control the system from the unit. 85US Note • When you set "S-AIR STBY" to "ON," the power consumption during the standby mode increases. • ... is not inserted in the unit, you can only select the same band for the tuner on the S-AIR receiver. 4 Adjust the volume on the remote and unit. The default setting differs depending on the S-AIR receiver. Press H, X, x, ./> S-AIR CH Operation Share the same operations on the S-AIR receiver....
...as follows. Change the function of the unit. Enjoying the S-AIR receiver while the unit is in the front panel display. • If you can control the system from the unit. 85US Note • When you set "S-AIR STBY" to "ON," the power consumption during the standby mode increases. • ... is not inserted in the unit, you can only select the same band for the tuner on the S-AIR receiver. 4 Adjust the volume on the remote and unit. The default setting differs depending on the S-AIR receiver. Press H, X, x, ./> S-AIR CH Operation Share the same operations on the S-AIR receiver....

Operating Instructions
Page 91
... * Use these buttons (other input sources. See page 73. TOOLS* Displays the operation menu for [SUBWOOFER] is always [YES] since the system does not perform subwoofer calibration. the headphones are not correctly connected. - Follow the message, then select [YES] to select [YES] or [... display. Note • Depending on the menu of the TV. THEATER Enjoy optimal image suited for movies. TV CH +/-* Select the TV channel. Controlling the TV with the Supplied Remote You can control the TV (Sony only) by using following buttons. Number buttons*, ENTER* Select the TV...
... * Use these buttons (other input sources. See page 73. TOOLS* Displays the operation menu for [SUBWOOFER] is always [YES] since the system does not perform subwoofer calibration. the headphones are not correctly connected. - Follow the message, then select [YES] to select [YES] or [... display. Note • Depending on the menu of the TV. THEATER Enjoy optimal image suited for movies. TV CH +/-* Select the TV channel. Controlling the TV with the Supplied Remote You can control the TV (Sony only) by using following buttons. Number buttons*, ENTER* Select the TV...
Operating Instructions
Page 114
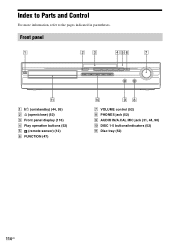
Index to Parts and Control For more information, refer to the pages indicated in parentheses. Front panel A "/1 (on/standby) (44, 95) B A (open/close) (52) C Front panel display (116) D Play operation buttons (52) E (remote sensor) (12) F FUNCTION (47) G VOLUME control (52) H PHONES jack (52) I AUDIO IN/A.CAL MIC jack (31, 44, 90) J DISC 1-5 buttons/indicators (52) K Disc tray (52) 114US
Index to Parts and Control For more information, refer to the pages indicated in parentheses. Front panel A "/1 (on/standby) (44, 95) B A (open/close) (52) C Front panel display (116) D Play operation buttons (52) E (remote sensor) (12) F FUNCTION (47) G VOLUME control (52) H PHONES jack (52) I AUDIO IN/A.CAL MIC jack (31, 44, 90) J DISC 1-5 buttons/indicators (52) K Disc tray (52) 114US

Operating Instructions
Page 117
... (63) PRESET +/- wj (91) TV INPUT w; (91) TV VOL +/- wj (77) S-AIR MODE 4 SLEEP qj (92) SOUND MODE 5 (51) SUBTITLE ws (54) SYSTEM MENU wf (41, 48, 92, 93, 83) THEATER qk (79) TOOLS wh (91) TUNING +/- 0 (76) TV wl (91) TV CH +/- O P - Depending on /standby) ql (91) C/X/x/c/ qs (41, 44, 55... (52) DISPLAY** wh (44, 55, 58, 89) O RETURN ea (56, 91) es (91) * The ENTER button has the same function as the button. Additional Information Remote control ALPHABETICAL ORDER A -
... (63) PRESET +/- wj (91) TV INPUT w; (91) TV VOL +/- wj (77) S-AIR MODE 4 SLEEP qj (92) SOUND MODE 5 (51) SUBTITLE ws (54) SYSTEM MENU wf (41, 48, 92, 93, 83) THEATER qk (79) TOOLS wh (91) TUNING +/- 0 (76) TV wl (91) TV CH +/- O P - Depending on /standby) ql (91) C/X/x/c/ qs (41, 44, 55... (52) DISPLAY** wh (44, 55, 58, 89) O RETURN ea (56, 91) es (91) * The ENTER button has the same function as the button. Additional Information Remote control ALPHABETICAL ORDER A -
Operating Instructions
Page 121
...DISC RESUME 73 Multiplex broadcast sound 51 N Naming preset stations 77 NIGHT 92 O ORIGINAL 61 OSD 69 P PARENTAL CONTROL 66, 73, 111 PAUSE MODE 70 PBC Playback 56 PICTURE NAVI 63 PLAY LIST 61 Playable discs 6 Program ...58 PROGRESSIVE (COMPONENT OUT) 69 Progressive format 46, 111 Q Quick Setup 44 R Rear panel 115 Region Code 8 Remote 12 Repeat Play 59 RESET 73, 96 Resume Play 57 RF CHANGE 87 S S-AIR 111 S-AIR SETUP 72 S-... 73, 74 LEVEL 74 SUBTITLE 54, 69 Super Audio CD 55, 111 SYSTEM MENU 41, 48, 49, 54, 77, 85, 87, 92, 93 SYSTEM SETUP 72 T TEST TONE 74 TIME 61 TRACK SELECTION 72 TV TYPE 69...
...DISC RESUME 73 Multiplex broadcast sound 51 N Naming preset stations 77 NIGHT 92 O ORIGINAL 61 OSD 69 P PARENTAL CONTROL 66, 73, 111 PAUSE MODE 70 PBC Playback 56 PICTURE NAVI 63 PLAY LIST 61 Playable discs 6 Program ...58 PROGRESSIVE (COMPONENT OUT) 69 Progressive format 46, 111 Q Quick Setup 44 R Rear panel 115 Region Code 8 Remote 12 Repeat Play 59 RESET 73, 96 Resume Play 57 RF CHANGE 87 S S-AIR 111 S-AIR SETUP 72 S-... 73, 74 LEVEL 74 SUBTITLE 54, 69 Super Audio CD 55, 111 SYSTEM MENU 41, 48, 49, 54, 77, 85, 87, 92, 93 SYSTEM SETUP 72 T TEST TONE 74 TIME 61 TRACK SELECTION 72 TV TYPE 69...


